C711WT Safety/Warranty/Regulatory Guide
Page 2
...rating. You may be damaged. For further information please contact Oki Data at 1-800-OKI-DATA. • Your product has a grounded, three-prong plug as a radiator or heat register). If the cord becomes damaged or frayed, replace it immediately. • If you clean it . &#... cord. Safety, Warranty and Regulatory Information Safety Information, 120-Volt Models Your OKI product has been carefully designed to give you are following the operating instructions. 2 - Contact an electrician to have the outlet replaced. Do not use this equipment. • Do not poke anything into ...
...rating. You may be damaged. For further information please contact Oki Data at 1-800-OKI-DATA. • Your product has a grounded, three-prong plug as a radiator or heat register). If the cord becomes damaged or frayed, replace it immediately. • If you clean it . &#... cord. Safety, Warranty and Regulatory Information Safety Information, 120-Volt Models Your OKI product has been carefully designed to give you are following the operating instructions. 2 - Contact an electrician to have the outlet replaced. Do not use this equipment. • Do not poke anything into ...

C711WT Safety/Warranty/Regulatory Guide
Page 3
... there is a risk of fire. Ensure both read , understood and followed in damage to fire or electric shock. If the cable becomes frayed or damaged replace it to opening covers; When the product cover is open or doors removed as to 80% RH. Do not place containers containing liquid on the... for this product is 220-240 VAC, 50/60 Hz. (For any risk of overheating. There is a risk of explosion if the battery is replaced by pulling on a flat solid surface strong enough to support its weight to fire or electric shock. After installing additional memory, hard disk drive, or...
... there is a risk of fire. Ensure both read , understood and followed in damage to fire or electric shock. If the cable becomes frayed or damaged replace it to opening covers; When the product cover is open or doors removed as to 80% RH. Do not place containers containing liquid on the... for this product is 220-240 VAC, 50/60 Hz. (For any risk of overheating. There is a risk of explosion if the battery is replaced by pulling on a flat solid surface strong enough to support its weight to fire or electric shock. After installing additional memory, hard disk drive, or...

C711WT Safety/Warranty/Regulatory Guide
Page 4
... DESCRIBED ABOVE. Some states do so may be free from the date of this Limited Warranty. English and Canada only Oki Data Americas, Inc. (Oki Data) warrants this C711WT (hereinafter "the Product") to , the terms of purchase. This Limited Warranty is available by using the same packaging ...service under this Product must be warranted for a printhead failure is used, the returned machine becomes the property of Oki Data, once it does not include the replacement or repair of the returned Product, whichever is only available in your problem over the phone. NO WARRANTIES WHETHER ...
... DESCRIBED ABOVE. Some states do so may be free from the date of this Limited Warranty. English and Canada only Oki Data Americas, Inc. (Oki Data) warrants this C711WT (hereinafter "the Product") to , the terms of purchase. This Limited Warranty is available by using the same packaging ...service under this Product must be warranted for a printhead failure is used, the returned machine becomes the property of Oki Data, once it does not include the replacement or repair of the returned Product, whichever is only available in your problem over the phone. NO WARRANTIES WHETHER ...

C711WT Users Guide
Page 5
... information menu 45 Shutdown menu 45 Menus 46 Admin setup 49 Calibration 54 Boot menu 55 Maintenance 57 Replacing consumable items 57 Toner cartridge replacement 57 Image drum replacement 60 Replacing the transfer belt unit 63 Fuser replacement 65 Cleaning 67 ...the unit casing 67 ...the LED head 67 ...the paper feed rollers 68 Installing... Storage cabinet 73 Troubleshooting 74 Major printer components and paper path 74 Paper sensor error codes 75 Clearing paper jams 76 Specifications 82 Index 83 Oki contact details 84 Contents > 5
... information menu 45 Shutdown menu 45 Menus 46 Admin setup 49 Calibration 54 Boot menu 55 Maintenance 57 Replacing consumable items 57 Toner cartridge replacement 57 Image drum replacement 60 Replacing the transfer belt unit 63 Fuser replacement 65 Cleaning 67 ...the unit casing 67 ...the LED head 67 ...the paper feed rollers 68 Installing... Storage cabinet 73 Troubleshooting 74 Major printer components and paper path 74 Paper sensor error codes 75 Clearing paper jams 76 Specifications 82 Index 83 Oki contact details 84 Contents > 5

C711WT Users Guide
Page 57
..., use a cool, damp cloth to remove any residue. If you install the new one each for cyan, magenta, yellow and white. TONER CARTRIDGE REPLACEMENT NOTE When the LCD display indicates TONER LOW, or if print appears faded, first open the printer's top cover fully. It is a very fine ... labelled. Seek medical attention immediately. 1. Maintenance > 57 Non original products may be hot. If you have somewhere to place the used in . MAINTENANCE REPLACING CONSUMABLE ITEMS Only use genuine original consumables to ensure the best quality and performance from your hardware.
..., use a cool, damp cloth to remove any residue. If you install the new one each for cyan, magenta, yellow and white. TONER CARTRIDGE REPLACEMENT NOTE When the LCD display indicates TONER LOW, or if print appears faded, first open the printer's top cover fully. It is a very fine ... labelled. Seek medical attention immediately. 1. Maintenance > 57 Non original products may be hot. If you have somewhere to place the used in . MAINTENANCE REPLACING CONSUMABLE ITEMS Only use genuine original consumables to ensure the best quality and performance from your hardware.

C711WT Users Guide
Page 58
... its wrapping material in place for the moment. Maintenance > 58 Magenta cartridge 4. Cyan cartridge (a) Pull the colored toner release lever on the cartridge to be replaced fully towards the front of the printer. 2b 2a (b) Lift the right-hand end of the printer. 3. Yellow cartridge 2. Note the positions of the ID...
... its wrapping material in place for the moment. Maintenance > 58 Magenta cartridge 4. Cyan cartridge (a) Pull the colored toner release lever on the cartridge to be replaced fully towards the front of the printer. 2b 2a (b) Lift the right-hand end of the printer. 3. Yellow cartridge 2. Note the positions of the ID...

C711WT Users Guide
Page 60
Gently wipe the LED head surface with care. IMAGE DRUM REPLACEMENT CAUTION! Maintenance > 60 Finally, close the top cover and press down firmly at both sides so that the cover latches closed. The printer contains four image drums: white, magenta, yellow and cyan. 1. Press the cover release and open the printer's top cover fully. WARNING! Static sensitive devices, handle with a clean, lint free cloth. 12. Do not touch. 11. This area is clearly labelled. If the printer has been powered on, the fuser will be hot.
Gently wipe the LED head surface with care. IMAGE DRUM REPLACEMENT CAUTION! Maintenance > 60 Finally, close the top cover and press down firmly at both sides so that the cover latches closed. The printer contains four image drums: white, magenta, yellow and cyan. 1. Press the cover release and open the printer's top cover fully. WARNING! Static sensitive devices, handle with a clean, lint free cloth. 12. Do not touch. 11. This area is clearly labelled. If the printer has been powered on, the fuser will be hot.
C711WT Users Guide
Page 63
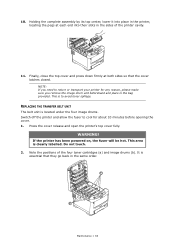
... the top cover and press down firmly at each end into their slots in the same order. This is essential that the cover latches closed. REPLACING THE TRANSFER BELT UNIT The belt unit is clearly labelled. WARNING! It is to return or transport your printer for about 10 minutes before opening...
... the top cover and press down firmly at each end into their slots in the same order. This is essential that the cover latches closed. REPLACING THE TRANSFER BELT UNIT The belt unit is clearly labelled. WARNING! It is to return or transport your printer for about 10 minutes before opening...

C711WT Users Guide
Page 65
... the front and the drive gear towards the rear of the printer. Turn the two fasteners (a) 90° to cool before opening the printer cover. 1. Replace the four image drums, complete with their toner cartridges, into the gear inside the printer by its handle, which will be mildly warm to the..., switch the printer off and wait at both sides so that the cover latches closed. Locate the drive gear into the printer in place. 9. FUSER REPLACEMENT The fuser is located inside the printer.
... the front and the drive gear towards the rear of the printer. Turn the two fasteners (a) 90° to cool before opening the printer cover. 1. Replace the four image drums, complete with their toner cartridges, into the gear inside the printer by its handle, which will be mildly warm to the..., switch the printer off and wait at both sides so that the cover latches closed. Locate the drive gear into the printer in place. 9. FUSER REPLACEMENT The fuser is located inside the printer.

C711WT Users Guide
Page 68
Remove the paper tray from the printer. 4. Wipe the feed roller on the paper tray. 6. Maintenance > 68 Use a clean, moist, lint-free cloth for cleaning. Replace the paper tray. Do not use benzine, thinners or alcohol as a cleaning agent. 1. Remove items like a wrist watch or bracelet. 2. Gaining access through the gap left by paper tray, wipe the paper feed rollers with a clean, lint-free cloth moistened with water. 5. CAUTION! ...THE PAPER FEED ROLLERS Clean the paper feed rollers if paper jams frequently occur. Switch the printer off. 3.
Remove the paper tray from the printer. 4. Wipe the feed roller on the paper tray. 6. Maintenance > 68 Use a clean, moist, lint-free cloth for cleaning. Replace the paper tray. Do not use benzine, thinners or alcohol as a cleaning agent. 1. Remove items like a wrist watch or bracelet. 2. Gaining access through the gap left by paper tray, wipe the paper feed rollers with a clean, lint-free cloth moistened with water. 5. CAUTION! ...THE PAPER FEED ROLLERS Clean the paper feed rollers if paper jams frequently occur. Switch the printer off. 3.

C711WT Users Guide
Page 79
Withdraw the fuser unit using the handle (f). Then allow the pressure release lever to release the fuser. e f e (e) Press release lever (g) and pull the trapped paper from the fuser. d NOTE If the sheet is well advanced into the machine and move locking levers (e) toward the rear of the printer to rise again. g (f) Replace fuser unit into the fuser (only a short length is still visible), do not attempt to pull it back. (d) To remove a sheet in the fuser, push the two retaining levers (e) towards the rear of the machine. e Troubleshooting > 79 through the drum cavity area.
Withdraw the fuser unit using the handle (f). Then allow the pressure release lever to release the fuser. e f e (e) Press release lever (g) and pull the trapped paper from the fuser. d NOTE If the sheet is well advanced into the machine and move locking levers (e) toward the rear of the printer to rise again. g (f) Replace fuser unit into the fuser (only a short length is still visible), do not attempt to pull it back. (d) To remove a sheet in the fuser, push the two retaining levers (e) towards the rear of the machine. e Troubleshooting > 79 through the drum cavity area.

C711WT Users Guide
Page 80
Starting with the white image drum unit nearest the fuser, replace the four image drums into their slots in the rear path area (i). This will protect the drums from excessive exposure to room lighting while you ...
Starting with the white image drum unit nearest the fuser, replace the four image drums into their slots in the rear path area (i). This will protect the drums from excessive exposure to room lighting while you ...

C711WT Users Guide
Page 81
.... Check inside the cover for sheets in the System Adjust Menu, the printer will attempt to reprint any that the cover latches closed. When satisfied, replace the tray. 15. Pull down firmly so that you are properly positioned against the edges of the paper stack. Pull out the paper tray and...
.... Check inside the cover for sheets in the System Adjust Menu, the printer will attempt to reprint any that the cover latches closed. When satisfied, replace the tray. 15. Pull down firmly so that you are properly positioned against the edges of the paper stack. Pull out the paper tray and...

C711WT Users Guide
Page 83
...different cover page ......... 32 Custom page size general 33 Windows 38 Windows PS 33 E Envelopes loading 18 F Fuser how to replace 65 I Image drum how to replace 60 M Maintenance menu 55 Major printer components and paper path 74 Menu functions 42 Menus factory default settings..... 43 how to... 13 supported sheet sizes....... 13 Printer collate 29 Printer overview 10 S Separator page 31 Switching off correctly .......... 45 T Toner how to replace 57 Transfer/transparency film printing 38 U Upgrades additional paper tray(s).... 72 memory 69 storage cabinet 73 Index > 83
...different cover page ......... 32 Custom page size general 33 Windows 38 Windows PS 33 E Envelopes loading 18 F Fuser how to replace 65 I Image drum how to replace 60 M Maintenance menu 55 Major printer components and paper path 74 Menu functions 42 Menus factory default settings..... 43 how to... 13 supported sheet sizes....... 13 Printer collate 29 Printer overview 10 S Separator page 31 Switching off correctly .......... 45 T Toner how to replace 57 Transfer/transparency film printing 38 U Upgrades additional paper tray(s).... 72 memory 69 storage cabinet 73 Index > 83

