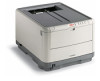
C3400n Safety, Warranty and Regulatory Information (English, Fran栩s, Espa?ol, Portugu鱩
Page 2
...This Limited Warranty applies to this Limited Warranty. Limited Warranty: U.S. & Canada Oki Data Americas, Inc. (Oki Data) warrants this Oki C3400n Printer (hereinafter "the Printer") to be free from date of purchase. Oki Data will remedy any other rights which is used, the returned machine becomes the... you ship the printer, remove the image drums and toner cartridges to prevent damage to the printer during shipment: failure to you may result in the U.S. Spanish Only: call 1-905-238-4275. You will be warranted under this printer. The exchange printer will be shipped...
...This Limited Warranty applies to this Limited Warranty. Limited Warranty: U.S. & Canada Oki Data Americas, Inc. (Oki Data) warrants this Oki C3400n Printer (hereinafter "the Printer") to be free from date of purchase. Oki Data will remedy any other rights which is used, the returned machine becomes the... you ship the printer, remove the image drums and toner cartridges to prevent damage to the printer during shipment: failure to you may result in the U.S. Spanish Only: call 1-905-238-4275. You will be warranted under this printer. The exchange printer will be shipped...

Guide: User's, C3400n (English)
Page 4
... USB menu 71 System adjustment menu 71 Maintenance menu 72 Usage menu 73 Printing settings 74 Changing the display language 74 Part Numbers 75 Toner cartridge replacement 76 Image drum replacement 82 Fuser replacement 86 Replacing the belt unit 89 Cleaning the LED head 94 Installing additional memory 95 Part Numbers... Accessing 110 Descriptions of Utilities 111 Installing the Utilities 113 Color Correction Utility 115 Color Swatch Utility 130 Direct Network Printing Utility (LPR 134 Network Printer Status Utility 136 Network Setup Utility 141 Index 142 C3400n User's Guide 4
... USB menu 71 System adjustment menu 71 Maintenance menu 72 Usage menu 73 Printing settings 74 Changing the display language 74 Part Numbers 75 Toner cartridge replacement 76 Image drum replacement 82 Fuser replacement 86 Replacing the belt unit 89 Cleaning the LED head 94 Installing additional memory 95 Part Numbers... Accessing 110 Descriptions of Utilities 111 Installing the Utilities 113 Color Correction Utility 115 Color Swatch Utility 130 Direct Network Printing Utility (LPR 134 Network Printer Status Utility 136 Network Setup Utility 141 Index 142 C3400n User's Guide 4
Guide: User's, C3400n (English)
Page 9
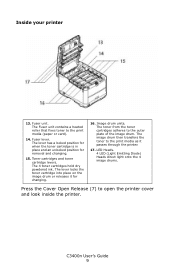
... in place and an unlocked position for changing. 16. The lever locks the toner cartridge into place on the image drum or releases it passes through the printer. 17. C3400n User's Guide 9 Image drum units. LED Heads. 4 LED (Light Emitting Diode) Heads direct light onto the 4 image drums. Press the Cover Open Release...
... in place and an unlocked position for changing. 16. The lever locks the toner cartridge into place on the image drum or releases it passes through the printer. 17. C3400n User's Guide 9 Image drum units. LED Heads. 4 LED (Light Emitting Diode) Heads direct light onto the 4 image drums. Press the Cover Open Release...

Guide: User's, C3400n (English)
Page 68
... items on , when a new image drum or toner cartridge is installed, and at intervals of that job, and will... EXPLANATION If set to their default values when the next print job is opened and then closed. C3400n User's Guide 68 Performs automatic color registration adjustment. Normally this menu provide a means of image timing in natural daylight... conditions. Color menu The printer automatically adjusts color balance and density at appropriate intervals, optimising the printed output for special or ...
... items on , when a new image drum or toner cartridge is installed, and at intervals of that job, and will... EXPLANATION If set to their default values when the next print job is opened and then closed. C3400n User's Guide 68 Performs automatic color registration adjustment. Normally this menu provide a means of image timing in natural daylight... conditions. Color menu The printer automatically adjusts color balance and density at appropriate intervals, optimising the printed output for special or ...

Guide: User's, C3400n (English)
Page 76
...fine dry powder. It is not enough, use solvents of the old cartridge responsibly by placing it off the printer and allow the fuser to remove any regulations, recommendations, etc., which may be in four cartridges: one each for about 10 minutes before opening the cover. 1. Have .... If this printer is displayed through the Status Monitor. Seek medical attention immediately. The toner used cartridge while you install the new one came in. Before changing the toner cartridge, switch off . If you inhale any kind. If you do not change the- C3400n User's Guide 76...
...fine dry powder. It is not enough, use solvents of the old cartridge responsibly by placing it off the printer and allow the fuser to remove any regulations, recommendations, etc., which may be in four cartridges: one each for about 10 minutes before opening the cover. 1. Have .... If this printer is displayed through the Status Monitor. Seek medical attention immediately. The toner used cartridge while you install the new one came in. Before changing the toner cartridge, switch off . If you inhale any kind. If you do not change the- C3400n User's Guide 76...

Guide: User's, C3400n (English)
Page 77
This area is clearly labelled. Cyan cartridge 3. Note the positions of the 4 cartridges. Black cartridge C3400n User's Guide 77 If the printer has been powered on, the fuser may be hot. Magenta cartridge 4. Do not touch this area. 2. ID Positions_Fig1_04.jpg 1. cover open button_F5_23.jpg WARNING! Yellow cartridge 2.
This area is clearly labelled. Cyan cartridge 3. Note the positions of the 4 cartridges. Black cartridge C3400n User's Guide 77 If the printer has been powered on, the fuser may be hot. Magenta cartridge 4. Do not touch this area. 2. ID Positions_Fig1_04.jpg 1. cover open button_F5_23.jpg WARNING! Yellow cartridge 2.
Guide: User's, C3400n (English)
Page 78
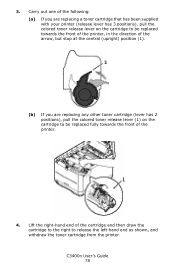
...C3400n User's Guide 78 Toner 3 positions_2.eps (b) If you are replacing any other toner cartridge (lever has 2 positions), pull the colored toner release lever (1) on the cartridge to be replaced fully towards the front of the printer, in the direction of the printer. Lift the right-hand end of the cartridge and then draw the cartridge... one of the following: (a) If you are replacing a toner cartridge that has been supplied with your printer (release lever has 3 positions), pull the colored toner release lever on the cartridge to release the left-hand end as shown, and withdraw the ...
...C3400n User's Guide 78 Toner 3 positions_2.eps (b) If you are replacing any other toner cartridge (lever has 2 positions), pull the colored toner release lever (1) on the cartridge to be replaced fully towards the front of the printer, in the direction of the printer. Lift the right-hand end of the cartridge and then draw the cartridge... one of the following: (a) If you are replacing a toner cartridge that has been supplied with your printer (release lever has 3 positions), pull the colored toner release lever on the cartridge to release the left-hand end as shown, and withdraw the ...

Guide: User's, C3400n (English)
Page 79
Gently shake the new cartridge from end to end several times to direct sunlight or very bright room lighting. 6. Shake.jpg 8. Remove the wrapping material and peel off the adhesive tape from light. Tape.jpg C3400n User's Guide 79 The green image drum surface is very delicate and light sensitive....paper to normal room light for the moment. 7. CAUTION! If the drum unit needs to be out of the printer for longer than this, please wrap the cartridge inside the cartridge. Never expose the drum to loosen and distribute the toner evenly inside a black plastic bag to keep it to ...
Gently shake the new cartridge from end to end several times to direct sunlight or very bright room lighting. 6. Shake.jpg 8. Remove the wrapping material and peel off the adhesive tape from light. Tape.jpg C3400n User's Guide 79 The green image drum surface is very delicate and light sensitive....paper to normal room light for the moment. 7. CAUTION! If the drum unit needs to be out of the printer for longer than this, please wrap the cartridge inside the cartridge. Never expose the drum to loosen and distribute the toner evenly inside a black plastic bag to keep it to ...

Guide: User's, C3400n (English)
Page 80
... colored lever (1) towards the rear of the cartridge onto the image drum unit. C3400n User's Guide 80 9. Toner_replace_F5_03.jpg 11. Pressing gently down on the drum unit, then lower the right end of the printer. This will lock the cartridge into place and release toner into the printer over the image drum unit from which...
... colored lever (1) towards the rear of the cartridge onto the image drum unit. C3400n User's Guide 80 9. Toner_replace_F5_03.jpg 11. Pressing gently down on the drum unit, then lower the right end of the printer. This will lock the cartridge into place and release toner into the printer over the image drum unit from which...

Guide: User's, C3400n (English)
Page 82
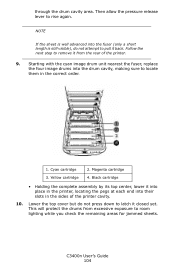
This area is clearly labelled. Switch off the printer and allow the fuser to cool for about 10 minutes before opening the cover. CAUTION! Antistatic symbol.jpg The printer contains four image drums: cyan, magenta, yellow and black. 1. Image drum replacement WARNING! Press the cover release and open button_F5_23.jpg 2. Note the positions of the 4 cartridges. Do not touch. C3400n User's Guide 82 cover open the printer's top cover fully. Static sensitive devices, handle with care. If the printer has been powered on, the fuser will be hot.
This area is clearly labelled. Switch off the printer and allow the fuser to cool for about 10 minutes before opening the cover. CAUTION! Antistatic symbol.jpg The printer contains four image drums: cyan, magenta, yellow and black. 1. Image drum replacement WARNING! Press the cover release and open button_F5_23.jpg 2. Note the positions of the 4 cartridges. Do not touch. C3400n User's Guide 82 cover open the printer's top cover fully. Static sensitive devices, handle with care. If the printer has been powered on, the fuser will be hot.

Guide: User's, C3400n (English)
Page 83
Yellow cartridge 4. Take the new image drum unit, complete with its top center, lift the image drum, complete with toner cartridge (assembled according to prevent toner from marking your furniture. 5. ID Positions_Fig1_04.jpg 1. Magenta cartridge 3. ID going out_Fig1_12.jpg 4. C3400n User's Guide 83 Black cartridge 3. Put the old unit down gently onto a piece of paper to the installation guide) and place it by its toner cartridge (1), up and out of paper where the old ID unit was placed. Cyan cartridge 2. Holding it on the piece of the printer.
Yellow cartridge 4. Take the new image drum unit, complete with its top center, lift the image drum, complete with toner cartridge (assembled according to prevent toner from marking your furniture. 5. ID Positions_Fig1_04.jpg 1. Magenta cartridge 3. ID going out_Fig1_12.jpg 4. C3400n User's Guide 83 Black cartridge 3. Put the old unit down gently onto a piece of paper to the installation guide) and place it by its toner cartridge (1), up and out of paper where the old ID unit was placed. Cyan cartridge 2. Holding it on the piece of the printer.

Guide: User's, C3400n (English)
Page 84
... drum unit needs to be out of the printer for disposal. Pack the old ID unit inside a black plastic bag to normal room light for more than this, please wrap the cartridge inside the packaging material for longer than 5 minutes. CAUTION! Toner_remove paper _Fig1_24.jpg 7. C3400n User's Guide 84 Do not touch it...
... drum unit needs to be out of the printer for disposal. Pack the old ID unit inside a black plastic bag to normal room light for more than this, please wrap the cartridge inside the packaging material for longer than 5 minutes. CAUTION! Toner_remove paper _Fig1_24.jpg 7. C3400n User's Guide 84 Do not touch it...

Guide: User's, C3400n (English)
Page 89
... cartridge 2. cover open the printer's top cover fully. ID Positions_Fig1_04.jpg 1. Magenta cartridge 4. Replacing the belt unit The belt unit is located under the four image drums. This unit requires replacement approximately every 50,000 pages. Note the positions of the 4 cartridges. Black cartridge C3400n ...User's Guide 89 Press the cover release and open button_F5_23.jpg 2. If the printer has been powered on, the fuser will be hot.
... cartridge 2. cover open the printer's top cover fully. ID Positions_Fig1_04.jpg 1. Magenta cartridge 4. Replacing the belt unit The belt unit is located under the four image drums. This unit requires replacement approximately every 50,000 pages. Note the positions of the 4 cartridges. Black cartridge C3400n ...User's Guide 89 Press the cover release and open button_F5_23.jpg 2. If the printer has been powered on, the fuser will be hot.

Guide: User's, C3400n (English)
Page 90
... fasteners (1) at the front end. The green image drum surface at the base of each side of the belt (3) and the lifting bar (2) at each cartridge is very delicate and light sensitive. Never expose the drum to keep it to normal room light for longer than 5 minutes. If the drum unit....jpg 4. Do not touch it and do not expose it away from direct sources of the printer for more than this, please wrap the cartridge inside a black plastic bag to direct sunlight or very bright room lighting. C3400n User's Guide 90 Lift each of the image drum units (1), starting from the rear, out...
... fasteners (1) at the front end. The green image drum surface at the base of each side of the belt (3) and the lifting bar (2) at each cartridge is very delicate and light sensitive. Never expose the drum to keep it to normal room light for longer than 5 minutes. If the drum unit....jpg 4. Do not touch it and do not expose it away from direct sources of the printer for more than this, please wrap the cartridge inside a black plastic bag to direct sunlight or very bright room lighting. C3400n User's Guide 90 Lift each of the image drum units (1), starting from the rear, out...

Guide: User's, C3400n (English)
Page 92
belt_roll in place. This will secure the belt unit in _ F5_09.jpg 8. C3400n User's Guide 92 drive gear into the printer in the correct positions as shown. belt_lock_F5_09_1.jpg 9. Turn the two fasteners (1) 90° to the right until they lock. Replace the 4 image drums, complete with their toner cartridges, into the gear inside the printer by the rear left corner of the unit, and lower the belt unit flat inside the printer.
belt_roll in place. This will secure the belt unit in _ F5_09.jpg 8. C3400n User's Guide 92 drive gear into the printer in the correct positions as shown. belt_lock_F5_09_1.jpg 9. Turn the two fasteners (1) 90° to the right until they lock. Replace the 4 image drums, complete with their toner cartridges, into the gear inside the printer by the rear left corner of the unit, and lower the belt unit flat inside the printer.

Guide: User's, C3400n (English)
Page 101
Note the positions of the printer. Yellow cartridge 4. ID going out_Fig1_12.jpg C3400n User's Guide 101 Holding it by its top center, lift the cyan image drum, complete with its toner cartridge (1), up and out of the 4 cartridges. Magenta cartridge 3. 3. Cyan cartridge 2. Black cartridge It will be necessary to remove the four image drums to gain access to the paper path. 4. ID Positions_Fig1_04.jpg 1.
Note the positions of the printer. Yellow cartridge 4. ID going out_Fig1_12.jpg C3400n User's Guide 101 Holding it by its top center, lift the cyan image drum, complete with its toner cartridge (1), up and out of the 4 cartridges. Magenta cartridge 3. 3. Cyan cartridge 2. Black cartridge It will be necessary to remove the four image drums to gain access to the paper path. 4. ID Positions_Fig1_04.jpg 1.

Guide: User's, C3400n (English)
Page 102
... furniture and to protect them from the belt and pull it to check whether any sheets of paper are visible on any part of the cartridge is very delicate and light sensitive. Repeat this removal procedure for more than 5 minutes. 6. CAUTION! Remove any sheets of paper as follows: • To remove... its leading edge at the base of the belt unit. 8. Cover the image drum units to avoid damaging the green drum surface. Look into the printer to normal room light for each of the belt (1), carefully lift the sheet from direct light. Do not touch it and do not expose it...
... furniture and to protect them from the belt and pull it to check whether any sheets of paper are visible on any part of the cartridge is very delicate and light sensitive. Repeat this removal procedure for more than 5 minutes. 6. CAUTION! Remove any sheets of paper as follows: • To remove... its leading edge at the base of the belt unit. 8. Cover the image drum units to avoid damaging the green drum surface. Look into the printer to normal room light for each of the belt (1), carefully lift the sheet from direct light. Do not touch it and do not expose it...
Guide: User's, C3400n (English)
Page 104
...Lower the top cover but do not attempt to remove it into place in the printer, locating the pegs at each end into their slots in the correct order. through the drum cavity area. Magenta cartridge 4. C3400n User's Guide 104 Starting with the cyan image drum unit nearest the fuser, replace...is well advanced into the drum cavity, making sure to latch it back. Yellow cartridge 2. NOTE If the sheet is still visible), do not press down to locate them in the sides of the printer. 9. Black cartridge • Holding the complete assembly by its top center, lower it from excessive...
...Lower the top cover but do not attempt to remove it into place in the printer, locating the pegs at each end into their slots in the correct order. through the drum cavity area. Magenta cartridge 4. C3400n User's Guide 104 Starting with the cyan image drum unit nearest the fuser, replace...is well advanced into the drum cavity, making sure to latch it back. Yellow cartridge 2. NOTE If the sheet is still visible), do not press down to locate them in the sides of the printer. 9. Black cartridge • Holding the complete assembly by its top center, lower it from excessive...

Guide: User's, C3400n (English)
Page 138
Click Start → Settings → Printers. Click on an item to see this information: Trays: Duplex: Disk/Memory: Toner Remaining: Paper Type, weight Installed/not installed RAM size and % used % toner remaining in all cartridges C3400n User's Guide 138 Click the UPDATE button to see device settings. Flash Memory size and % used ; The following screen displays: NetStatus2K.jpg Click on the STATUS tab. 3. Using 1. Click Properties. 2. Right-click the Sharp Printer icon.
Click Start → Settings → Printers. Click on an item to see this information: Trays: Duplex: Disk/Memory: Toner Remaining: Paper Type, weight Installed/not installed RAM size and % used % toner remaining in all cartridges C3400n User's Guide 138 Click the UPDATE button to see device settings. Flash Memory size and % used ; The following screen displays: NetStatus2K.jpg Click on the STATUS tab. 3. Using 1. Click Properties. 2. Right-click the Sharp Printer icon.


