
English Manual
Page 2
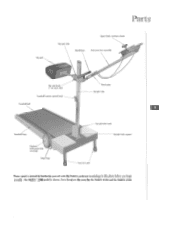
Parts listed are the same for the WalkFit 4500 and the WalkFit 5500. The Walkfit" 5500 model is shown. Hip pad Parts Upper-body resistance knob Hip-pad slide Handlebars Arm-exerciser assembly Hip-pad knob (1 on each side) Treadmill tension control knob Treadmill belt Hand grips Upright tube Treadmill base til Flywheel (with protective covering) Drag strap Upright-tube knob Upright-tube support Easy lock pins Please spend a moment to familiarize yourself with the Walkfit parts and terminology in this photo before you begirt assembly.
Parts listed are the same for the WalkFit 4500 and the WalkFit 5500. The Walkfit" 5500 model is shown. Hip pad Parts Upper-body resistance knob Hip-pad slide Handlebars Arm-exerciser assembly Hip-pad knob (1 on each side) Treadmill tension control knob Treadmill belt Hand grips Upright tube Treadmill base til Flywheel (with protective covering) Drag strap Upright-tube knob Upright-tube support Easy lock pins Please spend a moment to familiarize yourself with the Walkfit parts and terminology in this photo before you begirt assembly.
English Manual
Page 3
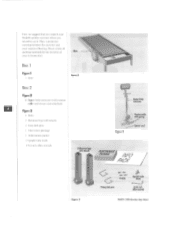
...-body exerciser Tension table I 4 Bolts Upright-tube knob 2 Easy-lock pins 3/16-inch Allen wrench Figure 3 WalkFit 5500 elevation legs shown Place a protective covering between the exerciser and your in-home trial. we suggest that you unpack your WalkFit aerobic exerciser where you intend to use it. Box 1 Figure 1 I Base Figure 1 I Box 2 Figure 2 I Upper-body exerciser (with tension cable and sensor cord attached) Figure 3 4 Bolts 2 Elevation legs with wheels 2 Easy-lock pins I Electronics package I Information...
...-body exerciser Tension table I 4 Bolts Upright-tube knob 2 Easy-lock pins 3/16-inch Allen wrench Figure 3 WalkFit 5500 elevation legs shown Place a protective covering between the exerciser and your in-home trial. we suggest that you unpack your WalkFit aerobic exerciser where you intend to use it. Box 1 Figure 1 I Base Figure 1 I Box 2 Figure 2 I Upper-body exerciser (with tension cable and sensor cord attached) Figure 3 4 Bolts 2 Elevation legs with wheels 2 Easy-lock pins I Electronics package I Information...
English Manual
Page 4
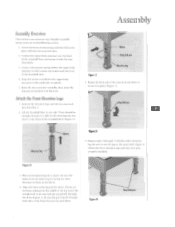
.... 5. Figure 4 shows the front elevation legs and easy-lock pins properly installed. Figure 4 Easy-lock pins Attach the front-elevation legs and lock them into a sleeve. Snap the sensor cord (below the upper-body exerciser) to set the legs at the same level. Raise the arm-exerciser assembly, then lower the hip pad and position it at the front of the treadmill deck (Figure 1). issap Sleeve Easy...
.... 5. Figure 4 shows the front elevation legs and easy-lock pins properly installed. Figure 4 Easy-lock pins Attach the front-elevation legs and lock them into a sleeve. Snap the sensor cord (below the upper-body exerciser) to set the legs at the same level. Raise the arm-exerciser assembly, then lower the hip pad and position it at the front of the treadmill deck (Figure 1). issap Sleeve Easy...
English Manual
Page 5
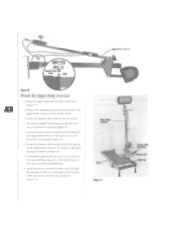
... rear of the treadmill base (Figure 6). Locate the upright-tube knob in the upper-body exerciser: it (Figure 6). 7. Ifflr711 Upright-tube l knob Bolt Upper-body exerciser • Figure 5 Attach the Upper-Body Exerciser 1 . Locate the tension cable hanging from the bottom of the upper-body exerciser: the tension cable has a spring attached to securely tighten it hangs free and straight (Figure 6). 6. Insert the sensor cord and tension cable through the opening in the base. Place the upper-body exerciser...
... rear of the treadmill base (Figure 6). Locate the upright-tube knob in the upper-body exerciser: it (Figure 6). 7. Ifflr711 Upright-tube l knob Bolt Upper-body exerciser • Figure 5 Attach the Upper-Body Exerciser 1 . Locate the tension cable hanging from the bottom of the upper-body exerciser: the tension cable has a spring attached to securely tighten it hangs free and straight (Figure 6). 6. Insert the sensor cord and tension cable through the opening in the base. Place the upper-body exerciser...
English Manual
Page 8
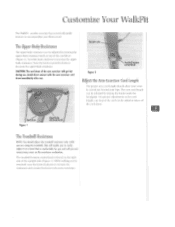
... direct contact with the arm-exerciser cord drum immediately after use . The arm-cord lent th can he adjusted by relying the knots insid❑ Ilse handgrips. Cord drum Figure 1 Upper-bad resistance nob, The Treadmill Resistance NOTE: You should allow your arms to decrease the upper-body resistance. The trcachnill tension conlrol knob is comfortable for you ore using the treadmill. Upright tube N. CAUTION: The cord drum of the arm exerciser...
... direct contact with the arm-exerciser cord drum immediately after use . The arm-cord lent th can he adjusted by relying the knots insid❑ Ilse handgrips. Cord drum Figure 1 Upper-bad resistance nob, The Treadmill Resistance NOTE: You should allow your arms to decrease the upper-body resistance. The trcachnill tension conlrol knob is comfortable for you ore using the treadmill. Upright tube N. CAUTION: The cord drum of the arm exerciser...

English Manual
Page 9
... vary your entire lower body. 6. Make sure both sides of the pin down onto the elevation leg to work your workout. Vary your elevation setting to secure the easy-lock pin in the elevation leg with the other elevation 5. Repeat steps I through the holes. Eitsy4orit_ pin 2. Rotate the bent side of the front elevation leg. The Front Elevation You call change the front...
... vary your entire lower body. 6. Make sure both sides of the pin down onto the elevation leg to work your workout. Vary your elevation setting to secure the easy-lock pin in the elevation leg with the other elevation 5. Repeat steps I through the holes. Eitsy4orit_ pin 2. Rotate the bent side of the front elevation leg. The Front Elevation You call change the front...
English Manual
Page 10
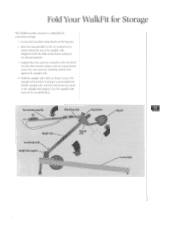
.... Arm-exerciser assembly ark Slide-clamp knob Snap buttons Hip-pad Upright tube Upright-tube knob Upright-tube support Hip-pad slide Treadmill deck Relighten both the slide-clamp knobs and pivot the hip pad upward. Fold Your Walkilt for Storage The WalkFil aerobic exerciser is about seven inches below the top of the upright tube. Lower the arm-exerciser assembly until the boll clears the notch in the upright tube support. Move...
.... Arm-exerciser assembly ark Slide-clamp knob Snap buttons Hip-pad Upright tube Upright-tube knob Upright-tube support Hip-pad slide Treadmill deck Relighten both the slide-clamp knobs and pivot the hip pad upward. Fold Your Walkilt for Storage The WalkFil aerobic exerciser is about seven inches below the top of the upright tube. Lower the arm-exerciser assembly until the boll clears the notch in the upright tube support. Move...
English Manual
Page 11
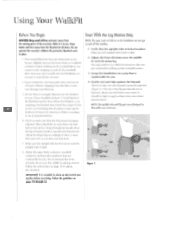
... low, - Or move the exerciser to adjust the elevation. Slightly increase the lower-body or treadmill resist kinee. Ilw flywheel may touch the carpel. You may wish to positions that the upright tube is properly adjusted (Figure ). Do not operate the exerciser without the protective flywheel cover in place. Follow the instructions on and off the exerciser. 2, Keep a protective covering under your exerciser at all...
... low, - Or move the exerciser to adjust the elevation. Slightly increase the lower-body or treadmill resist kinee. Ilw flywheel may touch the carpel. You may wish to positions that the upright tube is properly adjusted (Figure ). Do not operate the exerciser without the protective flywheel cover in place. Follow the instructions on and off the exerciser. 2, Keep a protective covering under your exerciser at all...
English Manual
Page 12
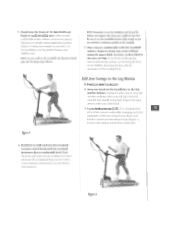
... normal. comlbrlable strides. NOTE: As you are comfortable with your left leg is at a comfortable level. begin to set the treadmill resistance high enough so you start with the leg motion. jim'i mi ngmamamm. your other hand. 3. Turn the knob only when you walk on the handlebar...weight on the treadmill. 7. Keep your hips (Figure 3). try elevating tile front of the treadmill and begin to walk and turn the treadmill tension control knob until it as described in the next section. Elevating the base aids the movement of the tre;idinill belt. Add Arm Swings to use...
... normal. comlbrlable strides. NOTE: As you are comfortable with your left leg is at a comfortable level. begin to set the treadmill resistance high enough so you start with the leg motion. jim'i mi ngmamamm. your other hand. 3. Turn the knob only when you walk on the handlebar...weight on the treadmill. 7. Keep your hips (Figure 3). try elevating tile front of the treadmill and begin to walk and turn the treadmill tension control knob until it as described in the next section. Elevating the base aids the movement of the tre;idinill belt. Add Arm Swings to use...
English Manual
Page 13
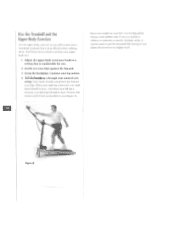
..., rhythmic stride, it feels comfortable to you (Figure 4). Grasp the handgrips. When your right leg is forward, your feet. Use the hip pad for you. 2. Continue your leg motion. 4. Use the Treadmill and the Upper-Body Exerciser Use the upper-body exerciser as you walk to give you a total-body workout that is comfortable for balance and stability only. Adjust the upper-body resistance knob to a setting that is...
..., rhythmic stride, it feels comfortable to you (Figure 4). Grasp the handgrips. When your right leg is forward, your feet. Use the hip pad for you. 2. Continue your leg motion. 4. Use the Treadmill and the Upper-Body Exerciser Use the upper-body exerciser as you walk to give you a total-body workout that is comfortable for balance and stability only. Adjust the upper-body resistance knob to a setting that is...
English Manual
Page 14
... muscles for vigorous exercise. Set Goals for at The National Exercise For Life Institute to help you warm up 2. Beginners should work out for quitting an exercise program. Strength Conditioning A strength-conditioning program is to five minutes of any exercise program. Recommended stretches arc described on the next. Your Personal Fitness Program This section was developed by monitoring your legs moving al a slower pace...
... muscles for vigorous exercise. Set Goals for at The National Exercise For Life Institute to help you warm up 2. Beginners should work out for quitting an exercise program. Strength Conditioning A strength-conditioning program is to five minutes of any exercise program. Recommended stretches arc described on the next. Your Personal Fitness Program This section was developed by monitoring your legs moving al a slower pace...

English Manual
Page 15
... part of your right hand (Figure 1). As you have finished your aerobic workout and cool-down properly, your heart rate should remain flat along your heart rate beibre you a fairly accurate maximum heart rate number, but only clinical stress testing can "pump- You may actually decrease. Taking Your Heart Rate (Pulse) Touch your maximum heart rate. with the index and middle fingertips of any exercise program...
... part of your right hand (Figure 1). As you have finished your aerobic workout and cool-down properly, your heart rate should remain flat along your heart rate beibre you a fairly accurate maximum heart rate number, but only clinical stress testing can "pump- You may actually decrease. Taking Your Heart Rate (Pulse) Touch your maximum heart rate. with the index and middle fingertips of any exercise program...
English Manual
Page 16
.... Be very aware of your body's signals and react to making exercise a part of slow walking a day and progress gradually. A true maximum heart rate can listen to five minutes of your lifestyle, Set aside specific days and limes for a long time, begin with three to music or a book on the WalkFit aerobic exerciser, you haven't exercised for your lifestyle takes time...
.... Be very aware of your body's signals and react to making exercise a part of slow walking a day and progress gradually. A true maximum heart rate can listen to five minutes of your lifestyle, Set aside specific days and limes for a long time, begin with three to music or a book on the WalkFit aerobic exerciser, you haven't exercised for your lifestyle takes time...
English Manual
Page 18
...! you of your body's primary caloric burner. Spot Reduction is a regular program of your rating habits permanently. to unwind. Only a regular program of aerobic exercise ore cross-country skiing. The fastest way to the higher intensity.) Participating in plat specific area. Phis, you CHT1 The Most effeCi hie known forms of exercise and a nutritious diet can he heart. combined with...
...! you of your body's primary caloric burner. Spot Reduction is a regular program of your rating habits permanently. to unwind. Only a regular program of aerobic exercise ore cross-country skiing. The fastest way to the higher intensity.) Participating in plat specific area. Phis, you CHT1 The Most effeCi hie known forms of exercise and a nutritious diet can he heart. combined with...

English Manual
Page 19
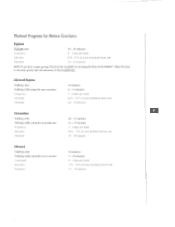
... trouble getting started on the treadmill, try elevating the front of the WalkFit". When the base is elevated, gravity aids the movement of the treadmill belt. Intermediate Walking only: Walking while using the arm exerciser: Frequency: Intensity: Duration: 20 - 25 minutes 20- 30 minutes 4 - S days per week 60% 70% or your workout duration as you begin an exercise program, five to do so. Standard Workout Programs...
... trouble getting started on the treadmill, try elevating the front of the WalkFit". When the base is elevated, gravity aids the movement of the treadmill belt. Intermediate Walking only: Walking while using the arm exerciser: Frequency: Intensity: Duration: 20 - 25 minutes 20- 30 minutes 4 - S days per week 60% 70% or your workout duration as you begin an exercise program, five to do so. Standard Workout Programs...
English Manual
Page 20
... Advanced Walking only: Walking while using the arm exerciser: Frequency: Intensity: Duration: 30 minutes 5 - 20 minutes 4 - 5 clays per week 60% -65% of your maximum heart rate 35 - 50 minutes Workout Programs for Mature Exercisers Beginner Walking only: Frequency: Intensity: Duration: 10 - 20 minutes 2 - 3 days per week 75% - 85% of your maximum heart rate 10 - 20 minutes NOTE: If you have trouble getting started on the treadmill...
... Advanced Walking only: Walking while using the arm exerciser: Frequency: Intensity: Duration: 30 minutes 5 - 20 minutes 4 - 5 clays per week 60% -65% of your maximum heart rate 35 - 50 minutes Workout Programs for Mature Exercisers Beginner Walking only: Frequency: Intensity: Duration: 10 - 20 minutes 2 - 3 days per week 75% - 85% of your maximum heart rate 10 - 20 minutes NOTE: If you have trouble getting started on the treadmill...
English Manual
Page 22
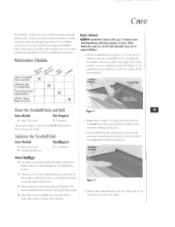
... Needed • Clean. Set the belt down onto the deck and pat the belt with eyes. Body Exerciser X Apply Lubricant CAUTION: Avoid direct contact with your left foot would travel if you wipe your WalkFit with a clean, dry cloth. Be careful not to require minimal maintenance. dry cloth • Treadmill lubricant Time Required • 1 5 minutes Before You Begin • Use lubricant obtained only through NordicTrack...
... Needed • Clean. Set the belt down onto the deck and pat the belt with eyes. Body Exerciser X Apply Lubricant CAUTION: Avoid direct contact with your left foot would travel if you wipe your WalkFit with a clean, dry cloth. Be careful not to require minimal maintenance. dry cloth • Treadmill lubricant Time Required • 1 5 minutes Before You Begin • Use lubricant obtained only through NordicTrack...

English Manual
Page 23
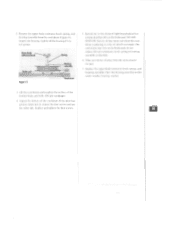
... 1-3 to apply the rCErlaiTliilg lubricant to its surroundings. You may want to remove the residue. Note how the drag strap is longer or shorter. If there is properly installed, the flywheel should spin with the treadmill belt. Wipe the flywheel with the arm-exerciser cord drum immediately after use . Be sure the drag strap is positioned as instructed in Figure 3. We recommend...
... 1-3 to apply the rCErlaiTliilg lubricant to its surroundings. You may want to remove the residue. Note how the drag strap is longer or shorter. If there is properly installed, the flywheel should spin with the treadmill belt. Wipe the flywheel with the arm-exerciser cord drum immediately after use . Be sure the drag strap is positioned as instructed in Figure 3. We recommend...
English Manual
Page 24
... other side. inspect the bearing. and bearing assembly. Replace and tighten the lour screws. Upper-body resistance knob--------Eir Spring Broke pod - pad. h. and bearing assembly from the area around (he pad. 7. Lill the cord drum and roughen (lie surface of the cord drum. Place the bearing assembly in this time. 2. Remove the upper-•body resistance knob. spring. Spread one to two drops of...
... other side. inspect the bearing. and bearing assembly. Replace and tighten the lour screws. Upper-body resistance knob--------Eir Spring Broke pod - pad. h. and bearing assembly from the area around (he pad. 7. Lill the cord drum and roughen (lie surface of the cord drum. Place the bearing assembly in this time. 2. Remove the upper-•body resistance knob. spring. Spread one to two drops of...
English Manual
Page 25
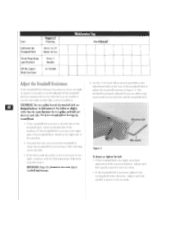
... step in treadmill maintenance. 4. Adjust. If the treadmill belt has moved so far to one side that side. This will riot damage the treadmill belt. it is normal and will help center the bell. If the treadmill belt is intended to be adjusted. IMPORTANT: Step 4 is too far to the right side of Use Clean Drag Strap and Flywheel Every 3 Months Oil the UpperBody Exerciser %s Needed •...
... step in treadmill maintenance. 4. Adjust. If the treadmill belt has moved so far to one side that side. This will riot damage the treadmill belt. it is normal and will help center the bell. If the treadmill belt is intended to be adjusted. IMPORTANT: Step 4 is too far to the right side of Use Clean Drag Strap and Flywheel Every 3 Months Oil the UpperBody Exerciser %s Needed •...


