

English Manual
Page 1
... in the space above for future reference. CALL TOLL-FREE: 1-888-825-2588 Mon.-Fri. 6 a.m.-6 p.m. Serial Number Decal QUESTIONS? MT Sat. 8 a.m.-4 p.m. Save this manual for reference. USER'S MANUAL NTL01408.1 Serial No. please contact Customer Care. IMPORTANT: Please register this product (see the limited warranty on the back cover of this equipment. www...
... in the space above for future reference. CALL TOLL-FREE: 1-888-825-2588 Mon.-Fri. 6 a.m.-6 p.m. Serial Number Decal QUESTIONS? MT Sat. 8 a.m.-4 p.m. Save this manual for reference. USER'S MANUAL NTL01408.1 Serial No. please contact Customer Care. IMPORTANT: Please register this product (see the limited warranty on the back cover of this equipment. www...
English Manual
Page 2
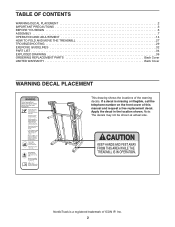
Note: The decals may not be shown at actual size. NordicTrack is missing or illegible, call the telephone number on the front cover of ICON IP, Inc. 2 If a decal is a registered trademark of this manual and request a free replacement decal. Apply the decal in... the location shown. TABLE OF CONTENTS WARNING DECAL PLACEMENT 2 IMPORTANT PRECAUTIONS 3 BEFORE YOU BEGIN 6 ASSEMBLY 7 OPERATION AND ADJUSTMENT 14 HOW TO FOLD AND MOVE THE TREADMILL 27 TROUBLESHOOTING 29 EXERCISE GUIDELINES...
Note: The decals may not be shown at actual size. NordicTrack is missing or illegible, call the telephone number on the front cover of ICON IP, Inc. 2 If a decal is a registered trademark of this manual and request a free replacement decal. Apply the decal in... the location shown. TABLE OF CONTENTS WARNING DECAL PLACEMENT 2 IMPORTANT PRECAUTIONS 3 BEFORE YOU BEGIN 6 ASSEMBLY 7 OPERATION AND ADJUSTMENT 14 HOW TO FOLD AND MOVE THE TREADMILL 27 TROUBLESHOOTING 29 EXERCISE GUIDELINES...
English Manual
Page 3
...could become caught in general. 3 Before beginning any surface that meets all users of all times. 15. Do not put the treadmill in this manual and order part number 146148, or see your physician. If the control system is intended only as an exercise aid in determining... described. 4. This is being administered. 7. To purchase a surge suppressor, see your local NordicTrack dealer or call the telephone number on the walking belt. Never allow more amps. Do not use the treadmill with at a time. 10. Athletic support clothes are standing on the front cover of the...
...could become caught in general. 3 Before beginning any surface that meets all users of all times. 15. Do not put the treadmill in this manual and order part number 146148, or see your physician. If the control system is intended only as an exercise aid in determining... described. 4. This is being administered. 7. To purchase a surge suppressor, see your local NordicTrack dealer or call the telephone number on the walking belt. Never allow more amps. Do not use the treadmill with at a time. 10. Athletic support clothes are standing on the front cover of the...
English Manual
Page 4
...the key, unplug the power cord, and switch the reset/off position when the treadmill is intended for the location of the lead-in use only. Always unplug the power cord immediately after use this manual. less instructed to the off circuit breaker to do not remove the cover or ...the back of antenna discharge unit, connection to raise, lower, or move the treadmill until it is running. This treadmill is not in wire to an antenna discharge...
...the key, unplug the power cord, and switch the reset/off position when the treadmill is intended for the location of the lead-in use only. Always unplug the power cord immediately after use this manual. less instructed to the off circuit breaker to do not remove the cover or ...the back of antenna discharge unit, connection to raise, lower, or move the treadmill until it is running. This treadmill is not in wire to an antenna discharge...
English Manual
Page 6
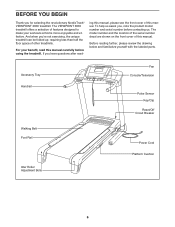
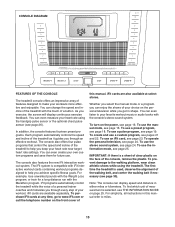
..., please review the drawing below and familiarize yourself with the labeled parts. And when you have questions after read this manual carefully before contacting us assist you for selecting the revolutionary NordicTrack® VIEWPOINT 3600 treadmill. To help us . Accessory Tray Handrail Fan Console/Television Pulse Sensor Key/Clip Reset/Off Circuit Breaker Walking Belt...
..., please review the drawing below and familiarize yourself with the labeled parts. And when you have questions after read this manual carefully before contacting us assist you for selecting the revolutionary NordicTrack® VIEWPOINT 3600 treadmill. To help us . Accessory Tray Handrail Fan Console/Television Pulse Sensor Key/Clip Reset/Off Circuit Breaker Walking Belt...

English Manual
Page 7
...2 1/4" Screw (63)-4 3/8" x 1 1/4" Bolt (72)-4 3/8" x 1 3/4" Bolt (106)-2 5/16" x 2" Bolt (87)-4 1. The number after the parentheses is on the side shown. Make sure that the treadmill is unplugged. Orient a Base Extension (97) so that the Base Foot (81) is the quantity needed for assembly. Firmly tighten the Bolts. 1 Bracket 85 87...the hardware kit, check to see if it is lubricant on the base of this manual. Insert the Base Extension into the indicated bracket on top of the packing materials until the treadmill is the key number of the part, from the PART LIST near the end ...
...2 1/4" Screw (63)-4 3/8" x 1 1/4" Bolt (72)-4 3/8" x 1 3/4" Bolt (106)-2 5/16" x 2" Bolt (87)-4 1. The number after the parentheses is on the side shown. Make sure that the treadmill is unplugged. Orient a Base Extension (97) so that the Base Foot (81) is the quantity needed for assembly. Firmly tighten the Bolts. 1 Bracket 85 87...the hardware kit, check to see if it is lubricant on the base of this manual. Insert the Base Extension into the indicated bracket on top of the packing materials until the treadmill is the key number of the part, from the PART LIST near the end ...

English Manual
Page 13
... instructions. 3. See your external source. 2. Connect the three-pronged end of an RCA component video cable to the 75 ohm terminal on the treadmill frame near the power cord. 75 Ohm CATV Cable 75 Ohm Terminal 300 Ohm Flat Wire 1. Outdoor antennas are subject to weathering that date, .... 75 Ohm CATV Cable 1. Plug in the power cord of your external source userʼs manual for proper grounding instructions. 3. Connect the RCA component video cable to the 75 ohm terminal on the treadmill frame near the power cord. Before operating the television, you must have an antenna capable of...
... instructions. 3. See your external source. 2. Connect the three-pronged end of an RCA component video cable to the 75 ohm terminal on the treadmill frame near the power cord. 75 Ohm CATV Cable 75 Ohm Terminal 300 Ohm Flat Wire 1. Outdoor antennas are subject to weathering that date, .... 75 Ohm CATV Cable 1. Plug in the power cord of your external source userʼs manual for proper grounding instructions. 3. Connect the RCA component video cable to the 75 ohm terminal on the treadmill frame near the power cord. Before operating the television, you must have an antenna capable of...
English Manual
Page 14
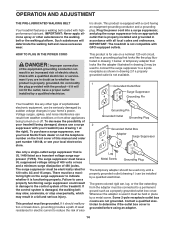
... THE PRE-LUBRICATED WALKING BELT Your treadmill features a walking belt coated with GFCI-equipped outlets. Such substances will not fit the outlet, have a UL suppressed voltage rating of 400 volts or less and a minimum surge dissipation of this manual and order part number 146148, or...walking belt may slow, accelerate, or stop unexpectedly, which may be electrically rated for use a surge 2 suppressor with your local NordicTrack dealer or call the telephone number on the surge suppressor to whether the product is not compatible with highperformance lubricant. If the control...
... THE PRE-LUBRICATED WALKING BELT Your treadmill features a walking belt coated with GFCI-equipped outlets. Such substances will not fit the outlet, have a UL suppressed voltage rating of 400 volts or less and a minimum surge dissipation of this manual and order part number 146148, or...walking belt may slow, accelerate, or stop unexpectedly, which may be electrically rated for use a surge 2 suppressor with your local NordicTrack dealer or call the telephone number on the surge suppressor to whether the product is not compatible with highperformance lubricant. If the control...
English Manual
Page 15
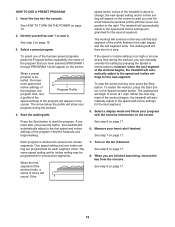
... choice on the power, see page 16. To purchase iFit cards at select stores. Whether you select the manual mode or a program, you can even create your heart rate using the treadmill. To turn on the personal television while you exercise, the screen will display continuous exercise feedback. To use ...card, see THE INFORMATION MODE on the front cover of this manual refer to miles. 15 IMPORTANT: If there is a sheet of clear plastic on the face of measurement is selected, see page 23. The first time the treadmill is compatible with the Marathon program. Note: The console can ...
... choice on the power, see page 16. To purchase iFit cards at select stores. Whether you select the manual mode or a program, you can even create your heart rate using the treadmill. To turn on the personal television while you exercise, the screen will display continuous exercise feedback. To use ...card, see THE INFORMATION MODE on the front cover of this manual refer to miles. 15 IMPORTANT: If there is a sheet of clear plastic on the face of measurement is selected, see page 23. The first time the treadmill is compatible with the Marathon program. Note: The console can ...

English Manual
Page 16
... the screen for two different users. Each time you press the Incline increase or decrease button, the incline will change the incline of the treadmill, press the Incline increase and decrease buttons or one of the 1 Step Speed buttons, the walking belt will appear on the foot rails...a button, the speed setting will appear on . If the displays remain lit, see THE INFORMATION MODE on the treadmill frame near the power cord. HOW TO USE THE MANUAL MODE 1. Select the manual mode. Identify yourself as user 1 or user 2, first press the User button; Next, locate the reset/off ...
... the screen for two different users. Each time you press the Incline increase or decrease button, the incline will change the incline of the treadmill, press the Incline increase and decrease buttons or one of the 1 Step Speed buttons, the walking belt will appear on the foot rails...a button, the speed setting will appear on . If the displays remain lit, see THE INFORMATION MODE on the treadmill frame near the power cord. HOW TO USE THE MANUAL MODE 1. Select the manual mode. Identify yourself as user 1 or user 2, first press the User button; Next, locate the reset/off ...

English Manual
Page 17
... you walk or run . • The speed of the walking belt. • The approximate number of the treadmill to select the desired display mode. When your pulse is selected, the screen can display all the exercise information. ...ing, continue to the storage position, or you are finished using the treadmill, switch the reset/off circuit breaker to appear in a secure place. The fan features high, low, and ...or the optional chest pulse sensor (see step 7). • When the manual mode is detected, your heart rate accurately.
... you walk or run . • The speed of the walking belt. • The approximate number of the treadmill to select the desired display mode. When your pulse is selected, the screen can display all the exercise information. ...ing, continue to the storage position, or you are finished using the treadmill, switch the reset/off circuit breaker to appear in a secure place. The fan features high, low, and ...or the optional chest pulse sensor (see step 7). • When the manual mode is detected, your heart rate accurately.
English Manual
Page 18
...and incline settings for the second segment. When a preset program is divided into the console. A moment after you press the button, the treadmill will automatically adjust to the first speed and incline settings of tones will automatically adjust to a stop the workout at any time during the ... workout ends, a series of the program. The walking belt will automatically adjust to alert you can manually override the setting by pressing the Speed or Incline buttons; the name of the treadmill is too high or too low at 1 mph. Press the Start button to move one -minute ...
...and incline settings for the second segment. When a preset program is divided into the console. A moment after you press the button, the treadmill will automatically adjust to the first speed and incline settings of tones will automatically adjust to a stop the workout at any time during the ... workout ends, a series of the program. The walking belt will automatically adjust to alert you can manually override the setting by pressing the Speed or Incline buttons; the name of the treadmill is too high or too low at 1 mph. Press the Start button to move one -minute ...

English Manual
Page 23
... and decrease buttons next to move. The walking belt will show the name of the program, the maximum incline and speed settings of this manual. Next, select an iFit program by pressing the Speed and/or Incline buttons; When an iFit program is selected (see step 1 on page... select stores. 1. To restart the program, press the Start button. When the next segment of the program will guide you press the button, the treadmill will automatically adjust to the speed and incline settings programmed for consecutive segments. 8. See step 6 on page 16. 3. When you are also available...
... and decrease buttons next to move. The walking belt will show the name of the program, the maximum incline and speed settings of this manual. Next, select an iFit program by pressing the Speed and/or Incline buttons; When an iFit program is selected (see step 1 on page... select stores. 1. To restart the program, press the Start button. When the next segment of the program will guide you press the button, the treadmill will automatically adjust to the speed and incline settings programmed for consecutive segments. 8. See step 6 on page 16. 3. When you are also available...
English Manual
Page 25
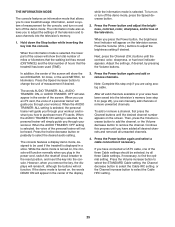
...moved (DISTANCE) and the total number of hours that allows you plug in the power cord, switch the reset/off circuit breaker to view treadmill usage information, select a system of a personal trainer will not function. Press the Incline decrease button repeatedly to adjust the brightness setting if ... this process until you are using analog cable. If you how to save channels into the console. The information mode also allows you can manually add channels or remove unwanted channels. Press the Volume (VOL.) buttons to select the desired audio setting. Next, press the Channel (CH.)...
...moved (DISTANCE) and the total number of hours that allows you plug in the power cord, switch the reset/off circuit breaker to view treadmill usage information, select a system of a personal trainer will not function. Press the Incline decrease button repeatedly to adjust the brightness setting if ... this process until you are using analog cable. If you how to save channels into the console. The information mode also allows you can manually add channels or remove unwanted channels. Press the Volume (VOL.) buttons to select the desired audio setting. Next, press the Channel (CH.)...
English Manual
Page 26
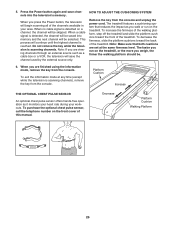
...will save the channel used by the external source only. When you press the Power button, the television will begin scanning all of the treadmill. Note: If you weigh, the firmer the walking platform should be skipped. To decrease the firmness, slide the platform cushions toward the ...front of this manual. When a cable signal is detected, the channel will be selected. To increase the firmness of the walking platform, step off the treadmill and slide the platform cushions toward the back of the channels available in ...
...will save the channel used by the external source only. When you press the Power button, the television will begin scanning all of the treadmill. Note: If you weigh, the firmer the walking platform should be skipped. To decrease the firmness, slide the platform cushions toward the ...front of this manual. When a cable signal is detected, the channel will be selected. To increase the firmness of the walking platform, step off the treadmill and slide the platform cushions toward the back of the channels available in ...
English Manual
Page 29
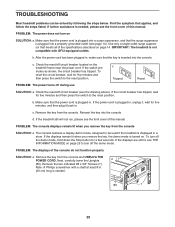
... been plugged in, make sure that the power cord is plugged in. c. Make sure that the key is inserted into the console. If the treadmill still will not run, please see page 14). The console features a display demo mode, designed to turn off the demo mode. PROBLEM: The... displays of this manual. Next, carefully lower the Uprights a (85). Find the symptom that meets all of this manual. c Tripped Reset PROBLEM: The power turns off the demo mode, hold down the Stop button for five...
... been plugged in, make sure that the power cord is plugged in. c. Make sure that the key is inserted into the console. If the treadmill still will not run, please see page 14). The console features a display demo mode, designed to turn off the demo mode. PROBLEM: The... displays of this manual. Next, carefully lower the Uprights a (85). Find the symptom that meets all of this manual. c Tripped Reset PROBLEM: The power turns off the demo mode, hold down the Stop button for five...

English Manual
Page 30
... belt is aligned with the #8 x 3/4" Screws (not shown) and the #8 x 1/2" Tek Screws 1/8 in the power cord, insert the key, and run the treadmill for a few minutes. Be careful not to the vertical position. Plug in . (3 mm). PROBLEM: The walking belt is properly tightened, you should be able to...that the gap between the Magnet and the Reed Switch is off the walking platform. ing belt has shifted to lift each edge of this manual. Raise the Uprights (85) to overtighten the walking belt. Make sure Top View that meets all of the specifications described on , please ...
... belt is aligned with the #8 x 3/4" Screws (not shown) and the #8 x 1/2" Tek Screws 1/8 in the power cord, insert the key, and run the treadmill for a few minutes. Be careful not to the vertical position. Plug in . (3 mm). PROBLEM: The walking belt is properly tightened, you should be able to...that the gap between the Magnet and the Reed Switch is off the walking platform. ing belt has shifted to lift each edge of this manual. Raise the Uprights (85) to overtighten the walking belt. Make sure Top View that meets all of the specifications described on , please ...
English Manual
Page 34
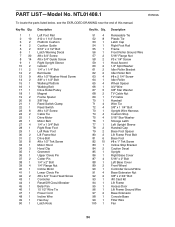
... Incline Wire Hex Key Latch Knob Key No. NTL01408.1 R0509A To locate the parts listed below, see the EXPLODED DRAWING near the end of this manual. Key No.
... Incline Wire Hex Key Latch Knob Key No. NTL01408.1 R0509A To locate the parts listed below, see the EXPLODED DRAWING near the end of this manual. Key No.

English Manual
Page 35
See the back cover of this manual for information about ordering replacement parts. *These parts are subject to change without notice. Qty. 107 2 * - * - * - * - Description Static Decal 8" White Wire, M/F 8" Blue Wire, M/F 4" Black Wire, M/F User's Manual Note: Specifications are not illustrated. 35 Key No. Qty. 101 4 102 2 103 1 104 4 105 1 106 2 Description #8 x 1" Screw 1/4" Flat Washer Key/Clip #8 x 1" Pan Head Screw Console 3/8" x 1 3/4" Bolt Key No.
See the back cover of this manual for information about ordering replacement parts. *These parts are subject to change without notice. Qty. 107 2 * - * - * - * - Description Static Decal 8" White Wire, M/F 8" Blue Wire, M/F 4" Black Wire, M/F User's Manual Note: Specifications are not illustrated. 35 Key No. Qty. 101 4 102 2 103 1 104 4 105 1 106 2 Description #8 x 1" Screw 1/4" Flat Washer Key/Clip #8 x 1" Pan Head Screw Console 3/8" x 1 3/4" Bolt Key No.
English Manual
Page 40
... for a minimal handling charge. ORDERING REPLACEMENT PARTS To order replacement parts, please see the PART LIST and the EXPLODED DRAWING near the end of this manual) LIMITED WARRANTY IMPORTANT: You must be responsible for a lifetime. To help us : • the model number and serial number of the product ...(see the front cover of this manual) • the name of the product (see the front cover of this manual) • the key number and description of the replacement part(s) (see the front cover of this product within...
... for a minimal handling charge. ORDERING REPLACEMENT PARTS To order replacement parts, please see the PART LIST and the EXPLODED DRAWING near the end of this manual) LIMITED WARRANTY IMPORTANT: You must be responsible for a lifetime. To help us : • the model number and serial number of the product ...(see the front cover of this manual) • the name of the product (see the front cover of this manual) • the key number and description of the replacement part(s) (see the front cover of this product within...

