
English Manual
Page 2
... 2 IMPORTANT PRECAUTIONS 3 BEFORE YOU BEGIN 7 PART IDENTIFICATION CHART 8 ASSEMBLY 9 HOW TO USE THE TREADMILL 17 FCC INFORMATION 25 HOW TO FOLD AND MOVE THE TREADMILL 26 MAINTENANCE AND TROUBLESHOOTING 27 EXERCISE GUIDELINES 30 PART LIST 31 EXPLODED DRAWING 32 ORDERING REPLACEMENT PARTS Back ...decal in the location shown. and other countries and is a trademark or registered trademark of this manual and request a free replacement decal. NORDICTRACK is missing or illegible, call the telephone number on the front cover of Cisco in the U.S. If a decal is a registered trademark ...
... 2 IMPORTANT PRECAUTIONS 3 BEFORE YOU BEGIN 7 PART IDENTIFICATION CHART 8 ASSEMBLY 9 HOW TO USE THE TREADMILL 17 FCC INFORMATION 25 HOW TO FOLD AND MOVE THE TREADMILL 26 MAINTENANCE AND TROUBLESHOOTING 27 EXERCISE GUIDELINES 30 PART LIST 31 EXPLODED DRAWING 32 ORDERING REPLACEMENT PARTS Back ...decal in the location shown. and other countries and is a trademark or registered trademark of this manual and request a free replacement decal. NORDICTRACK is missing or illegible, call the telephone number on the front cover of Cisco in the U.S. If a decal is a registered trademark ...
English Manual
Page 3
... exercise clothes while using the treadmill. 3 The treadmill is damaged, the walking belt may result in a fall and serious injury. 16. Use the treadmill only as cell phone chargers, into the surge suppressor or into an appropriate outlet (see your local NORDICTRACK dealer, call the telephone number... on page 17. Do not use of the treadmill by persons with bare feet, wearing only stockings, or in sandals. 3. Plug the power cord...
... exercise clothes while using the treadmill. 3 The treadmill is damaged, the walking belt may result in a fall and serious injury. 16. Use the treadmill only as cell phone chargers, into the surge suppressor or into an appropriate outlet (see your local NORDICTRACK dealer, call the telephone number... on page 17. Do not use of the treadmill by persons with bare feet, wearing only stockings, or in sandals. 3. Plug the power cord...
English Manual
Page 4
... other than the procedures in speed. 23. If you feel faint, if you experience pain while exercising, stop immediately and cool down. The treadmill is walking on page 26.) You must be performed by an authorized ser- The heart rate monitor is used. DANGER: 30. Never insert .... 24. When a person is capable of breath, or if you become short of high speeds. Over exercising may affect the accuracy of the treadmill will increase. 27. Adjust the speed in serious injury or death. Various factors, including the user's movement, may result in small increments to...
... other than the procedures in speed. 23. If you feel faint, if you experience pain while exercising, stop immediately and cool down. The treadmill is walking on page 26.) You must be performed by an authorized ser- The heart rate monitor is used. DANGER: 30. Never insert .... 24. When a person is capable of breath, or if you become short of high speeds. Over exercising may affect the accuracy of the treadmill will increase. 27. Adjust the speed in serious injury or death. Various factors, including the user's movement, may result in small increments to...
English Manual
Page 7
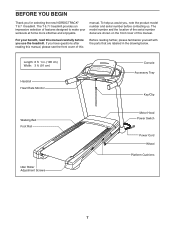
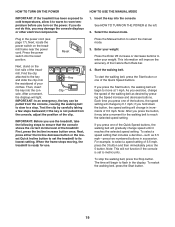
... Rail Idler Roller Adjustment Screws Motor Hood Power Switch Power Cord Wheel Platform Cushions 7 The T 6.7 I treadmill. For your workouts at home more effective and enjoyable. To help us . If you for selecting the new NORDICTRACK® T 6.7 I treadmill provides an impressive selection of this manual. BEFORE YOU BEGIN Thank you have questions after reading... to make your benefit, read this manual carefully before you , note the product model number and serial number before contacting us assist you use the treadmill.
... Rail Idler Roller Adjustment Screws Motor Hood Power Switch Power Cord Wheel Platform Cushions 7 The T 6.7 I treadmill. For your workouts at home more effective and enjoyable. To help us . If you for selecting the new NORDICTRACK® T 6.7 I treadmill provides an impressive selection of this manual. BEFORE YOU BEGIN Thank you have questions after reading... to make your benefit, read this manual carefully before you , note the product model number and serial number before contacting us assist you use the treadmill.
English Manual
Page 9
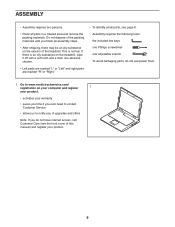
ASSEMBLY • Assembly requires two persons. • Place all assembly steps. • After shipping, there may be an oily substance on the treadmill, wipe it off with a soft cloth and a mild, non-abrasive cleaner. • Left parts are marked "L" or "Left" and right parts are marked "R" or "...Right." • To identify small parts, see the front cover of the treadmill. This is an oily substance on the exterior of this manual) and register your warranty • saves you time if you ever need to contact...
ASSEMBLY • Assembly requires two persons. • Place all assembly steps. • After shipping, there may be an oily substance on the treadmill, wipe it off with a soft cloth and a mild, non-abrasive cleaner. • Left parts are marked "L" or "Left" and right parts are marked "R" or "...Right." • To identify small parts, see the front cover of the treadmill. This is an oily substance on the exterior of this manual) and register your warranty • saves you time if you ever need to contact...
English Manual
Page 15
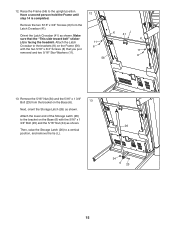
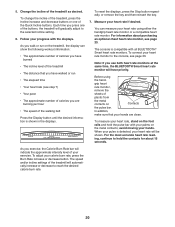
... Washers (11). Then, raise the Storage Latch (26) to the upright position. Have a second person hold the Frame until 12 step 14 is facing the treadmill. Remove the two 5/16" x 3/4" Screws (8) from the bracket on the Base (6) with the two 5/16" x 3/4" Screws (8) that the "This side toward belt" sticker (J) is completed...
... Washers (11). Then, raise the Storage Latch (26) to the upright position. Have a second person hold the Frame until 12 step 14 is facing the treadmill. Remove the two 5/16" x 3/4" Screws (8) from the bracket on the Base (6) with the two 5/16" x 3/4" Screws (8) that the "This side toward belt" sticker (J) is completed...

English Manual
Page 16
... push a spacer (M) out of the Right Upright (90). Make sure that all parts are sheets of the Storage Latch (26) with the bracket on the treadmill decals, remove the plastic. Keep the included hex key in a secure place; Remove the 5/16" Nut (34) and the 5/16" x 2 1/4" Bolt (25) ...63 90 7 16. To avoid damage to the console, keep the treadmill out of the Left Upright (89). 14. If there are properly tightened before you use the treadmill. To protect the floor or carpet, place a mat under the treadmill. Note: Extra hardware may be able to adjust the walking belt ...
... push a spacer (M) out of the Right Upright (90). Make sure that all parts are sheets of the Storage Latch (26) with the bracket on the treadmill decals, remove the plastic. Keep the included hex key in a secure place; Remove the 5/16" Nut (34) and the 5/16" x 2 1/4" Bolt (25) ...63 90 7 16. To avoid damage to the console, keep the treadmill out of the Left Upright (89). 14. If there are properly tightened before you use the treadmill. To protect the floor or carpet, place a mat under the treadmill. Note: Extra hardware may be able to adjust the walking belt ...
English Manual
Page 17
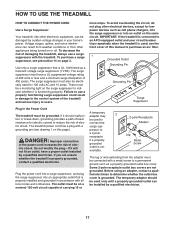
... such as a transient voltage surge suppressor (TVSS). DANGER: Improper connection of the power cord increases the risk of damaging the treadmill, always use a properly functioning surge suppressor could result in damage to purchase an arc filter. 1 Grounded Outlet Grounding Pin Grounding... box cover is functioning properly. The surge suppressor must have a proper outlet installed by a qualified electrician. 17 IMPORTANT: If the treadmill is connected to users. If you are not grounded. The surge suppressor must be installed by a qualified electrician. Before using an ...
... such as a transient voltage surge suppressor (TVSS). DANGER: Improper connection of the power cord increases the risk of damaging the treadmill, always use a properly functioning surge suppressor could result in damage to purchase an arc filter. 1 Grounded Outlet Grounding Pin Grounding... box cover is functioning properly. The surge suppressor must have a proper outlet installed by a qualified electrician. 17 IMPORTANT: If the treadmill is connected to users. If you are not grounded. The surge suppressor must be installed by a qualified electrician. Before using an ...
English Manual
Page 18
... use the manual mode, see page 22. To connect your workouts more effective and enjoyable. You can change the speed and incline of the treadmill with the console's sound system while you exercise, the console will display instant exercise feedback. To turn on the console, remove the plastic. To... refer to the console and use the settings mode, see page 24. To prevent damage to record and track your heart rate using the treadmill. To use an iFit® app to the walking platform, wear clean athletic shoes while using the handgrip heart rate monitor or a compatible...
... use the manual mode, see page 22. To connect your workouts more effective and enjoyable. You can change the speed and incline of the treadmill with the console's sound system while you exercise, the console will display instant exercise feedback. To turn on the console, remove the plastic. To... refer to the console and use the settings mode, see page 24. To prevent damage to record and track your heart rate using the treadmill. To use an iFit® app to the walking platform, wear clean athletic shoes while using the handgrip heart rate monitor or a compatible...
English Manual
Page 19
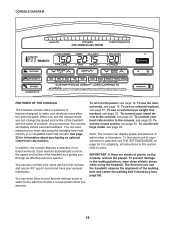
... will change the speed of 3.5 mph, press the 3 button and then immediately press the 5 button. As you may take a moment for use the treadmill, take the following steps to a stop the walking belt, press the Stop button. Note: After you press one of the buttons, the speed setting will...desired by carefully taking a few steps backward; For example, to its lowest setting. The time will not function if the console is set the treadmill to select a speed setting of the walking belt as 3.5 mph-press two numbered buttons in the display. Insert the key into the con- Then...
... will change the speed of 3.5 mph, press the 3 button and then immediately press the 5 button. As you may take a moment for use the treadmill, take the following steps to a stop the walking belt, press the Stop button. Note: After you press one of the buttons, the speed setting will...desired by carefully taking a few steps backward; For example, to its lowest setting. The time will not function if the console is set the treadmill to select a speed setting of the walking belt as 3.5 mph-press two numbered buttons in the display. Insert the key into the con- Then...
English Manual
Page 20
... you use both heart rate monitors at the same time, the BLUETOOTH Smart heart rate monitor will indicate the approximate intensity level of the treadmill • The distance that your hands. You can show the following workout information: • The approximate number of calories you have burned...with all BLUETOOTH® Smart heart rate monitors. Note: If you are clean. grip heart rate monitor, remove the sheets of the treadmill will automatically increase or decrease to hold the pulse bar with the displays. When your exercise. The speed and/or incline settings of ...
... you use both heart rate monitors at the same time, the BLUETOOTH Smart heart rate monitor will indicate the approximate intensity level of the treadmill • The distance that your hands. You can show the following workout information: • The approximate number of calories you have burned...with all BLUETOOTH® Smart heart rate monitors. Note: If you are clean. grip heart rate monitor, remove the sheets of the treadmill will automatically increase or decrease to hold the pulse bar with the displays. When your exercise. The speed and/or incline settings of ...
English Manual
Page 21
... an onboard workout, the display will automatically adjust to the speed and incline settings for consecutive segments. When the next segment of the treadmill to the storage position. HOW TO USE AN ONBOARD WORKOUT 1. Follow your progress with the displays. When you fold it in the display.... When you press the button, the treadmill will begin walking. A moment after you are programmed for the next segment. See step 8 on page 20. When you can manually override the...
... an onboard workout, the display will automatically adjust to the speed and incline settings for consecutive segments. When the next segment of the treadmill to the storage position. HOW TO USE AN ONBOARD WORKOUT 1. Follow your progress with the displays. When you fold it in the display.... When you press the button, the treadmill will begin walking. A moment after you are programmed for the next segment. See step 8 on page 20. When you can manually override the...
English Manual
Page 24
... exit the workout before you can access the information mode. Then, release the Stop button. The faster you to change the unit of the treadmill are set to the same firmness level. make sure that keeps track of measurement for less firmness, turn a cushion to the position... shown in . Press the Speed increase or decrease button to select a unit of treadmill usage information and allows you run on your personal audio player. To exit the information mode, remove the key from the console and unplug the...
... exit the workout before you can access the information mode. Then, release the Stop button. The faster you to change the unit of the treadmill are set to the same firmness level. make sure that keeps track of measurement for less firmness, turn a cushion to the position... shown in . Press the Speed increase or decrease button to select a unit of treadmill usage information and allows you run on your personal audio player. To exit the information mode, remove the key from the console and unplug the...
English Manual
Page 26
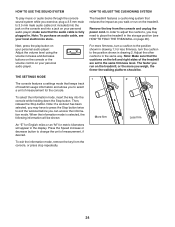
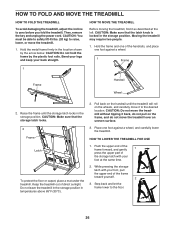
...frame by the arrow below. Hold the frame and one of direct sunlight. Raise the frame until the treadmill will roll on the wheels, and carefully move it back, do not pull on the handrail until the... locks in the location shown by the plastic foot rails. HOW TO LOWER THE TREADMILL FOR USE 1. Hold the metal frame firmly in the storage position. Bend your legs and... keep your back straight. Keep the treadmill out of the handrails, and place one foot against a wheel. 1 Frame 1 Frame Handrail Wheel 2....
...frame by the arrow below. Hold the frame and one of direct sunlight. Raise the frame until the treadmill will roll on the wheels, and carefully move it back, do not pull on the handrail until the... locks in the location shown by the plastic foot rails. HOW TO LOWER THE TREADMILL FOR USE 1. Hold the metal frame firmly in the storage position. Bend your legs and... keep your back straight. Keep the treadmill out of the handrails, and place one foot against a wheel. 1 Frame 1 Frame Handrail Wheel 2....
English Manual
Page 27
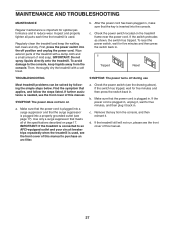
...into the console. Remove the key from the console. To avoid damage to an AFCI-equipped outlet and your circuit breaker trips repeatedly when the treadmill is inserted into a properly grounded outlet (see the front cover of mild soap. If the switch protrudes as shown, the switch has tripped... switch (see the front cover of this manual to reduce wear. d. Inspect and properly tighten all of this manual. 27 Regularly clean the treadmill and keep liquids away from the console, and then reinsert it back in . b. Check the power switch located on a. To reset the power...
...into the console. Remove the key from the console. To avoid damage to an AFCI-equipped outlet and your circuit breaker trips repeatedly when the treadmill is inserted into a properly grounded outlet (see the front cover of mild soap. If the switch protrudes as shown, the switch has tripped... switch (see the front cover of this manual to reduce wear. d. Inspect and properly tighten all of this manual. 27 Regularly clean the treadmill and keep liquids away from the console, and then reinsert it back in . b. Check the power switch located on a. To reset the power...
English Manual
Page 28
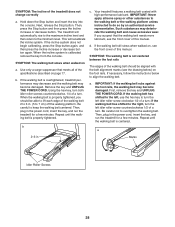
... you suspect that meets all of the specifications described on a. a 2-3 in the power cord, insert the key, and run the treadmill for a few minutes. SYMPTOM: The incline of a turn. Next, release the Stop button. When the incline system is properly tightened. Be ... walking belt should be aligned with high-performance lubricant. Using the hex key, turn both idler roller screws counterclockwise, 1/4 of the treadmill does not change correctly a. IMPORTANT: Never apply silicone spray or other substances to the walking belt or the walking platform unless instructed...
... you suspect that meets all of the specifications described on a. a 2-3 in the power cord, insert the key, and run the treadmill for a few minutes. SYMPTOM: The incline of a turn. Next, release the Stop button. When the incline system is properly tightened. Be ... walking belt should be aligned with high-performance lubricant. Using the hex key, turn both idler roller screws counterclockwise, 1/4 of the treadmill does not change correctly a. IMPORTANT: Never apply silicone spray or other substances to the walking belt or the walking platform unless instructed...

English Manual
Page 29
SYMPTOM: The walking belt slips when walked on the treadmill for a few minutes. Then, plug in . (5 to keep the walking belt centered. When the walking belt is properly tightened. 29 Using the hex key, turn . Be careful to 7 cm) off the walking platform. Repeat until the walking belt is correctly tightened, you should be able to lift each edge of a turn both idler roller screws clockwise, 1/4 of the walking belt 2 to 3 in the power cord, insert the key, and carefully walk on a a. First, remove the key and UNPLUG THE POWER CORD.
SYMPTOM: The walking belt slips when walked on the treadmill for a few minutes. Then, plug in . (5 to keep the walking belt centered. When the walking belt is properly tightened. 29 Using the hex key, turn . Be careful to 7 cm) off the walking platform. Repeat until the walking belt is correctly tightened, you should be able to lift each edge of a turn both idler roller screws clockwise, 1/4 of the walking belt 2 to 3 in the power cord, insert the key, and carefully walk on a a. First, remove the key and UNPLUG THE POWER CORD.


