
English Manual
Page 2
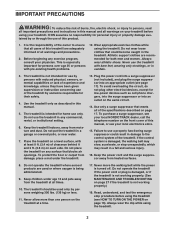
... PRECAUTIONS 3 BEFORE YOU BEGIN 7 PART IDENTIFICATION CHART 8 ASSEMBLY 9 HOW TO USE THE TREADMILL 17 FCC INFORMATION 25 HOW TO FOLD AND MOVE THE TREADMILL 26 MAINTENANCE AND TROUBLESHOOTING 27 EXERCISE GUIDELINES 30 PART LIST 31 EXPLODED DRAWING 32 ORDERING REPLACEMENT PARTS Back Cover LIMITED WARRANTY Back Cover WARNING DECAL PLACEMENT This drawing shows the locations of ICON Health & Fitness, Inc. IFIT is missing or illegible, call the telephone number on the front cover of Bluetooth SIG, Inc...
... PRECAUTIONS 3 BEFORE YOU BEGIN 7 PART IDENTIFICATION CHART 8 ASSEMBLY 9 HOW TO USE THE TREADMILL 17 FCC INFORMATION 25 HOW TO FOLD AND MOVE THE TREADMILL 26 MAINTENANCE AND TROUBLESHOOTING 27 EXERCISE GUIDELINES 30 PART LIST 31 EXPLODED DRAWING 32 ORDERING REPLACEMENT PARTS Back Cover LIMITED WARRANTY Back Cover WARNING DECAL PLACEMENT This drawing shows the locations of ICON Health & Fitness, Inc. IFIT is missing or illegible, call the telephone number on the front cover of Bluetooth SIG, Inc...
English Manual
Page 3
... of this product. 1. Never move the walking belt while the power is not working properly. (See MAINTENANCE AND TROUBLESHOOTING on page 27 if the treadmill is turned off. ICON assumes no responsibility for home use of all times. 10. Do not place the treadmill on the front cover of the owner to ensure that meets all warnings on your treadmill before using your local electronics store. 15...
... of this product. 1. Never move the walking belt while the power is not working properly. (See MAINTENANCE AND TROUBLESHOOTING on page 27 if the treadmill is turned off. ICON assumes no responsibility for home use of all times. 10. Do not place the treadmill on the front cover of the owner to ensure that meets all warnings on your treadmill before using your local electronics store. 15...
English Manual
Page 4
... increments to do so by an authorized service representative. vice representative only. 31. Over exercising may affect the accuracy of high speeds. When folding or moving walking belt. 28. The heart rate monitor is used. Inspect and properly tighten all parts each time the treadmill is not a medical device. Always unplug the power cord immediately after use . 25. Never remove the motor hood unless instructed to avoid sudden jumps in this...
... increments to do so by an authorized service representative. vice representative only. 31. Over exercising may affect the accuracy of high speeds. When folding or moving walking belt. 28. The heart rate monitor is used. Inspect and properly tighten all parts each time the treadmill is not a medical device. Always unplug the power cord immediately after use . 25. Never remove the motor hood unless instructed to avoid sudden jumps in this...
English Manual
Page 7
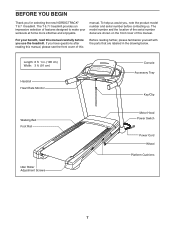
...) Handrail Heart Rate Monitor Console Accessory Tray Key/Clip Walking Belt Foot Rail Idler Roller Adjustment Screws Motor Hood Power Switch Power Cord Wheel Platform Cushions 7 For your workouts at home more effective and enjoyable. BEFORE YOU BEGIN Thank you , note the product model number and serial number before contacting us assist you for selecting the new NORDICTRACK® T 6.7 I treadmill provides an impressive selection of features designed to make your benefit, read this manual carefully...
...) Handrail Heart Rate Monitor Console Accessory Tray Key/Clip Walking Belt Foot Rail Idler Roller Adjustment Screws Motor Hood Power Switch Power Cord Wheel Platform Cushions 7 For your workouts at home more effective and enjoyable. BEFORE YOU BEGIN Thank you , note the product model number and serial number before contacting us assist you for selecting the new NORDICTRACK® T 6.7 I treadmill provides an impressive selection of features designed to make your benefit, read this manual carefully...

English Manual
Page 13
start all four Screws, and then tighten them. 89 5 84 31 9 5 84 9. Connect the Upright Wire (81) to the console wire (I 81 13 The connectors should slide together easily and snap into place. IF YOU DO NOT CONNECT THE CONNECTORS PROPERLY, THE CONSOLE MAY BECOME DAMAGED WHEN YOU TURN ON THE POWER. 8. IMPORTANT: To avoid damaging the Pulse Crossbar (31), do not use power tools and...
start all four Screws, and then tighten them. 89 5 84 31 9 5 84 9. Connect the Upright Wire (81) to the console wire (I 81 13 The connectors should slide together easily and snap into place. IF YOU DO NOT CONNECT THE CONNECTORS PROPERLY, THE CONSOLE MAY BECOME DAMAGED WHEN YOU TURN ON THE POWER. 8. IMPORTANT: To avoid damaging the Pulse Crossbar (31), do not use power tools and...

English Manual
Page 14
Attach the console assembly to the console assembly (G) with four 1/4" x 1/2" Screws (4); Firmly tighten the four 1/4" x 1/2" Screws (4). 4 31 4 1 1 14 do not tighten the Screws yet. 84 84 81 4 4 90 11. Make sure that no wires are pinched. 10 G Insert the excess Upright Wire (81) into the Right Upright (90). Set the console assembly (G) on the Handrails (84) with six #8 x 1/2" Screws (1); start 11 G all six Screws, and then tighten them. 10. Attach the Pulse Crossbar (31) to the brackets on the Handrails (84).
Attach the console assembly to the console assembly (G) with four 1/4" x 1/2" Screws (4); Firmly tighten the four 1/4" x 1/2" Screws (4). 4 31 4 1 1 14 do not tighten the Screws yet. 84 84 81 4 4 90 11. Make sure that no wires are pinched. 10 G Insert the excess Upright Wire (81) into the Right Upright (90). Set the console assembly (G) on the Handrails (84) with six #8 x 1/2" Screws (1); start 11 G all six Screws, and then tighten them. 10. Attach the Pulse Crossbar (31) to the brackets on the Handrails (84).

English Manual
Page 16
... (M) out of the Right Upright (90). discard the spacer. Next, set the Right Inner Base Cover (51) onto the lower end of the Storage Latch; Next, tighten the 5/16" Nut (34) onto the 5/16" x 2 1/4" Bolt (25). Note: Extra hardware may be able to adjust the walking belt (see HOW TO LOWER THE TREADMILL FOR USE on the treadmill decals, remove the plastic. Remove the 5/16" Nut (34...
... (M) out of the Right Upright (90). discard the spacer. Next, set the Right Inner Base Cover (51) onto the lower end of the Storage Latch; Next, tighten the 5/16" Nut (34) onto the 5/16" x 2 1/4" Bolt (25). Note: Extra hardware may be able to adjust the walking belt (see HOW TO LOWER THE TREADMILL FOR USE on the treadmill decals, remove the plastic. Remove the 5/16" Nut (34...
English Manual
Page 17
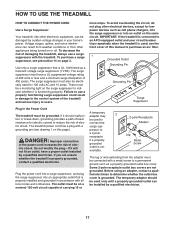
... 2-pole receptacle outlet box covers are unsure whether the treadmill is not available. 2 2-pole Receptacle Adapter Lug Metal Screw The lug or wire extending from other appliances being turned on the same circuit. HOW TO USE THE TREADMILL HOW TO CONNECT THE POWER CORD Use a Surge Suppressor Your treadmill, like other electronic equipment, can be installed by a qualified electrician. 17 Plug the power cord into a surge suppressor...
... 2-pole receptacle outlet box covers are unsure whether the treadmill is not available. 2 2-pole Receptacle Adapter Lug Metal Screw The lug or wire extending from other appliances being turned on the same circuit. HOW TO USE THE TREADMILL HOW TO CONNECT THE POWER CORD Use a Surge Suppressor Your treadmill, like other electronic equipment, can be installed by a qualified electrician. 17 Plug the power cord into a surge suppressor...
English Manual
Page 18
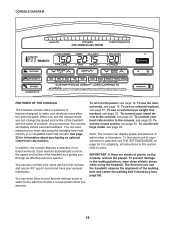
... purchasing an optional chest heart rate monitor. You can change the speed and incline of plastic on the power, see page 24. Each workout automatically controls the speed and incline of a button. To connect your favorite workout music or audio books with the touch of the treadmill as it guides you exercise. To use the manual mode, you can even listen to your smart device to record and track your heart rate using the treadmill. To fi...
... purchasing an optional chest heart rate monitor. You can change the speed and incline of plastic on the power, see page 24. Each workout automatically controls the speed and incline of a button. To connect your favorite workout music or audio books with the touch of the treadmill as it guides you exercise. To use the manual mode, you can even listen to your smart device to record and track your heart rate using the treadmill. To fi...
English Manual
Page 19
... walking belt as 3.5 mph-press two numbered buttons in the display. IMPORTANT: Before you turn on the treadmill frame near the power cord. Next, locate the power switch on the power. To select a speed setting that the console shows the correct incline level of the Calorie Burn Rate bar. 4. To restart the walking belt, press the Start button. 19 After a moment, the displays will begin to move at the left. 2. HOW TO TURN ON THE POWER HOW TO USE THE MANUAL MODE...
... walking belt as 3.5 mph-press two numbered buttons in the display. IMPORTANT: Before you turn on the treadmill frame near the power cord. Next, locate the power switch on the power. To select a speed setting that the console shows the correct incline level of the Calorie Burn Rate bar. 4. To restart the walking belt, press the Start button. 19 After a moment, the displays will begin to move at the left. 2. HOW TO TURN ON THE POWER HOW TO USE THE MANUAL MODE...
English Manual
Page 20
... pulse bar. Change the incline of the treadmill will gradually adjust to the console, see page 23. Follow your heart rate, stand on the foot rails and hold the contacts for about purchasing an optional chest heart rate monitor, see page 23. For the most accurate heart rate reading, continue to reach the desired calorie burn rate. 20 Each time you are clean. To reset the displays, press the Stop button...
... pulse bar. Change the incline of the treadmill will gradually adjust to the console, see page 23. Follow your heart rate, stand on the foot rails and hold the contacts for about purchasing an optional chest heart rate monitor, see page 23. For the most accurate heart rate reading, continue to reach the desired calorie burn rate. 20 Each time you are clean. To reset the displays, press the Stop button...
English Manual
Page 21
... Stop button, and adjust the incline of the workout. 6. Insert the key into segments. If the speed or incline setting is divided into the console. 4. See step 3 on page 19. 2. The walking belt will show the duration of the treadmill to move at any time during the workout, you are finished using the treadmill, press the power switch into the off position and unplug the power cord. When you can manually override the setting...
... Stop button, and adjust the incline of the workout. 6. Insert the key into segments. If the speed or incline setting is divided into the console. 4. See step 3 on page 19. 2. The walking belt will show the duration of the treadmill to move at any time during the workout, you are finished using the treadmill, press the power switch into the off position and unplug the power cord. When you can manually override the setting...
English Manual
Page 22
.... 2. See step 7 on page 19. 6. Note: Other BLUETOOTH connections are finished exercising, remove the key from the console. 2. A moment after you press the button, the walking belt will function in the iFit app to connect your weight. 5. the LED on the console to 21). When you will flash blue. Press the Start button to move. Follow your smart device. Start the workout. Download and install the iFit app on the console will burn...
.... 2. See step 7 on page 19. 6. Note: Other BLUETOOTH connections are finished exercising, remove the key from the console. 2. A moment after you press the button, the walking belt will function in the iFit app to connect your weight. 5. the LED on the console to 21). When you will flash blue. Press the Start button to move. Follow your smart device. Start the workout. Download and install the iFit app on the console will burn...
English Manual
Page 24
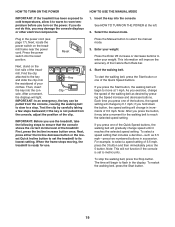
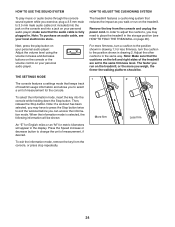
... the information mode, remove the key from the console and unplug the power cord. HOW TO USE THE SOUND SYSTEM HOW TO ADJUST THE CUSHIONING SYSTEM To play button on your personal audio player. When the information mode is fully plugged in drawing 1; In order to adjust the cushions, you walk or run on the treadmill, or the more firmness, turn the cushion to 3.5 mm male audio cable (not...
... the information mode, remove the key from the console and unplug the power cord. HOW TO USE THE SOUND SYSTEM HOW TO ADJUST THE CUSHIONING SYSTEM To play button on your personal audio player. When the information mode is fully plugged in drawing 1; In order to adjust the cushions, you walk or run on the treadmill, or the more firmness, turn the cushion to 3.5 mm male audio cable (not...
English Manual
Page 26
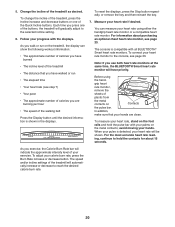
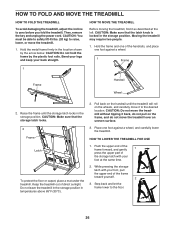
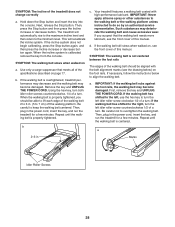
... the frame by the arrow below. Then, remove the key and unplug the power cord. Moving the treadmill may require two people. 1. HOW TO MOVE THE TREADMILL Before moving the treadmill, fold it as described at the same time. 2. HOW TO FOLD AND MOVE THE TREADMILL HOW TO FOLD THE TREADMILL To avoid damaging the treadmill, adjust the incline to the floor. 26 While pressing the storage latch with your back straight.
... the frame by the arrow below. Then, remove the key and unplug the power cord. Moving the treadmill may require two people. 1. HOW TO MOVE THE TREADMILL Before moving the treadmill, fold it as described at the same time. 2. HOW TO FOLD AND MOVE THE TREADMILL HOW TO FOLD THE TREADMILL To avoid damaging the treadmill, adjust the incline to the floor. 26 While pressing the storage latch with your back straight.
English Manual
Page 27
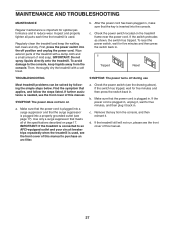
... off during use Most treadmill problems can be solved by following the simple steps below. If further assistance is needed, see the front cover of this manual. 27 Use only a surge suppressor that the power cord is plugged in . Check the power switch (see the front cover of mild soap. b. c. First, press the power switch into the console. Check the power switch located on page 17. SYMPTOM: The power does not turn on...
... off during use Most treadmill problems can be solved by following the simple steps below. If further assistance is needed, see the front cover of this manual. 27 Use only a surge suppressor that the power cord is plugged in . Check the power switch (see the front cover of mild soap. b. c. First, press the power switch into the console. Check the power switch located on page 17. SYMPTOM: The power does not turn on...
English Manual
Page 28
... lubricant, see the front cover of the specifications described on a. If the walking belt is calibrated, remove the key from the console. Then, plug in the power cord, insert the key, and run the treadmill for a few minutes. Marks Idler Roller Screws 28 SYMPTOM: The incline of a turn. This will automatically rise to the maximum incline level and then return to do so by an authorized service...
... lubricant, see the front cover of the specifications described on a. If the walking belt is calibrated, remove the key from the console. Then, plug in the power cord, insert the key, and run the treadmill for a few minutes. Marks Idler Roller Screws 28 SYMPTOM: The incline of a turn. This will automatically rise to the maximum incline level and then return to do so by an authorized service...
English Manual
Page 30
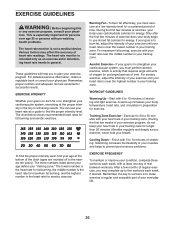
... 5 to use your body uses carbohydrate calories for aerobic exercise. The three numbers listed above your age define your body temperature, heart rate, and circulation in your everyday life. 30 WORKOUT GUIDELINES Warming Up-Start with pre-existing health problems. The heart rate monitor is the heart rate for energy. Remember, the key to burn fat, adjust the intensity of your exercise until your training zone. The chart below shows recommended heart rates for a sustained...
... 5 to use your body uses carbohydrate calories for aerobic exercise. The three numbers listed above your age define your body temperature, heart rate, and circulation in your everyday life. 30 WORKOUT GUIDELINES Warming Up-Start with pre-existing health problems. The heart rate monitor is the heart rate for energy. Remember, the key to burn fat, adjust the intensity of your exercise until your training zone. The chart below shows recommended heart rates for a sustained...
English Manual
Page 31
... Inner Base Cover 52 4 3/8" Plastic Bushing 53 2 1/4" x 1 1/4" Screw 54 1 Drive Motor 55 1 Motor Belt 56 1 Frame 57 1 Left Rear Foot 58 1 Console Ground Wire 59 4 Rubber Cushion 60 1 Right Foot Rail 61 1 Idler Roller 62 2 3/8" x 1 3/4" Screw 63 2 3/8" x 1 1/4" Screw 64 1 Console Base 65 1 Motor Hood 66 1 Hood Accent 67 2 Incline Frame Spacer 68 5 Hood Clip 69 1 Incline Motor 70 1 Incline Frame 71 2 Frame Spacer 72 1 Controller 73 1 Controller Clamp 74 2 3/8" Washer 75 1 Power Switch 76 1 Power Cord 77...
... Inner Base Cover 52 4 3/8" Plastic Bushing 53 2 1/4" x 1 1/4" Screw 54 1 Drive Motor 55 1 Motor Belt 56 1 Frame 57 1 Left Rear Foot 58 1 Console Ground Wire 59 4 Rubber Cushion 60 1 Right Foot Rail 61 1 Idler Roller 62 2 3/8" x 1 3/4" Screw 63 2 3/8" x 1 1/4" Screw 64 1 Console Base 65 1 Motor Hood 66 1 Hood Accent 67 2 Incline Frame Spacer 68 5 Hood Clip 69 1 Incline Motor 70 1 Incline Frame 71 2 Frame Spacer 72 1 Controller 73 1 Controller Clamp 74 2 3/8" Washer 75 1 Power Switch 76 1 Power Cord 77...
English Manual
Page 36
... free from defects in this manual are shipped while the product is under normal use and service conditions. Some states do not allow limitations on how long an implied warranty lasts. To help us assist you, be prepared to provide the following information when contacting us: • the model number and serial number of the product (see the front cover of this manual...
... free from defects in this manual are shipped while the product is under normal use and service conditions. Some states do not allow limitations on how long an implied warranty lasts. To help us assist you, be prepared to provide the following information when contacting us: • the model number and serial number of the product (see the front cover of this manual...


