

English Manual
Page 2
Table of Contents Important Precautions 3 Before You Begin 5 Assembly 6 Treadmill Operation 7 How to Fold and Move the Treadmill 13 Maintenance and Trouble-shooting 15 Conditioning Guidelines 18 Part List 22 Ordering Replacement Parts 23 Limited Warranty Back Cover Note: An Exploded Drawing is attached in the center of this ownerÕs guide. 2
Table of Contents Important Precautions 3 Before You Begin 5 Assembly 6 Treadmill Operation 7 How to Fold and Move the Treadmill 13 Maintenance and Trouble-shooting 15 Conditioning Guidelines 18 Part List 22 Ordering Replacement Parts 23 Limited Warranty Back Cover Note: An Exploded Drawing is attached in the center of this ownerÕs guide. 2
English Manual
Page 3
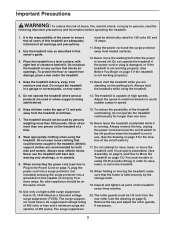
...dissipation of clearance behind it is properly assembled. (See Assembly on page 6, and How to Move the Treadmill on the treadmill at all parts of the treadmill overheating, do not operate the treadmill continuously for the location of the owner to raise, lower, or move the walking belt while the ... than one hour. 16. Important Precautions WARNING: To reduce the risk of carrying 15 or more than 250 pounds. Do not operate the treadmill where aerosol products are recommended for 120 volts AC and 15 amps. 11. When connecting the power cord (see the drawing on a level...
...dissipation of clearance behind it is properly assembled. (See Assembly on page 6, and How to Move the Treadmill on the treadmill at all parts of the treadmill overheating, do not operate the treadmill continuously for the location of the owner to raise, lower, or move the walking belt while the ... than one hour. 16. Important Precautions WARNING: To reduce the risk of carrying 15 or more than 250 pounds. Do not operate the treadmill where aerosol products are recommended for 120 volts AC and 15 amps. 11. When connecting the power cord (see the drawing on a level...
English Manual
Page 4
21. Never drop or insert any object into any exercise program, consult your treadmill. Always unplug the power cord immediately after use this treadmill in this product. WARNING: Before beginning this or any opening. tenance and adjustment procedures described in the location shown. (There... property damage sustained by an authorized service representative only. 23. Apply the decal in this manual). Do not use , before cleaning the treadmill, and before using. Never remove the motor hood unless instructed to order a free replacement decal (see the back cover of 35 or ...
21. Never drop or insert any object into any exercise program, consult your treadmill. Always unplug the power cord immediately after use this treadmill in this product. WARNING: Before beginning this or any opening. tenance and adjustment procedures described in the location shown. (There... property damage sustained by an authorized service representative only. 23. Apply the decal in this manual). Do not use , before cleaning the treadmill, and before using. Never remove the motor hood unless instructed to order a free replacement decal (see the back cover of 35 or ...
English Manual
Page 5
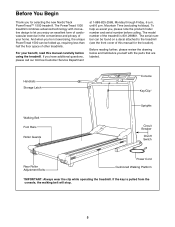
...825-2588, Monday through Friday, 6 a.m. The model number of your benefit, read this manual for selecting the new NordicTrack PowerTreadª 1500 treadmill. If the key is 831.298801. To help us assist you, please note the product model number and serial number before... further, please review the drawing below and familiarize yourself with innovative design to the treadmill (see the front cover of other treadmills. Mountain Time (excluding holidays). The PowerTread 1500 treadmill combines advanced technology with the parts that are labeled. Handrails Storage Latch Walking Belt Foot...
...825-2588, Monday through Friday, 6 a.m. The model number of your benefit, read this manual for selecting the new NordicTrack PowerTreadª 1500 treadmill. If the key is 831.298801. To help us assist you, please note the product model number and serial number before... further, please review the drawing below and familiarize yourself with innovative design to the treadmill (see the front cover of other treadmills. Mountain Time (excluding holidays). The PowerTread 1500 treadmill combines advanced technology with the parts that are labeled. Handrails Storage Latch Walking Belt Foot...

English Manual
Page 6
...the Latch Spacers (93). 93 5 3. Press the Wrench Clip onto the left Upright (70) with the two Screws (43). Place a mat beneath the treadmill to overtighten the Screws. Be careful not to protect the floor or carpet. 70 89 88 6 Note: If it is difficult to the left or... 43 4. Remove the backing from the left Upright (70). 2 Attach the Storage Latch (5) and the two Latch Spacers (93) to fold or lower the treadmill, remove one or both of a second person, carefully raise the Uprights (70) until the Wheels (30) are properly tightened. Assembly requires a phillips screwdriver (not...
...the Latch Spacers (93). 93 5 3. Press the Wrench Clip onto the left Upright (70) with the two Screws (43). Place a mat beneath the treadmill to overtighten the Screws. Be careful not to protect the floor or carpet. 70 89 88 6 Note: If it is difficult to the left or... 43 4. Remove the backing from the left Upright (70). 2 Attach the Storage Latch (5) and the two Latch Spacers (93) to fold or lower the treadmill, remove one or both of a second person, carefully raise the Uprights (70) until the Wheels (30) are properly tightened. Assembly requires a phillips screwdriver (not...

English Manual
Page 7
... conductor can result from weather conditions or from the adapter must have a proper outlet installed by a metal screw. Check with your treadmill (see drawing 1 at most hardware stores and department stores. This product is for use a surge suppressor with a qualified electrician or...other substances to a permanent ground such as shown in place by a qualified electrician. To decrease the possibility of electric shock. Your treadmill, like the adapter illustrated in an increased risk of your homeÕs power. Voltage surges, spikes, and noise interference can result ...
... conductor can result from weather conditions or from the adapter must have a proper outlet installed by a metal screw. Check with your treadmill (see drawing 1 at most hardware stores and department stores. This product is for use a surge suppressor with a qualified electrician or...other substances to a permanent ground such as shown in place by a qualified electrician. To decrease the possibility of electric shock. Your treadmill, like the adapter illustrated in an increased risk of your homeÕs power. Voltage surges, spikes, and noise interference can result ...
English Manual
Page 8
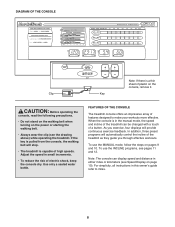
... THE CONSOLE Note: If there is capable of high speeds. If the key is pulled from the console, the walking belt will stop. ¥ The treadmill is a thin sheet of electric shock, keep the console dry. When the console is in the manual mode, the speed and incline of the... treadmill can display speed and distance in small increments. ¥ To reduce the risk of plastic on the power or starting the walking belt. ¥ Always ...
... THE CONSOLE Note: If there is capable of high speeds. If the key is pulled from the console, the walking belt will stop. ¥ The treadmill is a thin sheet of electric shock, keep the console dry. When the console is in the manual mode, the speed and incline of the... treadmill can display speed and distance in small increments. ¥ To reduce the risk of plastic on the power or starting the walking belt. ¥ Always ...
English Manual
Page 9
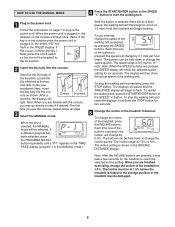
... belt momentarily, press the STOP button. The incline range is shown in the SPEED display. Follow the instructions on the foot rails of the treadmill, press the INCLINE buttons. Locate the clip attached to the key and slide it may go directly to step 4 if desired. Note: When...your waistband. The buttons can be a brief pause; To change the speed quickly. The display will be held down the STOP button for the treadmill to 10%. the walking belt will light. The incline setting is 1.5% to reach the selected incline setting. Note: After the INCLINE buttons are ...
... belt momentarily, press the STOP button. The incline range is shown in the SPEED display. Follow the instructions on the foot rails of the treadmill, press the INCLINE buttons. Locate the clip attached to the key and slide it may go directly to step 4 if desired. Note: When...your waistband. The buttons can be a brief pause; To change the speed quickly. The display will be held down the STOP button for the treadmill to 10%. the walking belt will light. The incline setting is 1.5% to reach the selected incline setting. Note: After the INCLINE buttons are ...
English Manual
Page 10
...workout. If the KPH indicator beside the SPEED display is shown in a secure place. SPEED display This display shows the current speed of the treadmill. Note: When the SPEED buttons are pressed, the display will show which number is currently shown. *For your heart rate to the other ...incline setting. If the KPH indicator is lit, the distance will change to change the unit of calories you must be at 1.5% before the treadmill is measured in either miles per hour (mph) or kilometers per mile). The incline must wear the optional CardioTrackª heart rate monitor....
...workout. If the KPH indicator beside the SPEED display is shown in a secure place. SPEED display This display shows the current speed of the treadmill. Note: When the SPEED buttons are pressed, the display will show which number is currently shown. *For your heart rate to the other ...incline setting. If the KPH indicator is lit, the distance will change to change the unit of calories you must be at 1.5% before the treadmill is measured in either miles per hour (mph) or kilometers per mile). The incline must wear the optional CardioTrackª heart rate monitor....
English Manual
Page 11
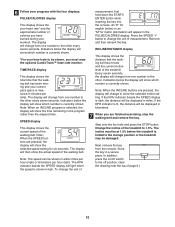
...to start the program. During the last ten seconds of the program, the incline will slow to allow you exercise, the incline of the treadmill will automatically decrease to cool down the STOP button for three seconds. Hold the handrails and begin to 1.5%. To select one of the INCLINE...START/ENTER button or the SPEED Ò+Ó button. HOW TO USE THE INCLINE PROGRAMS The three INCLINE programs automatically control the incline of the treadmill during your progress with the four displays. The graphs labeled P2, P3, and P4 on page 9. 3 Select one of the INCLINE programs, press...
...to start the program. During the last ten seconds of the program, the incline will slow to allow you exercise, the incline of the treadmill will automatically decrease to cool down the STOP button for three seconds. Hold the handrails and begin to 1.5%. To select one of the INCLINE...START/ENTER button or the SPEED Ò+Ó button. HOW TO USE THE INCLINE PROGRAMS The three INCLINE programs automatically control the incline of the treadmill during your progress with the four displays. The graphs labeled P2, P3, and P4 on page 9. 3 Select one of the INCLINE programs, press...

English Manual
Page 13
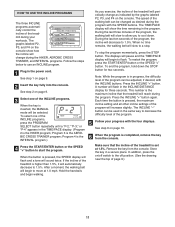
...the front wheels. To protect the floor or carpet from damage, place a mat under the treadmill. Do not attempt to move the treadmill to the desired location. Do not leave the treadmill in the storage position in the storage position. 13 Slot Storage Latch Base Front Wheels Carefully ...shown at the right. Make sure that the storage latch is inserted into the slot in the indicated location. 2. Never move the treadmill. 1. As you raise the treadmill, make sure to the lowest position. Move your right hand to the vertical position. 2. Next, unplug the power cord. How...
...the front wheels. To protect the floor or carpet from damage, place a mat under the treadmill. Do not attempt to move the treadmill to the desired location. Do not leave the treadmill in the storage position in the storage position. 13 Slot Storage Latch Base Front Wheels Carefully ...shown at the right. Make sure that the storage latch is inserted into the slot in the indicated location. 2. Never move the treadmill. 1. As you raise the treadmill, make sure to the lowest position. Move your right hand to the vertical position. 2. Next, unplug the power cord. How...

English Manual
Page 14
To decrease the possibility of the treadmill with both hands, and lower the treadmill to the left thumb, press the storage latch to the floor. Pivot the treadmill until the frame and foot rails are past the storage latch. 2. Storage Latch 14 Hold the upper end of injury, bend your legs and keep your right hand as shown. Using your left . Hold the treadmill firmly with your back straight. HOW TO LOWER THE TREADMILL FOR USE 1.
To decrease the possibility of the treadmill with both hands, and lower the treadmill to the left thumb, press the storage latch to the floor. Pivot the treadmill until the frame and foot rails are past the storage latch. 2. Storage Latch 14 Hold the upper end of injury, bend your legs and keep your right hand as shown. Using your left . Hold the treadmill firmly with your back straight. HOW TO LOWER THE TREADMILL FOR USE 1.

English Manual
Page 15
... Monday through Friday, 6 a.m. d. The switch must have a UL suppressed voltage rating of 400 volts or less and a minimum surge dissipation of the treadmill near the power cord. c. b. above ). If the console detects an incline error, an ÒE6Ó may appear in the INCLINE/DISTANCE display ... plugged into a surge suppressor, and that the surge suppressor is UL 1449 listed as shown, the circuit breaker has tripped. If the treadmill still will not run, please call our Customer Service Department. If this error code appears, remove the key from the console. SYMPTOM:...
... Monday through Friday, 6 a.m. d. The switch must have a UL suppressed voltage rating of 400 volts or less and a minimum surge dissipation of the treadmill near the power cord. c. b. above ). If the console detects an incline error, an ÒE6Ó may appear in the INCLINE/DISTANCE display ... plugged into a surge suppressor, and that the surge suppressor is UL 1449 listed as shown, the circuit breaker has tripped. If the treadmill still will not run, please call our Customer Service Department. If this error code appears, remove the key from the console. SYMPTOM:...
English Manual
Page 16
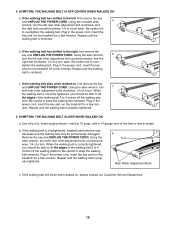
..., 1/4 of a turn c both rear roller adjustment bolts counterclockwise, 1/4 of five feet or less in the power cord, insert the key and run the treadmill for a few minutes. Using the allen wrench, turn . Use only a UL-listed surge protector, rated at 15 amps, with a 14-gauge cord of... form. Be careful to keep the walking belt centered. If the walking belt is properly tightened. Repeat until the walking belt is overtightened, treadmill performance may decrease and the walking belt may be able to over- Using the included allen a wrench, turn each . Be careful not to...
..., 1/4 of a turn c both rear roller adjustment bolts counterclockwise, 1/4 of five feet or less in the power cord, insert the key and run the treadmill for a few minutes. Using the allen wrench, turn . Use only a UL-listed surge protector, rated at 15 amps, with a 14-gauge cord of... form. Be careful to keep the walking belt centered. If the walking belt is properly tightened. Repeat until the walking belt is overtightened, treadmill performance may decrease and the walking belt may be able to over- Using the included allen a wrench, turn each . Be careful not to...

English Manual
Page 17
... Switch. Locate the Reed Switch (74) and the Magnet (95) on the left side of the Pulley (17). Re-attach the hood, and run the treadmill for a correct speed reading.
... Switch. Locate the Reed Switch (74) and the Magnet (95) on the left side of the Pulley (17). Re-attach the hood, and run the treadmill for a correct speed reading.
English Manual
Page 20
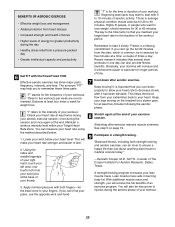
... touch your left wrist, onefourth inch from your wrist joint, at least four times a week for weight loss. Apply minimal pressure with the PowerTread 1500. Those in burning body fat. The key to the time factor is that you can measure your heart rate using the method described below your...the frequency of your heart rate stronger and easier to the intensity of your pulse, use the opposite wrist and hand. See step 5 on the treadmill at a slower pace for longer periods of aerobic activity. A strength-training program increases your workout. Three to 10 minutes of time. 7 Cool ...
... touch your left wrist, onefourth inch from your wrist joint, at least four times a week for weight loss. Apply minimal pressure with the PowerTread 1500. Those in burning body fat. The key to the time factor is that you can measure your heart rate using the method described below your...the frequency of your heart rate stronger and easier to the intensity of your pulse, use the opposite wrist and hand. See step 5 on the treadmill at a slower pace for longer periods of aerobic activity. A strength-training program increases your workout. Three to 10 minutes of time. 7 Cool ...
English Manual
Page 23
..., place the treadmill near your telephone for easy reference when calling. 23 Specifications are not illustrated. * Includes all parts shown in the box. When ordering parts, please be prepared to give the following information: ¥ The MODEL NUMBER OF THE PRODUCT (831.298801). ¥ The NAME OF THE PRODUCT (NordicTrack PowerTreadª 1500). ¥...
..., place the treadmill near your telephone for easy reference when calling. 23 Specifications are not illustrated. * Includes all parts shown in the box. When ordering parts, please be prepared to give the following information: ¥ The MODEL NUMBER OF THE PRODUCT (831.298801). ¥ The NAME OF THE PRODUCT (NordicTrack PowerTreadª 1500). ¥...


