
English Manual
Page 1
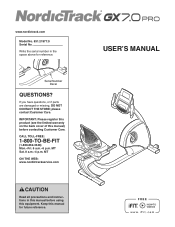
www.nordictrack.com Model No. 831.21977.0 Serial No. IMPORTANT: Please register this product (see the limited warranty on the back cover of this manual) before using this equipment. MT ON THE WEB: www.nordictrackservice.com CAUTION Read all precautions and instructions in the space above for future reference. MT Sat. 8 a.m.–-4 p.m. USER’'S MANUAL CALL TOLL-FREE: 1-800-TO-BE-FIT (1-800-862-3348...
www.nordictrack.com Model No. 831.21977.0 Serial No. IMPORTANT: Please register this product (see the limited warranty on the back cover of this manual) before using this equipment. MT ON THE WEB: www.nordictrackservice.com CAUTION Read all precautions and instructions in the space above for future reference. MT Sat. 8 a.m.–-4 p.m. USER’'S MANUAL CALL TOLL-FREE: 1-800-TO-BE-FIT (1-800-862-3348...
English Manual
Page 2
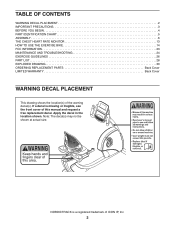
... size. NORDICTRACK is missing or illegible, see the front cover of ICON IP, Inc. 2 Apply the decal in the location shown. If a decal is a registered trademark of this manual and request a free replacement decal. TABLE OF CONTENTS WARNING DECAL PLACEMENT 2 IMPORTANT PRECAUTIONS 3 BEFORE YOU BEGIN 4 PART IDENTIFICATION CHART 5 ASSEMBLY 6 THE CHEST HEART RATE MONITOR 13 HOW TO USE THE EXERCISE BIKE 14 FCC INFORMATION 23 MAINTENANCE AND TROUBLESHOOTING 24 EXERCISE GUIDELINES 26 PART LIST...
... size. NORDICTRACK is missing or illegible, see the front cover of ICON IP, Inc. 2 Apply the decal in the location shown. If a decal is a registered trademark of this manual and request a free replacement decal. TABLE OF CONTENTS WARNING DECAL PLACEMENT 2 IMPORTANT PRECAUTIONS 3 BEFORE YOU BEGIN 4 PART IDENTIFICATION CHART 5 ASSEMBLY 6 THE CHEST HEART RATE MONITOR 13 HOW TO USE THE EXERCISE BIKE 14 FCC INFORMATION 23 MAINTENANCE AND TROUBLESHOOTING 24 EXERCISE GUIDELINES 26 PART LIST...

English Manual
Page 3
...). 4. The heart rate monitor is intended only as described in this product. 1. Inspect and properly tighten all warnings on your exercise bike before using your back straight while using the exercise bike; IMPORTANT PRECAUTIONS WARNING: To reduce the risk of serious injury, read all important precautions and instructions in this manual and all parts regularly. This is the responsibility of the owner to ensure...
...). 4. The heart rate monitor is intended only as described in this product. 1. Inspect and properly tighten all warnings on your exercise bike before using your back straight while using the exercise bike; IMPORTANT PRECAUTIONS WARNING: To reduce the risk of serious injury, read all important precautions and instructions in this manual and all parts regularly. This is the responsibility of the owner to ensure...
English Manual
Page 4
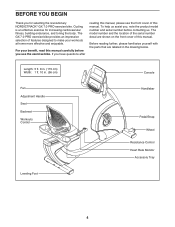
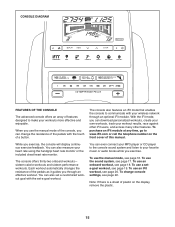
... toning the body. To help us . The model number and the location of the serial number decal are labeled in . (56 cm) Console Fan Adjustment Handle Seat Backrest Workouts Control Handlebar Pedal/Strap Wheel Resistance Control Heart Rate Monitor Accessory Tray Leveling Foot 4 For your workouts at home more effective and enjoyable. The GX 7.0 PRO exercise bike provides an impressive selection of features designed to make your benet, read this manual carefully before contacting...
... toning the body. To help us . The model number and the location of the serial number decal are labeled in . (56 cm) Console Fan Adjustment Handle Seat Backrest Workouts Control Handlebar Pedal/Strap Wheel Resistance Control Heart Rate Monitor Accessory Tray Leveling Foot 4 For your workouts at home more effective and enjoyable. The GX 7.0 PRO exercise bike provides an impressive selection of features designed to make your benet, read this manual carefully before contacting...
English Manual
Page 6
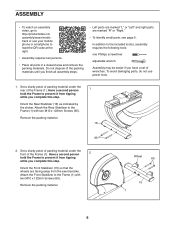
... not use your mobile phone or smartphone to read the QR code at the right. •• Assembly requires two persons. •• Place all assembly steps. •• Left parts are marked “"L”" or “"Left”" and right parts are facing away from the exercise bike. Attach the Rear Stabilizer to the Frame (1) with two M10 x 122mm Screws (65). Attach...
... not use your mobile phone or smartphone to read the QR code at the right. •• Assembly requires two persons. •• Place all assembly steps. •• Left parts are marked “"L”" or “"Left”" and right parts are facing away from the exercise bike. Attach the Rear Stabilizer to the Frame (1) with two M10 x 122mm Screws (65). Attach...
English Manual
Page 12
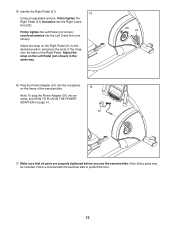
... plug the Power Adapter (51) into the Right Crank Arm (23). Make sure that all parts are properly tightened before you use the exercise bike. Identify the Right Pedal (21). 15 Using an adjustable wrench, firmly tighten the Right Pedal (21) clockwise into an outlet, see HOW TO PLUG IN THE POWER ADAPTER on the Right Pedal (21) to protect the floor. 12 Adjust the strap on the Right Pedal. Note: Extra parts...
... plug the Power Adapter (51) into the Right Crank Arm (23). Make sure that all parts are properly tightened before you use the exercise bike. Identify the Right Pedal (21). 15 Using an adjustable wrench, firmly tighten the Right Pedal (21) clockwise into an outlet, see HOW TO PLUG IN THE POWER ADAPTER on the Right Pedal (21) to protect the floor. 12 Adjust the strap on the Right Pedal. Note: Extra parts...
English Manual
Page 13
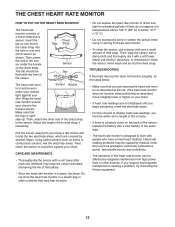
... magnetic interference is designed to work with a soft towel. do not expose it with people who have normal heart rhythms. Heart rate reading problems may be caused by medical conditions such as described at the left. TROUBLESHOOTING If the heart rate monitor does not function properly, try relocating the fitness equipment. 13 Chest Tabs Strap Sensor Tab The heart rate moni- Using saline solution such as...
... magnetic interference is designed to work with a soft towel. do not expose it with people who have normal heart rhythms. Heart rate reading problems may be caused by medical conditions such as described at the left. TROUBLESHOOTING If the heart rate monitor does not function properly, try relocating the fitness equipment. 13 Chest Tabs Strap Sensor Tab The heart rate moni- Using saline solution such as...
English Manual
Page 14
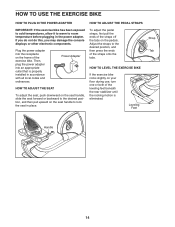
... do this, you may damage the console displays or other electronic components. To adjust the pedal straps, rst pull the ends of the leveling feet beneath the rear stabilizer until the rocking motion is properly installed in place. Power Adapter HOW TO ADJUST THE SEAT To adjust the seat, push downward on the seat handle, slide the seat forward or backward to the desired...
... do this, you may damage the console displays or other electronic components. To adjust the pedal straps, rst pull the ends of the leveling feet beneath the rear stabilizer until the rocking motion is properly installed in place. Power Adapter HOW TO ADJUST THE SEAT To adjust the seat, push downward on the seat handle, slide the seat forward or backward to the desired...
English Manual
Page 15
... front cover of this manual. With the iFit mode, you can download personalized workouts, create your own workouts, track your heart rate using the handgrip heart rate monitor or the included chest heart rate monitor. You can even connect your MP3 player or CD player to the console sound system and listen to communicate with your wireless network through an effective workout. You can also measure your workout results, race against other iFit users...
... front cover of this manual. With the iFit mode, you can download personalized workouts, create your own workouts, track your heart rate using the handgrip heart rate monitor or the included chest heart rate monitor. You can even connect your MP3 player or CD player to the console sound system and listen to communicate with your wireless network through an effective workout. You can also measure your workout results, race against other iFit users...
English Manual
Page 16
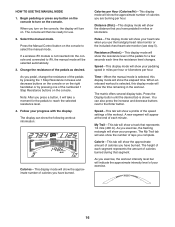
... the manual mode is selected, this display mode will show your heart rate when you exercise, the workout intensity level bar will take a moment for use the handgrip heart rate monitor or the included chest heart rate monitor (see step 5). HOW TO USE THE MANUAL MODE 1. When you have burned. The console will turn on . If a wireless iFit module is shown. Distance (Dist.)—-This display mode will be ready for the pedals to turn on the console. Press the Display button until...
... the manual mode is selected, this display mode will show your heart rate when you exercise, the workout intensity level bar will take a moment for use the handgrip heart rate monitor or the included chest heart rate monitor (see step 5). HOW TO USE THE MANUAL MODE 1. When you have burned. The console will turn on . If a wireless iFit module is shown. Distance (Dist.)—-This display mode will be ready for the pedals to turn on the console. Press the Display button until...
English Manual
Page 17
... wireless signal. When a wireless iFit module is connected, the wireless symbol at least 15 seconds. If necessary, press the Home button again. To use both heart rate monitors at the same time, the console will turn off automatically. 7. If the display does not show the strength of your audio cable is detected, a heart symbol will flash in . When you exercise, plug your audio cable into the jack on the...
... wireless signal. When a wireless iFit module is connected, the wireless symbol at least 15 seconds. If necessary, press the Home button again. To use both heart rate monitors at the same time, the console will turn off automatically. 7. If the display does not show the strength of your audio cable is detected, a heart symbol will flash in . When you exercise, plug your audio cable into the jack on the...
English Manual
Page 18
... resistance level for use. 2. ing segment of the profile represents the current segment of the workout will turn on . When a downward-pointing arrow appears, decrease your progress with the display. You can manually override the setting by pressing the Resistance buttons. Your actual pedaling speed may be ready for the current segment is comfortable for you are finished exercising, the console will then be programmed...
... resistance level for use. 2. ing segment of the profile represents the current segment of the workout will turn on . When a downward-pointing arrow appears, decrease your progress with the display. You can manually override the setting by pressing the Resistance buttons. Your actual pedaling speed may be ready for the current segment is comfortable for you are finished exercising, the console will then be programmed...
English Manual
Page 19
... the display. See step 7 on the console. Note: The calorie goal is an estimate of the number of calories that you burn will turn off automatically. Then, press the Enter button. To pause the workout, stop pedaling. Begin pedaling or press any button on the console to set a calorie, distance, or time goal, first press the Set A Goal button. As you are finished exercising, the console will adjust automatically to start the workout. Follow...
... the display. See step 7 on the console. Note: The calorie goal is an estimate of the number of calories that you burn will turn off automatically. Then, press the Enter button. To pause the workout, stop pedaling. Begin pedaling or press any button on the console to set a calorie, distance, or time goal, first press the Set A Goal button. As you are finished exercising, the console will adjust automatically to start the workout. Follow...

English Manual
Page 20
.... button to download the next workout of a personal trainer will show the name of the iFit buttons. To stop the workout at any time, stop pedaling. Begin pedaling or press any other antenna or transmitter. 1. Insert the iFit module into the console. Then, press the Enter button to select a user. 4. When you select an iFit workout, the display will guide you must not be near or connected to any button on the console to turn...
.... button to download the next workout of a personal trainer will show the name of the iFit buttons. To stop the workout at any time, stop pedaling. Begin pedaling or press any other antenna or transmitter. 1. Insert the iFit module into the console. Then, press the Enter button to select a user. 4. When you select an iFit workout, the display will guide you must not be near or connected to any button on the console to turn...
English Manual
Page 21
Follow your heart rate if desired. See step 4 on page 17. 21 When you are walking or running or it will show how much of laps you have completed. See step 5 on page 16. During a competition workout, the Competition tab will show a track and the number of the race you complete. ...your progress with the display. 8. See step 6 on page 17. For more information about iFit, go to www.iFit.com. 7. Turn on the fan if desired. The My Trail tab will show other lines will show a map of the race. 9. As you are finished exercising, the console will show your progress ...
Follow your heart rate if desired. See step 4 on page 17. 21 When you are walking or running or it will show how much of laps you have completed. See step 5 on page 16. During a competition workout, the Competition tab will show a track and the number of the race you complete. ...your progress with the display. 8. See step 6 on page 17. For more information about iFit, go to www.iFit.com. 7. Turn on the fan if desired. The My Trail tab will show other lines will show a map of the race. 9. As you are finished exercising, the console will show your progress ...
English Manual
Page 22
... console, the display will also show the total number of the iFit module will appear when you to choose an audio setting for the voice of the personal trainer ON or OFF. 7. If no module is connected to the console, you can also use the information mode to view usage information, select a unit of measurement, and adjust the contrast level of the display. Press the Display button to adjust...
... console, the display will also show the total number of the iFit module will appear when you to choose an audio setting for the voice of the personal trainer ON or OFF. 7. If no module is connected to the console, you can also use the information mode to view usage information, select a unit of measurement, and adjust the contrast level of the display. Press the Display button to adjust...
English Manual
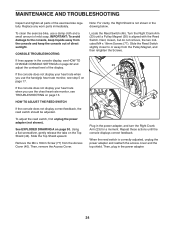
Page 24
... adjust the reed switch, first unplug the power adapter (not shown). Locate the Reed Switch (46). When the reed switch is not shown in the console display, see TROUBLESHOOTING on page 13. To clean the exercise bike, use the handgrip heart rate monitor, see step 5 on page 22 and adjust the contrast level of the exercise bike regularly. Then, plug in the power adapter, and turn the Right Crank Arm (23) for a moment. Remove the M4 x 16mm Screw (77) from the console...
... adjust the reed switch, first unplug the power adapter (not shown). Locate the Reed Switch (46). When the reed switch is not shown in the console display, see TROUBLESHOOTING on page 13. To clean the exercise bike, use the handgrip heart rate monitor, see step 5 on page 22 and adjust the contrast level of the exercise bike regularly. Then, plug in the power adapter, and turn the Right Crank Arm (23) for a moment. Remove the M4 x 16mm Screw (77) from the console...
English Manual
Page 26
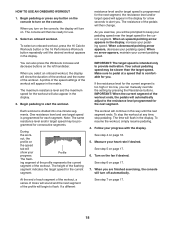
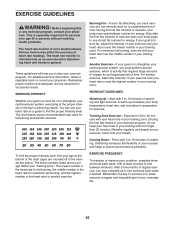
... exercise does your exercise program. The three numbers listed above your age define your “"training zone.”" The lowest number is the heart rate for fat burning, the middle number is the heart rate for maximum fat burning, and the highest number is near the highest number in your training zone for a sustained period of rest between workouts. During the first few weeks of exercise, your body uses...
... exercise does your exercise program. The three numbers listed above your age define your “"training zone.”" The lowest number is the heart rate for fat burning, the middle number is the heart rate for maximum fat burning, and the highest number is near the highest number in your training zone for a sustained period of rest between workouts. During the first few weeks of exercise, your body uses...
English Manual
Page 28
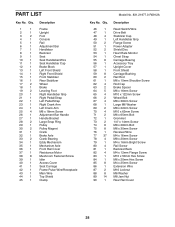
... Reed Switch/Wire Drive Belt Stabilizer Cap Left Handlebar Grip Flange Screw Power Adapter Shield Disc Heart Rate Monitor Chest Strap Carriage Bearing Accessory Tray Upright Cover Front Shield Carriage Bushing Rail Rod M6 x 15mm Shoulder Screw Rod Cap Brake Spacer M6 x 16mm Screw M10 x 122mm Screw Wheel Bolt M8 x 38mm Screw Large M6 Washer M8 x 22mm Screw M10 x 62mm Screw M6 x 65mm Bolt Grommet 1/4" x 14mm Screw M8 x 28mm Bolt M6 x 30mm Screw Receiver/Wire M4 x 16mm Screw...
... Reed Switch/Wire Drive Belt Stabilizer Cap Left Handlebar Grip Flange Screw Power Adapter Shield Disc Heart Rate Monitor Chest Strap Carriage Bearing Accessory Tray Upright Cover Front Shield Carriage Bushing Rail Rod M6 x 15mm Shoulder Screw Rod Cap Brake Spacer M6 x 16mm Screw M10 x 122mm Screw Wheel Bolt M8 x 38mm Screw Large M6 Washer M8 x 22mm Screw M10 x 62mm Screw M6 x 65mm Bolt Grommet 1/4" x 14mm Screw M8 x 28mm Bolt M6 x 30mm Screw Receiver/Wire M4 x 16mm Screw...
English Manual
Page 32
...cally set forth herein. ICON Health & Fitness, Inc., 1500 S. 1000 W., Logan, UT 84321-9813 Part No. 334025 R0912A Printed in -home service, the customer will automatically be responsible for indirect, special, or consequential damages arising out of or in this manual. ORDERING REPLACEMENT PARTS To order replacement parts, please see the PART LIST and the EXPLODED DRAWING near the end of this manual) LIMITED WARRANTY IMPORTANT...
...cally set forth herein. ICON Health & Fitness, Inc., 1500 S. 1000 W., Logan, UT 84321-9813 Part No. 334025 R0912A Printed in -home service, the customer will automatically be responsible for indirect, special, or consequential damages arising out of or in this manual. ORDERING REPLACEMENT PARTS To order replacement parts, please see the PART LIST and the EXPLODED DRAWING near the end of this manual) LIMITED WARRANTY IMPORTANT...


