
English Manual
Page 1
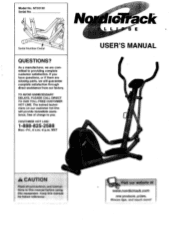
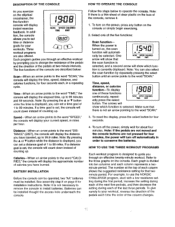
..., free of charge to you have questions, or if there are missing parts, we are committed to providing complete customer satisfaction. The trained technicians on our customer hot line will guarantee complete satisfaction through direct assistance from our factory. NT33130 Serial No. 0 Serial Number Decal QUESTIONS? MST 0' L L USER'S MANUAL fb A CAUTION Read'all precautions and instructions in'this manual before using this manual...
..., free of charge to you have questions, or if there are missing parts, we are committed to providing complete customer satisfaction. The trained technicians on our customer hot line will guarantee complete satisfaction through direct assistance from our factory. NT33130 Serial No. 0 Serial Number Decal QUESTIONS? MST 0' L L USER'S MANUAL fb A CAUTION Read'all precautions and instructions in'this manual before using this manual...

English Manual
Page 2
er L L TABLE OF CONTENTS IMPORTANT PRECAUTIONS BEFORE YOU BEGIN ASSEMBLY HOW TO USE THE ELLIPTICAL CROSSTRAINER MAINTENANCE AND TROUBLE-SHOOTING CONDITIONING GUIDELINES PART LIST EXPLODED DRAWING HOW TO ORDER REPLACEMENT PARTS LIMITED WARRANTY 3 4 - 5 9 11 12 14 15 Back Cover Back Cover 2
er L L TABLE OF CONTENTS IMPORTANT PRECAUTIONS BEFORE YOU BEGIN ASSEMBLY HOW TO USE THE ELLIPTICAL CROSSTRAINER MAINTENANCE AND TROUBLE-SHOOTING CONDITIONING GUIDELINES PART LIST EXPLODED DRAWING HOW TO ORDER REPLACEMENT PARTS LIMITED WARRANTY 3 4 - 5 9 11 12 14 15 Back Cover Back Cover 2
English Manual
Page 3
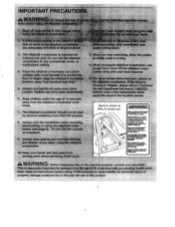
... not use the elliptical crosstrainer in this manual before beginning arty cords, entera cruet yule doctor or born PROSES40•101. Stop eterelorng .1 once lf ru w riters pain. Set ro eerier on a not ref retro elth error creersere on a level surface, with pre-existing health prob. IMPORTANT PRECAUTIONS AWARNING - Do not use the console as a support. `rty 9 Always wear appropriate exercise clothing , and...
... not use the elliptical crosstrainer in this manual before beginning arty cords, entera cruet yule doctor or born PROSES40•101. Stop eterelorng .1 once lf ru w riters pain. Set ro eerier on a not ref retro elth error creersere on a level surface, with pre-existing health prob. IMPORTANT PRECAUTIONS AWARNING - Do not use the console as a support. `rty 9 Always wear appropriate exercise clothing , and...
English Manual
Page 4
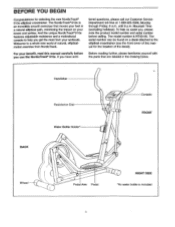
... moves your benefit, read this manual for selecting the new NordicTrace 910e elliptical crosstrainer. BACK Wheel Handlebar Resistance Dial Water Bottle Holder* Console FRONT O 0 RIGHT SIDE 0 Pedal Arm Pedal *No water bottle is NT33130. BEFORE YOU BEGIN Congratulations for the location of natural, ellipticalmotion exercise from your knees and ankles. For your feet in the drawing below. The model number is included 4 If you use...
... moves your benefit, read this manual for selecting the new NordicTrace 910e elliptical crosstrainer. BACK Wheel Handlebar Resistance Dial Water Bottle Holder* Console FRONT O 0 RIGHT SIDE 0 Pedal Arm Pedal *No water bottle is NT33130. BEFORE YOU BEGIN Congratulations for the location of natural, ellipticalmotion exercise from your knees and ankles. For your feet in the drawing below. The model number is included 4 If you use...
English Manual
Page 5
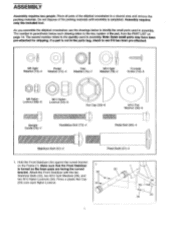
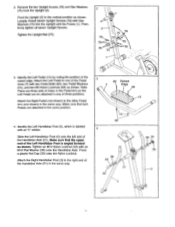
... only the included tool. Do not dispose of the elliptical crosstrainer in the parts bag, check to the key number of the part, from the PART LIST on the Frame (1). The second number refers to identify the small parts used in assembly. a- 34 7 33 34 The number in parenthesis below to the quantity used in assembly. Hold the Front Stabilizer (30) against the curved bracket...
... only the included tool. Do not dispose of the elliptical crosstrainer in the parts bag, check to the key number of the part, from the PART LIST on the Frame (1). The second number refers to identify the small parts used in assembly. a- 34 7 33 34 The number in parenthesis below to the quantity used in assembly. Hold the Front Stabilizer (30) against the curved bracket...
English Manual
Page 6
... three positions. Identify the Left Pedal (13) by noting the position of the Handlebar Axle (21). Press a plastic Nut Cap (33) onto the Nylon Locknut. Then, firmly tighten all seven Upright Screws. Make sure that both Pedals are three sets of the Pedal Arms (7) with an M10 Flat Washer... 21 33 5 Attach the Left Pedal to the other Pedal Arm (not shown) in any of the Handlebar Axle (21) in the same position. 4. 2. Tighten an M10 Nylon Locknut (34) with two Pedal Bolts (69), two Pedal Washers (72), and two M6 Nylon Locknuts (68) as shown. Tighten the Upright Nut (77)....
... three positions. Identify the Left Pedal (13) by noting the position of the Handlebar Axle (21). Press a plastic Nut Cap (33) onto the Nylon Locknut. Then, firmly tighten all seven Upright Screws. Make sure that both Pedals are three sets of the Pedal Arms (7) with an M10 Flat Washer... 21 33 5 Attach the Left Pedal to the other Pedal Arm (not shown) in any of the Handlebar Axle (21) in the same position. 4. 2. Tighten an M10 Nylon Locknut (34) with two Pedal Bolts (69), two Pedal Washers (72), and two M6 Nylon Locknuts (68) as shown. Tighten the Upright Nut (77)....
English Manual
Page 7
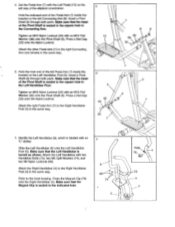
... Shaft (6) through both parts. Press a Nut Cap (33) onto the Nylon Locknut. Identify the Left Handlebar (6), which is seated in the square hole in the same way. Press a Nut Cap (33) onto the Nylon Locknut. Hold the front end of the left Connecting Arm (8). Tighten an M10 Nylon Locknut (34) with two Handlebar Bolts (73), two M5 Split...
... Shaft (6) through both parts. Press a Nut Cap (33) onto the Nylon Locknut. Identify the Left Handlebar (6), which is seated in the square hole in the same way. Press a Nut Cap (33) onto the Nylon Locknut. Hold the front end of the left Connecting Arm (8). Tighten an M10 Nylon Locknut (34) with two Handlebar Bolts (73), two M5 Split...
English Manual
Page 8
... may be left over after assembly is included. 19 9 Insert batteries nl. 2 2 80 19 10. To protect the floor or carpet from damage, place a mat under the elliptical crosstrainer. Next, insert the two batteries into the Console. Attach the Console (14) to the Upright (2) with three Console Screws (19). 9. To install the batteries, first turn the Console face down 8 and remove the Battery Cover (15) as shown in...
... may be left over after assembly is included. 19 9 Insert batteries nl. 2 2 80 19 10. To protect the floor or carpet from damage, place a mat under the elliptical crosstrainer. Next, insert the two batteries into the Console. Attach the Console (14) to the Upright (2) with three Console Screws (19). 9. To install the batteries, first turn the Console face down 8 and remove the Battery Cover (15) as shown in...
English Manual
Page 9
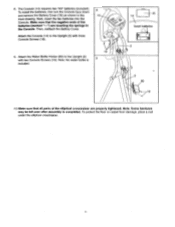
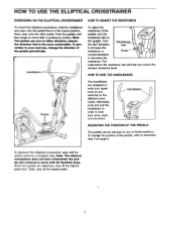
... adjusted to your arms, back, and shoulders. To change the direction of the pedals, tum the L=:7 .!:==7.1§" resistance dial on page 6. 0 To dismount the elliptical crosstrainer, wait until the pedals come to move until they begin to a complete stop. Note: The elliptical crosstrainer does not have a freewheel; Push the pedals until the flywheel stops. To give variety to any of the pedals, refer to assembly step 3 on the upright. ADJUSTING...
... adjusted to your arms, back, and shoulders. To change the direction of the pedals, tum the L=:7 .!:==7.1§" resistance dial on page 6. 0 To dismount the elliptical crosstrainer, wait until the pedals come to move until they begin to a complete stop. Note: The elliptical crosstrainer does not have a freewheel; Push the pedals until the flywheel stops. To give variety to any of the pedals, refer to assembly step 3 on the upright. ADJUSTING...
English Manual
Page 10
... distance is not necessary to remove the console to install batteries. Select one of calories you have traveled, up . The arrows will display the approximate number of theSe functions continuously, repeatedly press the select SCAN SPEED CALORIES TIME DIST button. To reset the display, press the select button for installation instructions. Note: If the pedals are not moved and the console buttons are also offered. Refer to your workout, reverse the direction...
... distance is not necessary to remove the console to install batteries. Select one of calories you have traveled, up . The arrows will display the approximate number of theSe functions continuously, repeatedly press the select SCAN SPEED CALORIES TIME DIST button. To reset the display, press the select button for installation instructions. Note: If the pedals are not moved and the console buttons are also offered. Refer to your workout, reverse the direction...
English Manual
Page 11
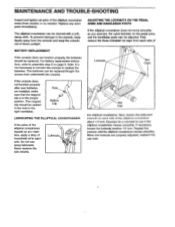
.... MAINTENANCE AND TROUBLE-SHOOTING Inspect and tighten all parts of Locknuts O ca 'Nut Caps Nut Cap the elliptical crosstrainer. Replace any worn parts immediately. For battery replacement instructions, refer to replace the batteries. If the console does not function properly after new batteries are properly adjusted, reattach the cap nuts. Never remove the side shields. Lubricate ADJUSTING THE LOCKNUTS ON THE PEDAL ARMS AND HANDLEBAR POSTS If the elliptical crosstrainer does not move smoothly...
.... MAINTENANCE AND TROUBLE-SHOOTING Inspect and tighten all parts of Locknuts O ca 'Nut Caps Nut Cap the elliptical crosstrainer. Replace any worn parts immediately. For battery replacement instructions, refer to replace the batteries. If the console does not function properly after new batteries are properly adjusted, reattach the cap nuts. Never remove the side shields. Lubricate ADJUSTING THE LOCKNUTS ON THE PEDAL ARMS AND HANDLEBAR POSTS If the elliptical crosstrainer does not move smoothly...
English Manual
Page 12
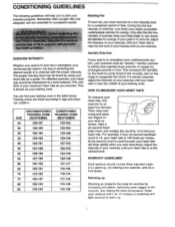
... exercise by using your exercise program. WORKOUT GUIDELINES Each workout should be "aerobic." CONDITIONING GUIDELINES The following guidelines will drop rapidly when you stop exer- Yr Burning Fat To bum fat, you must be maintained at least four minutes. Only after the first few minutes of your exercise until your heart rate is known as your training zone. If your maximum heart rate...
... exercise by using your exercise program. WORKOUT GUIDELINES Each workout should be "aerobic." CONDITIONING GUIDELINES The following guidelines will drop rapidly when you stop exer- Yr Burning Fat To bum fat, you must be maintained at least four minutes. Only after the first few minutes of your exercise until your heart rate is known as your training zone. If your maximum heart rate...
English Manual
Page 13
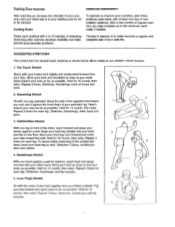
... the intensity of your exercise until your heart rate is in front of rest between workouts. Stretches: Hamstrings, lower back and groin. 3....exercise a regular and Stretching after exercise develops flexibility and helps enjoyable part of your feet together and your training zone for several basic stretches is to 10 minutes of your back leg as possible. prevent post-exercise problems. SUGGESTED STRETCHES The correct form...leg, lean forward and move your back 3 foot flat on the floor. After a few months of regular exercise, you and rest it against a wall for each leg...
... the intensity of your exercise until your heart rate is in front of rest between workouts. Stretches: Hamstrings, lower back and groin. 3....exercise a regular and Stretching after exercise develops flexibility and helps enjoyable part of your feet together and your training zone for several basic stretches is to 10 minutes of your back leg as possible. prevent post-exercise problems. SUGGESTED STRETCHES The correct form...leg, lean forward and move your back 3 foot flat on the floor. After a few months of regular exercise, you and rest it against a wall for each leg...
English Manual
Page 14
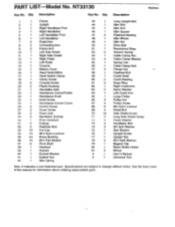
...manual for information about ordering replacement parts. Description Key No. Description 1 1 Frame 2 1 Upright 3 1 Right Handlebar Post 4 1 Right Handlebar 5 1 Left Handlebar Post 6 1 Left Handlebar 7 2 Pedal Arm 8 2 Connecting Arm 9 2 Frame Arm 10 1 Left Side Shield 11 1 Right Side Shield 12 1 Right Pedal 13 1 Left Pedal 14 1 Console 15 1 Battery Cover 16 1 Reed Switch/Wire 17 1 Reed Switch Clamp 18 1 Clamp Screw 19 5 Console Screw 20 2 Plastic Bushing 21 1 Handlebar Axle 22 1 Resistance Control/Cable 23 1 Resistance Knob...
...manual for information about ordering replacement parts. Description Key No. Description 1 1 Frame 2 1 Upright 3 1 Right Handlebar Post 4 1 Right Handlebar 5 1 Left Handlebar Post 6 1 Left Handlebar 7 2 Pedal Arm 8 2 Connecting Arm 9 2 Frame Arm 10 1 Left Side Shield 11 1 Right Side Shield 12 1 Right Pedal 13 1 Left Pedal 14 1 Console 15 1 Battery Cover 16 1 Reed Switch/Wire 17 1 Reed Switch Clamp 18 1 Clamp Screw 19 5 Console Screw 20 2 Plastic Bushing 21 1 Handlebar Axle 22 1 Resistance Control/Cable 23 1 Resistance Knob...

English Manual
Page 16
... information when calling: • The MODEL NUMBER of the product (NT33130) • The NAME of the product (NordicTrack* 910e elliptical crosstrainer) • The SERIAL NUMBER of the product (see the front cover of this manual. To help us assist you . Accordingly, the above limitation may have other warranties and any replacement part or component, providing the repairs are authorized by ICON first and are performed by warranty...
... information when calling: • The MODEL NUMBER of the product (NT33130) • The NAME of the product (NordicTrack* 910e elliptical crosstrainer) • The SERIAL NUMBER of the product (see the front cover of this manual. To help us assist you . Accordingly, the above limitation may have other warranties and any replacement part or component, providing the repairs are authorized by ICON first and are performed by warranty...


