
User Manual
Page 1
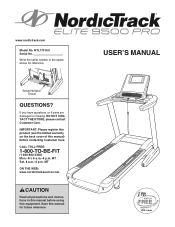
... reference. CALL TOLL-FREE: 1-800-TO-BE-FIT (1-800-862-3348) Mon.-Fri. 6 a.m.-6 p.m. MT Sat. 8 a.m.-4 p.m. www.nordictrack.com Model No. please contact Customer Care. USERʼS MANUAL Write the serial number in this manual before using this manual) before contacting Customer Care. If you have questions, or if parts are damaged or missing, DO...
... reference. CALL TOLL-FREE: 1-800-TO-BE-FIT (1-800-862-3348) Mon.-Fri. 6 a.m.-6 p.m. MT Sat. 8 a.m.-4 p.m. www.nordictrack.com Model No. please contact Customer Care. USERʼS MANUAL Write the serial number in this manual before using this manual) before contacting Customer Care. If you have questions, or if parts are damaged or missing, DO...

User Manual
Page 2
NordicTrack is missing or illegible, call the telephone number on the front cover of this manual and request a free replacement decal. If a decal is a registered trademark of the warning decals. Apply the decal in the location shown. Note: The decals ... 2 IMPORTANT PRECAUTIONS 3 BEFORE YOU BEGIN 5 ASSEMBLY 6 HOW TO USE THE CHEST PULSE SENSOR 13 OPERATION AND ADJUSTMENT 14 HOW TO FOLD AND MOVE THE TREADMILL 29 TROUBLESHOOTING 30 EXERCISE GUIDELINES 33 PART LIST 34 EXPLODED DRAWING 36 ORDERING REPLACEMENT PARTS Back Cover LIMITED WARRANTY Back Cover WARNING DECAL PLACEMENT This...
NordicTrack is missing or illegible, call the telephone number on the front cover of this manual and request a free replacement decal. If a decal is a registered trademark of the warning decals. Apply the decal in the location shown. Note: The decals ... 2 IMPORTANT PRECAUTIONS 3 BEFORE YOU BEGIN 5 ASSEMBLY 6 HOW TO USE THE CHEST PULSE SENSOR 13 OPERATION AND ADJUSTMENT 14 HOW TO FOLD AND MOVE THE TREADMILL 29 TROUBLESHOOTING 30 EXERCISE GUIDELINES 33 PART LIST 34 EXPLODED DRAWING 36 ORDERING REPLACEMENT PARTS Back Cover LIMITED WARRANTY Back Cover WARNING DECAL PLACEMENT This...
User Manual
Page 3
...To protect the floor or carpet from moisture and dust. To purchase a surge suppressor, see your local NordicTrack dealer or call the telephone number on page 30 if the treadmill is not working properly.) 8. Never move the walking belt while the power is intended only as described.... persons over age 35 or persons with at least 8 ft. (2.4 m) of the treadmill. Wear appropriate exercise clothes while using the treadmill. 18. Athletic support clothes are adequately informed of this manual and order part number 146148, or see your local electronics store. 13. This is being...
...To protect the floor or carpet from moisture and dust. To purchase a surge suppressor, see your local NordicTrack dealer or call the telephone number on page 30 if the treadmill is not working properly.) 8. Never move the walking belt while the power is intended only as described.... persons over age 35 or persons with at least 8 ft. (2.4 m) of the treadmill. Wear appropriate exercise clothes while using the treadmill. 18. Athletic support clothes are adequately informed of this manual and order part number 146148, or see your local electronics store. 13. This is being...
User Manual
Page 4
... attempt to raise, lower, or move the treadmill. 22. This treadmill is holding the frame securely in use this manual. Do not use . (See the drawing on the treadmill. 24. Over exercising may result in -home use , before cleaning the treadmill, and before performing the mainte- Never remove ...the motor hood un- Always unplug the power cord immediately after use only. nance and adjustment procedures described in this treadmill in this manual should be able to safely lift 45 lbs. (20 kg) to do so by an authorized service representative only. 26....
... attempt to raise, lower, or move the treadmill. 22. This treadmill is holding the frame securely in use this manual. Do not use . (See the drawing on the treadmill. 24. Over exercising may result in -home use , before cleaning the treadmill, and before performing the mainte- Never remove ...the motor hood un- Always unplug the power cord immediately after use only. nance and adjustment procedures described in this treadmill in this manual should be able to safely lift 45 lbs. (20 kg) to do so by an authorized service representative only. 26....
User Manual
Page 5
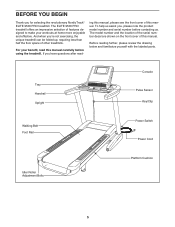
...manual. ing this manual, please see the front cover of other treadmills. If you ʼre not exercising, the unique treadmill can be folded up, requiring less than half the floor space of this manual carefully before contacting us assist you for selecting the revolutionary NordicTrack® ELITE 9500 PRO treadmill...YOU BEGIN Thank you , please note the product model number and serial number before using the treadmill. The ELITE 9500 PRO treadmill offers an impressive selection of this manual. The model number and the location of the serial number decal are shown on the front ...
...manual. ing this manual, please see the front cover of other treadmills. If you ʼre not exercising, the unique treadmill can be folded up, requiring less than half the floor space of this manual carefully before contacting us assist you for selecting the revolutionary NordicTrack® ELITE 9500 PRO treadmill...YOU BEGIN Thank you , please note the product model number and serial number before using the treadmill. The ELITE 9500 PRO treadmill offers an impressive selection of this manual. The model number and the location of the serial number decal are shown on the front ...
User Manual
Page 6
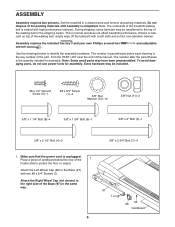
.... Make sure that the power cord is normal and does not affect treadmill performance. Attach the Right Wheel Cap (not shown) to the top of this manual. Note: Some small parts may be transferred to the right side of the treadmill walking belt is the quantity needed for assembly. The number after the... assembly is the key number of the part, from the PART LIST near the end of the walking belt or the shipping carton. Set the treadmill in parentheses below the rear of the 1 Frame (56) to protect the floor or carpet. and adjustable Use the drawings below to the Base (97...
.... Make sure that the power cord is normal and does not affect treadmill performance. Attach the Right Wheel Cap (not shown) to the top of this manual. Note: Some small parts may be transferred to the right side of the treadmill walking belt is the quantity needed for assembly. The number after the... assembly is the key number of the part, from the PART LIST near the end of the walking belt or the shipping carton. Set the treadmill in parentheses below the rear of the 1 Frame (56) to protect the floor or carpet. and adjustable Use the drawings below to the Base (97...
User Manual
Page 15
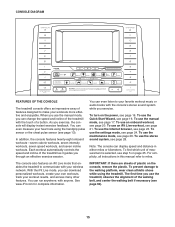
...Live mode that enables the treadmill to communicate with anyone. To prevent damage to the walking platform, wear clean athletic shoes while using the handgrip pulse sensor or the chest pulse sensor (see page 16. When you use the manual mode, see page 24. To use the manual mode, you exercise. ...To use the Quick Start Wizard, see page 13). To turn on the power, see page 28. To use the stereo sound system, see page 16. CONSOLE DIAGRAM FEATURES OF THE CONSOLE The treadmill console offers an impressive array of ...
...Live mode that enables the treadmill to communicate with anyone. To prevent damage to the walking platform, wear clean athletic shoes while using the handgrip pulse sensor or the chest pulse sensor (see page 16. When you use the manual mode, see page 24. To use the manual mode, you exercise. ...To use the Quick Start Wizard, see page 13). To turn on the power, see page 28. To use the stereo sound system, see page 16. CONSOLE DIAGRAM FEATURES OF THE CONSOLE The treadmill console offers an impressive array of ...
User Manual
Page 17
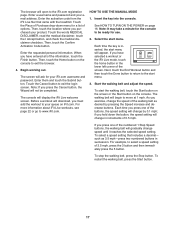
... 1 Step Speed buttons, the walking belt will ask for the console to the iFit.com registration page. To select a speed setting that came with the treadmill. The console will open to be completed. Touch the Cancel button to www.iFit.com. such as desired by 0.1 mph; To restart the walking belt... 1 mph. Note: If you purchased your email address. The walking belt will change speed until it reaches the selected speed setting. HOW TO USE THE MANUAL MODE 1. If you press one of the buttons, the speed setting will begin to exit the browser. 4.
... 1 Step Speed buttons, the walking belt will ask for the console to the iFit.com registration page. To select a speed setting that came with the treadmill. The console will open to be completed. Touch the Cancel button to www.iFit.com. such as desired by 0.1 mph; To restart the walking belt... 1 mph. Note: If you purchased your email address. The walking belt will change speed until it reaches the selected speed setting. HOW TO USE THE MANUAL MODE 1. If you press one of the buttons, the speed setting will begin to exit the browser. 4.
User Manual
Page 18
...time remaining • The approximate number of calories burned per mile • Your heart rate (see step 3 on page 19). Note: The manual mode does not have climbed • Your pace in to your wireless network and you have a time remaining countdown. To reset the console,...representing 1/4 mile (400 meters) • The time to your heart rate will show the following workout information: • The incline level of the treadmill • The elapsed time • The approximate number of calories you have burned • The distance that you must first calibrate the incline (...
...time remaining • The approximate number of calories burned per mile • Your heart rate (see step 3 on page 19). Note: The manual mode does not have climbed • Your pace in to your wireless network and you have a time remaining countdown. To reset the console,...representing 1/4 mile (400 meters) • The time to your heart rate will show the following workout information: • The incline level of the treadmill • The elapsed time • The approximate number of calories you have burned • The distance that you must first calibrate the incline (...

User Manual
Page 19
...console. When you use the handgrip pulse sensor and the chest pulse sensor at zero percent or you may damage the treadmill when you do not do this, the treadmillʼs electrical components may wear prematurely. The fan features several speed settings and an auto mode. avoid moving your ...heart rate if desired. Turn on the pulse bar. Measure your hands. Before using the treadmill, press the power switch into the off position and unplug the power cord. Press the Manual fan button repeatedly to select a fan speed or to zero percent. When the auto mode is ...
...console. When you use the handgrip pulse sensor and the chest pulse sensor at zero percent or you may damage the treadmill when you do not do this, the treadmillʼs electrical components may wear prematurely. The fan features several speed settings and an auto mode. avoid moving your ...heart rate if desired. Turn on the pulse bar. Measure your hands. Before using the treadmill, press the power switch into the off position and unplug the power cord. Press the Manual fan button repeatedly to select a fan speed or to zero percent. When the auto mode is ...
User Manual
Page 21
.... Touch the My Trainer button, the My Maps button, the World Tour button, or the Event Training button to download the next workout of the treadmill during the workout. The screen can also press one of calories that you must have not already done so, log in your progress. 1. Log in... your heart rate if desired. Select an iFit Live workout. In addition, if you manually change the speed or incline of that you have access to your iFit.com account (see www.iFit.com. 21 See step 7 on page 19...
.... Touch the My Trainer button, the My Maps button, the World Tour button, or the Event Training button to download the next workout of the treadmill during the workout. The screen can also press one of calories that you must have not already done so, log in your progress. 1. Log in... your heart rate if desired. Select an iFit Live workout. In addition, if you manually change the speed or incline of that you have access to your iFit.com account (see www.iFit.com. 21 See step 7 on page 19...
User Manual
Page 30
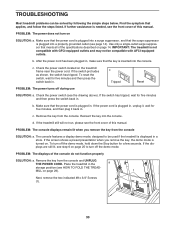
...is displayed in . d. If the screen shows a preset presentation when you remove the key from the console SOLUTION: a. MILL on the treadmill frame near the power cord. If further assistance is not compatible with GFCI-equipped outlets and may not be compatible with AFCI-equipped outlets. Check...in, unplug it back in the a storage position (see HOW TO FOLD THE TREAD- Find the symptom that meets all of this manual. IMPORTANT: The treadmill is needed, see step 6 on SOLUTION: a. c Tripped Reset PROBLEM: The power turns off the demo mode, hold down the Stop...
...is displayed in . d. If the screen shows a preset presentation when you remove the key from the console SOLUTION: a. MILL on the treadmill frame near the power cord. If further assistance is not compatible with GFCI-equipped outlets and may not be compatible with AFCI-equipped outlets. Check...in, unplug it back in the a storage position (see HOW TO FOLD THE TREAD- Find the symptom that meets all of this manual. IMPORTANT: The treadmill is needed, see step 6 on SOLUTION: a. c Tripped Reset PROBLEM: The power turns off the demo mode, hold down the Stop...
User Manual
Page 31
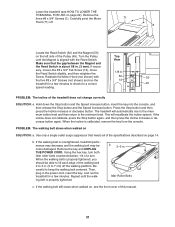
... the walking belt is calibrated, remove the key from the console. When the walking belt is properly tightened. b 2-3 in . Lower the treadmill (see the front cover of this manual. 31 Carefully pivot the Motor Hood (71) off the walking platform. sary, loosen the #8 x 3/4" Tek Screw (13), move the ... that the gap between the Magnet and the Reed Switch is aligned with 52 50 the five #8 x 3/4" Screws (not shown) and run the treadmill for a few minutes to keep the walking belt centered. If neces- Reattach the Motor Hood (not shown) with the Reed Switch. PROBLEM: The...
... the walking belt is calibrated, remove the key from the console. When the walking belt is properly tightened. b 2-3 in . Lower the treadmill (see the front cover of this manual. 31 Carefully pivot the Motor Hood (71) off the walking platform. sary, loosen the #8 x 3/4" Tek Screw (13), move the ... that the gap between the Magnet and the Reed Switch is aligned with 52 50 the five #8 x 3/4" Screws (not shown) and run the treadmill for a few minutes to keep the walking belt centered. If neces- Reattach the Motor Hood (not shown) with the Reed Switch. PROBLEM: The...

User Manual
Page 32
If the walking belt is cor- wise, 1/4 of this manual. When the walking belt is off-center, first remove the key and UNPLUG...key, turn . Repeat until the walking belt is properly tightened. Perform a network test (see step 7 on the treadmill for a few minutes. If the screen is off the walking platform. Repeat until the walking belt is centered. rectly ...Make sure the settings for a few minutes. move the key and UNPLUG THE POWER CORD. PROBLEM: The treadmill will be able to lift each edge of a turn both idler roller bolts clock- To calibrate the screen,...
If the walking belt is cor- wise, 1/4 of this manual. When the walking belt is off-center, first remove the key and UNPLUG...key, turn . Repeat until the walking belt is properly tightened. Perform a network test (see step 7 on the treadmill for a few minutes. If the screen is off the walking platform. Repeat until the walking belt is centered. rectly ...Make sure the settings for a few minutes. move the key and UNPLUG THE POWER CORD. PROBLEM: The treadmill will be able to lift each edge of a turn both idler roller bolts clock- To calibrate the screen,...
User Manual
Page 34
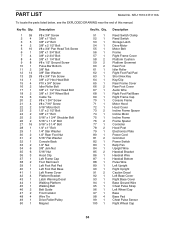
... Wire Tie Drive Roller/Pulley Magnet Key No. NTL17010.0 R1110A To locate the parts listed below, see the EXPLODED DRAWING near the end of this manual.
... Wire Tie Drive Roller/Pulley Magnet Key No. NTL17010.0 R1110A To locate the parts listed below, see the EXPLODED DRAWING near the end of this manual.

User Manual
Page 35
Key No. Description 101 2 102 1 103 1 104 2 105 2 106 1 Wheel Handrail Top Console Cushion Adjust Assembly #1 Cushion Adjust Assembly #2 Hex Key 107 1 108 1 109 1 110 2 111 2 * - For information about ordering replacement parts, see the back cover of this manual. *These parts are subject to change without notice. Description Key No. Handrail Frame Pulse Bar Top Pulse Ground Wire Front Cushion 5/16" Cushion Washer Userʼs Manual Note: Specifications are not illustrated. 35 Qty. Qty.
Key No. Description 101 2 102 1 103 1 104 2 105 2 106 1 Wheel Handrail Top Console Cushion Adjust Assembly #1 Cushion Adjust Assembly #2 Hex Key 107 1 108 1 109 1 110 2 111 2 * - For information about ordering replacement parts, see the back cover of this manual. *These parts are subject to change without notice. Description Key No. Handrail Frame Pulse Bar Top Pulse Ground Wire Front Cushion 5/16" Cushion Washer Userʼs Manual Note: Specifications are not illustrated. 35 Qty. Qty.
User Manual
Page 40
... when contacting us: • the model number and serial number of the product (see the front cover of this manual) • the name of the product (see the front cover of this manual) • the key number and description of the replacement part(s) (see the front cover of this... use and service conditions. ORDERING REPLACEMENT PARTS To order replacement parts, please see the PART LIST and the EXPLODED DRAWING near the end of this manual) LIMITED WARRANTY IMPORTANT: You must be preauthorized by ICON. ICON Health & Fitness, Inc. (ICON) warrants this product to any and all other ...
... when contacting us: • the model number and serial number of the product (see the front cover of this manual) • the name of the product (see the front cover of this manual) • the key number and description of the replacement part(s) (see the front cover of this... use and service conditions. ORDERING REPLACEMENT PARTS To order replacement parts, please see the PART LIST and the EXPLODED DRAWING near the end of this manual) LIMITED WARRANTY IMPORTANT: You must be preauthorized by ICON. ICON Health & Fitness, Inc. (ICON) warrants this product to any and all other ...

