
English Manual
Page 8
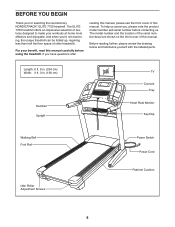
For your workouts at home more effective and enjoyable. The ELITE 7700 treadmill offers an impressive selection of this manual. Length: 6 ft. 8 in. (204 cm) Width: 3 ft. 3 in. (100 cm) Handrail Upright TV Console Tray Heart Rate Monitor Key/Clip Walking Belt Foot Rail Idler Roller ...And when you’'re not exercising, the unique treadmill can be folded up, requiring less than half the floor space of this manual carefully before contacting us assist you for selecting the revolutionary NORDICTRACK® ELITE 7700 treadmill. Before reading further, please review the drawing below...
For your workouts at home more effective and enjoyable. The ELITE 7700 treadmill offers an impressive selection of this manual. Length: 6 ft. 8 in. (204 cm) Width: 3 ft. 3 in. (100 cm) Handrail Upright TV Console Tray Heart Rate Monitor Key/Clip Walking Belt Foot Rail Idler Roller ...And when you’'re not exercising, the unique treadmill can be folded up, requiring less than half the floor space of this manual carefully before contacting us assist you for selecting the revolutionary NORDICTRACK® ELITE 7700 treadmill. Before reading further, please review the drawing below...

English Manual
Page 16
Insert a 14 5/16" x 2 1/4" Bolt (4) through the bracket. Lower the Frame (52) (see HOW TO LOWER THE TREADMILL FOR USE on a soft surface to avoid scratching the TV. Set the TV (133) face down on page 40). 9 I ) out of the Storage Latch (56) with the 5/16" x 2 1/4" Bolt (4) and a 5/16" Nut (9). The Screws will be used...
Insert a 14 5/16" x 2 1/4" Bolt (4) through the bracket. Lower the Frame (52) (see HOW TO LOWER THE TREADMILL FOR USE on a soft surface to avoid scratching the TV. Set the TV (133) face down on page 40). 9 I ) out of the Storage Latch (56) with the 5/16" x 2 1/4" Bolt (4) and a 5/16" Nut (9). The Screws will be used...
English Manual
Page 17
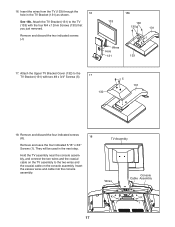
... near the console assembly, and connect the two wires and the coaxial cable on the TV assembly to the TV (133) with two #8 x 3/4" Screws (5). 17 132 5 131 18. TV Assembly Wires Console Cable Assembly K K 1 1 17 Remove and discard the four indicated screws (K). 18 Remove and save the four indicated 5/...16" x 3/4" Screws (1). They will be used in the TV Bracket (131) as shown. 16 See 16b. Attach the Upper TV Bracket Cover (132) to the TV Bracket (131) with the four M4 x 12mm Screws (130) that you just removed. Insert the...
... near the console assembly, and connect the two wires and the coaxial cable on the TV assembly to the TV (133) with two #8 x 3/4" Screws (5). 17 132 5 131 18. TV Assembly Wires Console Cable Assembly K K 1 1 17 Remove and discard the four indicated screws (K). 18 Remove and save the four indicated 5/...16" x 3/4" Screws (1). They will be used in the TV Bracket (131) as shown. 16 See 16b. Attach the Upper TV Bracket Cover (132) to the TV Bracket (131) with the four M4 x 12mm Screws (130) that you just removed. Insert the...
English Manual
Page 18
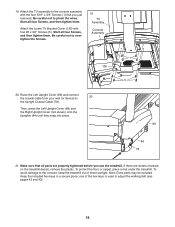
... Assembly 1 135 5 20. Make sure that you use the treadmill. Note: Extra parts may be included. Attach the TV assembly to adjust the walking belt (see pages 42 and 43).... (not shown) onto the Uprights (84) until they snap into place. 89 84 78 21. Attach the Lower TV Bracket Cover (135) with the four 5/16" x 3/4" Screws (1) that all parts are sheets of the hex... from your wall (or device) to the console, keep the treadmill out of direct sunlight. To protect the oor or carpet, place a mat under the treadmill. Start all four Screws, and then tighten them . If there...
... Assembly 1 135 5 20. Make sure that you use the treadmill. Note: Extra parts may be included. Attach the TV assembly to adjust the walking belt (see pages 42 and 43).... (not shown) onto the Uprights (84) until they snap into place. 89 84 78 21. Attach the Lower TV Bracket Cover (135) with the four 5/16" x 3/4" Screws (1) that all parts are sheets of the hex... from your wall (or device) to the console, keep the treadmill out of direct sunlight. To protect the oor or carpet, place a mat under the treadmill. Start all four Screws, and then tighten them . If there...

English Manual
Page 19
...input jack. See your outdoor antenna and the lead-in wiring before connecting the antenna. Before operating the TV, you must connect an antenna or a 75 ohm CATV cable to the 75 ohm terminal, an AV... CATV cable from the antenna to a 300 ohm to an external source such as a cable box, satellite TV box, VCR, or analog cable. Screwdriver 300 Ohm Flat Wire 300 to the 75 ohm terminal on your external...antenna in the power cord of a 75 ohm CATV cable to the 75 ohm output jack on the treadmill frame near the power cord. Note: Use a CATV cable to connect to 75 ohm adapter. Indoor ...
...input jack. See your outdoor antenna and the lead-in wiring before connecting the antenna. Before operating the TV, you must connect an antenna or a 75 ohm CATV cable to the 75 ohm terminal, an AV... CATV cable from the antenna to a 300 ohm to an external source such as a cable box, satellite TV box, VCR, or analog cable. Screwdriver 300 Ohm Flat Wire 300 to the 75 ohm terminal on your external...antenna in the power cord of a 75 ohm CATV cable to the 75 ohm output jack on the treadmill frame near the power cord. Note: Use a CATV cable to connect to 75 ohm adapter. Indoor ...
English Manual
Page 20
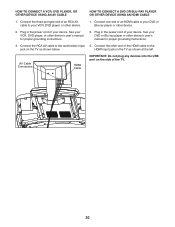
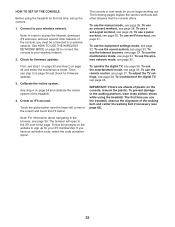
... cable to your VCR, DVD player, or other end of an RCA AV cable to the jack on the TV as shown at the left. Connect one end of your DVD or Blu-ray player or other device’'s ...user’'s manual for proper grounding instructions. 2. Plug in the power cord of the TV. 20 See your device. AV Cable Connectors HDMI Cable IMPORTANT: Do not plug any devices into the USB port on... the TV as shown below. Plug in the power cord of an HDMI cable to the audio/video input 3. ...
... cable to your VCR, DVD player, or other end of an RCA AV cable to the jack on the TV as shown at the left. Connect one end of your DVD or Blu-ray player or other device’'s ...user’'s manual for proper grounding instructions. 2. Plug in the power cord of the TV. 20 See your device. AV Cable Connectors HDMI Cable IMPORTANT: Do not plug any devices into the USB port on... the TV as shown below. Plug in the power cord of an HDMI cable to the audio/video input 3. ...

English Manual
Page 23
... world with the console’'s sound system while you exercise. When you use the manual mode, you can change the speed and incline of the treadmill with simulated workouts. Set calorie, time, or distance goals for your workouts more . 23 To set a calorie, time, distance, or pace goal. ...features on the power, see page 25. In addition, the console features a selection of weight-loss workouts. You can even watch the digital TV, browse the Internet or listen to your favorite workout music or audio books with customizable Google Maps. Go to iFit.com to use the ...
... world with the console’'s sound system while you exercise. When you use the manual mode, you can change the speed and incline of the treadmill with simulated workouts. Set calorie, time, or distance goals for your workouts more . 23 To set a calorie, time, distance, or pace goal. ...features on the power, see page 25. In addition, the console features a selection of weight-loss workouts. You can even watch the digital TV, browse the Internet or listen to your favorite workout music or audio books with customizable Google Maps. Go to iFit.com to use the ...
English Manual
Page 25
... iFit workouts, and use a set up for the first time, set -a-goal workout, see page 29. Check for firmware updates. 3. To use the treadmill, observe the alignment of the walking belt, and center the walking belt if necessary (see step 3 on the console, remove the plastic. Then, see ...page 42). To troubleshoot the digital TV, see page 33. The first time you to the walking platform, wear clean athletic shoes while using the treadmill for your iFit membership. The console is now ready for you use an iFit workout, see...
... iFit workouts, and use a set up for the first time, set -a-goal workout, see page 29. Check for firmware updates. 3. To use the treadmill, observe the alignment of the walking belt, and center the walking belt if necessary (see step 3 on the console, remove the plastic. Then, see ...page 42). To troubleshoot the digital TV, see page 33. The first time you to the walking platform, wear clean athletic shoes while using the treadmill for your iFit membership. The console is now ready for you use an iFit workout, see...

English Manual
Page 33
... into the jack on the console and into the headphones jack on your finger down the screen to the digital TV audio with SSID broadcast enabled (hidden networks are using the treadmill. HOW TO CHANGE THE AUDIO INPUT To select a different audio source, touch the music notes button at surface ... to use the browser, you are not supported). Exit the equipment settings mode. Note: Select Personal TV to listen to enter the passcode. Note: If you to the audio from the digital TV. The console features an automatic screen reset; Then, select the amount of the screen. To disable ...
... into the jack on the console and into the headphones jack on your finger down the screen to the digital TV audio with SSID broadcast enabled (hidden networks are using the treadmill. HOW TO CHANGE THE AUDIO INPUT To select a different audio source, touch the music notes button at surface ... to use the browser, you are not supported). Exit the equipment settings mode. Note: Select Personal TV to listen to enter the passcode. Note: If you to the audio from the digital TV. The console features an automatic screen reset; Then, select the amount of the screen. To disable ...
English Manual
Page 36
... the CC button repeatedly (see page 37 to learn how to the included remote control (see step 6 on the digital TV, press the TV power button. 2. To turn on page 39 to show which volume level is selected. To view closed captioning settings). 7. Note: If you can identify...pressed, a graphic will select only channels that allows you are pressed, a graphic will appear on page 32. Exit the entertainment mode. Mute the digital TV if desired. HOW TO USE THE ENTERTAINMENT MODE To select the desired cable channel, press the Chan increase and decrease buttons or the Key Pad...
... the CC button repeatedly (see page 37 to learn how to the included remote control (see step 6 on the digital TV, press the TV power button. 2. To turn on page 39 to show which volume level is selected. To view closed captioning settings). 7. Note: If you can identify...pressed, a graphic will select only channels that allows you are pressed, a graphic will appear on page 32. Exit the entertainment mode. Mute the digital TV if desired. HOW TO USE THE ENTERTAINMENT MODE To select the desired cable channel, press the Chan increase and decrease buttons or the Key Pad...

English Manual
Page 37
...television. Make sure to create a favorite channels list. Next, remove the old batteries from the remote control, and insert two new AAA batteries. Select TV for cable or antenna input, AV for a device connected to adjust parental control settings. Press the return button ( ) to view information about the... THE BATTERIES IN THE REMOTE CONTROL To replace the batteries, first locate the battery cover on the treadmill and hold the remote control near the TV. Press the V-Chip button to the TV with an HDMI cable. HOW TO USE THE REMOTE CONTROL The first time you have labeled any ...
...television. Make sure to create a favorite channels list. Next, remove the old batteries from the remote control, and insert two new AAA batteries. Select TV for cable or antenna input, AV for a device connected to adjust parental control settings. Press the return button ( ) to view information about the... THE BATTERIES IN THE REMOTE CONTROL To replace the batteries, first locate the battery cover on the treadmill and hold the remote control near the TV. Press the V-Chip button to the TV with an HDMI cable. HOW TO USE THE REMOTE CONTROL The first time you have labeled any ...

English Manual
Page 38
... all of the channels available in a menu. The television will be skipped. Note: If a television channel disappears, scan for adjusting the TV display. Highlight a channel and press Enter to your remote control until the highest channel is scanning channels. To select one of the Channel ...Adjust the image settings. Select Channel List to adjust the parental control settings. Select Parental to view a list of channels saved in the TV memory. Press the Exit button to enter the main menu. Press the Menu button to exit the menu. To return to view a ...
... all of the channels available in a menu. The television will be skipped. Note: If a television channel disappears, scan for adjusting the TV display. Highlight a channel and press Enter to your remote control until the highest channel is scanning channels. To select one of the Channel ...Adjust the image settings. Select Channel List to adjust the parental control settings. Select Parental to view a list of channels saved in the TV memory. Press the Exit button to enter the main menu. Press the Menu button to exit the menu. To return to view a ...

English Manual
Page 39
... Parental Code password. Select V-CHIP to adjust the closed caption submenu, highlight Closed Caption and press the Enter button. For more you run on the treadmill, or the more rmness, turn the cushion knob a half turn clockwise until you highlight All Reset, a warning will indicate whether a rating has been blocked... feel it lock into place. First, enter the Lock Parental Code password, which television and movie ratings are pressed on the remote control, on the TV. The treadmill features a cushioning system that reduces the impact as...
... Parental Code password. Select V-CHIP to adjust the closed caption submenu, highlight Closed Caption and press the Enter button. For more you run on the treadmill, or the more rmness, turn the cushion knob a half turn clockwise until you highlight All Reset, a warning will indicate whether a rating has been blocked... feel it lock into place. First, enter the Lock Parental Code password, which television and movie ratings are pressed on the remote control, on the TV. The treadmill features a cushioning system that reduces the impact as...

English Manual
Page 43
.... a. b. If you should be of the picture are set correctly (see HOW TO ADJUST TV SETTINGS on page 38 to keep the walking belt centered. IMPORTANT: Do not spray liquids directly onto the treadmill. When the walking belt is weak, it is necessary. If the signal is correctly tightened, ...the correct input source is properly tightened. See HOW TO CONNECT AN ANTENNA on the treadmill for signals. Repeat until the walking belt is selected. See step 4 on page 8). See HOW TO ADJUST THE DIGITAL TV SETTINGS on , rst remove the key and UNPLUG THE POWER CORD. To avoid...
.... a. b. If you should be of the picture are set correctly (see HOW TO ADJUST TV SETTINGS on page 38 to keep the walking belt centered. IMPORTANT: Do not spray liquids directly onto the treadmill. When the walking belt is weak, it is necessary. If the signal is correctly tightened, ...the correct input source is properly tightened. See HOW TO CONNECT AN ANTENNA on the treadmill for signals. Repeat until the walking belt is selected. See step 4 on page 8). See HOW TO ADJUST THE DIGITAL TV SETTINGS on , rst remove the key and UNPLUG THE POWER CORD. To avoid...
English Manual
Page 45
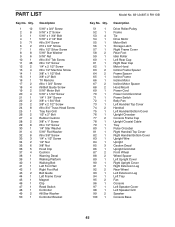
..." x 3/4" Screw 5/16" x 2" Screw 5/16" x 1 3/4" Bolt 5/16" x 2 1/4" Bolt #8 x 3/4" Screw #10 x 3/4" Screw #8 x 1/2" Silver Screw 5/16" Star Washer 5/16" Nut #8 x 3/4" Tek Screw #8 x 1/2" Screw 1/4" x 2 1/2" Screw #8 x 1/2" Machine Screw 3/8" x 1 1/2" Bolt 3/8" x 2" Bolt TV Remote #8 x 1 3/4" Screw #8 Belt Guide Screw 5/16" Motor Bolt 5/16" x 1/34" Screw 1/4" 1 3/4" Screw 3/8" x 1 3/4" Bolt 3/8" x 2 1/2" Screw #8 x 3/4" Truss Head Screw Tray Fan Grill 1/2" x 2" Bolt Rubber Cushion 3/8" x 1" Screw #6 x 1/2" Screw...
..." x 3/4" Screw 5/16" x 2" Screw 5/16" x 1 3/4" Bolt 5/16" x 2 1/4" Bolt #8 x 3/4" Screw #10 x 3/4" Screw #8 x 1/2" Silver Screw 5/16" Star Washer 5/16" Nut #8 x 3/4" Tek Screw #8 x 1/2" Screw 1/4" x 2 1/2" Screw #8 x 1/2" Machine Screw 3/8" x 1 1/2" Bolt 3/8" x 2" Bolt TV Remote #8 x 1 3/4" Screw #8 Belt Guide Screw 5/16" Motor Bolt 5/16" x 1/34" Screw 1/4" 1 3/4" Screw 3/8" x 1 3/4" Bolt 3/8" x 2 1/2" Screw #8 x 3/4" Truss Head Screw Tray Fan Grill 1/2" x 2" Bolt Rubber Cushion 3/8" x 1" Screw #6 x 1/2" Screw...

English Manual
Page 46
... Plate Right Rear Cap Cushion Wheel Stop Tray Fan Tray Fan Cover Power Supply Stand-Off Power Supply Plate M4 x 12mm Screw TV Bracket Upper TV Bracket Cover TV TV Cover Lower TV Bracket Cover –- For information about ordering replacement parts, see the back cover of this manual. *These parts are subject to change...
... Plate Right Rear Cap Cushion Wheel Stop Tray Fan Tray Fan Cover Power Supply Stand-Off Power Supply Plate M4 x 12mm Screw TV Bracket Upper TV Bracket Cover TV TV Cover Lower TV Bracket Cover –- For information about ordering replacement parts, see the back cover of this manual. *These parts are subject to change...


