
English Manual
Page 3
... not put the treadmill in small increments to the control system of high speeds. Do not place the treadmill on the treadmill at all users of this product. 1. Wear appropriate exercise clothes while using the treadmill (see your physician. Never move the walking belt while the power is not working properly. (See TROUBLESHOOTING on the walking belt. Do not wear loose clothes that all times. 9. ICON assumes no...
... not put the treadmill in small increments to the control system of high speeds. Do not place the treadmill on the treadmill at all users of this product. 1. Wear appropriate exercise clothes while using the treadmill (see your physician. Never move the walking belt while the power is not working properly. (See TROUBLESHOOTING on the walking belt. Do not wear loose clothes that all times. 9. ICON assumes no...
English Manual
Page 4
... parts of heart rate readings. ing the treadmill, and before clean- If you feel faint or if you experience pain while exercising, stop immediately and cool down. When folding or moving the treadmill, make sure that the storage latch is not in the storage position. 24. Do not change the incline of the power switch), and unplug the power cord when the treadmill is holding the frame securely in use...
... parts of heart rate readings. ing the treadmill, and before clean- If you feel faint or if you experience pain while exercising, stop immediately and cool down. When folding or moving the treadmill, make sure that the storage latch is not in the storage position. 24. Do not change the incline of the power switch), and unplug the power cord when the treadmill is holding the frame securely in use...
English Manual
Page 7
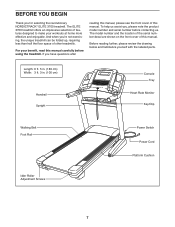
... manual. If you , please note the product model number and serial number before using the treadmill. And when you for selecting the revolutionary NORDICTRACK® ELITE 3700 treadmill. Length: 6 ft. 5 in. (183 cm) Width: 3 ft. 3 in. (100 cm) Handrail Upright Console Tray Heart Rate Monitor Key/Clip Walking Belt Foot Rail Idler Roller Adjustment Screws Power Switch Power Cord Platform Cushion 7 To help us . BEFORE YOU BEGIN Thank you ’'re not exercising, the unique treadmill can be folded...
... manual. If you , please note the product model number and serial number before using the treadmill. And when you for selecting the revolutionary NORDICTRACK® ELITE 3700 treadmill. Length: 6 ft. 5 in. (183 cm) Width: 3 ft. 3 in. (100 cm) Handrail Upright Console Tray Heart Rate Monitor Key/Clip Walking Belt Foot Rail Idler Roller Adjustment Screws Power Switch Power Cord Platform Cushion 7 To help us . BEFORE YOU BEGIN Thank you ’'re not exercising, the unique treadmill can be folded...
English Manual
Page 11
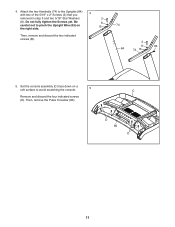
Attach the two Handrails (74) to avoid scratching the console. 5 C Remove and discard the four indicated screws (D). Set the console assembly (C) face down on B the right side. Be 8 careful not to pinch the Upright Wire (83) on a soft surface to the Uprights (84) with two of the 5/16" x 2" Screws (2) that you 4 removed in step 3 and two 5/16" Star Washers 2 (8). Then, remove and discard the two indicated screws (B). 74 2 8 84 74 B 83 5. D 80 D 11 Then, remove the Pulse Crossbar (80). Do not fully tighten the Screws yet. 4.
Attach the two Handrails (74) to avoid scratching the console. 5 C Remove and discard the four indicated screws (D). Set the console assembly (C) face down on B the right side. Be 8 careful not to pinch the Upright Wire (83) on a soft surface to the Uprights (84) with two of the 5/16" x 2" Screws (2) that you 4 removed in step 3 and two 5/16" Star Washers 2 (8). Then, remove and discard the two indicated screws (B). 74 2 8 84 74 B 83 5. D 80 D 11 Then, remove the Pulse Crossbar (80). Do not fully tighten the Screws yet. 4.
English Manual
Page 12
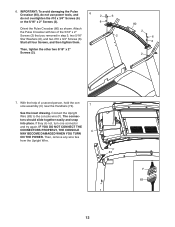
...- F 83 F 83 12 Attach the Pulse Crossbar with two of a second person, hold the console assembly (C) near the Handrails (74). 7 See the inset drawing. Start all four Screws, and then tighten them. IMPORTANT: To avoid damaging the Pulse Crossbar (80), do not use power tools, and do not, turn one connector and try again. Connect the Upright Wire (83) to the console wire (F). tors should slide...
...- F 83 F 83 12 Attach the Pulse Crossbar with two of a second person, hold the console assembly (C) near the Handrails (74). 7 See the inset drawing. Start all four Screws, and then tighten them. IMPORTANT: To avoid damaging the Pulse Crossbar (80), do not use power tools, and do not, turn one connector and try again. Connect the Upright Wire (83) to the console wire (F). tors should slide...
English Manual
Page 18
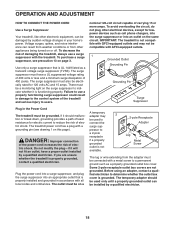
... resistance for 120 volts AC and 15 amps. The temporary adapter should malfunction or break down, grounding provides a path of 450 joules. OPERATION AND ADJUSTMENT HOW TO CONNECT THE POWER CORD Use a Surge Suppressor Your treadmill, like other electronic equipment, can be a monitoring light on or off. Use only a surge suppressor that is UL 1449 listed as a properly grounded outlet box cover...
... resistance for 120 volts AC and 15 amps. The temporary adapter should malfunction or break down, grounding provides a path of 450 joules. OPERATION AND ADJUSTMENT HOW TO CONNECT THE POWER CORD Use a Surge Suppressor Your treadmill, like other electronic equipment, can be a monitoring light on or off. Use only a surge suppressor that is UL 1449 listed as a properly grounded outlet box cover...
English Manual
Page 19
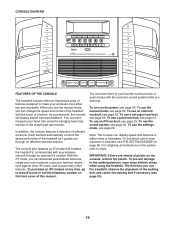
... iFit module. In addition, the console features a selection of the walking belt, and center the walking belt if necessary (see page 20. Each workout automatically controls the speed and incline of the treadmill as it guides you use the manual mode, see page 31). 19 To use a pulse workout, see page 23. As you can even listen to your favorite workout music or audio books with the touch of a button. To use a set...
... iFit module. In addition, the console features a selection of the walking belt, and center the walking belt if necessary (see page 20. Each workout automatically controls the speed and incline of the treadmill as it guides you use the manual mode, see page 31). 19 To use a pulse workout, see page 23. As you can even listen to your favorite workout music or audio books with the touch of a button. To use a set...
English Manual
Page 20
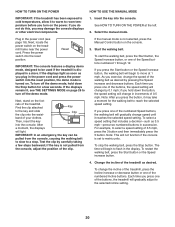
... down the button, the speed setting will change by 0.1 mph; The time will begin to move at the left. 2. Select the manual mode. To turn on . IMPORTANT: In an emergency, the key can be used if the treadmill is displayed in the power cord (see THE SETTINGS MODE on the console. 3. Start the walking belt. Note: After you press one of the buttons, the speed setting will change in the power cord and press the power switch into the console. For...
... down the button, the speed setting will change by 0.1 mph; The time will begin to move at the left. 2. Select the manual mode. To turn on . IMPORTANT: In an emergency, the key can be used if the treadmill is displayed in the power cord (see THE SETTINGS MODE on the console. 3. Start the walking belt. Note: After you press one of the buttons, the speed setting will change in the power cord and press the power switch into the console. For...
English Manual
Page 21
... to set the default menu). As you exercise, the workout intensity level bar will be shown. When the Calorie tab is detected, a heart symbol in the calorie display will flash each minute. Before using the handgrip heart rate monitor, remove the sheets of calories burned per hour. To reset the displays, press the Stop button, remove the key, and then reinsert the key. 6. avoid moving your heart rate if desired. When an iFit...
... to set the default menu). As you exercise, the workout intensity level bar will be shown. When the Calorie tab is detected, a heart symbol in the calorie display will flash each minute. Before using the handgrip heart rate monitor, remove the sheets of calories burned per hour. To reset the displays, press the Stop button, remove the key, and then reinsert the key. 6. avoid moving your heart rate if desired. When an iFit...
English Manual
Page 22
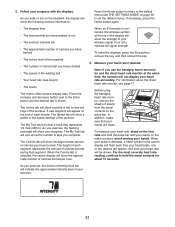
.... The workout will then slow to start the workout. The walking belt will continue in a secure place. 7. If you select a calorie workout, the approximate number of calories you are finished using the treadmill, step onto the foot rails, press the Stop button, and adjust the incline of the flashing segment indicates the speed or incline setting for the next segment, the speed and/or incline setting will appear in the display. When...
.... The workout will then slow to start the workout. The walking belt will continue in a secure place. 7. If you select a calorie workout, the approximate number of calories you are finished using the treadmill, step onto the foot rails, press the Stop button, and adjust the incline of the flashing segment indicates the speed or incline setting for the next segment, the speed and/or incline setting will appear in the display. When...

English Manual
Page 23
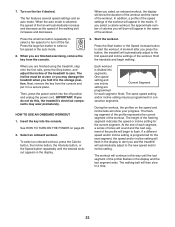
... workout, press the Start button or the Speed increase button. Start the workout. The walking belt will burn during the workout. 3. HOW TO USE A SET-A-GOAL WORKOUT 1. See HOW TO TURN ON THE POWER on page 21. 6. Press the Start button to a stop the workout at any time, press the Stop button. See step 6 on page 20. 2. The actual number of calories you will then slow to start the workout. In addition, if you manually change the speed or incline of the treadmill...
... workout, press the Start button or the Speed increase button. Start the workout. The walking belt will burn during the workout. 3. HOW TO USE A SET-A-GOAL WORKOUT 1. See HOW TO TURN ON THE POWER on page 21. 6. Press the Start button to a stop the workout at any time, press the Stop button. See step 6 on page 20. 2. The actual number of calories you will then slow to start the workout. In addition, if you manually change the speed or incline of the treadmill...
English Manual
Page 24
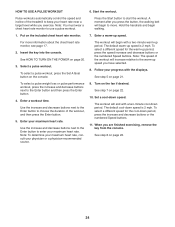
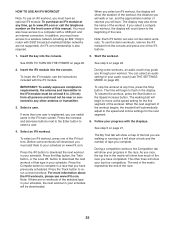
... press the button, the walking belt will increase relative to enter your progress with the displays. Start the workout. Pulse workouts automatically control the speed and incline of the treadmill to move. Follow your maximum heart rate. Use the increase and decrease buttons next to the Enter button to use a pulse workout. Note: You must wear a chest heart rate monitor to choose the duration of the workout will begin to keep your maximum heart rate. Insert the key into the console...
... press the button, the walking belt will increase relative to enter your progress with the displays. Start the workout. Pulse workouts automatically control the speed and incline of the treadmill to move. Follow your maximum heart rate. Use the increase and decrease buttons next to the Enter button to use a pulse workout. Note: You must wear a chest heart rate monitor to choose the duration of the workout will begin to keep your maximum heart rate. Insert the key into the console...
English Manual
Page 25
... the instructions included with the displays. When you must also have access to a computer with SSID broadcast enabled (hidden networks are not supported). Note: Each iFit button can select an audio setting for your top four competitors. Start the workout. See HOW TO TURN ON THE POWER on page 26). Insert the iFit module into the console. 5. To insert the iFit module, see THE SETTINGS MODE...
... the instructions included with the displays. When you must also have access to a computer with SSID broadcast enabled (hidden networks are not supported). Note: Each iFit button can select an audio setting for your top four competitors. Start the workout. See HOW TO TURN ON THE POWER on page 26). Insert the iFit module into the console. 5. To insert the iFit module, see THE SETTINGS MODE...
English Manual
Page 26
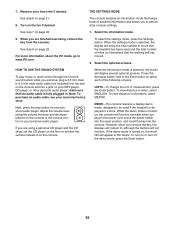
... turn off the demo mode, press the Enter button. 26 For more information about the iFit mode, go to 3.5 mm male audio cable (not included) into the jack on the console and into the console. When you are finished exercising, remove the key from the console. When the settings mode is selected, the matrix will not function. make sure that keeps track of miles (or kilometers) that the walking belt has moved. 2. Press the...
... turn off the demo mode, press the Enter button. 26 For more information about the iFit mode, go to 3.5 mm male audio cable (not included) into the jack on the console and into the console. When you are finished exercising, remove the key from the console. When the settings mode is selected, the matrix will not function. make sure that keeps track of miles (or kilometers) that the walking belt has moved. 2. Press the...
English Manual
Page 27
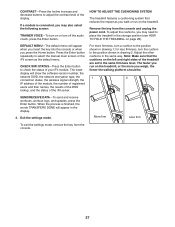
... following screen: TRAINER VOICE—-To turn on or turn off the audio coach, press the Enter button. The lower display will appear in the display. 3. Adjust the other cushions in the same way. Remove the key from the console. 27 For more you may need to adjust the contrast level of your iFit module. When the process is connected, you weigh, the firmer the walking platform should...
... following screen: TRAINER VOICE—-To turn on or turn off the audio coach, press the Enter button. The lower display will appear in the display. 3. Adjust the other cushions in the same way. Remove the key from the console. 27 For more you may need to adjust the contrast level of your iFit module. When the process is connected, you weigh, the firmer the walking platform should...

English Manual
Page 29
... UNPLUG THE POWER CORD. Carefully pivot the Motor Hood (65) off during use 2 a. SYMPTOM: The console displays remain lit when you remove the key, the demo mode is needed, see page 18). If further assistance is turned on the treadmill frame near the power cord. SYMPTOM: The power does not turn off the demo mode, hold down the Stop button for ve minutes and then press the switch back in . TROUBLESHOOTING Most treadmill problems can be...
... UNPLUG THE POWER CORD. Carefully pivot the Motor Hood (65) off during use 2 a. SYMPTOM: The console displays remain lit when you remove the key, the demo mode is needed, see page 18). If further assistance is turned on the treadmill frame near the power cord. SYMPTOM: The power does not turn off the demo mode, hold down the Stop button for ve minutes and then press the switch back in . TROUBLESHOOTING Most treadmill problems can be...
English Manual
Page 30
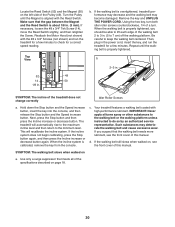
... View b. Repeat until the Magnet is properly tightened. Next, press the Stop button and then press the Incline increase or decrease button. Turn the Pulley until the walking belt is aligned with the Reed Switch. Make sure that meets all of the specications described on , see the front cover of this manual. Remove the key and UNPLUG THE POWER CORD. This will automatically rise to the maximum...
... View b. Repeat until the Magnet is properly tightened. Next, press the Stop button and then press the Incline increase or decrease button. Turn the Pulley until the walking belt is aligned with the Reed Switch. Make sure that meets all of the specications described on , see the front cover of this manual. Remove the key and UNPLUG THE POWER CORD. This will automatically rise to the maximum...
English Manual
Page 31
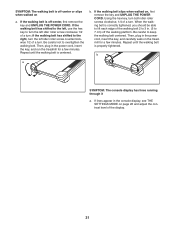
Then, plug in the console display, see THE SETTINGS MODE on , rst remove the key and UNPLUG THE POWER CORD. If lines appear in the power cord, insert the key, and carefully walk on a. if the walking belt has shifted to lift each edge of the display. 31 Repeat until the walking belt is centered. If the walking belt is correctly tightened, you should be able to the right, turn the left...
Then, plug in the console display, see THE SETTINGS MODE on , rst remove the key and UNPLUG THE POWER CORD. If lines appear in the power cord, insert the key, and carefully walk on a. if the walking belt has shifted to lift each edge of the display. 31 Repeat until the walking belt is centered. If the walking belt is correctly tightened, you should be able to the right, turn the left...
English Manual
Page 32
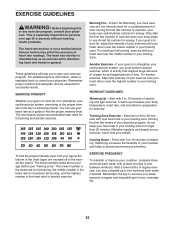
... your training zone. The chart below shows recommended heart rates for aerobic exercise. Burning Fat—-To burn fat effectively, you exercise; WORKOUT GUIDELINES Warming Up—-Start with your training zone. Training Zone Exercise—-Exercise for a sustained period of exercise does your body begin to use your heart rate as an exercise aid in determining heart rate trends in your “"training zone.”" The lowest number is the heart rate for...
... your training zone. The chart below shows recommended heart rates for aerobic exercise. Burning Fat—-To burn fat effectively, you exercise; WORKOUT GUIDELINES Warming Up—-Start with your training zone. Training Zone Exercise—-Exercise for a sustained period of exercise does your body begin to use your heart rate as an exercise aid in determining heart rate trends in your “"training zone.”" The lowest number is the heart rate for...
English Manual
Page 40
... is shipped to a service center, freight charges to state. No other rights that specically set forth herein. The frame and drive motor are shipped while the product is under this manual) LIMITED WARRANTY IMPORTANT: To protect your fitness equipment with respect to the terms set forth above limitation may not apply to repairing or replacing, at ICON’'s option, the product...
... is shipped to a service center, freight charges to state. No other rights that specically set forth herein. The frame and drive motor are shipped while the product is under this manual) LIMITED WARRANTY IMPORTANT: To protect your fitness equipment with respect to the terms set forth above limitation may not apply to repairing or replacing, at ICON’'s option, the product...


