
English Manual
Page 27
... target. To calibrate the screen, touch the Calibrate Screen button. Using a pencil eraser or other objects away from the elliptical while the incline is calibrated, touch the Finish button. 2. Touch the Machine Info button to touch the correct buttons on the screen. 7. Then, touch the Begin button to the maintenance mode. Calibrate...
... target. To calibrate the screen, touch the Calibrate Screen button. Using a pencil eraser or other objects away from the elliptical while the incline is calibrated, touch the Finish button. 2. Touch the Machine Info button to touch the correct buttons on the screen. 7. Then, touch the Begin button to the maintenance mode. Calibrate...
English Manual
Page 31
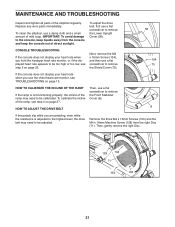
... low, see screwdriver to be adjusted. IMPORTANT: To avoid damage Cover (56). and then use a damp cloth and a small the Lower Upright amount of the elliptical regularly. Then, use the chest heart rate monitor, see step 4 on page 27. Remove the three M4 x 16mm Screws (104) and the M4 x 16mm... Machine Screw (128) from the console and keep the console out of the ramp, see TROUBLESHOOTING on page 22. To adjust the drive Replace any worn ...
... low, see screwdriver to be adjusted. IMPORTANT: To avoid damage Cover (56). and then use a damp cloth and a small the Lower Upright amount of the elliptical regularly. Then, use the chest heart rate monitor, see step 4 on page 27. Remove the three M4 x 16mm Screws (104) and the M4 x 16mm... Machine Screw (128) from the console and keep the console out of the ramp, see TROUBLESHOOTING on page 22. To adjust the drive Replace any worn ...
English Manual
Page 32
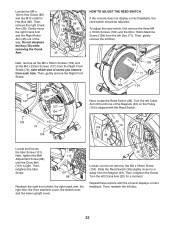
... 19 Locate and loosen the Idler Screw (101). To adjust the reed switch, first remove the three M4 x 16mm Screws (104) and the M4 x 16mm Machine Screw (128) from the Right Front Shield (74); Do not misplace the Key (78) while removing the Crank Arm. 86 78 85 20 45 HOW...
... 19 Locate and loosen the Idler Screw (101). To adjust the reed switch, first remove the three M4 x 16mm Screws (104) and the M4 x 16mm Machine Screw (128) from the Right Front Shield (74); Do not misplace the Key (78) while removing the Crank Arm. 86 78 85 20 45 HOW...
English Manual
Page 35
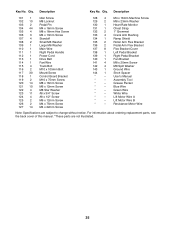
... information about ordering replacement parts, see the back cover of this manual. *These parts are subject to change without notice. Description Key No. M4 x 16mm Machine Screw M8 x 23mm Washer Heart Rate Monitor Chest Strap 1" Grommet Crank Arm Bushing Ramp Shield Roller Arm Flex Bracket Pedal Arm Flex Bracket Flex Bracket... 103 2 104 44 105 4 106 3 107 4 108 2 109 1 110 1 111 1 112 1 113 1 114 1 115 4 116 2 117 30 118 1 119 2 120 14 121 10 122 4 123 11 124 4 125 2 126 2 127 14 Idler Screw M8 Locknut Pedal Pin M4 x 16mm Screw M8 x 16mm Hex Screw M4 x 13mm Screw Standoff Small M6 Washer Large...
... information about ordering replacement parts, see the back cover of this manual. *These parts are subject to change without notice. Description Key No. M4 x 16mm Machine Screw M8 x 23mm Washer Heart Rate Monitor Chest Strap 1" Grommet Crank Arm Bushing Ramp Shield Roller Arm Flex Bracket Pedal Arm Flex Bracket Flex Bracket... 103 2 104 44 105 4 106 3 107 4 108 2 109 1 110 1 111 1 112 1 113 1 114 1 115 4 116 2 117 30 118 1 119 2 120 14 121 10 122 4 123 11 124 4 125 2 126 2 127 14 Idler Screw M8 Locknut Pedal Pin M4 x 16mm Screw M8 x 16mm Hex Screw M4 x 13mm Screw Standoff Small M6 Washer Large...

