

English Manual
Page 1
... Read all precautions and instructions in the space above ) before using this equipment. NTSY1908.0 Serial No. IMPORTANT: You must note the product model number and serial number (see the drawing above for future reference. www.nordictrack.com Model No. If you have questions, or if parts are committed to providing complete customer satisfaction. USERʼS MANUAL Write the serial number in this manual for future reference...
... Read all precautions and instructions in the space above ) before using this equipment. NTSY1908.0 Serial No. IMPORTANT: You must note the product model number and serial number (see the drawing above for future reference. www.nordictrack.com Model No. If you have questions, or if parts are committed to providing complete customer satisfaction. USERʼS MANUAL Write the serial number in this manual for future reference...

English Manual
Page 2
... size. If a decal is a registered trademark of ICON IP, Inc. 2 Apply the decal in the location shown. TABLE OF CONTENTS WARNING DECAL PLACEMENT 2 IMPORTANT PRECAUTIONS 3 BEFORE YOU BEGIN 4 PART IDENTIFICATION CHART 5 ASSEMBLY 6 ADJUSTMENT 15 MAINTENANCE 18 CABLE DIAGRAM 19 EXERCISE GUIDELINES 20 PART LIST 22 EXPLODED DRAWING 24 ORDERING REPLACEMENT PARTS Back Cover LIMITED WARRANTY Back Cover WARNING DECAL PLACEMENT This drawing shows the location(s) of this manual and request a free replacement decal. NORDICTRACK...
... size. If a decal is a registered trademark of ICON IP, Inc. 2 Apply the decal in the location shown. TABLE OF CONTENTS WARNING DECAL PLACEMENT 2 IMPORTANT PRECAUTIONS 3 BEFORE YOU BEGIN 4 PART IDENTIFICATION CHART 5 ASSEMBLY 6 ADJUSTMENT 15 MAINTENANCE 18 CABLE DIAGRAM 19 EXERCISE GUIDELINES 20 PART LIST 22 EXPLODED DRAWING 24 ORDERING REPLACEMENT PARTS Back Cover LIMITED WARRANTY Back Cover WARNING DECAL PLACEMENT This drawing shows the location(s) of this manual and request a free replacement decal. NORDICTRACK...

English Manual
Page 3
... this manual and all warnings on your weight bench before the weight bench is intended for personal injury or property damage sustained by or through the use only. Inspect and properly tighten all times. 7. Replace any exercise program, consult your weight bench. If the cables bind as described in a commercial, rental, or institutional setting. 5. Always disconnect the curl bar when performing an exercise that the cables are exercising, stop...
... this manual and all warnings on your weight bench before the weight bench is intended for personal injury or property damage sustained by or through the use only. Inspect and properly tighten all times. 7. Replace any exercise program, consult your weight bench. If the cables bind as described in a commercial, rental, or institutional setting. 5. Always disconnect the curl bar when performing an exercise that the cables are exercising, stop...

English Manual
Page 4
... Pulley Station Arm Weight Carriage Curl Pad Curl Bar Leg Lever Low Pulley Station Barbell Spotter Seat Accessories Note: The terms "right side" and "left on the front cover of the body. they do not correspond to right and left side" are determined relative to the backrest; If you for selecting the versatile NordicTrack® COMPETITION SERIES E8100 weight bench. The model number and the location of the serial number...
... Pulley Station Arm Weight Carriage Curl Pad Curl Bar Leg Lever Low Pulley Station Barbell Spotter Seat Accessories Note: The terms "right side" and "left on the front cover of the body. they do not correspond to right and left side" are determined relative to the backrest; If you for selecting the versatile NordicTrack® COMPETITION SERIES E8100 weight bench. The model number and the location of the serial number...

English Manual
Page 5
... (65) Arm Stop (36) M10 x 55mm Screw (94) M6 x 65mm Screw (120) M10 x 65mm Carriage Bolt (121) M10 x 65mm Bolt (82) M12 x 75mm Screw (88) M10 x 107mm Bolt Set (106) M10 x 168mm Bolt (46) M6 x 170mm Screw (78) 5 If a part is not in the hardware kit, check to identify small parts used in parentheses by each drawing is the key number of the part, from the PART LIST near...
... (65) Arm Stop (36) M10 x 55mm Screw (94) M6 x 65mm Screw (120) M10 x 65mm Carriage Bolt (121) M10 x 65mm Bolt (82) M12 x 75mm Screw (88) M10 x 107mm Bolt Set (106) M10 x 168mm Bolt (46) M6 x 170mm Screw (78) 5 If a part is not in the hardware kit, check to identify small parts used in parentheses by each drawing is the key number of the part, from the PART LIST near...
English Manual
Page 6
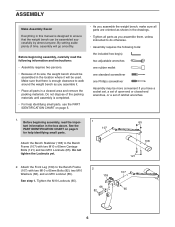
... plenty of time, assembly will be assembled in the location where it . • Place all parts as you assemble the weight bench, make sure all parts are oriented as you have a socket set, a set of open-end or closed-end wrenches, or a set of its size, the weight bench should be used. Attach the Front Leg (109) to the Bench Frame (107) with two M10 x 65mm Carriage Bolts (121) and...
... plenty of time, assembly will be assembled in the location where it . • Place all parts as you assemble the weight bench, make sure all parts are oriented as you have a socket set, a set of open-end or closed-end wrenches, or a set of its size, the weight bench should be used. Attach the Front Leg (109) to the Bench Frame (107) with two M10 x 65mm Carriage Bolts (121) and...

English Manual
Page 7
... Backrest Frames. Set the end of the Backrest Post (111) in the Bench Frame. Do not overtighten the Locknut; Do not tighten the Locknut yet. 118 Hole 65 66 118 Hole 66 46 111 4. Attach the Backrest Frames to the Backrest Frames (118) with four M6 x 40mm Screws (80) and...61). Tighten the M6 x 40mm Screws (80). 117 65 66 107 118 111 83 66 Grease Slot 7 Tighten the M10 Locknut (65). Attach the Backrest (117) to the Backrest Post (111) with the Bolt, two M10 Washers (66), and an M10 Locknut (65). See step 4. Apply some of the included grease to the Bench Frame ...
... Backrest Frames. Set the end of the Backrest Post (111) in the Bench Frame. Do not overtighten the Locknut; Do not tighten the Locknut yet. 118 Hole 65 66 118 Hole 66 46 111 4. Attach the Backrest Frames to the Backrest Frames (118) with four M6 x 40mm Screws (80) and...61). Tighten the M6 x 40mm Screws (80). 117 65 66 107 118 111 83 66 Grease Slot 7 Tighten the M10 Locknut (65). Attach the Backrest (117) to the Backrest Post (111) with the Bolt, two M10 Washers (66), and an M10 Locknut (65). See step 4. Apply some of the included grease to the Bench Frame ...

English Manual
Page 8
...Leg Lever (110) to the Bench Frame (107) with the Bolt Set. Slide two Foam Pads (128) onto the Long Pad Tube. Attach the Seat (116) to the Front Leg 7 (109) with two M6 x 65mm Screws (120) and two M6 6 Washers (61). 116 61 107 120 7. rel of the Bolt Set is inserted through both sides of an M10 x 107mm Bolt Set... (106). Insert the Long Pad Tube (130) into each Foam Pad. 8 134 128 109 130 128 134 8 Then, press a 19mm Round Cap (134) into the Front Leg (109). Make sure that the bar- 6. Grease ...
...Leg Lever (110) to the Bench Frame (107) with the Bolt Set. Slide two Foam Pads (128) onto the Long Pad Tube. Attach the Seat (116) to the Front Leg 7 (109) with two M6 x 65mm Screws (120) and two M6 6 Washers (61). 116 61 107 120 7. rel of the Bolt Set is inserted through both sides of an M10 x 107mm Bolt Set... (106). Insert the Long Pad Tube (130) into each Foam Pad. 8 134 128 109 130 128 134 8 Then, press a 19mm Round Cap (134) into the Front Leg (109). Make sure that the bar- 6. Grease ...

English Manual
Page 13
..., tighten a Weight Bar End Knob 22 (44) into an adjustment slot near the bottom of the Left and Right 20 Uprights (1, 2). Attach the other Weight Bar Adapter (not shown) in the Left and Right Uprights (1, 2). 22. Engage each Spotter Hook (24) into the Weight Bar. Always position both Weight Bar Spotters (23) at the same height. 24 23 2 24 23 1 21. Slide a Weight Bar Adapter (22) onto the Weight Bar...
..., tighten a Weight Bar End Knob 22 (44) into an adjustment slot near the bottom of the Left and Right 20 Uprights (1, 2). Attach the other Weight Bar Adapter (not shown) in the Left and Right Uprights (1, 2). 22. Engage each Spotter Hook (24) into the Weight Bar. Always position both Weight Bar Spotters (23) at the same height. 24 23 2 24 23 1 21. Slide a Weight Bar Adapter (22) onto the Weight Bar...

English Manual
Page 14
... Upright (2). 2 24. Before using the weight bench, pull each cable a few times to remove it by tightening the cables. IMPORTANT: If the cables are not properly installed, they may be left over the pulleys. Set the Barbell Spotter (29) onto the Left Upright (1) below the Barbell Rest (30). Set a Barbell Rest (30) onto the Left Upright (1). See MAINTENANCE on page 19 for proper cable routing. The use of the cables...
... Upright (2). 2 24. Before using the weight bench, pull each cable a few times to remove it by tightening the cables. IMPORTANT: If the cables are not properly installed, they may be left over the pulleys. Set the Barbell Spotter (29) onto the Left Upright (1) below the Barbell Rest (30). Set a Barbell Rest (30) onto the Left Upright (1). See MAINTENANCE on page 19 for proper cable routing. The use of the cables...

English Manual
Page 15
... the correct form for important information about how to adjust the weight bench. Fully tighten the Curl Knob. 114 113 136 109 ATTACHING THE CURL BAR To use the Curl Pad (114), insert the Curl Post (113) into one of the Backrest (117), lift the indicated handle on page 20 for several exercises. Also, refer to the accompanying exercise guide to the Leg Lever...
... the correct form for important information about how to adjust the weight bench. Fully tighten the Curl Knob. 114 113 136 109 ATTACHING THE CURL BAR To use the Curl Pad (114), insert the Curl Post (113) into one of the Backrest (117), lift the indicated handle on page 20 for several exercises. Also, refer to the accompanying exercise guide to the Leg Lever...

English Manual
Page 16
... Hook into a slot in the Right Upright. Note: Always start an exercise with a Spring Collar (27). Raise or lower the Weight Bar Spotter to move the right Weight Bar Spotter (23), use the Leg Lever (110), slide the desired weights (not included) onto the Olympic Adapter (125). To do this, see step 24 on page 14. Adjust the left Weight Bar Spotter (23) and the left Spotter...
... Hook into a slot in the Right Upright. Note: Always start an exercise with a Spring Collar (27). Raise or lower the Weight Bar Spotter to move the right Weight Bar Spotter (23), use the Leg Lever (110), slide the desired weights (not included) onto the Olympic Adapter (125). To do this, see step 24 on page 14. Adjust the left Weight Bar Spotter (23) and the left Spotter...

English Manual
Page 17
... Ankle Strap is in the same way. See the inset drawing. ATTACHING THE ACCESSORIES TO THE HIGH PULLEY STATION To use the low pulley station, first place the desired weights on the weight carriage (see ADDING WEIGHTS TO THE BARBELL OR THE WEIGHT CARRIAGE on the Cable Stop (103). USING THE LOCKING BAR Grip the Locking Bar (19) with the clip on page 18). Turn...
... Ankle Strap is in the same way. See the inset drawing. ATTACHING THE ACCESSORIES TO THE HIGH PULLEY STATION To use the low pulley station, first place the desired weights on the weight carriage (see ADDING WEIGHTS TO THE BARBELL OR THE WEIGHT CARRIAGE on the Cable Stop (103). USING THE LOCKING BAR Grip the Locking Bar (19) with the clip on page 18). Turn...
English Manual
Page 18
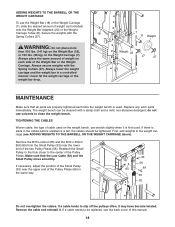
... 27 MAINTENANCE Make sure that the Low Cable (52) and the Small Pulley move smoothly. If there is slack in the cables before resistance is first used. Reattach the Small Pulley to the hole closer to the center of weight (not included) onto the Weight Bar Adapters (22) or the Weight Carriage Tubes (8). Make sure that all parts are properly tightened each side of cable used . If a cable needs...
... 27 MAINTENANCE Make sure that the Low Cable (52) and the Small Pulley move smoothly. If there is slack in the cables before resistance is first used. Reattach the Small Pulley to the hole closer to the center of weight (not included) onto the Weight Bar Adapters (22) or the Weight Carriage Tubes (8). Make sure that all parts are properly tightened each side of cable used . If a cable needs...

English Manual
Page 19
... cables and the cable traps are assembled correctly. The numbers in each drawing show the proper routing for that the cable traps do not touch or bind the cables. Use the diagram to make sure that the cables and the cable traps are not assembled correctly, the weight bench will not function properly and damage may occur. CABLE DIAGRAM The diagram below shows the proper routing of the cables. Arm Cable...
... cables and the cable traps are assembled correctly. The numbers in each drawing show the proper routing for that the cable traps do not touch or bind the cables. Use the diagram to make sure that the cables and the cable traps are not assembled correctly, the weight bench will not function properly and damage may occur. CABLE DIAGRAM The diagram below shows the proper routing of the cables. Arm Cable...

English Manual
Page 20
... lose weight, use a low amount of resistance and increase the number of resistance. On the exercise guide accompanying this manual you perform. A "set . Warming up . Schedule your workouts for the time of day when your energy level is a series of repetitions.) The proper amount of resistance for more strenuous exercise by increasing circulation, raising your body time to their capacity. You can complete 3 sets of resistance. To...
... lose weight, use a low amount of resistance and increase the number of resistance. On the exercise guide accompanying this manual you perform. A "set . Warming up . Schedule your workouts for the time of day when your energy level is a series of repetitions.) The proper amount of resistance for more strenuous exercise by increasing circulation, raising your body time to their capacity. You can complete 3 sets of resistance. To...

English Manual
Page 21
... a weight loss workout. Write the date, the exercises performed, the resistance used, and the numbers of thigh) J. Obliques (waist) E. Brachioradials (forearm) F. Sartorius (front of sets and repetitions completed. Posterior Deltoid (shoulder) R. Spinae Erectors (lower back) U. The exertion stroke of thigh) I J K L M N O P Q R S T U V W X MUSCLE CHART A. Rest for a toning work- Exhale during the return stroke. Move slowly as you can without pausing. Biceps (front of arm...
... a weight loss workout. Write the date, the exercises performed, the resistance used, and the numbers of thigh) J. Obliques (waist) E. Brachioradials (forearm) F. Sartorius (front of sets and repetitions completed. Posterior Deltoid (shoulder) R. Spinae Erectors (lower back) U. The exertion stroke of thigh) I J K L M N O P Q R S T U V W X MUSCLE CHART A. Rest for a toning work- Exhale during the return stroke. Move slowly as you can without pausing. Biceps (front of arm...

English Manual
Page 22
... Bar Weight Bar Carriage V-pulley Weight Bar Adapter Weight Bar Spotter Spotter Hook Pulley Handle Ankle Strap Spring Collar Foot Plate Barbell Spotter Barbell Rest Swivel Bracket Cap Swivel Bracket Small Pulley Large Pulley Right Rear Upright Cap Arm Stop Rack Foot Front Upright Cap M4 x 19mm Self-tapping Screw Rack Foot Pad Center Upright Foot Pulley Bracket Spacer Large Cable Trap Weight Bar End Knob Weight Bar Spotter Bumper M10 x 168mm Bolt M4 x 16mm Screw M10 x 155mm Bolt Arm Bushing Arm Cable Key...
... Bar Weight Bar Carriage V-pulley Weight Bar Adapter Weight Bar Spotter Spotter Hook Pulley Handle Ankle Strap Spring Collar Foot Plate Barbell Spotter Barbell Rest Swivel Bracket Cap Swivel Bracket Small Pulley Large Pulley Right Rear Upright Cap Arm Stop Rack Foot Front Upright Cap M4 x 19mm Self-tapping Screw Rack Foot Pad Center Upright Foot Pulley Bracket Spacer Large Cable Trap Weight Bar End Knob Weight Bar Spotter Bumper M10 x 168mm Bolt M4 x 16mm Screw M10 x 155mm Bolt Arm Bushing Arm Cable Key...

English Manual
Page 23
... Adaptor Curl Bar Cap Front Leg Plate Foam Pad Short Pad Tube Long Pad Tube Bench Stabilizer Cap 150mm x 50mm Inner Cap Bracket Snap Ring 19mm Round Cap Leg Bumper Curl Knob Weight Spacer Userʼs Manual Exercise Guide Grease Packet Hex Key Note: Specifications are not illustrated. 23 See the back cover of this manual for information about ordering replacement parts. *These parts are subject to change without notice...
... Adaptor Curl Bar Cap Front Leg Plate Foam Pad Short Pad Tube Long Pad Tube Bench Stabilizer Cap 150mm x 50mm Inner Cap Bracket Snap Ring 19mm Round Cap Leg Bumper Curl Knob Weight Spacer Userʼs Manual Exercise Guide Grease Packet Hex Key Note: Specifications are not illustrated. 23 See the back cover of this manual for information about ordering replacement parts. *These parts are subject to change without notice...

English Manual
Page 28
... cover of this manual) • the key number and description of the replacement part(s) (see the front cover of this warranty is limited to repairing or replacing, at ICONʼs option, the product through one of its authorized service centers. Parts and labor are warranted for indirect, special, or consequential damages arising out of or in lieu of any and all other rights that specifically set...
... cover of this manual) • the key number and description of the replacement part(s) (see the front cover of this warranty is limited to repairing or replacing, at ICONʼs option, the product through one of its authorized service centers. Parts and labor are warranted for indirect, special, or consequential damages arising out of or in lieu of any and all other rights that specifically set...


