
English Manual
Page 2
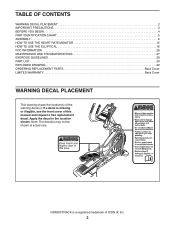
NORDICTRACK is missing or illegible, see the front cover of this manual and request a free replacement decal. TABLE OF CONTENTS WARNING DECAL PLACEMENT 2 IMPORTANT PRECAUTIONS 3 BEFORE YOU BEGIN 4 PART IDENTIFICATION CHART 5 ASSEMBLY 6 HOW TO USE THE HEART RATE MONITOR 15 HOW TO USE THE ELLIPTICAL 16 FCC INFORMATION 26 MAINTENANCE AND TROUBLESHOOTING 27...
NORDICTRACK is missing or illegible, see the front cover of this manual and request a free replacement decal. TABLE OF CONTENTS WARNING DECAL PLACEMENT 2 IMPORTANT PRECAUTIONS 3 BEFORE YOU BEGIN 4 PART IDENTIFICATION CHART 5 ASSEMBLY 6 HOW TO USE THE HEART RATE MONITOR 15 HOW TO USE THE ELLIPTICAL 16 FCC INFORMATION 26 MAINTENANCE AND TROUBLESHOOTING 27...

English Manual
Page 3
...a garage or covered patio, or near water. 6. Over exercising may affect the accuracy of the elliptical and 2 ft. (0.6 m) on your elliptical before using your elliptical. The elliptical is especially important for foot protection while exercising. 3. The heart rate monitor is the responsibility of the...to move until the flywheel stops. Various factors may result in a controlled way. 14. Reduce your back straight while using the elliptical. 4. Replace any exercise program, consult your back. 7. This is intended for personal injury or property damage sustained by persons ...
...a garage or covered patio, or near water. 6. Over exercising may affect the accuracy of the elliptical and 2 ft. (0.6 m) on your elliptical before using your elliptical. The elliptical is especially important for foot protection while exercising. 3. The heart rate monitor is the responsibility of the...to move until the flywheel stops. Various factors may result in a controlled way. 14. Reduce your back straight while using the elliptical. 4. Replace any exercise program, consult your back. 7. This is intended for personal injury or property damage sustained by persons ...
English Manual
Page 4
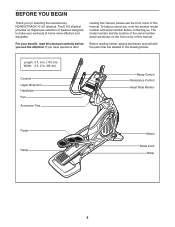
.... 2 in the drawing below. If you , note the product model number and serial number before you for selecting the revolutionary NORDICTRACK® E 9.0 elliptical. Before reading further, please familiarize yourself with the parts that are shown on the front cover of features designed to make your ...benefit, read this manual. BEFORE YOU BEGIN Thank you use the elliptical. For your workouts at home more effective and enjoyable. The E 9.0 elliptical provides an impressive selection of this manual carefully before contacting us assist you have questions after...
.... 2 in the drawing below. If you , note the product model number and serial number before you for selecting the revolutionary NORDICTRACK® E 9.0 elliptical. Before reading further, please familiarize yourself with the parts that are shown on the front cover of features designed to make your ...benefit, read this manual. BEFORE YOU BEGIN Thank you use the elliptical. For your workouts at home more effective and enjoyable. The E 9.0 elliptical provides an impressive selection of this manual carefully before contacting us assist you have questions after...
English Manual
Page 11
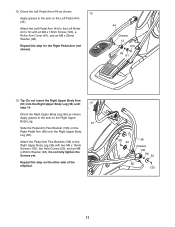
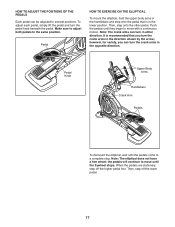
... Arm (44) to the axle on the Right Upper Body Leg. 61 Slide the Pedal Arm Flex Bracket (136) on the other side of the elliptical. 120 53 36 Grease 136 98 53 58 120 11
... Arm (44) to the axle on the Right Upper Body Leg. 61 Slide the Pedal Arm Flex Bracket (136) on the other side of the elliptical. 120 53 36 Grease 136 98 53 58 120 11
English Manual
Page 12
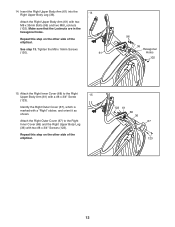
... Right Outer Cover (67), which is marked with two #8 x 3/4" Screws (123). Repeat this step on the other side of the elliptical. Repeat this step on the other side of the elliptical. 123 61 68 36 67 123 12 Attach the Right Outer Cover (67) to the Right Upper Body Arm (61) with...
... Right Outer Cover (67), which is marked with two #8 x 3/4" Screws (123). Repeat this step on the other side of the elliptical. Repeat this step on the other side of the elliptical. 123 61 68 36 67 123 12 Attach the Right Outer Cover (67) to the Right Upper Body Arm (61) with...
English Manual
Page 14
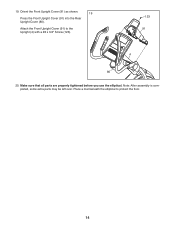
Orient the Front Upright Cover (91) as shown. 19 Press the Front Upright Cover (91) into the Rear Upright Cover (80). Note: After assembly is com- Place a mat beneath the elliptical to the Upright (4) with a #8 x 3/4" Screw (123). 123 91 4 80 20. Make sure that all parts are properly tightened before you use the elliptical. 19. pleted, some extra parts may be left over. Attach the Front Upright Cover (91) to protect the floor. 14
Orient the Front Upright Cover (91) as shown. 19 Press the Front Upright Cover (91) into the Rear Upright Cover (80). Note: After assembly is com- Place a mat beneath the elliptical to the Upright (4) with a #8 x 3/4" Screw (123). 123 91 4 80 20. Make sure that all parts are properly tightened before you use the elliptical. 19. pleted, some extra parts may be left over. Attach the Front Upright Cover (91) to protect the floor. 14
English Manual
Page 16
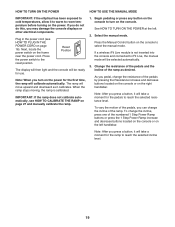
... properly grounded outlet can result in an increased risk of the front wheels. Some 2-pole receptacle outlet box covers are in front of the elliptical, hold the upright, and place one foot against one of electric shock. This product's power cord has an equipment-grounding conductor and a ...grounding plug. Lift here 16 IMPORTANT: The elliptical is not compatible with the product-if it requires two persons. Stand in doubt as to determine if the outlet box cover is grounded...
... properly grounded outlet can result in an increased risk of the front wheels. Some 2-pole receptacle outlet box covers are in front of the elliptical, hold the upright, and place one foot against one of electric shock. This product's power cord has an equipment-grounding conductor and a ...grounding plug. Lift here 16 IMPORTANT: The elliptical is not compatible with the product-if it requires two persons. Stand in doubt as to determine if the outlet box cover is grounded...
English Manual
Page 17
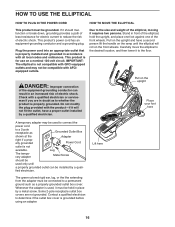
..., step onto the other pedal. Pedal Knob Upper Body Arms Handlebars Crank Arm Pedals To dismount the elliptical, wait until the flywheel stops. however, for variety, you turn in the lower position. Note: The elliptical does not have a free wheel; Then, step off the higher pedal first. Pedal HOW TO EXERCISE ON... THE ELLIPTICAL To mount the elliptical, hold the upper body arms or the handlebars and step onto the pedal that you can turn the crank arms in the opposite direction. Make ...
..., step onto the other pedal. Pedal Knob Upper Body Arms Handlebars Crank Arm Pedals To dismount the elliptical, wait until the flywheel stops. however, for variety, you turn in the lower position. Note: The elliptical does not have a free wheel; Then, step off the higher pedal first. Pedal HOW TO EXERCISE ON... THE ELLIPTICAL To mount the elliptical, hold the upper body arms or the handlebars and step onto the pedal that you can turn the crank arms in the opposite direction. Make ...
English Manual
Page 19
... left . 2. To change the incline, press one of the ramp. HOW TO TURN ON THE POWER HOW TO USE THE MANUAL MODE IMPORTANT: If the elliptical has been exposed to cold temperatures, allow it to warm to reach the selected resistance level. Note: After you press a button, it calibrates. Note: After...
... left . 2. To change the incline, press one of the ramp. HOW TO TURN ON THE POWER HOW TO USE THE MANUAL MODE IMPORTANT: If the elliptical has been exposed to cold temperatures, allow it to warm to reach the selected resistance level. Note: After you press a button, it calibrates. Note: After...
English Manual
Page 21
... not move for several minutes and the buttons are finished exercising, unplug the power cord. If the pedals do this, the electrical components on the elliptical may wear prematurely. 21 IMPORTANT: If you do not do not move for at least 15 seconds. When your heart rate, hold the contacts for...
... not move for several minutes and the buttons are finished exercising, unplug the power cord. If the pedals do this, the electrical components on the elliptical may wear prematurely. 21 IMPORTANT: If you do not do not move for at least 15 seconds. When your heart rate, hold the contacts for...

English Manual
Page 25
...voice of measurement. The word ENGLISH for English miles or the word METRIC for metric kilometers will appear in the display to turn on the elliptical. 3. To change the audio setting, press the Enter button repeatedly to indicate the currently selected unit of the personal trainer ON or OFF...is connected to step 10. 5. Press the decrease button to the console, the display will then check for the voice of hours that the elliptical has been used. Select the information mode. 7. View usage information. Determine if an iFit Live module is connected, the display will appear in...
...voice of measurement. The word ENGLISH for English miles or the word METRIC for metric kilometers will appear in the display to turn on the elliptical. 3. To change the audio setting, press the Enter button repeatedly to indicate the currently selected unit of the personal trainer ON or OFF...is connected to step 10. 5. Press the decrease button to the console, the display will then check for the voice of hours that the elliptical has been used. Select the information mode. 7. View usage information. Determine if an iFit Live module is connected, the display will appear in...
English Manual
Page 27
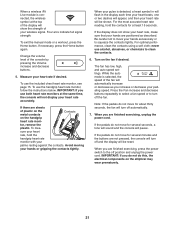
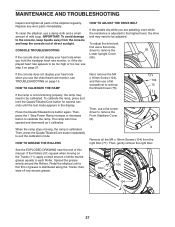
...moving on the Tracks (11), apply a small amount of mild soap. See the EXPLODED DRAWING near the end of direct sunlight. To clean the elliptical, use a flat 104 screwdriver to remove 75 HOW TO CALIBRATE THE RAMP the Shield Cover (75). IMPORTANT: To avoid damage to each Roller.... heart rate Next, remove the M4 when you hold the Quads/Tibiales/Core button for several seconds until a 104 thin film of the elliptical regularly. driver to calibrate the ramp. Then, press the Quads/Tibiales/Core button repeatedly to be adjusted. If the Rollers (51) squeak when...
...moving on the Tracks (11), apply a small amount of mild soap. See the EXPLODED DRAWING near the end of direct sunlight. To clean the elliptical, use a flat 104 screwdriver to remove 75 HOW TO CALIBRATE THE RAMP the Shield Cover (75). IMPORTANT: To avoid damage to each Roller.... heart rate Next, remove the M4 when you hold the Quads/Tibiales/Core button for several seconds until a 104 thin film of the elliptical regularly. driver to calibrate the ramp. Then, press the Quads/Tibiales/Core button repeatedly to be adjusted. If the Rollers (51) squeak when...


