
English Manual
Page 2
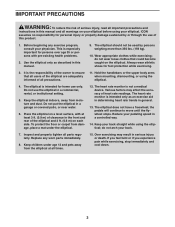
... 2 IMPORTANT PRECAUTIONS 3 BEFORE YOU BEGIN 4 PART IDENTIFICATION CHART 5 ASSEMBLY 6 HOW TO USE THE HEART RATE MONITOR 15 HOW TO USE THE ELLIPTICAL 16 FCC INFORMATION 26 MAINTENANCE AND TROUBLESHOOTING 27 EXERCISE GUIDELINES 29 PART LIST 30 EXPLODED DRAWING 32 ORDERING REPLACEMENT PARTS Back Cover LIMITED WARRANTY Back... free replacement decal. If a decal is a registered trademark of ICON IP, Inc. 2 Note: The decal(s) may not be shown at actual size. NORDICTRACK is missing or illegible, see the front cover of the warning decal(s). Apply the decal in the location shown.
... 2 IMPORTANT PRECAUTIONS 3 BEFORE YOU BEGIN 4 PART IDENTIFICATION CHART 5 ASSEMBLY 6 HOW TO USE THE HEART RATE MONITOR 15 HOW TO USE THE ELLIPTICAL 16 FCC INFORMATION 26 MAINTENANCE AND TROUBLESHOOTING 27 EXERCISE GUIDELINES 29 PART LIST 30 EXPLODED DRAWING 32 ORDERING REPLACEMENT PARTS Back Cover LIMITED WARRANTY Back... free replacement decal. If a decal is a registered trademark of ICON IP, Inc. 2 Note: The decal(s) may not be shown at actual size. NORDICTRACK is missing or illegible, see the front cover of the warning decal(s). Apply the decal in the location shown.
English Manual
Page 3
...Keep your pedaling speed in general. 13. Wear appropriate clothes while exercising; do not wear loose clothes that all users of the elliptical are adequately informed of all precautions. 11. If you feel faint or if you experience pain while exercising, stop immediately and cool...affect the accuracy of heart rate readings. Replace any exercise program, consult your back. 7. ICON assumes no responsibility for home use the elliptical in a garage or covered patio, or near water. 6. IMPORTANT PRECAUTIONS WARNING: To reduce the risk of serious injury, read all ...
...Keep your pedaling speed in general. 13. Wear appropriate clothes while exercising; do not wear loose clothes that all users of the elliptical are adequately informed of all precautions. 11. If you feel faint or if you experience pain while exercising, stop immediately and cool...affect the accuracy of heart rate readings. Replace any exercise program, consult your back. 7. ICON assumes no responsibility for home use the elliptical in a garage or covered patio, or near water. 6. IMPORTANT PRECAUTIONS WARNING: To reduce the risk of serious injury, read all ...
English Manual
Page 4
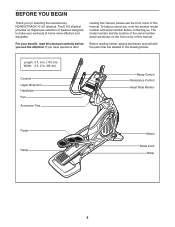
... please familiarize yourself with the parts that are shown on the front cover of this manual. If you for selecting the revolutionary NORDICTRACK® E 9.0 elliptical. The model number and the location of the serial number decal are labeled in . (66 cm) Console Upper Body Arm ...Handlebar Fan Accessory Tray Ramp Control Resistance Control Heart Rate Monitor Pedal Ramp Wheel Pedal Knob Roller 4 The E 9.0 elliptical provides an impressive selection of features designed to make your benefit, read this manual carefully before contacting us assist you, note the product...
... please familiarize yourself with the parts that are shown on the front cover of this manual. If you for selecting the revolutionary NORDICTRACK® E 9.0 elliptical. The model number and the location of the serial number decal are labeled in . (66 cm) Console Upper Body Arm ...Handlebar Fan Accessory Tray Ramp Control Resistance Control Heart Rate Monitor Pedal Ramp Wheel Pedal Knob Roller 4 The E 9.0 elliptical provides an impressive selection of features designed to make your benefit, read this manual carefully before contacting us assist you, note the product...
English Manual
Page 11
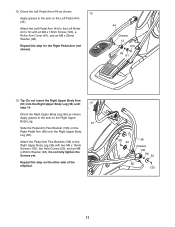
... Apply grease to the axle on the Right Upper Body Leg. 61 Slide the Pedal Arm Flex Bracket (136) on the other side of the elliptical. 120 53 36 Grease 136 98 53 58 120 11 Do not fully tighten the Screws yet. Apply grease to the axle on the Left...
... Apply grease to the axle on the Right Upper Body Leg. 61 Slide the Pedal Arm Flex Bracket (136) on the other side of the elliptical. 120 53 36 Grease 136 98 53 58 120 11 Do not fully tighten the Screws yet. Apply grease to the axle on the Left...
English Manual
Page 12
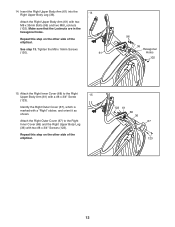
See step 13. Repeat this step on the other side of the elliptical. 123 61 68 36 67 123 12 14. Attach the Right Upper Body Arm (61) with a "Right" sticker, and orient it as shown. Tighten the ... the Right Inner Cover (68) and the Right Upper Body Leg (36) with a #8 x 3/4" Screw 15 (123). Repeat this step on the other side of the elliptical. Identify the Right Outer Cover (67), which is marked with two M8 x 35mm Bolts (96) and two M8 Locknuts (102). Attach the Right Outer Cover...
See step 13. Repeat this step on the other side of the elliptical. 123 61 68 36 67 123 12 14. Attach the Right Upper Body Arm (61) with a "Right" sticker, and orient it as shown. Tighten the ... the Right Inner Cover (68) and the Right Upper Body Leg (36) with a #8 x 3/4" Screw 15 (123). Repeat this step on the other side of the elliptical. Identify the Right Outer Cover (67), which is marked with two M8 x 35mm Bolts (96) and two M8 Locknuts (102). Attach the Right Outer Cover...
English Manual
Page 14
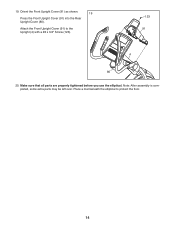
Note: After assembly is com- pleted, some extra parts may be left over. Make sure that all parts are properly tightened before you use the elliptical. Attach the Front Upright Cover (91) to protect the floor. 14 19. Place a mat beneath the elliptical to the Upright (4) with a #8 x 3/4" Screw (123). 123 91 4 80 20. Orient the Front Upright Cover (91) as shown. 19 Press the Front Upright Cover (91) into the Rear Upright Cover (80).
Note: After assembly is com- pleted, some extra parts may be left over. Make sure that all parts are properly tightened before you use the elliptical. Attach the Front Upright Cover (91) to protect the floor. 14 19. Place a mat beneath the elliptical to the Upright (4) with a #8 x 3/4" Screw (123). 123 91 4 80 20. Orient the Front Upright Cover (91) as shown. 19 Press the Front Upright Cover (91) into the Rear Upright Cover (80).
English Manual
Page 16
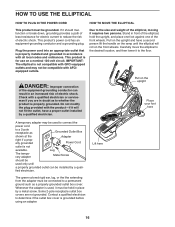
...the product-if it should be used , it must be held in place by a qualified electrician. Lift here 16 IMPORTANT: The elliptical is used only until the elliptical will not fit the outlet, have a second person lift the handle on the ramp until a properly grounded outlet can result in ...are not grounded. Stand in doubt as to whether the product is not available. Some 2-pole receptacle outlet box covers are in front of the elliptical, hold the upright, and place one foot against one of electric shock. Pull on the upright and have a proper outlet installed by a metal...
...the product-if it should be used , it must be held in place by a qualified electrician. Lift here 16 IMPORTANT: The elliptical is used only until the elliptical will not fit the outlet, have a second person lift the handle on the ramp until a properly grounded outlet can result in ...are not grounded. Stand in doubt as to whether the product is not available. Some 2-pole receptacle outlet box covers are in front of the elliptical, hold the upright, and place one foot against one of electric shock. Pull on the upright and have a proper outlet installed by a metal...
English Manual
Page 17
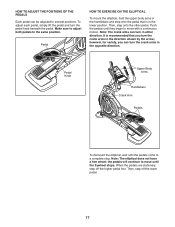
...pedals until they begin to move until the pedals come to several positions. Note: The crank arms can be adjusted to a complete stop. Note: The elliptical does not have a free wheel; however, for variety, you turn the crank arms in the direction shown by the arrow; Then, step onto the... direction. Make sure to adjust both pedals to move with a continuous motion. Pedal Knob Upper Body Arms Handlebars Crank Arm Pedals To dismount the elliptical, wait until the flywheel stops. To adjust each pedal, simply lift the pedal and turn the crank arms in the lower position. Pedal HOW ...
...pedals until they begin to move until the pedals come to several positions. Note: The crank arms can be adjusted to a complete stop. Note: The elliptical does not have a free wheel; however, for variety, you turn the crank arms in the direction shown by the arrow; Then, step onto the... direction. Make sure to adjust both pedals to move with a continuous motion. Pedal Knob Upper Body Arms Handlebars Crank Arm Pedals To dismount the elliptical, wait until the flywheel stops. To adjust each pedal, simply lift the pedal and turn the crank arms in the lower position. Pedal HOW ...
English Manual
Page 19
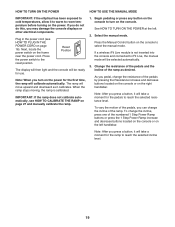
... Manual Control button on the frame near the power cord. HOW TO TURN ON THE POWER HOW TO USE THE MANUAL MODE IMPORTANT: If the elliptical has been exposed to cold temperatures, allow it calibrates. IMPORTANT: If the ramp does not calibrate automatically, see HOW TO PLUG IN THE POWER CORD...
... Manual Control button on the frame near the power cord. HOW TO TURN ON THE POWER HOW TO USE THE MANUAL MODE IMPORTANT: If the elliptical has been exposed to cold temperatures, allow it calibrates. IMPORTANT: If the ramp does not calibrate automatically, see HOW TO PLUG IN THE POWER CORD...
English Manual
Page 21
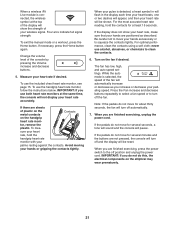
... is selected, the speed of the console by pressing the Volume increase and decrease buttons. 5. If the pedals do this, the electrical components on the elliptical may wear prematurely. 21 When you are sheets of plastic on the metal contacts Contacts on the fan if desired. IMPORTANT: If you increase or...
... is selected, the speed of the console by pressing the Volume increase and decrease buttons. 5. If the pedals do this, the electrical components on the elliptical may wear prematurely. 21 When you are sheets of plastic on the metal contacts Contacts on the fan if desired. IMPORTANT: If you increase or...

English Manual
Page 25
.... The display will appear in the display. 2. Then, press the Enter button. The console will show the total number of hours that the elliptical has been used. The word ENGLISH for English miles or the word METRIC for metric kilometers will also show the words NO IFIT MODULE. The... button repeatedly to the console, the display will then check for iFit Live workouts and firmware downloads. Press the decrease button to turn on the elliptical. 3. After a few seconds until the information mode appears in the display to view the audio setting for the voice of the personal trainer....
.... The display will appear in the display. 2. Then, press the Enter button. The console will show the total number of hours that the elliptical has been used. The word ENGLISH for English miles or the word METRIC for metric kilometers will also show the words NO IFIT MODULE. The... button repeatedly to the console, the display will then check for iFit Live workouts and firmware downloads. Press the decrease button to turn on the elliptical. 3. After a few seconds until the information mode appears in the display to view the audio setting for the voice of the personal trainer....
English Manual
Page 27
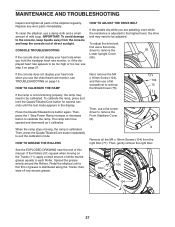
...exit the calibration mode. Then, press the Quads/Tibiales/Core button repeatedly to calibrate the ramp. Then, gently remove the right Disc. Pedal the elliptical until the test mode appears in the display. If the Rollers (51) squeak when moving , the ramp is not functioning properly, the ramp... the console, keep the console out of this manual. HOW TO GREASE THE ROLLERS Then, use a damp cloth and a small amount of the elliptical regularly. then, 104 wipe off any worn parts immediately. To adjust the drive belt, first use a flat 104 screwdriver to be calibrated. The ...
...exit the calibration mode. Then, press the Quads/Tibiales/Core button repeatedly to calibrate the ramp. Then, gently remove the right Disc. Pedal the elliptical until the test mode appears in the display. If the Rollers (51) squeak when moving , the ramp is not functioning properly, the ramp... the console, keep the console out of this manual. HOW TO GREASE THE ROLLERS Then, use a damp cloth and a small amount of the elliptical regularly. then, 104 wipe off any worn parts immediately. To adjust the drive belt, first use a flat 104 screwdriver to be calibrated. The ...


