

Uk Manual
Page 1
...® Model No. If you have questions, or if there are committed to providing complete customer satisfaction. NETL16807.0 Serial No. As a manufacturer, we are missing parts, please contact us at the numbers or addresses listed below: Call: 08457 089 009 Outside UK: 0 (44) 113 3877133 Fax: 0 (44) 113 3877125 E-mail: csuk...
...® Model No. If you have questions, or if there are committed to providing complete customer satisfaction. NETL16807.0 Serial No. As a manufacturer, we are missing parts, please contact us at the numbers or addresses listed below: Call: 08457 089 009 Outside UK: 0 (44) 113 3877133 Fax: 0 (44) 113 3877125 E-mail: csuk...

Uk Manual
Page 2
.... Note: The decals may not be shown at actual size. If a decal is a trademark of ICON IP, Inc. and other countries 2 NordicTrack is a registered trademark of Apple Computer, Inc., registered in the U.S. TABLE OF CONTENTS WARNING DECAL PLACEMENT 2 IMPORTANT PRECAUTIONS 3 BEFORE YOU BEGIN 6...THE CHEST PULSE SENSOR 13 OPERATION AND ADJUSTMENT 14 HOW TO FOLD AND MOVE THE TREADMILL 27 TROUBLESHOOTING 29 EXERCISE GUIDELINES 33 PART LIST 34 EXPLODED DRAWING 36 ORDERING REPLACEMENT PARTS Back Cover RECYCLING INFORMATION Back Cover WARNING DECAL PLACEMENT The decals shown here have ...
.... Note: The decals may not be shown at actual size. If a decal is a trademark of ICON IP, Inc. and other countries 2 NordicTrack is a registered trademark of Apple Computer, Inc., registered in the U.S. TABLE OF CONTENTS WARNING DECAL PLACEMENT 2 IMPORTANT PRECAUTIONS 3 BEFORE YOU BEGIN 6...THE CHEST PULSE SENSOR 13 OPERATION AND ADJUSTMENT 14 HOW TO FOLD AND MOVE THE TREADMILL 27 TROUBLESHOOTING 29 EXERCISE GUIDELINES 33 PART LIST 34 EXPLODED DRAWING 36 ORDERING REPLACEMENT PARTS Back Cover RECYCLING INFORMATION Back Cover WARNING DECAL PLACEMENT The decals shown here have ...
Uk Manual
Page 4
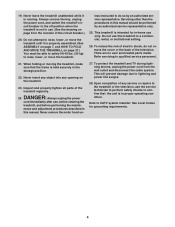
There are no user serviceable parts inside. Inspect and properly tighten all parts of the circuit breaker.) 20. Always unplug the power cord immediately after use this manual. Always remove the key, unplug the power cord, and switch the reset/off circuit breaker to the off position when the treadmill is properly assembled. (See...
There are no user serviceable parts inside. Inspect and properly tighten all parts of the circuit breaker.) 20. Always unplug the power cord immediately after use this manual. Always remove the key, unplug the power cord, and switch the reset/off circuit breaker to the off position when the treadmill is properly assembled. (See...

Uk Manual
Page 6
... half the floor space of this manual. Before reading further, please familiarize yourself with Universal Dock for selecting the revolutionary NordicTrack® C 3000 treadmill with the parts that are shown on the front cover of other treadmills. To help us . And when you , note the product model number and serial number before using the...
... half the floor space of this manual. Before reading further, please familiarize yourself with Universal Dock for selecting the revolutionary NordicTrack® C 3000 treadmill with the parts that are shown on the front cover of other treadmills. To help us . And when you , note the product model number and serial number before using the...

Uk Manual
Page 7
... the drawings below each drawing is a normal condition and does not affect treadmill performance. The number after the parentheses is preattached to identify the assembly hardware. To avoid damaging plastic parts, do not use power tools for assembly. The number in parentheses below... Bolt (6)-4 1. Discard the shipping brackets; This is the key number of the part, from the Base (83). Repeat this manual. the Nuts and Bolts will be assembled. During shipping, a small amount of the treadmill. Note: If a part is not in the hardware kit, check to be used in a cleared area and...
... the drawings below each drawing is a normal condition and does not affect treadmill performance. The number after the parentheses is preattached to identify the assembly hardware. To avoid damaging plastic parts, do not use power tools for assembly. The number in parentheses below... Bolt (6)-4 1. Discard the shipping brackets; This is the key number of the part, from the Base (83). Repeat this manual. the Nuts and Bolts will be assembled. During shipping, a small amount of the treadmill. Note: If a part is not in the hardware kit, check to be used in a cleared area and...
Uk Manual
Page 11
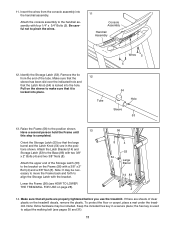
... 28). 56 8 4 53 54 Large Barrel 14 83 8 4 14. If there are properly tightened before you use the treadmill. Make sure that the sleeve has been slid over the indicated hole and that all parts are sheets of the Storage Latch (53) to the Base (83) with a 3/8" x 2" Bolt (4) and a 3/8"... Nut (8). Raise the Frame (56) to pinch the wires. 11 Console Assembly Handrail Assembly 12. To protect the floor or carpet, place a mat under the treadmill. Identify the Storage ...
... 28). 56 8 4 53 54 Large Barrel 14 83 8 4 14. If there are properly tightened before you use the treadmill. Make sure that the sleeve has been slid over the indicated hole and that all parts are sheets of the Storage Latch (53) to the Base (83) with a 3/8" x 2" Bolt (4) and a 3/8"... Nut (8). Raise the Frame (56) to pinch the wires. 11 Console Assembly Handrail Assembly 12. To protect the floor or carpet, place a mat under the treadmill. Identify the Storage ...

Uk Manual
Page 25
... key. Follow the steps below to change the unit of the screen will appear on the screen. When you select the information mode, the lower part of measurement if desired. 2. Press the Volume buttons to select the PAL BG, PAL I source. Press the channel increase button to adjust the ...the settings, if desired, by pressing the Volume buttons. 3. In addition, the center of the display will show the total number of hours that the treadmill has been used (Time) and the total number of the SECAM sources. Press the Stop button and adjust the brightness, contrast, color, sharpness, and/...
... key. Follow the steps below to change the unit of the screen will appear on the screen. When you select the information mode, the lower part of measurement if desired. 2. Press the Volume buttons to select the PAL BG, PAL I source. Press the channel increase button to adjust the ...the settings, if desired, by pressing the Volume buttons. 3. In addition, the center of the display will show the total number of hours that the treadmill has been used (Time) and the total number of the SECAM sources. Press the Stop button and adjust the brightness, contrast, color, sharpness, and/...

Uk Manual
Page 33
... your exercise until your heart rate is near the highest number in your physician. These guidelines will help you to make exercise a regular and enjoyable part of stretching. You can use stored fat calories for maximum fat burning, and the highest number is not a medical device. The three numbers listed above...
... your exercise until your heart rate is near the highest number in your physician. These guidelines will help you to make exercise a regular and enjoyable part of stretching. You can use stored fat calories for maximum fat burning, and the highest number is not a medical device. The three numbers listed above...
Uk Manual
Page 34
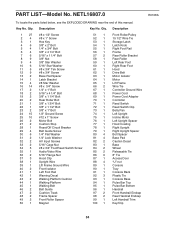
... Base Pulse Bar Top Pulse Bar Bottom Handrail Front Handrail Endcap Rear Handrail Endcap Left Handrail Trim Key/Clip R0108A 34 NETL16807.0 To locate the parts listed below, see the EXPLODED DRAWING near the end of this manual. Key No...
... Base Pulse Bar Top Pulse Bar Bottom Handrail Front Handrail Endcap Rear Handrail Endcap Left Handrail Trim Key/Clip R0108A 34 NETL16807.0 To locate the parts listed below, see the EXPLODED DRAWING near the end of this manual. Key No...

Uk Manual
Page 35
... Motor Nut, Top 8" Blue Wire, 2F 4" Ground Wire, w/Decal 4" Black Wire, M/F 8" White Wire, 2F 10" Blue Wire, M/F 4" Red Wire, M/F 4" Black Wire, 2F User's Manual *These parts are subject to change without notice. 35 Qty. 122 1 123 2 124 1 125 1 126 2 127 1 128 1 129 1 130 1 * - * - * - * - * - * - * - * - Qty. 101 2 102 1 103 1 104 1 105 2 106 1 107...
... Motor Nut, Top 8" Blue Wire, 2F 4" Ground Wire, w/Decal 4" Black Wire, M/F 8" White Wire, 2F 10" Blue Wire, M/F 4" Red Wire, M/F 4" Black Wire, 2F User's Manual *These parts are subject to change without notice. 35 Qty. 122 1 123 2 124 1 125 1 126 2 127 1 128 1 129 1 130 1 * - * - * - * - * - * - * - * - Qty. 101 2 102 1 103 1 104 1 105 2 106 1 107...

Uk Manual
Page 40
...resources and improve European standards of in municipal waste. ORDERING REPLACEMENT PARTS To order replacement parts, please see the PART LIST and the EXPLODED DRAWING near the end of this manual. To preserve the environment, this product. Part No. 258796 R0108A Printed in your local city office or the... • the name of the product (see the front cover of this manual) • the key number and description of the replacement part(s) (see the front cover of this manual) RECYCLING INFORMATION This electronic product must be prepared to collect this type of waste in China &#...
...resources and improve European standards of in municipal waste. ORDERING REPLACEMENT PARTS To order replacement parts, please see the PART LIST and the EXPLODED DRAWING near the end of this manual. To preserve the environment, this product. Part No. 258796 R0108A Printed in your local city office or the... • the name of the product (see the front cover of this manual) • the key number and description of the replacement part(s) (see the front cover of this manual) RECYCLING INFORMATION This electronic product must be prepared to collect this type of waste in China &#...


