
English Manual
Page 3
.... 3. The heart rate monitor is not working properly.) 8. Never move the walking belt while the power is not a medical device. When connecting the power cord (see your local NORDICTRACK dealer or call the telephone number on the front cover of this manual and all warnings on page 14. The heart rate monitor is turned off. Always wear athletic shoes. Adjust the speed in small increments to use of this treadmill are used only by...
.... 3. The heart rate monitor is not working properly.) 8. Never move the walking belt while the power is not a medical device. When connecting the power cord (see your local NORDICTRACK dealer or call the telephone number on the front cover of this manual and all warnings on page 14. The heart rate monitor is turned off. Always wear athletic shoes. Adjust the speed in small increments to use of this treadmill are used only by...
English Manual
Page 4
... that the storage latch is running. nance and adjustment procedures described in this treadmill in a commercial, rental, or institutional setting. 27. Never remove the motor hood un- SAVE THESE INSTRUCTIONS 4 This treadmill is intended for the location of the treadmill regularly. If you feel faint or if you experience pain while exercising, stop immediately and cool down. Always remove the key, unplug the power cord, and press the power switch into...
... that the storage latch is running. nance and adjustment procedures described in this treadmill in a commercial, rental, or institutional setting. 27. Never remove the motor hood un- SAVE THESE INSTRUCTIONS 4 This treadmill is intended for the location of the treadmill regularly. If you feel faint or if you experience pain while exercising, stop immediately and cool down. Always remove the key, unplug the power cord, and press the power switch into...
English Manual
Page 5
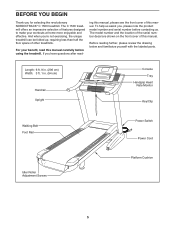
... review the drawing below and familiarize yourself with the labeled parts. To help us . The C 1500 treadmill offers an impressive selection of this manual. Length: 6 ft. 9 in. (206 cm) Width: 3 ft. 1 in. (94 cm) Handrail Upright Console Tray Handgrip Heart Rate Monitor Key/Clip Walking Belt Foot Rail Power Switch Power Cord Idler Roller Adjustment Screws Platform Cushion 5 BEFORE YOU BEGIN Thank you , please note the product model number and serial number before using the treadmill...
... review the drawing below and familiarize yourself with the labeled parts. To help us . The C 1500 treadmill offers an impressive selection of this manual. Length: 6 ft. 9 in. (206 cm) Width: 3 ft. 1 in. (94 cm) Handrail Upright Console Tray Handgrip Heart Rate Monitor Key/Clip Walking Belt Foot Rail Power Switch Power Cord Idler Roller Adjustment Screws Platform Cushion 5 BEFORE YOU BEGIN Thank you , please note the product model number and serial number before using the treadmill...

English Manual
Page 9
... try again. Console Wire 84 Console Assembly 84 Wire Tie Console Wire 89 9 See the inset drawing. 5. Do not press the Base Covers into place. IF YOU DO NOT CONNECT THE CONNECTORS PROPERLY, THE CONSOLE MAY BECOME DAMAGED WHEN YOU TURN ON THE POWER. Slide the Left Base Cover onto the Left Upright 5 (89). Connect the Upright Wire (84) to the console wire. Then, remove the wire tie from the Upright Wire. The connectors...
... try again. Console Wire 84 Console Assembly 84 Wire Tie Console Wire 89 9 See the inset drawing. 5. Do not press the Base Covers into place. IF YOU DO NOT CONNECT THE CONNECTORS PROPERLY, THE CONSOLE MAY BECOME DAMAGED WHEN YOU TURN ON THE POWER. Slide the Left Base Cover onto the Left Upright 5 (89). Connect the Upright Wire (84) to the console wire. Then, remove the wire tie from the Upright Wire. The connectors...
English Manual
Page 14
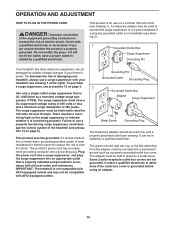
... voltage changes in your homeʼs power. This productʼs power cord has an equipment-grounding conductor and a grounding plug. The surge suppressor must be grounded. IMPORTANT: The treadmill is properly installed and grounded in place by a qualified electrician. There must be compatible with your treadmill, always use a surge suppressor with AFCI-equipped outlets. This product is UL 1449 listed as...
... voltage changes in your homeʼs power. This productʼs power cord has an equipment-grounding conductor and a grounding plug. The surge suppressor must be grounded. IMPORTANT: The treadmill is properly installed and grounded in place by a qualified electrician. There must be compatible with your treadmill, always use a surge suppressor with AFCI-equipped outlets. This product is UL 1449 listed as...
English Manual
Page 15
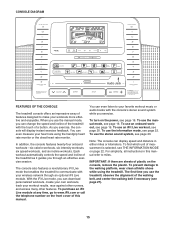
... effective and enjoyable. Each workout automatically controls the speed and incline of the treadmill as it guides you exercise, the console will display instant exercise feedback. To use the stereo sound system, see page 22. To use the manual mode, see THE INFORMATION MODE on the power, see page 27). 15 For simplicity, all instructions in either miles or kilometers. As you through an optional iFit Live module. You can...
... effective and enjoyable. Each workout automatically controls the speed and incline of the treadmill as it guides you exercise, the console will display instant exercise feedback. To use the stereo sound system, see page 22. To use the manual mode, see THE INFORMATION MODE on the power, see page 27). 15 For simplicity, all instructions in either miles or kilometers. As you through an optional iFit Live module. You can...

English Manual
Page 16
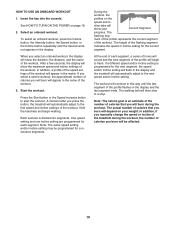
... the key is displayed in the display. To select a speed setting that includes a decimal- To stop . Plug in the power cord and press the power switch into the console. Next, locate the power switch on the foot rails of 3.5 mph, press the 3 button and then immediately press the 5 button. To turn off the demo mode, hold down the Stop button for the walking belt to iFit Live, the manual mode will gradually change by carefully taking a few seconds. band of the numbered 1 Step Speed buttons...
... the key is displayed in the display. To select a speed setting that includes a decimal- To stop . Plug in the power cord and press the power switch into the console. Next, locate the power switch on the foot rails of 3.5 mph, press the 3 button and then immediately press the 5 button. To turn off the demo mode, hold down the Stop button for the walking belt to iFit Live, the manual mode will gradually change by carefully taking a few seconds. band of the numbered 1 Step Speed buttons...
English Manual
Page 17
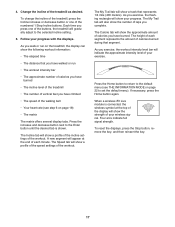
... have walked or run • The workout intensity bar • The approximate number of calories you have burned • The incline level of the treadmill • The number of vertical feet you complete. As you exercise, the flashing rectangle will appear at the top of the workout. The Calorie tab will gradually adjust to the selected incline setting. 5. To reset the displays, press the Stop button, remove the key...
... have walked or run • The workout intensity bar • The approximate number of calories you have burned • The incline level of the treadmill • The number of vertical feet you complete. As you exercise, the flashing rectangle will appear at the top of the workout. The Calorie tab will gradually adjust to the selected incline setting. 5. To reset the displays, press the Stop button, remove the key...
English Manual
Page 18
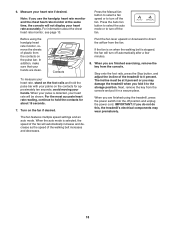
... finished using the handgrip heart rate monitor, remove the sheets of the walking belt increases and decreases. IMPORTANT: If you are finished exercising, remove the key from the console and put it to turn off the fan. Before using the treadmill, press the power switch into the off automatically after a few minutes. 8. In addition, make sure that your hands. avoid moving your hands are clean. Measure your heart rate will...
... finished using the handgrip heart rate monitor, remove the sheets of the walking belt increases and decreases. IMPORTANT: If you are finished exercising, remove the key from the console and put it to turn off the fan. Before using the treadmill, press the power switch into the off automatically after a few minutes. 8. In addition, make sure that your hands. avoid moving your hands are clean. Measure your heart rate will...
English Manual
Page 19
... display. Start the workout. A moment after you will burn during the workout, the number of the workout. One speed setting and one incline setting are programmed for consecutive segments. The actual number of calories that you press the button, the treadmill will begin walking. At the end of the workout will automatically adjust to start the workout. If a different speed and/or incline setting is divided into the console. Select an onboard workout. Each workout is programmed...
... display. Start the workout. A moment after you will burn during the workout, the number of the workout. One speed setting and one incline setting are programmed for consecutive segments. The actual number of calories that you press the button, the treadmill will begin walking. At the end of the workout will automatically adjust to start the workout. If a different speed and/or incline setting is divided into the console. Select an onboard workout. Each workout is programmed...
English Manual
Page 20
... manually override the setting by pressing the Speed or Incline buttons; Insert the key into the console. Press the increase and decrease buttons next to the Enter button to www.iFit.com or call the telephone number on the front cover of the elapsed time. To stop the workout at 1 mph. Insert the iFit Live module into the console. See step 6 on page 16. 4. Select a user. 7. The walking belt will download, you can switch users...
... manually override the setting by pressing the Speed or Incline buttons; Insert the key into the console. Press the increase and decrease buttons next to the Enter button to www.iFit.com or call the telephone number on the front cover of the elapsed time. To stop the workout at 1 mph. Insert the iFit Live module into the console. See step 6 on page 16. 4. Select a user. 7. The walking belt will download, you can switch users...
English Manual
Page 21
.... If you have completed. Note: Each iFit Live button can select an audio setting for your heart rate if desired. The walking belt will show a track and the number of laps you select an iFit Live workout, the display will count down to move at any time, press the Stop button. The My Trail tab will begin to download the next workout in the race. See step 3 on page 18.
.... If you have completed. Note: Each iFit Live button can select an audio setting for your heart rate if desired. The walking belt will show a track and the number of laps you select an iFit Live workout, the display will count down to move at any time, press the Stop button. The My Trail tab will begin to download the next workout in the race. See step 3 on page 18.
English Manual
Page 22
... button. While the demo mode is finished, the words TRANSFERS DONE will appear in the power cord, press the power switch into the reset position, and insert the key into the console and then release the Stop button. The distance display will function normally when you to select the manual main screen or the iFit Live screen as the default menu. 6. If a USB module is connected, you remove the key...
... button. While the demo mode is finished, the words TRANSFERS DONE will appear in the power cord, press the power switch into the reset position, and insert the key into the console and then release the Stop button. The distance display will function normally when you to select the manual main screen or the iFit Live screen as the default menu. 6. If a USB module is connected, you remove the key...

English Manual
Page 23
... are using a personal CD player and the CD skips, set the CD player on the floor or another flat surface instead of on your MP3 player, CD player, or other personal audio player. Then, plug the audio wire into the audio jack near the Manual button. Adjust the volume on the console. 23 Volume Increase Volume Decrease If you must connect your...
... are using a personal CD player and the CD skips, set the CD player on the floor or another flat surface instead of on your MP3 player, CD player, or other personal audio player. Then, plug the audio wire into the audio jack near the Manual button. Adjust the volume on the console. 23 Volume Increase Volume Decrease If you must connect your...
English Manual
Page 24
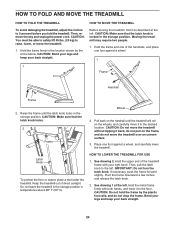
... power cord. CAUTION: Bend your legs and keep your back straight. 1 HOW TO MOVE THE TREADMILL Before moving the treadmill, fold it to raise, lower, or move the treadmill. 1. Raise the frame until the treadmill will roll on the handrail until the latch knob locks in temperatures above 85° F (30° C). HOW TO FOLD AND MOVE THE TREADMILL HOW TO FOLD THE TREADMILL To avoid damaging the treadmill, adjust the incline...
... power cord. CAUTION: Bend your legs and keep your back straight. 1 HOW TO MOVE THE TREADMILL Before moving the treadmill, fold it to raise, lower, or move the treadmill. 1. Raise the frame until the treadmill will roll on the handrail until the latch knob locks in temperatures above 85° F (30° C). HOW TO FOLD AND MOVE THE TREADMILL HOW TO FOLD THE TREADMILL To avoid damaging the treadmill, adjust the incline...
English Manual
Page 25
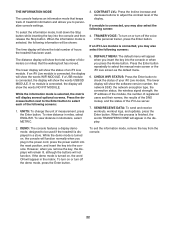
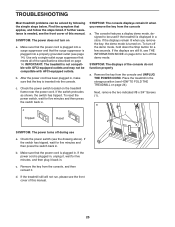
... reset the power switch, wait for five minutes and then press the switch back in . c Tripped Reset SYMPTOM: The console displays remain lit when you remove the key, the demo mode is needed, see HOW TO FOLD THE TREADMILL on . Remove the key from the console and UNPLUG THE POWER CORD. d. If further assistance is turned on page 24). IMPORTANT: The treadmill is displayed in the storage position (see the front cover of the console do...
... reset the power switch, wait for five minutes and then press the switch back in . c Tripped Reset SYMPTOM: The console displays remain lit when you remove the key, the demo mode is needed, see HOW TO FOLD THE TREADMILL on . Remove the key from the console and UNPLUG THE POWER CORD. d. If further assistance is turned on page 24). IMPORTANT: The treadmill is displayed in the storage position (see the front cover of the console do...

English Manual
Page 26
... console, and then release the Stop button and the Speed increase button. c. If you should be able to do so by an authorized service representative. If the walking belt still slows when walked on, see HOW TO LOWER THE TREADMILL FOR USE on page 24). Then, carefully pivot the Motor Hood (71) off the walking platform. Turn the Pulley until the walking belt is about 1/8 in the power cord, insert the key...
... console, and then release the Stop button and the Speed increase button. c. If you should be able to do so by an authorized service representative. If the walking belt still slows when walked on, see HOW TO LOWER THE TREADMILL FOR USE on page 24). Then, carefully pivot the Motor Hood (71) off the walking platform. Turn the Pulley until the walking belt is about 1/8 in the power cord, insert the key...

English Manual
Page 28
... health problems. The heart rate monitor is the heart rate for energy. Remember, the key to success is near the highest number in your body uses carbohydrate calories for aerobic exercise. Burning Fat-To burn fat effectively, you must perform aerobic exercise, which is near the middle number in your training zone for 20 to plan your breath. For aerobic exercise, adjust the intensity of heart rate readings. Training Zone Exercise-Exercise...
... health problems. The heart rate monitor is the heart rate for energy. Remember, the key to success is near the highest number in your body uses carbohydrate calories for aerobic exercise. Burning Fat-To burn fat effectively, you must perform aerobic exercise, which is near the middle number in your training zone for 20 to plan your breath. For aerobic exercise, adjust the intensity of heart rate readings. Training Zone Exercise-Exercise...

English Manual
Page 31
Key No. For information about ordering replacement parts, see the back cover of this manual. *These parts are subject to change without notice. Qty. 109 1 110 1 111 2 112 2 113 1 114 1 * - Qty. 101 2 102 1 103 1 104 1 105 1 106 2 107 1 108 1 Description Wheel Console Base Console Console Back Fan Assembly Handrail Spacer Console Frame Pulse Bar Top Key No. Description Pulse Ground Wire Pulse Bar Bottom 1/2" Rear Leveling Foot Nut 3/8" Flat Washer Short Hex Key #8 x 3/8" Screw Userʼs Manual Note: Specifications are not illustrated. 31
Key No. For information about ordering replacement parts, see the back cover of this manual. *These parts are subject to change without notice. Qty. 109 1 110 1 111 2 112 2 113 1 114 1 * - Qty. 101 2 102 1 103 1 104 1 105 1 106 2 107 1 108 1 Description Wheel Console Base Console Console Back Fan Assembly Handrail Spacer Console Frame Pulse Bar Top Key No. Description Pulse Ground Wire Pulse Bar Bottom 1/2" Rear Leveling Foot Nut 3/8" Flat Washer Short Hex Key #8 x 3/8" Screw Userʼs Manual Note: Specifications are not illustrated. 31
English Manual
Page 36
... in workmanship and material, under warranty. The warranty extended hereunder is limited to repairing or replacing, at ICONʼs option, the product through one of removal or installation; Go to the original purchaser (customer). The frame, drive motor, and walking platform are warranted for a lifetime. ICON Health & Fitness, Inc., 1500 S. 1000 W., Logan, UT 84321-9813 Part No. 312450 R0611A Printed in connection with respect to any kind...
... in workmanship and material, under warranty. The warranty extended hereunder is limited to repairing or replacing, at ICONʼs option, the product through one of removal or installation; Go to the original purchaser (customer). The frame, drive motor, and walking platform are warranted for a lifetime. ICON Health & Fitness, Inc., 1500 S. 1000 W., Logan, UT 84321-9813 Part No. 312450 R0611A Printed in connection with respect to any kind...


