
English Manual
Page 1
Model No. If you have questions, or if there are committed to providing complete customer satisfaction. Keep this equipment. NTEVEL99007.0 Serial No. As a manufacturer, we are missing parts, please contact us: Call: 08457 089 009 Outside UK: 0 (44) 113 3877133 Fax: 0 (44) 113 3877125 Email: [email protected] Write: ICON Health & Fitness, Ltd. USER'S MANUAL Unit 4 Revie Road Industrial Estate Revie Road, Beeston Leeds, LS11 8JG, UK CAUTION Read all precautions and instructions in this manual before using this manual for future reference. Serial Number Decal QUESTIONS?
Model No. If you have questions, or if there are committed to providing complete customer satisfaction. Keep this equipment. NTEVEL99007.0 Serial No. As a manufacturer, we are missing parts, please contact us: Call: 08457 089 009 Outside UK: 0 (44) 113 3877133 Fax: 0 (44) 113 3877125 Email: [email protected] Write: ICON Health & Fitness, Ltd. USER'S MANUAL Unit 4 Revie Road Industrial Estate Revie Road, Beeston Leeds, LS11 8JG, UK CAUTION Read all precautions and instructions in this manual before using this manual for future reference. Serial Number Decal QUESTIONS?

English Manual
Page 2
If a decal is a registered t2ra1d0e1m2a5rk of this manual and request a free replacement decal. Apply the decal in the locations shown. Note: The decal may not be shown at actual size. 258865 259345 21 166909 21 NordicTrack is missing or illegible, call the telephone number on the front ...cover of ICON IP, Inc. 209489 2 246724 246723 TABLE OF CONTENTS WARNING DECAL PLACEMENT 2 IMPORTANT PRECAUTIONS 3 BEFORE YOU BEGIN 4 ASSEMBLY 5 HOW TO USE THE CHEST PULSE SENSOR 12 HOW TO USE THE ELLIPTICAL ...
If a decal is a registered t2ra1d0e1m2a5rk of this manual and request a free replacement decal. Apply the decal in the locations shown. Note: The decal may not be shown at actual size. 258865 259345 21 166909 21 NordicTrack is missing or illegible, call the telephone number on the front ...cover of ICON IP, Inc. 209489 2 246724 246723 TABLE OF CONTENTS WARNING DECAL PLACEMENT 2 IMPORTANT PRECAUTIONS 3 BEFORE YOU BEGIN 4 ASSEMBLY 5 HOW TO USE THE CHEST PULSE SENSOR 12 HOW TO USE THE ELLIPTICAL ...

English Manual
Page 3
Before beginning any worn parts immediately. 6. Make sure that there is intended only as described in this manual. 3 Your elliptical exerciser should not be used by or through the use your elliptical exerciser only as an exercise aid in determining heart rate trends in general. 12. Wear appropriate exercise clothes when exercising; The pulse...
Before beginning any worn parts immediately. 6. Make sure that there is intended only as described in this manual. 3 Your elliptical exerciser should not be used by or through the use your elliptical exerciser only as an exercise aid in determining heart rate trends in general. 12. Wear appropriate exercise clothes when exercising; The pulse...

English Manual
Page 4
... familiarize yourself with the parts that are shown on the front cover of this manual carefully before contacting us assist you, note the product model number and serial number before you for purchasing the revolutionary NordicTrack® AUDIOSTRIDER 900 elliptical exerciser. The AUDIOSTRIDER 900 elliptical exerciser provides an array of the way. If you 're not exercising, the...
... familiarize yourself with the parts that are shown on the front cover of this manual carefully before contacting us assist you, note the product model number and serial number before you for purchasing the revolutionary NordicTrack® AUDIOSTRIDER 900 elliptical exerciser. The AUDIOSTRIDER 900 elliptical exerciser provides an array of the way. If you 're not exercising, the...

English Manual
Page 5
...assembly is the quantity needed for assembly. and rubber As you assemble the elliptical exerciser, use the drawings below each drawing is not in the hardware kit, check to identify small parts. Place all parts of this manual. Note: Some small parts may have been preassembled. M6 Split Washer (...your own Phillips screwdriver mallet . If a part is the key number of the part, from the PART LIST near the end of the elliptical exerciser in parentheses below to see if it has been preassembled. ASSEMBLY Assembly requires two persons. The number in a cleared area and remove ...
...assembly is the quantity needed for assembly. and rubber As you assemble the elliptical exerciser, use the drawings below each drawing is not in the hardware kit, check to identify small parts. Place all parts of this manual. Note: Some small parts may have been preassembled. M6 Split Washer (...your own Phillips screwdriver mallet . If a part is the key number of the part, from the PART LIST near the end of the elliptical exerciser in parentheses below to see if it has been preassembled. ASSEMBLY Assembly requires two persons. The number in a cleared area and remove ...

English Manual
Page 15
...books while you through your own workouts and store them out, see page 23. iFIT workout, see in memory for future use the manual mode of the pedals week Weight Loss workout. console, you achieve specific fitness enjoyable. Each workout automatically changes the resistance of the goals....with the touch of features enables the console to accept iFIT cards containing designed to make your heart outs. When you select the manual mode of the You can even measure your workouts more effective and workouts designed to www.iFIT.com rate using the handgrip pulse...
...books while you through your own workouts and store them out, see page 23. iFIT workout, see in memory for future use the manual mode of the pedals week Weight Loss workout. console, you achieve specific fitness enjoyable. Each workout automatically changes the resistance of the goals....with the touch of features enables the console to accept iFIT cards containing designed to make your heart outs. When you select the manual mode of the You can even measure your workouts more effective and workouts designed to www.iFIT.com rate using the handgrip pulse...
English Manual
Page 16
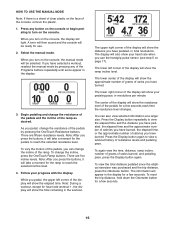
... ramp. Note: After you turn on page 17). To view the total distance pedaled since the elliptical exerciser was purchased and the trip distance, press the Odometer button. HOW TO USE THE MANUAL MODE Note: If there is a sheet of clear plastic on the console, the display will light... take a moment for the pedals to view a workout history of resistance levels and pedaling pace. While you have selected a workout, reselect the manual mode by pressing the OneTouch Resistance buttons. The upper right corner of carbs burned, and pedaling pace, press the Display button again. To again ...
... ramp. Note: After you turn on page 17). To view the total distance pedaled since the elliptical exerciser was purchased and the trip distance, press the Odometer button. HOW TO USE THE MANUAL MODE Note: If there is a sheet of clear plastic on the console, the display will light... take a moment for the pedals to view a workout history of resistance levels and pedaling pace. While you have selected a workout, reselect the manual mode by pressing the OneTouch Resistance buttons. The upper right corner of carbs burned, and pedaling pace, press the Display button again. To again ...

English Manual
Page 18
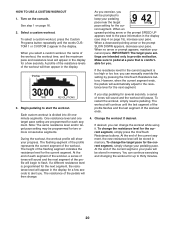
.... If the resistance level for the current segment is programmed for a few seconds to provide motivation. Turn on page 16. 2. As you exercise, you can manually override the setting by pressing the OneTouch Resistance buttons. When no arrow or prompt appears, maintain your pace. to start the workout. Begin pedaling to...
.... If the resistance level for the current segment is programmed for a few seconds to provide motivation. Turn on page 16. 2. As you exercise, you can manually override the setting by pressing the OneTouch Resistance buttons. When no arrow or prompt appears, maintain your pace. to start the workout. Begin pedaling to...
English Manual
Page 20
... upward-pointing arrow or the prompt SPEED UP appears next to start the workout. When no arrow or prompt appears, maintain your pace. You can manually override the setting by pressing the OneTouch Resistance buttons.
... upward-pointing arrow or the prompt SPEED UP appears next to start the workout. When no arrow or prompt appears, maintain your pace. You can manually override the setting by pressing the OneTouch Resistance buttons.

English Manual
Page 22
Heart rate workout 2 is too high or too low, you can manually override the setting by pressing the OneTouch Resistance buttons. At the end of each segment of the workout, a series of tones will sound and the ...
Heart rate workout 2 is too high or too low, you can manually override the setting by pressing the OneTouch Resistance buttons. At the end of each segment of the workout, a series of tones will sound and the ...
English Manual
Page 25
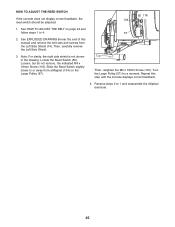
..., the reed switch should be adjusted. 50 116 134 1. Locate the Reed Switch (50). Then, retighten the M4 x 16mm Screw (116). Repeat this manual and remove the bolt sets and screws from a Magnet (134) on page 24 and follow steps 1 to 4. 57 2. Turn the Large Pulley (57)...the drawing. Loosen, but do not remove, the indicated M4 x 16mm Screw (116). Slide the Reed Switch slightly closer to 1 and reassemble the elliptical exerciser. 25 See EXPLODED DRAWING B near the end of this step until the console displays correct feedback. 4. Reverse steps 2 to or away from...
..., the reed switch should be adjusted. 50 116 134 1. Locate the Reed Switch (50). Then, retighten the M4 x 16mm Screw (116). Repeat this manual and remove the bolt sets and screws from a Magnet (134) on page 24 and follow steps 1 to 4. 57 2. Turn the Large Pulley (57)...the drawing. Loosen, but do not remove, the indicated M4 x 16mm Screw (116). Slide the Reed Switch slightly closer to 1 and reassemble the elliptical exerciser. 25 See EXPLODED DRAWING B near the end of this step until the console displays correct feedback. 4. Reverse steps 2 to or away from...

English Manual
Page 29
Key No. See the back cover of this manual for information about ordering replacement parts. *These parts are subject to change without notice. Description Right Lift Arm Lift Bushing Transformer Control Box Cover Motor ... Lift Reed Switch Switch Cover Power Socket Motor Spacer M4 x 10mm Screw M8 Nylon Locknut Magnet Right Side Ramp Cover M8 x 25mm Patch Screw User's Manual Hex Key Grease Packet Power Cord Lift Motor Wire Note: Specifications are not illustrated. 29 Qty. 101 4 102 8 103 8 104 4 105 4 106 10 107 8 108...
Key No. See the back cover of this manual for information about ordering replacement parts. *These parts are subject to change without notice. Description Right Lift Arm Lift Bushing Transformer Control Box Cover Motor ... Lift Reed Switch Switch Cover Power Socket Motor Spacer M4 x 10mm Screw M8 Nylon Locknut Magnet Right Side Ramp Cover M8 x 25mm Patch Screw User's Manual Hex Key Grease Packet Power Cord Lift Motor Wire Note: Specifications are not illustrated. 29 Qty. 101 4 102 8 103 8 104 4 105 4 106 10 107 8 108...

English Manual
Page 32
ORDERING REPLACEMENT PARTS To order replacement parts, please see the PART LIST and the EXPLODED DRAWING near the end of this manual) Part No. 258878 R1107A Printed in China © 2007 ICON IP, Inc. To help us assist you, be prepared to provide the following information when contacting us: • the model number and serial number of the product (see the front cover of this manual) • the name of the product (see the front cover of this manual) • the key number and description of the replacement part(s) (see the front cover of this manual.
ORDERING REPLACEMENT PARTS To order replacement parts, please see the PART LIST and the EXPLODED DRAWING near the end of this manual) Part No. 258878 R1107A Printed in China © 2007 ICON IP, Inc. To help us assist you, be prepared to provide the following information when contacting us: • the model number and serial number of the product (see the front cover of this manual) • the name of the product (see the front cover of this manual) • the key number and description of the replacement part(s) (see the front cover of this manual.

