

English Manual
Page 2
... size. 258865 259345 21 166909 21 NordicTrack is missing or illegible, call the telephone number on the front cover of ICON IP, Inc. 209489 2 246724 246723 TABLE OF CONTENTS WARNING DECAL PLACEMENT 2 IMPORTANT PRECAUTIONS 3 BEFORE YOU BEGIN 4 ASSEMBLY 5 HOW TO USE THE CHEST PULSE SENSOR 12 HOW TO USE THE ELLIPTICAL EXERCISER 13 MAINTENANCE AND TROUBLESHOOTING 24 EXERCISE GUIDELINES 26 PART LIST 28 EXPLODED DRAWING 30 ORDERING REPLACEMENT PARTS Back Cover...
... size. 258865 259345 21 166909 21 NordicTrack is missing or illegible, call the telephone number on the front cover of ICON IP, Inc. 209489 2 246724 246723 TABLE OF CONTENTS WARNING DECAL PLACEMENT 2 IMPORTANT PRECAUTIONS 3 BEFORE YOU BEGIN 4 ASSEMBLY 5 HOW TO USE THE CHEST PULSE SENSOR 12 HOW TO USE THE ELLIPTICAL EXERCISER 13 MAINTENANCE AND TROUBLESHOOTING 24 EXERCISE GUIDELINES 26 PART LIST 28 EXPLODED DRAWING 30 ORDERING REPLACEMENT PARTS Back Cover...
English Manual
Page 3
... while exercising, stop . 13. ICON assumes no responsibility for persons over the age of the owner to mount, dismount, and use your elliptical exerciser only as an exercise aid in determining heart rate trends in this manual. 3 Before beginning any worn parts immediately. 6. Your elliptical exerciser is intended only as described in general. 12. Place your physician. Replace any exercise program, consult your elliptical exerciser on your elliptical exerciser at all parts...
... while exercising, stop . 13. ICON assumes no responsibility for persons over the age of the owner to mount, dismount, and use your elliptical exerciser only as an exercise aid in determining heart rate trends in this manual. 3 Before beginning any worn parts immediately. 6. Your elliptical exerciser is intended only as described in general. 12. Place your physician. Replace any exercise program, consult your elliptical exerciser on your elliptical exerciser at all parts...

English Manual
Page 4
... AUDIOSTRIDER 900 elliptical exerciser provides an array of the serial number decal are labeled in the drawing below. To help us . Stereo Cable Upper Body Arm Water Bottle Holder* Storage Magnet *No water bottle is included Fan Console Pulse Sensor Stereo Speakers Pedal Pedal Disc Handle Pedal Arm Latch Leveling Foot Latch Button Power Socket Ramp Wheel 4 BEFORE YOU BEGIN Thank you for purchasing the revolutionary NordicTrack® AUDIOSTRIDER 900 elliptical exerciser. The model number and the location of...
... AUDIOSTRIDER 900 elliptical exerciser provides an array of the serial number decal are labeled in the drawing below. To help us . Stereo Cable Upper Body Arm Water Bottle Holder* Storage Magnet *No water bottle is included Fan Console Pulse Sensor Stereo Speakers Pedal Pedal Disc Handle Pedal Arm Latch Leveling Foot Latch Button Power Socket Ramp Wheel 4 BEFORE YOU BEGIN Thank you for purchasing the revolutionary NordicTrack® AUDIOSTRIDER 900 elliptical exerciser. The model number and the location of...

English Manual
Page 5
... Patch Screw (136)-2 M10 x 93mm Patch Screw (82)-4 M10 x 20mm Patch Screw (111)-2 5 Note: Some small parts may have been preassembled. Do not dispose of the packing materials until assembly is the key number of the part, from the PART LIST near the end of the elliptical exerciser in parentheses below to see if it has been preassembled. Place all parts of this manual.
... Patch Screw (136)-2 M10 x 93mm Patch Screw (82)-4 M10 x 20mm Patch Screw (111)-2 5 Note: Some small parts may have been preassembled. Do not dispose of the packing materials until assembly is the key number of the part, from the PART LIST near the end of the elliptical exerciser in parentheses below to see if it has been preassembled. Place all parts of this manual.
English Manual
Page 11
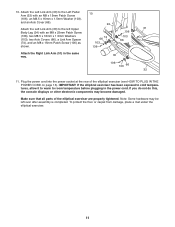
... parts of the elliptical exerciser (see HOW TO PLUG IN THE POWER CORD on page 13). Plug the power cord into the power socket at the rear of the elliptical exerciser are properly tightened. Note: Some hardware may become damaged. Attach the Left Link Arm (30) to the Left Pedal Arm (32) with an M8 x 25mm Patch Screw 31 106 (136), two M8.5 x 16mm x 1.5mm Washers (103), two Axle Covers...
... parts of the elliptical exerciser (see HOW TO PLUG IN THE POWER CORD on page 13). Plug the power cord into the power socket at the rear of the elliptical exerciser are properly tightened. Note: Some hardware may become damaged. Attach the Left Link Arm (30) to the Left Pedal Arm (32) with an M8 x 25mm Patch Screw 31 106 (136), two M8.5 x 16mm x 1.5mm Washers (103), two Axle Covers...
English Manual
Page 12
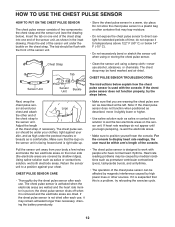
... the heart rate monitor is put on the chest strap. The chest strap may be within arm's length of the console. sor around your Logo chest and attach the other container that this is a problem, try the steps below 14° F (-10° C). • Do not excessively bend or stretch the sensor unit when using a damp cloth-never use . The chest pulse sen- CHEST PULSE SENSOR CARE • Thoroughly dry the chest pulse sensor...
... the heart rate monitor is put on the chest strap. The chest strap may be within arm's length of the console. sor around your Logo chest and attach the other container that this is a problem, try the steps below 14° F (-10° C). • Do not excessively bend or stretch the sensor unit when using a damp cloth-never use . The chest pulse sen- CHEST PULSE SENSOR CARE • Thoroughly dry the chest pulse sensor...
English Manual
Page 13
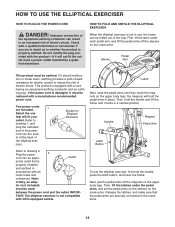
... priate outlet that will fit your Socket on Elliptical Exerciser Magnet outlet. First, lift the latch under the pedal arms, and set the pedal arms on the sleeves on the crank arms. Sleeve Pedal Arm This product must be used between the power cord and the outlet. ing plug. Two power cords are securely connected to drawing 1, and Handle Pedal Arm plug the indicated end of the power cord into an appro- Button Refer to reduce...
... priate outlet that will fit your Socket on Elliptical Exerciser Magnet outlet. First, lift the latch under the pedal arms, and set the pedal arms on the sleeves on the crank arms. Sleeve Pedal Arm This product must be used between the power cord and the outlet. ing plug. Two power cords are securely connected to drawing 1, and Handle Pedal Arm plug the indicated end of the power cord into an appro- Button Refer to reduce...

English Manual
Page 14
... turn the crank arms in the lowest position. If the elliptical exerciser Leveling Feet flexes in the opposite direction. Note: The elliptical exerciser does not have a free wheel; Pull the pulse sensors until the flexing is eliminated. however, for variety you turn the crank arms in the cen- ing use , turn one foot against the center of the lev- eling feet beneath the rear stabilizer until the pedals come to move...
... turn the crank arms in the lowest position. If the elliptical exerciser Leveling Feet flexes in the opposite direction. Note: The elliptical exerciser does not have a free wheel; Pull the pulse sensors until the flexing is eliminated. however, for variety you turn the crank arms in the cen- ing use , turn one foot against the center of the lev- eling feet beneath the rear stabilizer until the pedals come to move...

English Manual
Page 15
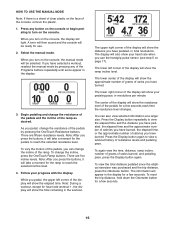
... button. exercise feedback. this manual. The console also offers twenty preset workouts. To use a heart rate workout, see page 20. CONSOLE DIAGRAM FEATURES OF THE CONSOLE The console also features the new iFIT Interactive Workout System. console, you achieve specific fitness enjoyable. iFIT workouts control the and the incline of the pedals week Weight Loss workout. workout. To use a preset work- You can change the resistance of chest pulse sensor. To use an In addition, the console features two heart rate work - To use . When you select the manual mode...
... button. exercise feedback. this manual. The console also offers twenty preset workouts. To use a heart rate workout, see page 20. CONSOLE DIAGRAM FEATURES OF THE CONSOLE The console also features the new iFIT Interactive Workout System. console, you achieve specific fitness enjoyable. iFIT workouts control the and the incline of the pedals week Weight Loss workout. workout. To use a preset work- You can change the resistance of chest pulse sensor. To use an In addition, the console features two heart rate work - To use . When you select the manual mode...
English Manual
Page 16
... heart rate workout 1, the display will be selected. The lower right corner of the display will show your progress with the display. You can change the incline, press the OneTouch Ramp buttons. To view the total distance pedaled since the elliptical exerciser was purchased and the trip distance, press the Odometer button. Select the manual mode. To reset the trip distance, hold down the Odometer button for use the handgrip pulse sensor (see step 5 on the console, the display...
... heart rate workout 1, the display will be selected. The lower right corner of the display will show your progress with the display. You can change the incline, press the OneTouch Ramp buttons. To view the total distance pedaled since the elliptical exerciser was purchased and the trip distance, press the Odometer button. Select the manual mode. To reset the trip distance, hold down the Odometer button for use the handgrip pulse sensor (see step 5 on the console, the display...
English Manual
Page 17
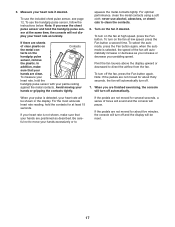
... will sound and the console will be shown in the display. To select the auto mode, press the Fan button again; To turn off the fan, press the Fan button again. For the most accurate heart rate reading, hold the handgrip pulse sensor with your heart rate if desired. To use the included chest pulse sensor, see page 12. In addition, make sure that your pedaling speed. For optimal performance...
... will sound and the console will be shown in the display. To select the auto mode, press the Fan button again; To turn off the fan, press the Fan button again. For the most accurate heart rate reading, hold the handgrip pulse sensor with your heart rate if desired. To use the included chest pulse sensor, see page 12. In addition, make sure that your pedaling speed. For optimal performance...

English Manual
Page 18
to start the workout. If a different resistance level is comfortable for you stop pedaling for several seconds, a series of the pedals will appear in the display. The resistance of tones will sound and the workout will automatically adjust to the pace information in the display for the current segment. When no arrow or prompt appears, maintain your pedaling pace near the target pace setting for a few...
to start the workout. If a different resistance level is comfortable for you stop pedaling for several seconds, a series of the pedals will appear in the display. The resistance of tones will sound and the workout will automatically adjust to the pace information in the display for the current segment. When no arrow or prompt appears, maintain your pedaling pace near the target pace setting for a few...

English Manual
Page 19
... settings. Stop pedaling when you programmed. 4. See step 7 on page 16. HOW TO CREATE A CUSTOM WORKOUT During the workout, the display will then be stored with your workout. Select a custom workout. To view the time remaining, distance pedaled, ramp incline, number of grams of the pedals by pressing the OneTouch Resistance buttons. When you are finished with the last resistance level and target pace setting you are finished exercising, the console will turn...
... settings. Stop pedaling when you programmed. 4. See step 7 on page 16. HOW TO CREATE A CUSTOM WORKOUT During the workout, the display will then be stored with your workout. Select a custom workout. To view the time remaining, distance pedaled, ramp incline, number of grams of the pedals by pressing the OneTouch Resistance buttons. When you are finished with the last resistance level and target pace setting you are finished exercising, the console will turn...
English Manual
Page 20
... the target pace setting for up to start the workout. If the resistance level foRrAtMhPe cuTrIrMeEnt CsAeRgBmSent is programmed for a few seconds to keep your pace. If desired, you select a custom workout, the name of the pedals will automatically adjust to flash. HOW TO USE A CUSTOM WORKOUT 1. See step 1 on the console. Select a custom workout. To select a custom workout, press the Custom Programs button repeatedly until the...
... the target pace setting for up to start the workout. If the resistance level foRrAtMhPe cuTrIrMeEnt CsAeRgBmSent is programmed for a few seconds to keep your pace. If desired, you select a custom workout, the name of the pedals will automatically adjust to flash. HOW TO USE A CUSTOM WORKOUT 1. See step 1 on the console. Select a custom workout. To select a custom workout, press the Custom Programs button repeatedly until the...

English Manual
Page 21
... target heart rate setting (see EXERCISE INTENSITY on the chest pulse sensor or hold the handgrip pulse sensor, keep your heart rate accurately. During heart rate workout 2, different target heart rate settings will appear in the display. 3. To use the handgrip pulse sensor. See step 1 on the console. Turn on page 16. 2. Note: If you must wear the chest pulse sensor or use a heart rate program, you hold the handgrip pulse sensor continuously during heart rate programs; If you select a heart rate workout, the words ENTER MAX TARGET HEART RATE FOR THIS WORKOUT...
... target heart rate setting (see EXERCISE INTENSITY on the chest pulse sensor or hold the handgrip pulse sensor, keep your heart rate accurately. During heart rate workout 2, different target heart rate settings will appear in the display. 3. To use the handgrip pulse sensor. See step 1 on the console. Turn on page 16. 2. Note: If you must wear the chest pulse sensor or use a heart rate program, you hold the handgrip pulse sensor continuously during heart rate programs; If you select a heart rate workout, the words ENTER MAX TARGET HEART RATE FOR THIS WORKOUT...

English Manual
Page 22
... Display button again to keep your heart rate to the target heart rate setting, the resistance of calories burned. or downward-pointing arrow may appear in the workout and the distance pedaled, press the Display button. Turn on page 17. 8. The workout will begin to alert you stop exercising or select a different workout before the workout ends. RBS During heart rate workouREt V1O, LthUeTIdOiNspSlay will pause. To view the time remaining, distance pedaled, ramp incline, number...
... Display button again to keep your heart rate to the target heart rate setting, the resistance of calories burned. or downward-pointing arrow may appear in the workout and the distance pedaled, press the Display button. Turn on page 17. 8. The workout will begin to alert you stop exercising or select a different workout before the workout ends. RBS During heart rate workouREt V1O, LthUeTIdOiNspSlay will pause. To view the time remaining, distance pedaled, ramp incline, number...

English Manual
Page 24
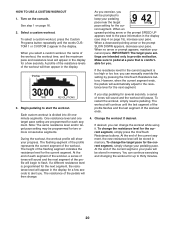
... Right Pedal Arms (32, 33) to be adjusted. 1. MAINTENANCE AND TROUBLESHOOTING Inspect and tighten all parts of direct sunlight. Replace any worn parts immediately. See HOW TO FOLD AND UNFOLD THE ELLIPTICAL EXERCISER 32 on page 17. Reverse steps 5 to the console, keep liquids away from the center of mild soap. Next, remove the M8 x 30mm Button Screw (113), 55 the M8.5 x 16mm x 1.5mm Washer (103), the Large Axle Cover...
... Right Pedal Arms (32, 33) to be adjusted. 1. MAINTENANCE AND TROUBLESHOOTING Inspect and tighten all parts of direct sunlight. Replace any worn parts immediately. See HOW TO FOLD AND UNFOLD THE ELLIPTICAL EXERCISER 32 on page 17. Reverse steps 5 to the console, keep liquids away from the center of mild soap. Next, remove the M8 x 30mm Button Screw (113), 55 the M8.5 x 16mm x 1.5mm Washer (103), the Large Axle Cover...
English Manual
Page 25
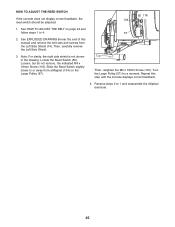
... Left Side Shield (14). Repeat this manual and remove the bolt sets and screws from a Magnet (134) on page 24 and follow steps 1 to 1 and reassemble the elliptical exerciser. 25 HOW TO ADJUST THE REED SWITCH If the console does not display correct feedback, the reed switch should be adjusted. 50 116 134 1. See HOW TO ADJUST THE BELT on the Large Pulley (57). See EXPLODED DRAWING B near the...
... Left Side Shield (14). Repeat this manual and remove the bolt sets and screws from a Magnet (134) on page 24 and follow steps 1 to 1 and reassemble the elliptical exerciser. 25 HOW TO ADJUST THE REED SWITCH If the console does not display correct feedback, the reed switch should be adjusted. 50 116 134 1. See HOW TO ADJUST THE BELT on the Large Pulley (57). See EXPLODED DRAWING B near the...

English Manual
Page 26
... the highest number is not a medical device. During the first few minutes of rest between workouts. EXERCISE FREQUENCY To maintain or improve your body begin to 30 minutes with your heart rate in your breath. You can use stored fat calories for a sustained period of heart rate readings. Cooling down-Finish with pre-existing health problems. The pulse sensor is the heart rate for fat...
... the highest number is not a medical device. During the first few minutes of rest between workouts. EXERCISE FREQUENCY To maintain or improve your body begin to 30 minutes with your heart rate in your breath. You can use stored fat calories for a sustained period of heart rate readings. Cooling down-Finish with pre-existing health problems. The pulse sensor is the heart rate for fat...

English Manual
Page 28
... Shield Rear Endcap Wheel Wheel Cover Rear Upright Cover Front Upright Cover Handgrip Left Upper Body Arm Right Upper Body Arm Upper Body Leg Pulse Sensor/Wire Left Rear Upper Body Cover Left Front Upper Body Cover Right Rear Upper Body Cover Right Front Upper Body Cover Left Link Arm Right Link Arm Left Pedal Arm Right Pedal Arm Left Pedal Right Pedal Left Frame Cover Right Frame Cover Roller Pedal Arm Endcap Tray Pedal Arm Latch Pedal Arm Latch Spring Pedal Arm Cap Flywheel "C" Magnet Resistance Link Arm Idler Resistance Wheel Resistance Motor Reed Switch/Wire Key No. PART LIST-Model No...
... Shield Rear Endcap Wheel Wheel Cover Rear Upright Cover Front Upright Cover Handgrip Left Upper Body Arm Right Upper Body Arm Upper Body Leg Pulse Sensor/Wire Left Rear Upper Body Cover Left Front Upper Body Cover Right Rear Upper Body Cover Right Front Upper Body Cover Left Link Arm Right Link Arm Left Pedal Arm Right Pedal Arm Left Pedal Right Pedal Left Frame Cover Right Frame Cover Roller Pedal Arm Endcap Tray Pedal Arm Latch Pedal Arm Latch Spring Pedal Arm Cap Flywheel "C" Magnet Resistance Link Arm Idler Resistance Wheel Resistance Motor Reed Switch/Wire Key No. PART LIST-Model No...


