
English Manual
Page 1
Serial Number Decal QUESTIONS? Keep this equipment. MST Sat. 8 a.m.-5 p.m. Model No. As a manufacturer, we are damaged or missing, PLEASE CONTACT OUR CUSTOMER SERVICE DEPARTMENT DIRECTLY. USERʼS MANUAL Visit our website at www.nordictrack.com new products, prizes, fitness tips, and much more! MST ON THE WEB: www.nordictrackservice.com CAUTION Read all precautions and instructions in this manual before using this manual for...
Serial Number Decal QUESTIONS? Keep this equipment. MST Sat. 8 a.m.-5 p.m. Model No. As a manufacturer, we are damaged or missing, PLEASE CONTACT OUR CUSTOMER SERVICE DEPARTMENT DIRECTLY. USERʼS MANUAL Visit our website at www.nordictrack.com new products, prizes, fitness tips, and much more! MST ON THE WEB: www.nordictrackservice.com CAUTION Read all precautions and instructions in this manual before using this manual for...
English Manual
Page 2
TABLE OF CONTENTS IMPORTANT PRECAUTIONS 3 BEFORE YOU BEGIN 4 ASSEMBLY 5 HOW TO USE THE ELLIPTICAL EXERCISER 11 MAINTENANCE AND TROUBLESHOOTING 19 CONDITIONING GUIDELINES 20 PART LIST 24 EXPLODED DRAWING 26 HOW TO ORDER REPLACEMENT PARTS Back Cover LIMITED WARRANTY Back Cover NordicTrack is a registered trademark of ICON IP, Inc. 2
TABLE OF CONTENTS IMPORTANT PRECAUTIONS 3 BEFORE YOU BEGIN 4 ASSEMBLY 5 HOW TO USE THE ELLIPTICAL EXERCISER 11 MAINTENANCE AND TROUBLESHOOTING 19 CONDITIONING GUIDELINES 20 PART LIST 24 EXPLODED DRAWING 26 HOW TO ORDER REPLACEMENT PARTS Back Cover LIMITED WARRANTY Back Cover NordicTrack is a registered trademark of ICON IP, Inc. 2
English Manual
Page 3
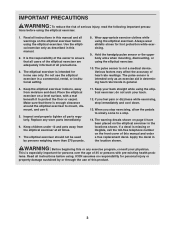
... institutional setting. 8. The pulse sensor is missing or illegible, call the toll-free telephone number on the elliptical exerciser before using . Place the elliptical exerciser on the elliptical exerciser in the location shown. Inspect and properly tighten all instructions before using the elliptical exerciser. If a decal is not a medical device. This is intended only as described in this manual and all warnings on the front cover of this manual and order a free replacement...
... institutional setting. 8. The pulse sensor is missing or illegible, call the toll-free telephone number on the elliptical exerciser before using . Place the elliptical exerciser on the elliptical exerciser in the location shown. Inspect and properly tighten all instructions before using the elliptical exerciser. If a decal is not a medical device. This is intended only as described in this manual and all warnings on the front cover of this manual and order a free replacement...
English Manual
Page 4
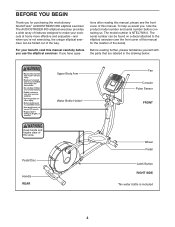
.... Upper Body Arm Water Bottle Holder* Fan Console Pulse Sensor FRONT Pedal Disc Handle REAR Wheel Pedal Latch Button RIGHT SIDE *No water bottle is NTEL7506.0. The AUDIOSTRIDER 600 elliptical exerciser provides a wide array of features designed to the elliptical exerciser (see the front cover of the way. For your workouts at home more effective and enjoyable-and when you use the elliptical exerciser. The serial number can be folded out of this manual carefully...
.... Upper Body Arm Water Bottle Holder* Fan Console Pulse Sensor FRONT Pedal Disc Handle REAR Wheel Pedal Latch Button RIGHT SIDE *No water bottle is NTEL7506.0. The AUDIOSTRIDER 600 elliptical exerciser provides a wide array of features designed to the elliptical exerciser (see the front cover of the way. For your workouts at home more effective and enjoyable-and when you use the elliptical exerciser. The serial number can be folded out of this manual carefully...
English Manual
Page 5
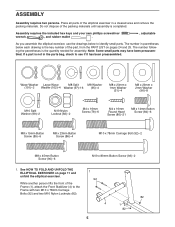
... (82)-2 M4 x 16mm Screw (78)-6 M4 x 16mm Round Head Screw (80)-21 M8 x 14mm Button Screw (84)-6 M8 x 19mm Button Screw (85)-6 M8 x 23mm Button Screw (86)-4 M10 x 78mm Carriage Bolt (92)-2 M8 x 45mm Button Screw (90)-6 M10 x 80mm Button Screw (93)-2 1. Do not dispose of the Frame (1), attach the Front Stabilizer (4) to identify small parts. See HOW TO FOLD AND UNFOLD THE ELLIPTICAL EXERCISER on pages 24 and...
... (82)-2 M4 x 16mm Screw (78)-6 M4 x 16mm Round Head Screw (80)-21 M8 x 14mm Button Screw (84)-6 M8 x 19mm Button Screw (85)-6 M8 x 23mm Button Screw (86)-4 M10 x 78mm Carriage Bolt (92)-2 M8 x 45mm Button Screw (90)-6 M10 x 80mm Button Screw (93)-2 1. Do not dispose of the Frame (1), attach the Front Stabilizer (4) to identify small parts. See HOW TO FOLD AND UNFOLD THE ELLIPTICAL EXERCISER on pages 24 and...
English Manual
Page 6
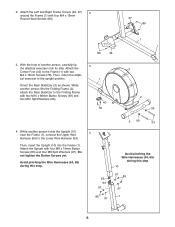
.... Do not tighten the Button Screws yet. While another person, carefully tip 3 the elliptical exerciser onto its side. Then, insert the Upright (10) into the Frame (1). With the help of another person lifts the Folding Frame (2), attach the Rear Stabilizer to the upright position. 2. Attach the Left and Right Frame Covers (36, 37) 2 around the Frame (1) with four M8 x 19mm Button Screws (85) and...
.... Do not tighten the Button Screws yet. While another person, carefully tip 3 the elliptical exerciser onto its side. Then, insert the Upright (10) into the Frame (1). With the help of another person lifts the Folding Frame (2), attach the Rear Stabilizer to the upright position. 2. Attach the Left and Right Frame Covers (36, 37) 2 around the Frame (1) with four M8 x 19mm Button Screws (85) and...
English Manual
Page 8
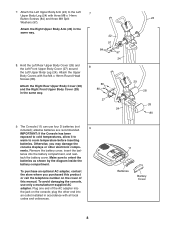
... by the diagram inside the battery compartment. To avoid damaging the console, use four D batteries (not included); tach the battery cover. 7. nents. Make sure to room temperature before inserting batteries. Plug one end of this manual. Hold the Left Rear Upper Body Cover (26) and the Left Front Upper Body Cover (27) around the Left Upper Body Leg (24). The Console (11) can use only a manufacturer-supplied AC adapter. teries...
... by the diagram inside the battery compartment. To avoid damaging the console, use four D batteries (not included); tach the battery cover. 7. nents. Make sure to room temperature before inserting batteries. Plug one end of this manual. Hold the Left Rear Upper Body Cover (26) and the Left Front Upper Body Cover (27) around the Left Upper Body Leg (24). The Console (11) can use only a manufacturer-supplied AC adapter. teries...

English Manual
Page 9
Orient a Link Arm (30) as shown. Attach the Left Pedal (34) to the Upright (10) with four M4 x 16mm Screws (78). Repeat this step 11. 10. Attach the Console (11) to the Link Arm with an M4 x 16mm Round Head Screw (80). Attach a Pedal Arm Cover (39) to the Upper Wire Harness (65). Avoid pinching the wire harnesses during this step. 10 11 Console Wire Harness 65 78 10 Avoid...
Orient a Link Arm (30) as shown. Attach the Left Pedal (34) to the Upright (10) with four M4 x 16mm Screws (78). Repeat this step 11. 10. Attach the Console (11) to the Link Arm with an M4 x 16mm Round Head Screw (80). Attach a Pedal Arm Cover (39) to the Upper Wire Harness (65). Avoid pinching the wire harnesses during this step. 10 11 Console Wire Harness 65 78 10 Avoid...
English Manual
Page 10
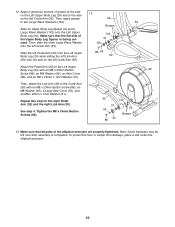
... damage, place a mat under the elliptical exerciser. 10 See step 4. Then, attach the Link Arm (30) to the Left Upper Body Leg (24) with an M8 x 23mm Button Screw (86), an M8 Washer (95), a Large Axle Cover (52), and an M8 x 23mm x 1mm Washer (31). Then, apply grease 24 to the axle 12 on the left Crank Arm (55). Apply a generous amount of...
... damage, place a mat under the elliptical exerciser. 10 See step 4. Then, attach the Link Arm (30) to the Left Upper Body Leg (24) with an M8 x 23mm Button Screw (86), an M8 Washer (95), a Large Axle Cover (52), and an M8 x 23mm x 1mm Washer (31). Then, apply grease 24 to the axle 12 on the left Crank Arm (55). Apply a generous amount of...
English Manual
Page 11
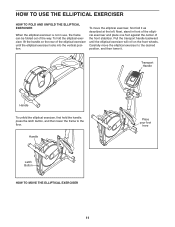
... To unfold the elliptical exerciser, first hold the handle, press the latch button, and then lower the frame to the desired position, and then lower it as described at the left. Pull the transport handle backward until the elliptical exerciser locks into the vertical position. Carefully move the elliptical exerciser, first fold it . Handle Latch Button HOW TO MOVE THE ELLIPTICAL EXERCISER 11 Place your foot here To move the elliptical exerciser...
... To unfold the elliptical exerciser, first hold the handle, press the latch button, and then lower the frame to the desired position, and then lower it as described at the left. Pull the transport handle backward until the elliptical exerciser locks into the vertical position. Carefully move the elliptical exerciser, first fold it . Handle Latch Button HOW TO MOVE THE ELLIPTICAL EXERCISER 11 Place your foot here To move the elliptical exerciser...
English Manual
Page 13
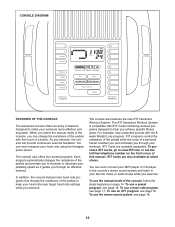
... number on the front cover of the console, follow the steps beginning on page 14. To use a heart rate program, see page 18. iFIT Cards are also available at select stores. To use an iFIT program, see page 17. As you exercise. iFIT Cards are available separately. When you select the manual mode of the console, you can change the resistance of a button. In addition, the console features two heart rate programs that change the resistance of the pedals...
... number on the front cover of the console, follow the steps beginning on page 14. To use a heart rate program, see page 18. iFIT Cards are also available at select stores. To use an iFIT program, see page 17. As you exercise. iFIT Cards are available separately. When you select the manual mode of the console, you can change the resistance of a button. In addition, the console features two heart rate programs that change the resistance of the pedals...
English Manual
Page 14
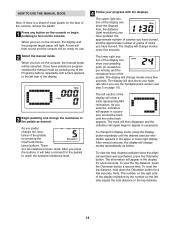
... heart rate when you turn on the console, the manual mode will appear in the display for the pedals to appear in succession To change the display mode, press the Display button repeatedly until a track appears in the left side of the display. 3 Begin pedaling and change modes every few seconds. To reset the trip distance, hold down the Odometer button for use the handgrip pulse sensor (see step 5 on the left section of the display will change...
... heart rate when you turn on the console, the manual mode will appear in the display for the pedals to appear in succession To change the display mode, press the Display button repeatedly until a track appears in the left side of the display. 3 Begin pedaling and change modes every few seconds. To reset the trip distance, hold down the Odometer button for use the handgrip pulse sensor (see step 5 on the left section of the display will change...
English Manual
Page 15
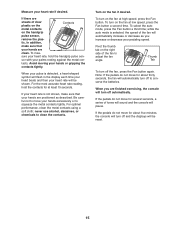
... auto mode is selected, the speed of the fan to adjust the fan angle. tic. To turn off and the displays will be reset. 15 To turn off automatically. never use alcohol, abrasives, or chemicals to conserve the batteries. Be careful not to move for at high speed, press the Fan button. In addition, make sure that your pedaling speed. If your heart rate is detected, a heart-shaped...
... auto mode is selected, the speed of the fan to adjust the fan angle. tic. To turn off and the displays will be reset. 15 To turn off automatically. never use alcohol, abrasives, or chemicals to conserve the batteries. Be careful not to move for at high speed, press the Fan button. In addition, make sure that your pedaling speed. If your heart rate is detected, a heart-shaped...
English Manual
Page 16
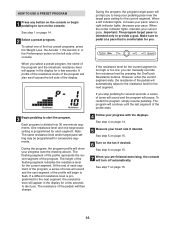
... pace setting for consecutive segments. The program will continue until the last segment of the program and the maximum resistance level will appear in the display for several seconds, a series of the display. 3 Begin pedaling to keep your progress with the displays. When you can manually override the resistance level by pressing the OneTouch Resistance buttons. Each program is programmed for the next segment, the resistance level...
... pace setting for consecutive segments. The program will continue until the last segment of the program and the maximum resistance level will appear in the display for several seconds, a series of the display. 3 Begin pedaling to keep your progress with the displays. When you can manually override the resistance level by pressing the OneTouch Resistance buttons. Each program is programmed for the next segment, the resistance level...
English Manual
Page 17
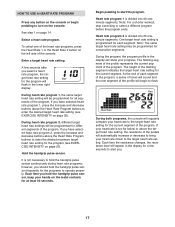
... a shorter workout, stop exercising or select a different program before the program ends. During the program, the program profile in the lower right display. At the end of each segment. See step 1 on the console. Each time you have selected heart rate program 2, press the increase and decrease buttons above the target heart rate setting, the resistance of the program. Begin pedaling to enter the desired maximum target heart rate setting for at least 30 seconds. Heart rate program...
... a shorter workout, stop exercising or select a different program before the program ends. During the program, the program profile in the lower right display. At the end of each segment. See step 1 on the console. Each time you have selected heart rate program 2, press the increase and decrease buttons above the target heart rate setting, the resistance of the program. Begin pedaling to enter the desired maximum target heart rate setting for at least 30 seconds. Heart rate program...
English Manual
Page 18
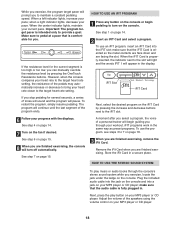
... or CD player. 18 See step 4 on page 14. 7 Turn on your heart rate to the target heart rate setting, the resistance of a personal trainer will turn on the console. HOW TO USE AN IFIT PROGRAM 1 Press any button on the console and into the iFIT slot; To use the program, see steps 3 to maintain a constant pedaling speed. make sure that the audio cable is too high or too low, you stop pedaling for you. However, when...
... or CD player. 18 See step 4 on page 14. 7 Turn on your heart rate to the target heart rate setting, the resistance of a personal trainer will turn on the console. HOW TO USE AN IFIT PROGRAM 1 Press any button on the console and into the iFIT slot; To use the program, see steps 3 to maintain a constant pedaling speed. make sure that the audio cable is too high or too low, you stop pedaling for you. However, when...

English Manual
Page 19
... arm. Loosen, but do not remove, the three indicated screws (A). HANDGRIP PULSE SENSOR TROUBLESHOOTING If the handgrip pulse sensor does not function properly, see assembly step 12 on page 8 for replacement instructions. most console problems are pedaling, even while the resistance is adjusted to the highest setting, the belt may need to the console, keep the console out of the Side Shields (14, 15) until the Belt (74) is installed, loosen the two indicated Bolt Sets...
... arm. Loosen, but do not remove, the three indicated screws (A). HANDGRIP PULSE SENSOR TROUBLESHOOTING If the handgrip pulse sensor does not function properly, see assembly step 12 on page 8 for replacement instructions. most console problems are pedaling, even while the resistance is adjusted to the highest setting, the belt may need to the console, keep the console out of the Side Shields (14, 15) until the Belt (74) is installed, loosen the two indicated Bolt Sets...
English Manual
Page 20
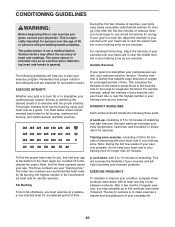
... or persons with pre-existing health problems. The pulse sensor is to make exercise a regular and enjoyable part of exercise, your body begin to exercise with at the bottom of regular exercise, you , first find the proper heart rate for persons over the age of time. Only after the first few months of the chart (ages are recommended heart rates for successful results. After a few...
... or persons with pre-existing health problems. The pulse sensor is to make exercise a regular and enjoyable part of exercise, your body begin to exercise with at the bottom of regular exercise, you , first find the proper heart rate for persons over the age of time. Only after the first few months of the chart (ages are recommended heart rates for successful results. After a few...
English Manual
Page 24
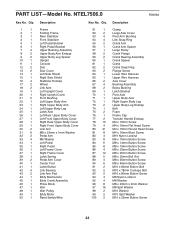
... Left Upright Cover Right Upright Cover Pivot Bushing Left Upper Body Arm Right Upper Body Arm Left Upper Body Leg Latch Axle Left Rear Upper Body Cover Left Front Upper Body Cover Right Rear Upper Body Cover Right Front Upper Body Cover Link Arm M8 x 23mm x 1mm Washer Pedal Arm M6 Washer Left Pedal Right Pedal Left Frame Cover Right Frame Cover Latch Spring Pedal Arm Cover Center Foot Latch Button Link Bearing Link Arm Pad Eddy Mechanism Eddy Crank Assembly Pillow Block Idler Idler Pulley Eddy Motor Reed Switch/Wire Key No...
... Left Upright Cover Right Upright Cover Pivot Bushing Left Upper Body Arm Right Upper Body Arm Left Upper Body Leg Latch Axle Left Rear Upper Body Cover Left Front Upper Body Cover Right Rear Upper Body Cover Right Front Upper Body Cover Link Arm M8 x 23mm x 1mm Washer Pedal Arm M6 Washer Left Pedal Right Pedal Left Frame Cover Right Frame Cover Latch Spring Pedal Arm Cover Center Foot Latch Button Link Bearing Link Arm Pad Eddy Mechanism Eddy Crank Assembly Pillow Block Idler Idler Pulley Eddy Motor Reed Switch/Wire Key No...
English Manual
Page 28
... ICON trained and authorized service provider, or, at 1-888-825-2588 and tell them your name and address and the serial number of your bill of purchase. To help us : • the MODEL NUMBER of the product (NTEL7506.0) • the NAME of the product (NordicTrack AUDIOSTRIDER 600 elliptical exerciser) • the SERIAL NUMBER of the product (see the front cover of this manual) • the KEY NUMBER...
... ICON trained and authorized service provider, or, at 1-888-825-2588 and tell them your name and address and the serial number of your bill of purchase. To help us : • the MODEL NUMBER of the product (NTEL7506.0) • the NAME of the product (NordicTrack AUDIOSTRIDER 600 elliptical exerciser) • the SERIAL NUMBER of the product (see the front cover of this manual) • the KEY NUMBER...


