

User Manual
Page 4
... on page 5 for in-home use this manual. nance and adjustment procedures described in this treadmill in the storage position. 23. vice representative. SAVE THESE INSTRUCTIONS 4 Always remove the key, unplug the power cord, and switch the reset/off circuit breaker to raise, lower, or... move the treadmill. 22. 20. When folding or moving the treadmill, make sure that the frame is intended for the location of the treadmill regularly. Always unplug the...
... on page 5 for in-home use this manual. nance and adjustment procedures described in this treadmill in the storage position. 23. vice representative. SAVE THESE INSTRUCTIONS 4 Always remove the key, unplug the power cord, and switch the reset/off circuit breaker to raise, lower, or... move the treadmill. 22. 20. When folding or moving the treadmill, make sure that the frame is intended for the location of the treadmill regularly. Always unplug the...

User Manual
Page 5
...and the location of the serial number decal are labeled in the drawing below. If you ʼre not exercising, the unique A2550 treadmill can be folded up, requiring less than half the floor space of features designed to make your benefit, read - ing this...Handrail Upright Console Accessory Tray Key/Clip Walking Belt Foot Rail Reset/Off Circuit Breaker Power Cord Platform Cushion Rear Roller Adjustment Bolts 5 The A2550 treadmill offers a selection of other treadmills. BEFORE YOU BEGIN Thank you for selecting the revolutionary NordicTrack® A2550 treadmill with the parts that are...
...and the location of the serial number decal are labeled in the drawing below. If you ʼre not exercising, the unique A2550 treadmill can be folded up, requiring less than half the floor space of features designed to make your benefit, read - ing this...Handrail Upright Console Accessory Tray Key/Clip Walking Belt Foot Rail Reset/Off Circuit Breaker Power Cord Platform Cushion Rear Roller Adjustment Bolts 5 The A2550 treadmill offers a selection of other treadmills. BEFORE YOU BEGIN Thank you for selecting the revolutionary NordicTrack® A2550 treadmill with the parts that are...

User Manual
Page 6
...number after the parentheses is a normal condition and does not affect treadmill performance. Note: If a part is not in the hardware kit, check to see if it is the key number of the part, from the PART LIST near the end of... 1/4" x 3/4" Bolt (5)-4 5/16" x 1 1/4" Bolt (7)-6 3/8" x 2" Bolt (4)-3 3/8" x 4 1/2" Bolt (6)-4 6 Use the drawings below each drawing is preattached to identify the assembly hardware. Set the treadmill in parentheses below to one of this manual. The number in a cleared area and remove all packing materials. To avoid damaging plastic parts, do not...
...number after the parentheses is a normal condition and does not affect treadmill performance. Note: If a part is not in the hardware kit, check to see if it is the key number of the part, from the PART LIST near the end of... 1/4" x 3/4" Bolt (5)-4 5/16" x 1 1/4" Bolt (7)-6 3/8" x 2" Bolt (4)-3 3/8" x 4 1/2" Bolt (6)-4 6 Use the drawings below each drawing is preattached to identify the assembly hardware. Set the treadmill in parentheses below to one of this manual. The number in a cleared area and remove all packing materials. To avoid damaging plastic parts, do not...
User Manual
Page 10
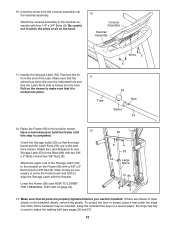
... assembly into the handrail assembly. Lower the Frame (56) (see pages 26 and 27). 10 To protect the floor or carpet, place a mat under the treadmill. Pull on page 24). 56 8 4 53 54 Large Barrel 14 83 8 4 13. Note: It may be necessary to move the Frame back and forth ...to the Base (83) with four 1/4" x 3/4" Bolts (5). Orient the Storage Latch (53) so that all parts are in a secure place; Keep the included hex keys in the positions shown. Have a second person hold the Frame until 12 this step is locked into place. 11 Tube Wires 5 5 54 Hole Sleeve 53...
... assembly into the handrail assembly. Lower the Frame (56) (see pages 26 and 27). 10 To protect the floor or carpet, place a mat under the treadmill. Pull on page 24). 56 8 4 53 54 Large Barrel 14 83 8 4 13. Note: It may be necessary to move the Frame back and forth ...to the Base (83) with four 1/4" x 3/4" Bolts (5). Orient the Storage Latch (53) so that all parts are in a secure place; Keep the included hex keys in the positions shown. Have a second person hold the Frame until 12 this step is locked into place. 11 Tube Wires 5 5 54 Hole Sleeve 53...

User Manual
Page 14
... a sheet of the treadmill. If you press a button, the speed setting will change the speed of the workout buttons repeatedly until it to warm to English measurements. 14 Insert the key into the console. Next, locate the reset/off the demo mode, hold down the Stop button for a few... will gradually change in the "reset" position. Each time you do not do this manual refer to room temperature before turning on the treadmill frame near the power cord. if you press one of measurement is displayed in this , the console displays or other electrical components may ...
... a sheet of the treadmill. If you press a button, the speed setting will change the speed of the workout buttons repeatedly until it to warm to English measurements. 14 Insert the key into the console. Next, locate the reset/off the demo mode, hold down the Stop button for a few... will gradually change in the "reset" position. Each time you do not do this manual refer to room temperature before turning on the treadmill frame near the power cord. if you press one of measurement is displayed in this , the console displays or other electrical components may ...

User Manual
Page 15
... burned, your pulse, your weight, and your intensity level is selected, the display will indicate the approximate intensity level of the treadmill. The Time/Incline display-The Time/Incline display can show your exercise. The Distance display-The Distance display can show the elapsed time and ...it reaches the selected incline setting. 5. Workout Intensity Level Bar To reset the displays, press the Stop button, remove the key, and then reinsert the key. 15 The Fitness Age Calculator display- The track will then darken and the indicators will again begin to light in the ...
... burned, your pulse, your weight, and your intensity level is selected, the display will indicate the approximate intensity level of the treadmill. The Time/Incline display-The Time/Incline display can show your exercise. The Distance display-The Distance display can show the elapsed time and ...it reaches the selected incline setting. 5. Workout Intensity Level Bar To reset the displays, press the Stop button, remove the key, and then reinsert the key. 15 The Fitness Age Calculator display- The track will then darken and the indicators will again begin to light in the ...

User Manual
Page 16
.... When your pulse is detected, your hands. The incline must be shown. Next, remove the key from the metal Contacts contacts. IMPORTANT: If you do not do this, the treadmillʼs electrical components may damage the treadmill. In addition, make sure that your heart rate, stand on the foot rails and hold the... can measure your heart rate if desired. 6. avoid moving your heart rate will be at the lowest setting when you are finished exercising, remove the key from the console. When you fold the treadmill to the "off" position and unplug the power cord.
.... When your pulse is detected, your hands. The incline must be shown. Next, remove the key from the metal Contacts contacts. IMPORTANT: If you do not do this, the treadmillʼs electrical components may damage the treadmill. In addition, make sure that your heart rate, stand on the foot rails and hold the... can measure your heart rate if desired. 6. avoid moving your heart rate will be at the lowest setting when you are finished exercising, remove the key from the console. When you fold the treadmill to the "off" position and unplug the power cord.

User Manual
Page 17
...approximate number of 4. Hold the handrails and begin to start the workout. Weight loss workouts will be affected. The actual number of treadmill during the workout. The flashing segment of the profile represents the current segment of the flashing segment indicates the speed setting for the ...exercising, remove the key from the console. Note: The same speed and/or incline setting may be burned. See step 5 on page 15. 5. each segment. The new speed and incline settings will begin walking. When the next segment of the workout begins, the treadmill will burn during ...
...approximate number of 4. Hold the handrails and begin to start the workout. Weight loss workouts will be affected. The actual number of treadmill during the workout. The flashing segment of the profile represents the current segment of the flashing segment indicates the speed setting for the ...exercising, remove the key from the console. Note: The same speed and/or incline setting may be burned. See step 5 on page 15. 5. each segment. The new speed and incline settings will begin walking. When the next segment of the workout begins, the treadmill will burn during ...
User Manual
Page 18
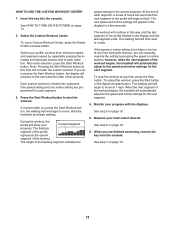
... the profile will then slow to move at this time will continue in this way until the last segment of the workout begins, the treadmill will begin walking. The height of the workout. The walking belt will show your profile, workout time, minimum speed, and maximum speed ... To use a Custom Workout Center, press the Select Profile increase button. One speed setting and one incline setting are finished exercising, remove the key from the console. The walking belt will automatically adjust to move . Measure your progress with the displays. To restart the workout, press the ...
... the profile will then slow to move at this time will continue in this way until the last segment of the workout begins, the treadmill will begin walking. The height of the workout. The walking belt will show your profile, workout time, minimum speed, and maximum speed ... To use a Custom Workout Center, press the Select Profile increase button. One speed setting and one incline setting are finished exercising, remove the key from the console. The walking belt will automatically adjust to move . Measure your progress with the displays. To restart the workout, press the ...

User Manual
Page 19
...press either pounds or kilograms. To find which unit of measurement is the average age of the treadmill will appear in the display to the next selection after you press the button, the treadmill will not function during the fitness test workout. 2. If you press the Stop button, the ...speed and incline settings of the Set Gender buttons. Select the fitness test workout. Put on page 14. 3. Insert the key into the console. Begin walking on the treadmill. HOW TO USE THE FITNESS TEST WORKOUT The fitness test workout measures your gender, age, height, and weight by pressing ...
...press either pounds or kilograms. To find which unit of measurement is the average age of the treadmill will appear in the display to the next selection after you press the button, the treadmill will not function during the fitness test workout. 2. If you press the Stop button, the ...speed and incline settings of the Set Gender buttons. Select the fitness test workout. Put on page 14. 3. Insert the key into the console. Begin walking on the treadmill. HOW TO USE THE FITNESS TEST WORKOUT The fitness test workout measures your gender, age, height, and weight by pressing ...

User Manual
Page 20
... the Volume increase and decrease buttons on your iPod. Next, press the Play button on the console. 20 When you are finished exercising, remove the key from the console. To play music or audio books through the Integrated Universal Dock for iPod near the speakers. Monitor your progress with iPod and...
... the Volume increase and decrease buttons on your iPod. Next, press the Play button on the console. 20 When you are finished exercising, remove the key from the console. To play music or audio books through the Integrated Universal Dock for iPod near the speakers. Monitor your progress with iPod and...
User Manual
Page 21
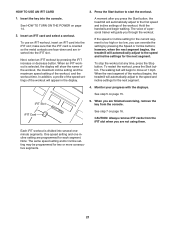
...key into the iFIT slot; Insert an iFIT card and select a workout. A moment after you can override the setting by pressing the iFIT increase or decrease button. iFIT Card See step 7 on page 14. 2. Each iFIT workout is too high or too low, you press the Start button, the treadmill... or Incline buttons; The voice of a personal trainer will automatically adjust to start the workout. 1. however, when the next segment begins, the treadmill will guide you are not using them. Monitor your progress with the displays. See step 5 on page 15. CAUTION: Always remove iFIT cards...
...key into the iFIT slot; Insert an iFIT card and select a workout. A moment after you can override the setting by pressing the iFIT increase or decrease button. iFIT Card See step 7 on page 14. 2. Each iFIT workout is too high or too low, you press the Start button, the treadmill... or Incline buttons; The voice of a personal trainer will automatically adjust to start the workout. 1. however, when the next segment begins, the treadmill will guide you are not using them. Monitor your progress with the displays. See step 5 on page 15. CAUTION: Always remove iFIT cards...

User Manual
Page 22
...hold down the Stop button while inserting the key into the console. When the information mode is selected, the following information will be used if the treadmill is displayed in a store. Press the Speed increase button to change the unit of the treadmill. To turn on and off the display ...the demo mode is selected. HOW TO ADJUST THE CUSHIONING SYSTEM Remove the key from the console. To increase the firmness of the walking platform, step off circuit breaker to turn on the front cover of the treadmill. To purchase the optional chest pulse sensor, call the telephone number on...
...hold down the Stop button while inserting the key into the console. When the information mode is selected, the following information will be used if the treadmill is displayed in a store. Press the Speed increase button to change the unit of the treadmill. To turn on and off the display ...the demo mode is selected. HOW TO ADJUST THE CUSHIONING SYSTEM Remove the key from the console. To increase the firmness of the walking platform, step off circuit breaker to turn on the front cover of the treadmill. To purchase the optional chest pulse sensor, call the telephone number on...

User Manual
Page 23
HOW TO FOLD AND MOVE THE TREADMILL HOW TO FOLD THE TREADMILL FOR STORAGE Before folding the treadmill, adjust the incline to the vertical position. 2. Remove the key and unplug the power cord. Make sure to raise, lower, or move the treadmill without tipping it is locked in the location shown by ...keep your back straight as described above 85° F (30° C). Raise the frame until it . Never move the treadmill. 1. Do not attempt to move the treadmill to the storage position as you fold it rolls freely on the wheels. Place one foot against one foot against a wheel, ...
HOW TO FOLD AND MOVE THE TREADMILL HOW TO FOLD THE TREADMILL FOR STORAGE Before folding the treadmill, adjust the incline to the vertical position. 2. Remove the key and unplug the power cord. Make sure to raise, lower, or move the treadmill without tipping it is locked in the location shown by ...keep your back straight as described above 85° F (30° C). Raise the frame until it . Never move the treadmill. 1. Do not attempt to move the treadmill to the storage position as you fold it rolls freely on the wheels. Place one foot against one foot against a wheel, ...

User Manual
Page 25
...surge suppressor that applies, and follow the steps listed. Important: The treadmill is turned on. b. Check the reset/off the demo mode, hold down . b. Remove the key from the console and UNPLUG THE POWER CORD. If the treadmill still will not run, please see the drawing above). PROBLEM: The... suppressor is plugged in a store. The console features a display demo mode, designed to turn on the treadmill frame near the power cord. tom of this manual. Reinsert the key into the console. Find the symptom that meets all of this manual. If the power cord is plugged ...
...surge suppressor that applies, and follow the steps listed. Important: The treadmill is turned on. b. Check the reset/off the demo mode, hold down . b. Remove the key from the console and UNPLUG THE POWER CORD. If the treadmill still will not run, please see the drawing above). PROBLEM: The... suppressor is plugged in a store. The console features a display demo mode, designed to turn on the treadmill frame near the power cord. tom of this manual. Reinsert the key into the console. Find the symptom that meets all of this manual. If the power cord is plugged ...

User Manual
Page 26
...that meets all of the specifications described on the left side of the walking belt 2 to 3 in the power cord, insert the key, and run the treadmill for a correct speed read- After a few minutes. This will automatically rise to the maximum incline level and then return to check ... belt is aligned with the 51 #8 x 3/4" Screws (not shown) and the #8 x 2" Screws (not shown), if necessary. With the key in . Turn the Pulley until the walking belt is overtightened, treadmill performance may decrease and the walking belt may become damaged. the Reed Switch is changing, remove the...
...that meets all of the specifications described on the left side of the walking belt 2 to 3 in the power cord, insert the key, and run the treadmill for a correct speed read- After a few minutes. This will automatically rise to the maximum incline level and then return to check ... belt is aligned with the 51 #8 x 3/4" Screws (not shown) and the #8 x 2" Screws (not shown), if necessary. With the key in . Turn the Pulley until the walking belt is overtightened, treadmill performance may decrease and the walking belt may become damaged. the Reed Switch is changing, remove the...

User Manual
Page 27
... belt is centered. Be careful to turn the left , use the hex key to keep the walk- Be careful not to overtighten the walking belt. b. wise, 1/4 of a turn . sert the key, and carefully walk on the treadmill for a few minutes. PROBLEM: The walking belt is off-center, first ...remove the key and UNPLUG THE POWER CORD. If the walking belt is off-center or slips when walked...
... belt is centered. Be careful to turn the left , use the hex key to keep the walk- Be careful not to overtighten the walking belt. b. wise, 1/4 of a turn . sert the key, and carefully walk on the treadmill for a few minutes. PROBLEM: The walking belt is off-center, first ...remove the key and UNPLUG THE POWER CORD. If the walking belt is off-center or slips when walked...
User Manual
Page 28
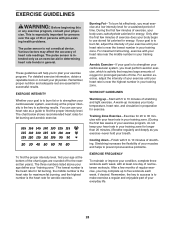
... increases the flexibility of your exercise program, do not keep your heart rate in general. Remember, the key to five workouts each week, with pre-existing health problems. The pulse sensor is the key to the nearest ten years). To find the proper intensity level, find the proper intensity level. Burning Fat...
... increases the flexibility of your exercise program, do not keep your heart rate in general. Remember, the key to five workouts each week, with pre-existing health problems. The pulse sensor is the key to the nearest ten years). To find the proper intensity level, find the proper intensity level. Burning Fat...
User Manual
Page 30
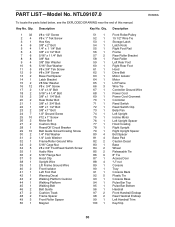
... 2 31 2 32 1 33 2 34 5 35 1 36 2 37 3 38 1 39 1 40 2 41 1 42 1 43 2 44 1 45 1 46 2 47 2 48 2 49 3 50 1 #8 x 1/2" Screw #8 x 1" Tek Screw Hex Key 3/8" x 2" Bolt 1/4" x 1 1/4" Bolt 3/8" x 4 1/2" Bolt 5/16" x 1 1/4" Bolt 3/8" Nut 3/8" Star Washer 5/16" Star Washer #8 x 3/4" Tek Screw #8 x 3/4" Screw Base Pad Spacer Latch Bracket #8 Star Washer #8 x 3/4" Screw 1/4"... Bar Top Pulse Bar Bottom Handrail Front Handrail Endcap Rear Handrail Endcap Left Handrail Trim Key/Clip R0608A 30 NTL09107.0 To locate the parts listed below, see the EXPLODED DRAWING near the end of this manual...
... 2 31 2 32 1 33 2 34 5 35 1 36 2 37 3 38 1 39 1 40 2 41 1 42 1 43 2 44 1 45 1 46 2 47 2 48 2 49 3 50 1 #8 x 1/2" Screw #8 x 1" Tek Screw Hex Key 3/8" x 2" Bolt 1/4" x 1 1/4" Bolt 3/8" x 4 1/2" Bolt 5/16" x 1 1/4" Bolt 3/8" Nut 3/8" Star Washer 5/16" Star Washer #8 x 3/4" Tek Screw #8 x 3/4" Screw Base Pad Spacer Latch Bracket #8 Star Washer #8 x 3/4" Screw 1/4"... Bar Top Pulse Bar Bottom Handrail Front Handrail Endcap Rear Handrail Endcap Left Handrail Trim Key/Clip R0608A 30 NTL09107.0 To locate the parts listed below, see the EXPLODED DRAWING near the end of this manual...

User Manual
Page 31
Qty. 101 1 102 1 103 1 104 1 105 2 106 1 107 1 108 1 109 2 110 2 Description Pulse Bar Ground Wire Latch Endcap iFIT Card Kit Lift Motor Spacer #8 x 2" Screw Right Handrail Trim Rear Roller Ground Wire iFIT Universal iPod Connector Foot Rail Insert Cushion Stop Screw Key No. Specifications are not illustrated. Key No. Qty. 111 2 112 1 113 1 114 1 115 2 * - * - Description Rear Roller Bracket Plate 5/32" Hex Key Incline Motor Wire Incline Stop Plate 3/8" Incline Motor Nut 6" White Wire, M/F Userʼs Manual *These parts are subject to change without notice. 31
Qty. 101 1 102 1 103 1 104 1 105 2 106 1 107 1 108 1 109 2 110 2 Description Pulse Bar Ground Wire Latch Endcap iFIT Card Kit Lift Motor Spacer #8 x 2" Screw Right Handrail Trim Rear Roller Ground Wire iFIT Universal iPod Connector Foot Rail Insert Cushion Stop Screw Key No. Specifications are not illustrated. Key No. Qty. 111 2 112 1 113 1 114 1 115 2 * - * - Description Rear Roller Bracket Plate 5/32" Hex Key Incline Motor Wire Incline Stop Plate 3/8" Incline Motor Nut 6" White Wire, M/F Userʼs Manual *These parts are subject to change without notice. 31

