
User Manual
Page 4
... INCLINE TRAINER is not a medical device. Adjust the speed in small increments to the off . The pulse sensor is not working properly. (See BEFORE YOU BEGIN on the INCLINE TRAINER at a time. 11. Always remove the key, unplug the power cord, and switch the on page 7). 7. Never use the INCLINE TRAINER with at all parts of burns, fire, electric shock, or injury to the INCLINE TRAINER. 3 Never move the walking belt while the power...
... INCLINE TRAINER is not a medical device. Adjust the speed in small increments to the off . The pulse sensor is not working properly. (See BEFORE YOU BEGIN on the INCLINE TRAINER at a time. 11. Always remove the key, unplug the power cord, and switch the on page 7). 7. Never use the INCLINE TRAINER with at all parts of burns, fire, electric shock, or injury to the INCLINE TRAINER. 3 Never move the walking belt while the power...
User Manual
Page 5
... by or through the use , before cleaning the INCLINE TRAINER, and before using. ICON assumes no responsibility for persons over the age of this manual. Always unplug the power cord immediately after use of 35 or persons with pre-existing health problems. Read all instructions before performing the maintenance and adjustment procedures described in this or any exercise program, consult your physician. Servicing other than the procedures...
... by or through the use , before cleaning the INCLINE TRAINER, and before using. ICON assumes no responsibility for persons over the age of this manual. Always unplug the power cord immediately after use of 35 or persons with pre-existing health problems. Read all instructions before performing the maintenance and adjustment procedures described in this or any exercise program, consult your physician. Servicing other than the procedures...
User Manual
Page 7
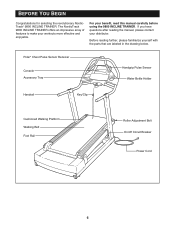
... reading further, please familiarize yourself with the parts that are labeled in the drawing below. For your distributor. The NordicTrack 9800 INCLINE TRAINER offers an impressive array of features to make your workouts more effective and enjoyable. Polar® Chest Pulse Sensor Receiver Console Accessory Tray Handgrip Pulse Sensor Water Bottle Holder Handrail Key/Clip Cushioned Walking Platform Walking Belt Foot Rail Roller Adjustment Bolt On/off Circuit Breaker Power Cord 6
... reading further, please familiarize yourself with the parts that are labeled in the drawing below. For your distributor. The NordicTrack 9800 INCLINE TRAINER offers an impressive array of features to make your workouts more effective and enjoyable. Polar® Chest Pulse Sensor Receiver Console Accessory Tray Handgrip Pulse Sensor Water Bottle Holder Handrail Key/Clip Cushioned Walking Platform Walking Belt Foot Rail Roller Adjustment Bolt On/off Circuit Breaker Power Cord 6
User Manual
Page 8
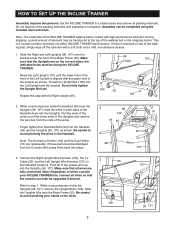
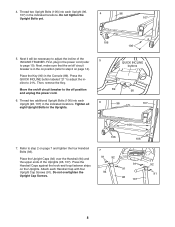
... lower ends of the Uprights and remove the wire ties from the Console (89), press them back into the Left Upright and the bracket. Note: Regardless of the wires. 93 94 Finger tighten four Handrail Bolts (93) into the Uprights (96, 107). This is completed. Slide the Uprights fully onto the Base Frame (52). HOW TO SET UP THE INCLINE TRAINER Assembly requires two persons. Set the INCLINE TRAINER...
... lower ends of the Uprights and remove the wire ties from the Console (89), press them back into the Left Upright and the bracket. Note: Regardless of the wires. 93 94 Finger tighten four Handrail Bolts (93) into the Uprights (96, 107). This is completed. Slide the Uprights fully onto the Base Frame (52). HOW TO SET UP THE INCLINE TRAINER Assembly requires two persons. Set the INCLINE TRAINER...
User Manual
Page 9
... ends of the INCLINE TRAINER. Do not tighten the 4 96 Upright Bolts yet. 107 106 106 5. Place the Key (90) in the indicated locations. Refer to step 2 on /off circuit breaker to the off circuit breaker is in the Uprights. Press the QUICK INCLINE button labeled "21" to adjust the incline to page 10). Then, remove the Key. Attach each Upright (96, 107) in the power cord (refer 5 to 21...
... ends of the INCLINE TRAINER. Do not tighten the 4 96 Upright Bolts yet. 107 106 106 5. Place the Key (90) in the indicated locations. Refer to step 2 on /off circuit breaker to the off circuit breaker is in the Uprights. Press the QUICK INCLINE button labeled "21" to adjust the incline to page 10). Then, remove the Key. Attach each Upright (96, 107) in the power cord (refer 5 to 21...
User Manual
Page 10
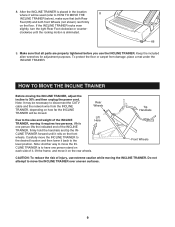
... the rear wheels. HOW TO MOVE THE INCLINE TRAINER Before moving the INCLINE TRAINER. While one person stand on the floor. CLINE TRAINER is to 30% and then unplug the power cord. 8. Rear Wheels Due to the level position. Note: Another way to HOW TO MOVE THE 8 INCLINE TRAINER below), make sure that all parts are properly tightened before you use extreme caution while moving the INCLINE TRAINER, adjust the incline to...
... the rear wheels. HOW TO MOVE THE INCLINE TRAINER Before moving the INCLINE TRAINER. While one person stand on the floor. CLINE TRAINER is to 30% and then unplug the power cord. 8. Rear Wheels Due to the level position. Note: Another way to HOW TO MOVE THE 8 INCLINE TRAINER below), make sure that all parts are properly tightened before you use extreme caution while moving the INCLINE TRAINER, adjust the incline to...
User Manual
Page 11
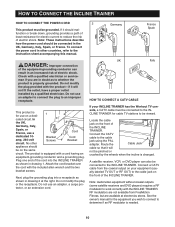
... screws. Attach the cord bracket over connected to the cable amp, 240-volt Screws Bracket jack using the PAL circuit. Note: These instructions describe how the power cord should cable so that it will be on Next, plug the grounding plug into the INCLINE TRAINER A satellite receiver, VCR, or DVD player can result in other adapter. The product is properly grounded. HOW TO CONNECT THE INCLINE TRAINER HOW TO CONNECT...
... screws. Attach the cord bracket over connected to the cable amp, 240-volt Screws Bracket jack using the PAL circuit. Note: These instructions describe how the power cord should cable so that it will be on Next, plug the grounding plug into the INCLINE TRAINER A satellite receiver, VCR, or DVD player can result in other adapter. The product is properly grounded. HOW TO CONNECT THE INCLINE TRAINER HOW TO CONNECT...

User Manual
Page 14
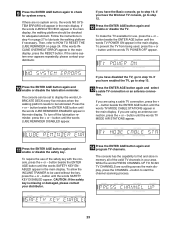
... the INCLINE TRAINER can even measure your workouts, and a unique fitness test pro- The pulse-driven programs and the fitness test pro- gram automatically controls the speed and incline of The Basic console offers an impressive array of a Polar®-compatible chest EKCL9252 pulse sensor (not included). 13 Note: You can be TRAINER to give you exercise, the during your heart rate using the built- console will provide continuous exercise feedback. the INCLINE TRAINER to...
... the INCLINE TRAINER can even measure your workouts, and a unique fitness test pro- The pulse-driven programs and the fitness test pro- gram automatically controls the speed and incline of The Basic console offers an impressive array of a Polar®-compatible chest EKCL9252 pulse sensor (not included). 13 Note: You can be TRAINER to give you exercise, the during your heart rate using the built- console will provide continuous exercise feedback. the INCLINE TRAINER to...
User Manual
Page 15
... at the right) while operating the INCLINE TRAINER. • Adjust the speed in the main display. The words ENTER WEIGHT and the current weight setting will light. 4 Enter your weight. To use the manual mode of the clip as an exercise aid in determining heart rate trends in speed. • The pulse sensor is pulled from the console, adjust the position of the console, follow the steps beginning on page 15. "On...
... at the right) while operating the INCLINE TRAINER. • Adjust the speed in the main display. The words ENTER WEIGHT and the current weight setting will light. 4 Enter your weight. To use the manual mode of the clip as an exercise aid in determining heart rate trends in speed. • The pulse sensor is pulled from the console, adjust the position of the console, follow the steps beginning on page 15. "On...
User Manual
Page 16
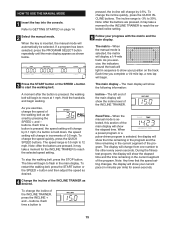
... selected speed setting. HOW TO USE THE MANUAL MODE 1 Insert the key into the console. Each time you exercise, the indicators around the track will begin to show your position on page 14. 2 Select the manual mode. The time will light in sequence to move at 1 mph. To restart the walking belt, press the START button or the SPEED + button and then adjust the speed as desired. 4 Change the incline of the main display...
... selected speed setting. HOW TO USE THE MANUAL MODE 1 Insert the key into the console. Each time you exercise, the indicators around the track will begin to show your position on page 14. 2 Select the manual mode. The time will light in sequence to move at 1 mph. To restart the walking belt, press the START button or the SPEED + button and then adjust the speed as desired. 4 Change the incline of the main display...

User Manual
Page 17
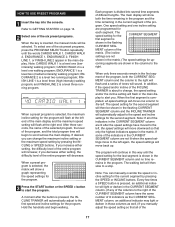
... section of the main display will show the approximate number of Calories you are finished exercising, stop the walking belt and remove the key. Speed-The right end of the main display will show the speed of the walking belt. 6 Measure your heart rate if desired. grip pulse sensor with both hands. For the most accurate heart rate read- Pulse/% Max-When you have burned. To reset the displayed time, distance, vertical meters, and...
... section of the main display will show the approximate number of Calories you are finished exercising, stop the walking belt and remove the key. Speed-The right end of the main display will show the speed of the walking belt. 6 Measure your heart rate if desired. grip pulse sensor with both hands. For the most accurate heart rate read- Pulse/% Max-When you have burned. To reset the displayed time, distance, vertical meters, and...
User Manual
Page 18
... pressing the INCLINE or SPEED buttons. The walking belt will move back up - If desired, you can manually override the speed or incline setting for the second segment will then be shown in the current segment of the entire program will be selected. If you decrease either setting, the difficulty level of the pro- The main display will decrease. The speed setting for the program. 3 Press the START button or the SPEED + button...
... pressing the INCLINE or SPEED buttons. The walking belt will move back up - If desired, you can manually override the speed or incline setting for the second segment will then be shown in the current segment of the entire program will be selected. If you decrease either setting, the difficulty level of the pro- The main display will decrease. The speed setting for the program. 3 Press the START button or the SPEED + button...
User Manual
Page 20
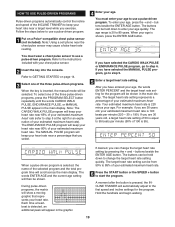
... programs, press the PROGRAM SELECT button repeatedly until the words CARDIO WALK PULSE, ENDURANCE PULSE, or MANUAL PULSE appear in the graphic. Refer to use a pulse-driven program. To select one of the INCLINE TRAINER to keep your heart rate near a percentage that represents your age quickly. The ENDURANCE PULSE program will scroll across the main display. You must wear a chest pulse sensor to step 5. 5 Enter a target heart rate setting. To enter your estimated maximum heart rate. When a pulse-driven program...
... programs, press the PROGRAM SELECT button repeatedly until the words CARDIO WALK PULSE, ENDURANCE PULSE, or MANUAL PULSE appear in the graphic. Refer to use a pulse-driven program. To select one of the INCLINE TRAINER to keep your heart rate near a percentage that represents your age quickly. The ENDURANCE PULSE program will scroll across the main display. You must wear a chest pulse sensor to step 5. 5 Enter a target heart rate setting. To enter your estimated maximum heart rate. When a pulse-driven program...
User Manual
Page 21
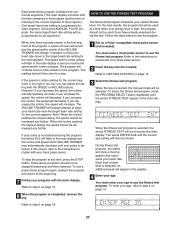
...; To stop . 1 Put on a Polar®-compatible chest pulse sensor (not included). When only three seconds remain in the main display and the incline and speed of the INCLINE TRAINER will always attempt to step 5 on page 14. Refer to keep your heart rate near the target heart rate setting for all segments.) HOW TO USE THE FITNESS TEST PROGRAM The fitness test program measures your progress with the SPEED or INCLINE buttons...
...; To stop . 1 Put on a Polar®-compatible chest pulse sensor (not included). When only three seconds remain in the main display and the incline and speed of the INCLINE TRAINER will always attempt to step 5 on page 14. Refer to keep your heart rate near the target heart rate setting for all segments.) HOW TO USE THE FITNESS TEST PROGRAM The fitness test program measures your progress with the SPEED or INCLINE buttons...
User Manual
Page 24
... use , press the + or - To allow the INCLINE TRAINER to be checked for adequate lubricant. If there are using an antenna connection, press the + or - Follow the instructions in the main display. If you are scrolling across the main display, press the CHANNEL + button to start the channel scanning process. 23 The console can be set to display the words LUBRICATE DECK every five minutes when the walking platform needs...
... use , press the + or - To allow the INCLINE TRAINER to be checked for adequate lubricant. If there are using an antenna connection, press the + or - Follow the instructions in the main display. If you are scrolling across the main display, press the CHANNEL + button to start the channel scanning process. 23 The console can be set to display the words LUBRICATE DECK every five minutes when the walking platform needs...
User Manual
Page 28
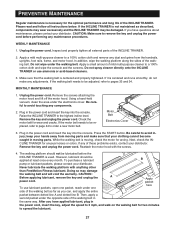
... adjustments. To purchase a lubricant B pump or lubricant packets, please contact your distributor. In addition, wipe the walking platform along the sides of the INCLINE TRAINER. 2. Do not wipe under the electronics cover. Unplug the power cord. Remove the screws attaching the motor hood and lift off the motor hood. Check the motor belt for unusual noises or odors. Never lubricate the walking platform with the screws. 4. Inspect and properly tighten all instructions below. Motor Belt...
... adjustments. To purchase a lubricant B pump or lubricant packets, please contact your distributor. In addition, wipe the walking platform along the sides of the INCLINE TRAINER. 2. Do not wipe under the electronics cover. Unplug the power cord. Remove the screws attaching the motor hood and lift off the motor hood. Check the motor belt for unusual noises or odors. Never lubricate the walking platform with the screws. 4. Inspect and properly tighten all instructions below. Motor Belt...
User Manual
Page 32
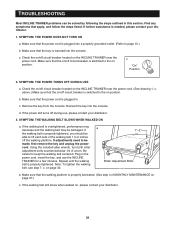
..., turn . a 1"-2" Roller Adjustment Bolts b. Make sure that the on the INCLINE TRAINER near the power cord. TROUBLESHOOTING Most INCLINE TRAINER problems can be solved by following the steps outlined in the power cord, insert the key, and use , please contact your distributor. 3. Find any symptoms that the on position. If the power still turns off circuit breaker is plugged into the console. If the walking belt is plugged in. Make sure that the power cord is switched...
..., turn . a 1"-2" Roller Adjustment Bolts b. Make sure that the on the INCLINE TRAINER near the power cord. TROUBLESHOOTING Most INCLINE TRAINER problems can be solved by following the steps outlined in the power cord, insert the key, and use , please contact your distributor. 3. Find any symptoms that the on position. If the power still turns off circuit breaker is plugged into the console. If the walking belt is plugged in. Make sure that the power cord is switched...
User Manual
Page 33
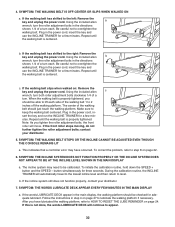
... to step 8 on page 24. Plug in the power cord, in the main display, the walking platform should just touch the walking platform. sert the key and run the INCLINE TRAINER for a few min- utes. Repeat until the walking belt is centered. Note: As you have occurred. If the front roller stops moving, do not further tighten the roller adjustment bolts; contact your distributor. 7. This indicates that a controller error may need to...
... to step 8 on page 24. Plug in the power cord, in the main display, the walking platform should just touch the walking platform. sert the key and run the INCLINE TRAINER for a few min- utes. Repeat until the walking belt is centered. Note: As you have occurred. If the front roller stops moving, do not further tighten the roller adjustment bolts; contact your distributor. 7. This indicates that a controller error may need to...
User Manual
Page 36
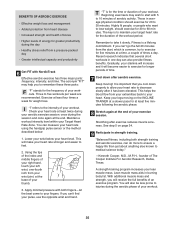
...start with both strength training and aerobic exercise, can also provide fitness benefits. Remember to 30 minutes. Keep your fingers. Stretching after aerobic exercise. Lower your wrist below : 1. Keep moving on page 34. 9 Participate in burning body fat. Check your heart rate at least twice during your heart rate using the handgrip pulse sensor...your aerobic exercise session: once during the aerobic phase of the workout period. You can 't find your exercise session. A strength-training program increases your heart level. Three to your workout. If you...
...start with both strength training and aerobic exercise, can also provide fitness benefits. Remember to 30 minutes. Keep your fingers. Stretching after aerobic exercise. Lower your wrist below : 1. Keep moving on page 34. 9 Participate in burning body fat. Check your heart rate at least twice during your heart rate using the handgrip pulse sensor...your aerobic exercise session: once during the aerobic phase of the workout period. You can 't find your exercise session. A strength-training program increases your heart level. Three to your workout. If you...
User Manual
Page 39
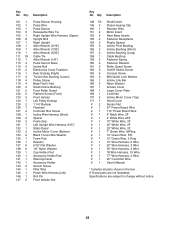
... Screw On/Off Switch Screw Console Screw Belt Guide Lock Washer Incline Link Bar Nylon Washer Access Cover Large Cover Plate J-bolt Nut Incline Motor Cover (Top) Hood Cover Sensor Nut 97" Power Board Wire 110" Power Board Wire 4" Black Wire, 2F 4" White Wire, M/F 10" White Wire. 2F 22" White Wire. 2F 20" White Wire. 2F 7" Green Wire, M/Ring 12" Green Wire, F/R 12" Green Wire, 2 Ring 12" Wire Harness, 6 Wire 20" Wire Harness, 3 Wire 50" Wire Harness, 3 Wire 76"Wire Harness, 15 Wire 77" Wire Harness, 4 Wire 20" Controller Wire User's Manual * Includes all parts...
... Screw On/Off Switch Screw Console Screw Belt Guide Lock Washer Incline Link Bar Nylon Washer Access Cover Large Cover Plate J-bolt Nut Incline Motor Cover (Top) Hood Cover Sensor Nut 97" Power Board Wire 110" Power Board Wire 4" Black Wire, 2F 4" White Wire, M/F 10" White Wire. 2F 22" White Wire. 2F 20" White Wire. 2F 7" Green Wire, M/Ring 12" Green Wire, F/R 12" Green Wire, 2 Ring 12" Wire Harness, 6 Wire 20" Wire Harness, 3 Wire 50" Wire Harness, 3 Wire 76"Wire Harness, 15 Wire 77" Wire Harness, 4 Wire 20" Controller Wire User's Manual * Includes all parts...


