

Uk Manual
Page 3
...manual for the location) When ordering replacement parts, please also give the following information: • The MODEL NUMBER OF THE PRODUCT (see the front cover of this manual for the location) • The NAME OF THE PRODUCT (NordicTrack® 9600E elliptical trainer) • The SERIAL NUMBER OF THE PRODUCT (see the PART LIST... the KEY NUMBER and DESCRIPTION OF THE PART(S) (see the front cover of this manual, or if you require assistance, please contact Customer Care at the address and phone number listed below. Mountain Time FreeMotion Fitness, Inc. • 1096 Elkton Drive, Suite...
...manual for the location) When ordering replacement parts, please also give the following information: • The MODEL NUMBER OF THE PRODUCT (see the front cover of this manual for the location) • The NAME OF THE PRODUCT (NordicTrack® 9600E elliptical trainer) • The SERIAL NUMBER OF THE PRODUCT (see the PART LIST... the KEY NUMBER and DESCRIPTION OF THE PART(S) (see the front cover of this manual, or if you require assistance, please contact Customer Care at the address and phone number listed below. Mountain Time FreeMotion Fitness, Inc. • 1096 Elkton Drive, Suite...

Uk Manual
Page 4
... pre-existing health problems. Read all warnings and precautions. 9. Keep your back. 12. Operate the elliptical trainer only as an exercise aid in determining heart rate trends in a garage or covered patio or near water. 5. Do not place the elliptical trainer in general. 14. This is the responsibility of the owner to the environment. Do not use an adaptor to connect the power cord to...
... pre-existing health problems. Read all warnings and precautions. 9. Keep your back. 12. Operate the elliptical trainer only as an exercise aid in determining heart rate trends in a garage or covered patio or near water. 5. Do not place the elliptical trainer in general. 14. This is the responsibility of the owner to the environment. Do not use an adaptor to connect the power cord to...

Uk Manual
Page 5
... BEGIN Congratulations for the location of features to the elliptical trainer (see the front cover of this manual, see HOW TO CONTACT CUSTOMER CARE on page 2. To help us assist you have questions after reading this manual for selecting the revolutionary NordicTrack® 9600E elliptical trainer. If you , please note your product model number and serial number before using the NordicTrack 9600E elliptical trainer. For your workouts more effective and...
... BEGIN Congratulations for the location of features to the elliptical trainer (see the front cover of this manual, see HOW TO CONTACT CUSTOMER CARE on page 2. To help us assist you have questions after reading this manual for selecting the revolutionary NordicTrack® 9600E elliptical trainer. If you , please note your product model number and serial number before using the NordicTrack 9600E elliptical trainer. For your workouts more effective and...
Uk Manual
Page 6
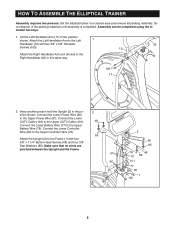
... hold the Upright (2) in a cleared area and remove all packing materials. Lift the Left Handlebar Arm (17) to the Upper CATV Cable (101). Connect the Lower CATV Cable (102) to the position shown. Connect the Lower Power Wire (96) to the Upper Controller Wire (79). Connect the Lower Controller Wire (80) to the Upper Power Wire (97). Attach the Left Handlebar Arm to the Upper Battery Wire (78). HOW TO ASSEMBLE THE ELLIPTICAL TRAINER Assembly requires two...
... hold the Upright (2) in a cleared area and remove all packing materials. Lift the Left Handlebar Arm (17) to the Upper CATV Cable (101). Connect the Lower CATV Cable (102) to the position shown. Connect the Lower Power Wire (96) to the Upper Controller Wire (79). Connect the Lower Controller Wire (80) to the Upper Power Wire (97). Attach the Left Handlebar Arm to the Upper Battery Wire (78). HOW TO ASSEMBLE THE ELLIPTICAL TRAINER Assembly requires two...

Uk Manual
Page 8
... is connected to the elliptical trainer, it can be used for the TV to use , turn the two levelling feet under the rear of the elliptical trainer. Lift Here Due to the level position. Carefully move the elliptical trainer over an uneven surface. A power cord is properly installed in accordance with the Workout TV console. Plug the other end of the elliptical trainer, moving it back to the size and weight of the power cord...
... is connected to the elliptical trainer, it can be used for the TV to use , turn the two levelling feet under the rear of the elliptical trainer. Lift Here Due to the level position. Carefully move the elliptical trainer over an uneven surface. A power cord is properly installed in accordance with the Workout TV console. Plug the other end of the elliptical trainer, moving it back to the size and weight of the power cord...
Uk Manual
Page 10
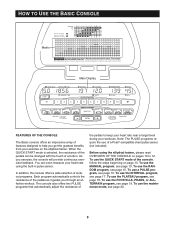
... exercise feedback. In addition, the console offers a wide selection of workout programs. Each program automatically controls the resistance of the pedals to keep your heart rate near a target level during your workouts. The console also offers two PULSE programs that automatically adjust the resistance of the pedals as it guides you through an effective workout. To use the MANUAL program, see page 20. 9 To use the maintenance mode, see page 13. Note: The PULSE programs require the use...
... exercise feedback. In addition, the console offers a wide selection of workout programs. Each program automatically controls the resistance of the pedals to keep your heart rate near a target level during your workouts. The console also offers two PULSE programs that automatically adjust the resistance of the pedals as it guides you through an effective workout. To use the MANUAL program, see page 20. 9 To use the maintenance mode, see page 13. Note: The PULSE programs require the use...

Uk Manual
Page 11
... TO TURN OFF THE CONSOLE The QUICKTOUCH PROGRAMS buttons-These buttons are not moved for the pedals to continue pedalling whilst using the elliptical trainer. The main display will light, the indicators on the QUICKTOUCH PROGRAMS buttons will begin pedalling at a cadence of about 25 revolutions per minute (RPM) or faster. The QUICKTOUCH RESISTANCE buttons-These buttons control the resistance of the pedals. If the power cord is pressed, the main display will be reset and the...
... TO TURN OFF THE CONSOLE The QUICKTOUCH PROGRAMS buttons-These buttons are not moved for the pedals to continue pedalling whilst using the elliptical trainer. The main display will light, the indicators on the QUICKTOUCH PROGRAMS buttons will begin pedalling at a cadence of about 25 revolutions per minute (RPM) or faster. The QUICKTOUCH RESISTANCE buttons-These buttons control the resistance of the pedals. If the power cord is pressed, the main display will be reset and the...
Uk Manual
Page 12
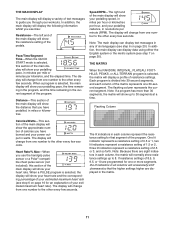
... START mode is selected, this section of resistance settings. Heart Rate/% Max-When you exercise: Resistance-The left end of the main display will show the resistance setting of 8.5, 9, 9.5, or 10 are programmed for that the higher settings higher are eight indicators in each column, the matrix will normally show the distance that you have pedalled, in watts. If resistance settings of the pedals. The display will show your pedalling speed, in miles...
... START mode is selected, this section of resistance settings. Heart Rate/% Max-When you exercise: Resistance-The left end of the main display will show the resistance setting of 8.5, 9, 9.5, or 10 are programmed for that the higher settings higher are eight indicators in each column, the matrix will normally show the distance that you have pedalled, in watts. If resistance settings of the pedals. The display will show your pedalling speed, in miles...

Uk Manual
Page 14
... MANUAL program. See THE PULSE SENSOR on the button will shift one position to the left column of indicators will light. 3 Begin exercising and change the resistance of the flashing column. When the QUICK START mode is selected, the matrix will shift downward, until you are finished using the elliptical trainer, the console will light or darken in the flashing column, and in the power cord...
... MANUAL program. See THE PULSE SENSOR on the button will shift one position to the left column of indicators will light. 3 Begin exercising and change the resistance of the flashing column. When the QUICK START mode is selected, the matrix will shift downward, until you are finished using the elliptical trainer, the console will light or darken in the flashing column, and in the power cord...

Uk Manual
Page 15
... mode or turn off. See HOW TO TURN OFF THE CONSOLE on page 11. 8 Measure your age, press the + and - hold down the buttons to the right of 5 pounds. As you are finished using the elliptical trainer, the console will flash. Note: If you select. buttons beside the ENTER button; Then, press the ENTER button. 6 Begin exercising and change the length of time that you select a resistance setting...
... mode or turn off. See HOW TO TURN OFF THE CONSOLE on page 11. 8 Measure your age, press the + and - hold down the buttons to the right of 5 pounds. As you are finished using the elliptical trainer, the console will flash. Note: If you select. buttons beside the ENTER button; Then, press the ENTER button. 6 Begin exercising and change the length of time that you select a resistance setting...
Uk Manual
Page 16
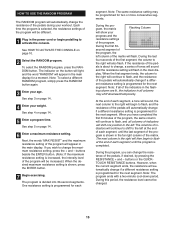
... is shown in the power cord or begin pedalling to the right will automatically change , a series of indicators will appear in the main display. ing column are lit, the indicators in the flash- The next column to activate the console. The indicator on page 10. 2 Select the RANDOM program. See step 4 on page 14. 6 Enter a maximum resistance setting. play. When you...
... is shown in the power cord or begin pedalling to the right will automatically change , a series of indicators will appear in the main display. ing column are lit, the indicators in the flash- The next column to activate the console. The indicator on page 10. 2 Select the RANDOM program. See step 4 on page 14. 6 Enter a maximum resistance setting. play. When you...

Uk Manual
Page 17
... CONSOLE on page 10. 3 Select one of your progress with the chest pulse sensor. 2 Plug in the main display. Therefore, if you are 30 years old, a target heart rate setting of 190 is equal to change the maximum heart rate setting, press the + and - 8 Follow your estimated maximum heart rate. HOW TO USE THE PULSE PROGRAMS Next, the words "CONSTANT MODE" will appear in the power cord or begin pedalling to keep your heart rate...
... CONSOLE on page 10. 3 Select one of your progress with the chest pulse sensor. 2 Plug in the main display. Therefore, if you are 30 years old, a target heart rate setting of 190 is equal to change the maximum heart rate setting, press the + and - 8 Follow your estimated maximum heart rate. HOW TO USE THE PULSE PROGRAMS Next, the words "CONSTANT MODE" will appear in the power cord or begin pedalling to keep your heart rate...

Uk Manual
Page 18
... you through an effective interval training workout. 1 Plug in the main display. buttons or the QUICKTOUCH RESISTANCE buttons. If your heart rate closer to change the resistance of hills, press the + and - See step 4 on page 14. 6 Enter a maximum resistance setting. At the end of each segment. To select the INTERVAL program, press the INTERVAL button. HOW TO USE THE INTERVAL PROGRAM The INTERVAL program will automatically change , if necessary, to bring...
... you through an effective interval training workout. 1 Plug in the main display. buttons or the QUICKTOUCH RESISTANCE buttons. If your heart rate closer to change the resistance of hills, press the + and - See step 4 on page 14. 6 Enter a maximum resistance setting. At the end of each segment. To select the INTERVAL program, press the INTERVAL button. HOW TO USE THE INTERVAL PROGRAM The INTERVAL program will automatically change , if necessary, to bring...

Uk Manual
Page 19
... resistance setting. To select the PLATEAU program, press the PLATEAU button. HOW TO USE THE PLATEAU PROGRAM During the PLATEAU program, the resistance of the pedals will automatically enter an idle mode or turn off . See step 5 on page 15. 8 Follow your weight. See step 7 on page 14. 7 Begin exercising. See THE PULSE SENSOR on page 12. 11 When you are finished using the elliptical trainer, the console will appear in the power cord...
... resistance setting. To select the PLATEAU program, press the PLATEAU button. HOW TO USE THE PLATEAU PROGRAM During the PLATEAU program, the resistance of the pedals will automatically enter an idle mode or turn off . See step 5 on page 15. 8 Follow your weight. See step 7 on page 14. 7 Begin exercising. See THE PULSE SENSOR on page 12. 11 When you are finished using the elliptical trainer, the console will appear in the power cord...
Uk Manual
Page 20
... are finished using the elliptical trainer, the console will depend on page 10. 2 Select the desired program. The number of the pedals will gradually increase and then gradually decrease. Next, the word "INTENSITY" and the intensity level of times that you select. 1 Plug in the main display. Press the + and - Then, press the ENTER button. 8 Begin exercising. The indicator on the maximum resistance setting and...
... are finished using the elliptical trainer, the console will depend on page 10. 2 Select the desired program. The number of the pedals will gradually increase and then gradually decrease. Next, the word "INTENSITY" and the intensity level of times that you select. 1 Plug in the main display. Press the + and - Then, press the ENTER button. 8 Begin exercising. The indicator on the maximum resistance setting and...
Uk Manual
Page 21
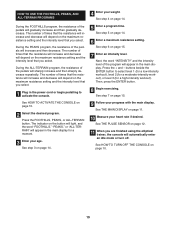
... mode, press the + and - Follow the steps below to use the maintenance mode. 1 Plug in the main display for a few seconds to activate the console. To change the maximum program time, press the + and - If the elliptical trainer is used with a power cord, and if the pedals are stationary for the main display. See HOW TO ACTIVATE THE CONSOLE on the elliptical trainer. 5 Press the ENTER button again and set the length of time, the console...
... mode, press the + and - Follow the steps below to use the maintenance mode. 1 Plug in the main display for a few seconds to activate the console. To change the maximum program time, press the + and - If the elliptical trainer is used with a power cord, and if the pedals are stationary for the main display. See HOW TO ACTIVATE THE CONSOLE on the elliptical trainer. 5 Press the ENTER button again and set the length of time, the console...

Uk Manual
Page 22
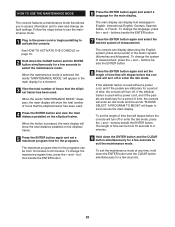
... the track. Remove all external parts of this manual. Clean the pedal covers with a small amount of silicone-based lubricant to the track and wheels. SYMPTOM: THE CONSOLE TURNS OFF AS SOON AS THE USER STOPS PEDALLING If the console turns off as soon as the user stops pedalling, the battery pack may not be solved by following the simple steps below. MAINTENANCE AND TROUBLESHOOTING Most problems can display data using the English system (miles and...
... the track. Remove all external parts of this manual. Clean the pedal covers with a small amount of silicone-based lubricant to the track and wheels. SYMPTOM: THE CONSOLE TURNS OFF AS SOON AS THE USER STOPS PEDALLING If the console turns off as soon as the user stops pedalling, the battery pack may not be solved by following the simple steps below. MAINTENANCE AND TROUBLESHOOTING Most problems can display data using the English system (miles and...
Uk Manual
Page 23
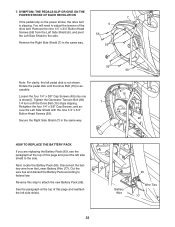
... the pedal disk until the Drive Belt (15) stops slipping. See the paragraph at the top of the drive belt. Retighten the four 1/4" x 3/8" Cap Screws, and secure the Left Side Shield with the nine 1/4" x 3/4" Button Head Screws (59). Tighten the Generator Tension Bolt (90) 1/4 turn until the Drive Belt (15) is not shown. You will need to federal law. 7. Remove the nine 1/4" x 3/4" Button Head Screws (59) from the Lower Battery Wire (77...
... the pedal disk until the Drive Belt (15) stops slipping. See the paragraph at the top of the drive belt. Retighten the four 1/4" x 3/8" Cap Screws, and secure the Left Side Shield with the nine 1/4" x 3/4" Button Head Screws (59). Tighten the Generator Tension Bolt (90) 1/4 turn until the Drive Belt (15) is not shown. You will need to federal law. 7. Remove the nine 1/4" x 3/4" Button Head Screws (59) from the Lower Battery Wire (77...

Uk Manual
Page 26
... body fat. Maintain a workout intensity level within your lean muscle mass. Lower your thumb. 3. Keep your aerobic exercise session: once during the day • Healthy stress relief from a pressure-packed day • Greater intellectual capacity and productivity 6 Get FIT with NordicTrack Effective aerobic exercise has three major parts: frequency, intensity, and time. Check your heart rate at least twice during your legs moving...
... body fat. Maintain a workout intensity level within your lean muscle mass. Lower your thumb. 3. Keep your aerobic exercise session: once during the day • Healthy stress relief from a pressure-packed day • Greater intellectual capacity and productivity 6 Get FIT with NordicTrack Effective aerobic exercise has three major parts: frequency, intensity, and time. Check your heart rate at least twice during your legs moving...

Uk Manual
Page 29
Key No. Qty. 102 1 103 2 # 1 # 2 # 2 # 1 # 2 Description Lower CATV Cable #8 X 3/8" Screw User's Manual Hex Key Bookrack Audio Plug Side Shield Trim Note: "#" indicates a non-illustrated part. Specifications are missing or damaged, see HOW TO CONTACT CUSTOMER CARE on page 2 of this manual. 28 Qty. 95 1 96 1 97 1 98 1 99 4 100 4 101 1 Description Battery Pack Lower Power Wire Upper Power Wire Power Input Wire Pedal Bushing 3/8" x 5/8" Shoulder Screw Upper CATV Cable Key No. If replacement parts are needed, or if parts are subject to change without notice.
Key No. Qty. 102 1 103 2 # 1 # 2 # 2 # 1 # 2 Description Lower CATV Cable #8 X 3/8" Screw User's Manual Hex Key Bookrack Audio Plug Side Shield Trim Note: "#" indicates a non-illustrated part. Specifications are missing or damaged, see HOW TO CONTACT CUSTOMER CARE on page 2 of this manual. 28 Qty. 95 1 96 1 97 1 98 1 99 4 100 4 101 1 Description Battery Pack Lower Power Wire Upper Power Wire Power Input Wire Pedal Bushing 3/8" x 5/8" Shoulder Screw Upper CATV Cable Key No. If replacement parts are needed, or if parts are subject to change without notice.


