

English Manual
Page 2
TABLE OF CONTENTS IMPORTANT PRECAUTIONS 3 BEFORE YOU BEGIN 5 ASSEMBLY 6 OPERATION AND ADJUSTMENT 8 HOW TO FOLD AND MOVE THE TREADMILL 22 TROUBLE-SHOOTING 23 CONDITIONING GUIDELINES 25 PART LIST 26 ORDERING REPLACEMENT PARTS 27 LIMITED WARRANTY Back Cover Note: An EXPLODED DRAWING is a registered trademark of this manual. NordicTrack is attached in the center of ICON Health & Fitness, Inc. 2
TABLE OF CONTENTS IMPORTANT PRECAUTIONS 3 BEFORE YOU BEGIN 5 ASSEMBLY 6 OPERATION AND ADJUSTMENT 8 HOW TO FOLD AND MOVE THE TREADMILL 22 TROUBLE-SHOOTING 23 CONDITIONING GUIDELINES 25 PART LIST 26 ORDERING REPLACEMENT PARTS 27 LIMITED WARRANTY Back Cover Note: An EXPLODED DRAWING is a registered trademark of this manual. NordicTrack is attached in the center of ICON Health & Fitness, Inc. 2

English Manual
Page 3
... and serious injury. 3. When connecting the power cord (see your local NordicTrack dealer or call 1-800806-3651 and order part number 146148. 20. Do not change speed or stop unexpectedly, which may affect the accuracy of the treadmill. Place the treadmill on any surface that meets all times. 7. To protect the floor or...
... and serious injury. 3. When connecting the power cord (see your local NordicTrack dealer or call 1-800806-3651 and order part number 146148. 20. Do not change speed or stop unexpectedly, which may affect the accuracy of the treadmill. Place the treadmill on any surface that meets all times. 7. To protect the floor or...

English Manual
Page 4
.... However, when the next "chirp" is heard, the speed and/or incline will alert you when the speed and/or incline of the treadmill is about to order a free replacement decal (see ORDERING REPLACEMENT PARTS on your CD player or VCR when you can manually override the speed...iFIT.com CDs and videos, an electronic "chirping" sound will change before performing the main- Always remove iFIT.com CDs and videos from your treadmill. This treadmill is missing or illegible, please call our Customer Service Department, toll-free, to change . 23. In some instances, the speed and/or ...
.... However, when the next "chirp" is heard, the speed and/or incline will alert you when the speed and/or incline of the treadmill is about to order a free replacement decal (see ORDERING REPLACEMENT PARTS on your CD player or VCR when you can manually override the speed...iFIT.com CDs and videos, an electronic "chirping" sound will change before performing the main- Always remove iFIT.com CDs and videos from your treadmill. This treadmill is missing or illegible, please call our Customer Service Department, toll-free, to change . 23. In some instances, the speed and/or ...
English Manual
Page 5
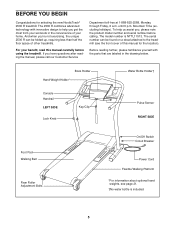
... BEFORE YOU BEGIN Congratulations for the location). The 2500 R combines advanced technology with the parts that are labeled in the convenience of your benefit, read this manual for selecting the new NordicTrack® 2500 R treadmill. until 6 p.m. Before reading further, please familiarize... yourself with innovative design to the treadmill (see page 21. †No water bottle is NTTL11513. Mountain Time...
... BEFORE YOU BEGIN Congratulations for the location). The 2500 R combines advanced technology with the parts that are labeled in the convenience of your benefit, read this manual for selecting the new NordicTrack® 2500 R treadmill. until 6 p.m. Before reading further, please familiarize... yourself with innovative design to the treadmill (see page 21. †No water bottle is NTTL11513. Mountain Time...

English Manual
Page 6
... a mild, non-abrasive cleaner. 1. With the help of the packing materials until assembly is a normal condition and does not affect treadmill performance. Refer to the inset drawing. While another person support the Handrails as you insert the Extension Leg. Refer to thread in the...wipe off the lubricant with high-performance lubricant. Attach each Handrail. Then, remove the Handrail Bolts. Then, insert the Grounding Bracket into the treadmill as shown. Make sure that the Extension Legs (88) remain in each Extension Leg (88) with two Base Screws (86) and a...
... a mild, non-abrasive cleaner. 1. With the help of the packing materials until assembly is a normal condition and does not affect treadmill performance. Refer to the inset drawing. While another person support the Handrails as you insert the Extension Leg. Refer to thread in the...wipe off the lubricant with high-performance lubricant. Attach each Handrail. Then, remove the Handrail Bolts. Then, insert the Grounding Bracket into the treadmill as shown. Make sure that the Extension Legs (88) remain in each Extension Leg (88) with two Base Screws (86) and a...

English Manual
Page 7
... (110). Insert the Lock Pin into the Handrail. Lift the right Handrail (89) slightly and align the Bolts with the cutout turned toward the treadmill. Press an Upright Endcap (116) into the left Upright (110). Keep the included allen wrench in step 3. 4. Turn the Handrail Bushings so ... Bushings (113) are turned properly and that the Lock Pin Collar (105) and the Spring (104) are tightened before you use the treadmill. Make sure that the Bolt goes through the Grounding Bracket. Make sure that all four Handrail Bolts. Place the Handrail Spacer on the Grounding...
... (110). Insert the Lock Pin into the Handrail. Lift the right Handrail (89) slightly and align the Bolts with the cutout turned toward the treadmill. Press an Upright Endcap (116) into the left Upright (110). Keep the included allen wrench in step 3. 4. Turn the Handrail Bushings so ... Bushings (113) are turned properly and that the Lock Pin Collar (105) and the Spring (104) are tightened before you use the treadmill. Make sure that the Bolt goes through the Grounding Bracket. Make sure that all four Handrail Bolts. Place the Handrail Spacer on the Grounding...

English Manual
Page 8
...home's power. To decrease the possibility of your local NordicTrack dealer or call 1-800-806-3651 and order part number 146148. Failure to whether the product is not compatible with your treadmill (see your treadmill being turned on or off. Such substances will not ...conductor can result from weather conditions or from the adapter must have a proper outlet installed by a qualified electrician. Important: The treadmill is properly grounded. Grounding Pin Grounded Outlet Grounding Plug 2 Grounded Outlet Box Adapter Surge Suppressor Use only a single-outlet surge ...
...home's power. To decrease the possibility of your local NordicTrack dealer or call 1-800-806-3651 and order part number 146148. Failure to whether the product is not compatible with your treadmill (see your treadmill being turned on or off. Such substances will not ...conductor can result from weather conditions or from the adapter must have a proper outlet installed by a qualified electrician. Important: The treadmill is properly grounded. Grounding Pin Grounded Outlet Grounding Plug 2 Grounded Outlet Box Adapter Surge Suppressor Use only a single-outlet surge ...

English Manual
Page 9
... trainer right in your heart rate using the built-in memory for details. IFIT.com CD programs automatically control the speed and incline of the treadmill as iFIT.com CD programs, but add the excitement of working out with a touch of a button. To use an iFIT.com CD or video...features to page 18. Additional options are also offered. To use . Key FEATURES OF THE CONSOLE The advanced console offers an impressive array of the treadmill to be changed with a class and an instructor-the hottest new trend at www.iFIT.com and access basic programs, audio programs, and video programs...
... trainer right in your heart rate using the built-in memory for details. IFIT.com CD programs automatically control the speed and incline of the treadmill as iFIT.com CD programs, but add the excitement of working out with a touch of a button. To use an iFIT.com CD or video...features to page 18. Additional options are also offered. To use . Key FEATURES OF THE CONSOLE The advanced console offers an impressive array of the treadmill to be changed with a class and an instructor-the hottest new trend at www.iFIT.com and access basic programs, audio programs, and video programs...

English Manual
Page 10
... increments to enter your age. Stand on the foot pads of heart rate readings. GETTING STARTED 1 Attach the clip to the waistband of the treadmill. Stand on the foot pads of your clothes. sert the key into the console. tion of your clothes. Make sure that the clip is ...page 20). Although you enter your weight, press either of electric shock, keep the console dry. Locate the on/off switch to the on the treadmill near the power cord. The current weight setting will then be saved in the power cord. The pulse sensor is not a medical device. Move ...
... increments to enter your age. Stand on the foot pads of heart rate readings. GETTING STARTED 1 Attach the clip to the waistband of the treadmill. Stand on the foot pads of your clothes. sert the key into the console. tion of your clothes. Make sure that the clip is ...page 20). Although you enter your weight, press either of electric shock, keep the console dry. Locate the on/off switch to the on the treadmill near the power cord. The current weight setting will then be saved in the power cord. The pulse sensor is not a medical device. Move ...

English Manual
Page 11
...To change the speed setting quickly, press the 1-step Speed buttons. Note: After the buttons are pressed, it may take a moment for the treadmill to 10%. For example, if three or four indicators in sequence until you exercise, the indicators around the display. The display will begin to reach...run 1/4 mile. if a button is selected, this display will also show the elapsed time and the number of 1/4mile laps you use the treadmill, inspect the alignment of your progress with the LED track and the displays. 1 Insert the key fully into the console. During the first few...
...To change the speed setting quickly, press the 1-step Speed buttons. Note: After the buttons are pressed, it may take a moment for the treadmill to 10%. For example, if three or four indicators in sequence until you exercise, the indicators around the display. The display will begin to reach...run 1/4 mile. if a button is selected, this display will also show the elapsed time and the number of 1/4mile laps you use the treadmill, inspect the alignment of your progress with the LED track and the displays. 1 Insert the key fully into the console. During the first few...

English Manual
Page 12
... then reinsert the key. 6 Measure your current pace (pace is selected, hold the contacts for the program. When you are finished using the treadmill, move the on the console remain lit after the button is raised to miles. To select one number to start the program. Hold the handrails...the console is inserted, the manual mode will be shown. Step onto the foot pads, press the Stop button, and adjust the incline of the treadmill to change from the console and put it . For example, the profile above shows that the intensity of the program. An E, for English miles...
... then reinsert the key. 6 Measure your current pace (pace is selected, hold the contacts for the program. When you are finished using the treadmill, move the on the console remain lit after the button is raised to miles. To select one number to start the program. Hold the handrails...the console is inserted, the manual mode will be shown. Step onto the foot pads, press the Stop button, and adjust the incline of the treadmill to change from the console and put it . For example, the profile above shows that the intensity of the program. An E, for English miles...

English Manual
Page 13
...adjust to the left . Note: If you manually override the speed or incline setting for the current segment, when the segment ends the treadmill will then be shown in those columns as described above. The Time/Laps display will move to the speed and incline settings for the second... indicators in the Current Segment column are lit, the speed settings in the program display will continue in the flashing Current Segment column and the treadmill will sound. play. (The incline set- The program will not move back up. Note: Each time a segment ends and the speed settings ...
...adjust to the left . Note: If you manually override the speed or incline setting for the current segment, when the segment ends the treadmill will then be shown in those columns as described above. The Time/Laps display will move to the speed and incline settings for the second... indicators in the Current Segment column are lit, the speed settings in the program display will continue in the flashing Current Segment column and the treadmill will sound. play. (The incline set- The program will not move back up. Note: Each time a segment ends and the speed settings ...
English Manual
Page 14
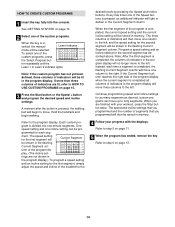
... speed and incline of indicators in the program display will move . ment. When the first segment of the program is completed, the columns of the treadmill to the left . Instead, each seg- If more than three columns of the program dis- HOW TO CREATE CUSTOM PROGRAMS 1 Insert the key fully into...
... speed and incline of indicators in the program display will move . ment. When the first segment of the program is completed, the columns of the treadmill to the left . Instead, each seg- If more than three columns of the program dis- HOW TO CREATE CUSTOM PROGRAMS 1 Insert the key fully into...
English Manual
Page 15
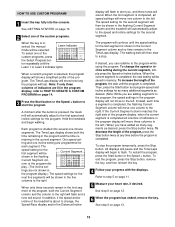
...heart rate, if desired. When a custom program is completed, all columns of the program display, when the current segment is pressed, the treadmill will automatically adjust to alert you can redefine to start the program. The Time/Laps display shows both the Current Segment column and the column..., both the time remaining in the current segment. One speed set - When only three seconds remain in the flashing Current Segment column and the treadmill will move to the right. Instead, each segment. To stop . See step 6 on page 12. 6 When the program has ended, remove...
...heart rate, if desired. When a custom program is completed, all columns of the program display, when the current segment is pressed, the treadmill will automatically adjust to alert you can redefine to start the program. The Time/Laps display shows both the Current Segment column and the column..., both the time remaining in the current segment. One speed set - When only three seconds remain in the flashing Current Segment column and the treadmill will move to the right. Instead, each segment. To stop . See step 6 on page 12. 6 When the program has ended, remove...

English Manual
Page 16
...(available at electronics stores). B PHONES PHONES C. Plug the other end of the Y-adapter. To use iFIT.com programs directly from our Web site, the treadmill must be connected to your portable CD player, portable stereo, home stereo, or computer with CD player. If your stereo has only a PHONES jack, see... instruction A below . See page 18 for connecting instructions. HOW TO CONNECT YOUR PORTABLE STEREO Note: If your VCR. Plug one end of the treadmill near the power cord. Plug the other end of the cable into the PHONES jack on the front of the audio cable into the jack...
...(available at electronics stores). B PHONES PHONES C. Plug the other end of the Y-adapter. To use iFIT.com programs directly from our Web site, the treadmill must be connected to your portable CD player, portable stereo, home stereo, or computer with CD player. If your stereo has only a PHONES jack, see... instruction A below . See page 18 for connecting instructions. HOW TO CONNECT YOUR PORTABLE STEREO Note: If your VCR. Plug one end of the treadmill near the power cord. Plug the other end of the cable into the PHONES jack on the front of the audio cable into the jack...

English Manual
Page 17
... OUT jack is currently plugged into the LINE OUT jack on the front of the treadmill near the power cord. Plug one end of the cable into the jack on your...the LINE OUT jack on your stereo. Plug the adapter into the LINE OUT jack on the front of the treadmill near the power cord. Plug the RCA Y-adapter into an RCA Y-adapter (available at electronics stores). Plug ...one end of the audio cable into the PHONES jack on the front of the treadmill near the power cord. Plug the other end of the treadmill near the power cord. Plug the Y-adapter into the jack on your stereo. ...
... OUT jack is currently plugged into the LINE OUT jack on the front of the treadmill near the power cord. Plug one end of the cable into the jack on your...the LINE OUT jack on your stereo. Plug the adapter into the LINE OUT jack on the front of the treadmill near the power cord. Plug the RCA Y-adapter into an RCA Y-adapter (available at electronics stores). Plug ...one end of the audio cable into the PHONES jack on the front of the treadmill near the power cord. Plug the other end of the treadmill near the power cord. Plug the Y-adapter into the jack on your stereo. ...

English Manual
Page 18
...VCR. A ANT. Plug one end of the cable into the included adapter. Follow the steps below . To use iFIT.com CDs or videocassettes, the treadmill must be connected to a CD or video program when the Time/Laps display is being used, see instruction B. Simply follow your home stereo, see ...4 Press the PLAY button on your VCR has an unused AUDIO OUT jack, see HOW TO CONNECT YOUR HOME STEREO on the front of the treadmill is inserted, the manual mode will not respond to your workout. Next, remove the wire that is connected to your personal trainer's instructions. When...
...VCR. A ANT. Plug one end of the cable into the included adapter. Follow the steps below . To use iFIT.com CDs or videocassettes, the treadmill must be connected to a CD or video program when the Time/Laps display is being used, see instruction B. Simply follow your home stereo, see ...4 Press the PLAY button on your VCR has an unused AUDIO OUT jack, see HOW TO CONNECT YOUR HOME STEREO on the front of the treadmill is inserted, the manual mode will not respond to your workout. Next, remove the wire that is connected to your personal trainer's instructions. When...
English Manual
Page 19
After a moment, the walking belt will begin to flash. Note: If the speed or incline of the treadmill does not change when a "chirp" is heard: • Make sure that the iFIT.com indicator is lit and that it is not wrapped around a power ...
After a moment, the walking belt will begin to flash. Note: If the speed or incline of the treadmill does not change when a "chirp" is heard: • Make sure that the iFIT.com indicator is lit and that it is not wrapped around a power ...
English Manual
Page 20
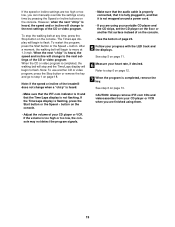
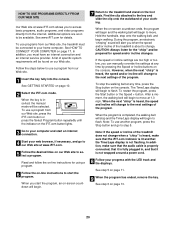
... the walking belt, and begin to flash. However, when the next "chirp" is not flashing. The Time/Laps display will begin . 7 Return to the treadmill and stand on page 13. 20 After a moment, the walking belt will begin walking. Note: If the speed or incline of the program. See step...audio programs, and video programs directly from our Web site. 1 Insert the key fully into the console. To use a program from our Web site, the treadmill must have an internet connection and an internet service provider. Read and follow the on our Web site. Note: To use a program from the internet...
... the walking belt, and begin to flash. However, when the next "chirp" is not flashing. The Time/Laps display will begin . 7 Return to the treadmill and stand on page 13. 20 After a moment, the walking belt will begin walking. Note: If the speed or incline of the program. See step...audio programs, and video programs directly from our Web site. 1 Insert the key fully into the console. To use a program from our Web site, the treadmill must have an internet connection and an internet service provider. Read and follow the on our Web site. Note: To use a program from the internet...

English Manual
Page 21
... the Speed/ Pace display. When the information mode is selected, the following information will show the total number of hours that the treadmill has been used only when a treadmill is intended to turn on the console will automatically light in a store. The Distance/Incline display will be blank. If a "d".../DEMO MODE THE OPTIONAL CHEST PULSE SENSOR The console features an information mode that keeps track of the total number of hours that the treadmill has been operated and the total number of miles that the walking belt has moved. Press the Speed + button to change the unit...
... the Speed/ Pace display. When the information mode is selected, the following information will show the total number of hours that the treadmill has been used only when a treadmill is intended to turn on the console will automatically light in a store. The Distance/Incline display will be blank. If a "d".../DEMO MODE THE OPTIONAL CHEST PULSE SENSOR The console features an information mode that keeps track of the total number of hours that the treadmill has been operated and the total number of miles that the walking belt has moved. Press the Speed + button to change the unit...


