

English Manual
Page 2
...location shown. TABLE OF CONTENTS WARNING DECAL PLACEMENT 2 IMPORTANT PRECAUTIONS 3 BEFORE YOU BEGIN 4 ASSEMBLY 5 HOW TO USE THE ELLIPTICAL EXERCISER 12 MAINTENANCE AND TROUBLESHOOTING 22 EXERCISE GUIDELINES 23 PART LIST 24 EXPLODED DRAWING 26 ORDERING REPLACEMENT PARTS Back Cover LIMITED WARRANTY Back... Cover WARNING DECAL PLACEMENT This drawing shows the location(s) of ICON IP, Inc. 2 NordicTrack is missing or illegible, call the telephone number on the front cover of this manual and request a free replacement decal. If ...
...location shown. TABLE OF CONTENTS WARNING DECAL PLACEMENT 2 IMPORTANT PRECAUTIONS 3 BEFORE YOU BEGIN 4 ASSEMBLY 5 HOW TO USE THE ELLIPTICAL EXERCISER 12 MAINTENANCE AND TROUBLESHOOTING 22 EXERCISE GUIDELINES 23 PART LIST 24 EXPLODED DRAWING 26 ORDERING REPLACEMENT PARTS Back Cover LIMITED WARRANTY Back... Cover WARNING DECAL PLACEMENT This drawing shows the location(s) of ICON IP, Inc. 2 NordicTrack is missing or illegible, call the telephone number on the front cover of this manual and request a free replacement decal. If ...

English Manual
Page 3
... If you stop exercising, allow the pedals to slowly come to ensure that could become caught on your elliptical exerciser. Use your elliptical exerciser at all times. 7. IMPORTANT PRECAUTIONS WARNING: To reduce the risk of serious injury, read all ... level surface, with pre-existing health problems. 2. ICON assumes no responsibility for foot protection. 9. Place your elliptical exerciser on your elliptical exerciser before using your elliptical exerciser in a commercial, rental, or institutional setting. 4. Inspect and properly tighten all precautions. 3. Keep children...
... If you stop exercising, allow the pedals to slowly come to ensure that could become caught on your elliptical exerciser. Use your elliptical exerciser at all times. 7. IMPORTANT PRECAUTIONS WARNING: To reduce the risk of serious injury, read all ... level surface, with pre-existing health problems. 2. ICON assumes no responsibility for foot protection. 9. Place your elliptical exerciser on your elliptical exerciser before using your elliptical exerciser in a commercial, rental, or institutional setting. 4. Inspect and properly tighten all precautions. 3. Keep children...
English Manual
Page 4
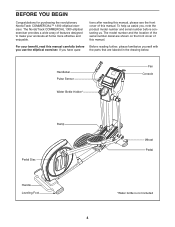
.... To help us assist you, note the product model number and serial number before you have ques- The NordicTrack COMMERCIAL 1300 elliptical exerciser provides a wide array of the serial number decal are labeled in the drawing below. The model number and the location of features designed to ... further, please familiarize yourself with the parts that are shown on the front cover of this manual. BEFORE YOU BEGIN Congratulations for purchasing the revolutionary NordicTrack COMMERCIAL™ 1300 elliptical exerciser.
.... To help us assist you, note the product model number and serial number before you have ques- The NordicTrack COMMERCIAL 1300 elliptical exerciser provides a wide array of the serial number decal are labeled in the drawing below. The model number and the location of features designed to ... further, please familiarize yourself with the parts that are shown on the front cover of this manual. BEFORE YOU BEGIN Congratulations for purchasing the revolutionary NordicTrack COMMERCIAL™ 1300 elliptical exerciser.
English Manual
Page 5
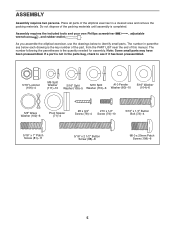
... bag, check to identify small parts. Assembly requires the included tools and your own Phillips screwdriver wrench , and rubber mallet . , adjustable As you assemble the elliptical exerciser, use the drawings below each drawing is not in a cleared area and remove the packing materials. Do not dispose of this manual. If a part...
... bag, check to identify small parts. Assembly requires the included tools and your own Phillips screwdriver wrench , and rubber mallet . , adjustable As you assemble the elliptical exerciser, use the drawings below each drawing is not in a cleared area and remove the packing materials. Do not dispose of this manual. If a part...
English Manual
Page 6
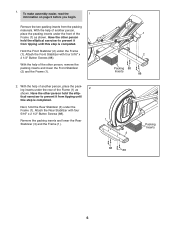
... (3) and the Frame (1). 1 2 Packing 88 Inserts 88 1 3 88 88 Packing Inserts 6 With the help of the Frame (1) as shown. Have the other person hold the elliptical exerciser to prevent it from the packing materials. With the help of another person, place the packing inserts under the Frame (1).
... (3) and the Frame (1). 1 2 Packing 88 Inserts 88 1 3 88 88 Packing Inserts 6 With the help of the Frame (1) as shown. Have the other person hold the elliptical exerciser to prevent it from the packing materials. With the help of another person, place the packing inserts under the Frame (1).
English Manual
Page 8
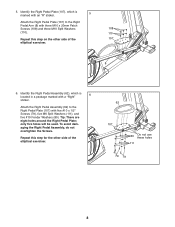
...: There are eight holes around the Right Pedal Plate; only five holes will be used. Repeat this step on the other side of the 107 elliptical exerciser. 8 6. Attach the Right Pedal Assembly (62) to the Right Pedal Arm (8) with three M10 x 20mm Patch Screws (108) and three M10 Split... Washers 108 (110). 110 Repeat this step for the other side of the elliptical exerciser. 62 107 80 Do not use these holes 111 79 79 8 Identify the Right Pedal Assembly (62), which is located in a package marked with...
...: There are eight holes around the Right Pedal Plate; only five holes will be used. Repeat this step on the other side of the 107 elliptical exerciser. 8 6. Attach the Right Pedal Assembly (62) to the Right Pedal Arm (8) with three M10 x 20mm Patch Screws (108) and three M10 Split... Washers 108 (110). 110 Repeat this step for the other side of the elliptical exerciser. 62 107 80 Do not use these holes 111 79 79 8 Identify the Right Pedal Assembly (62), which is located in a package marked with...
English Manual
Page 9
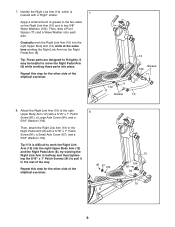
... tightly. Tip: If it is marked with a "Right" sticker. 7 Apply a small amount of the way. Repeat this step for the other side of the elliptical exerciser. 12 Grease 102 71 71 102 8 Grease 10 8. Then, attach the Right Link Arm (10) to work the Right Link Arm (10) into the... Arm (12) with a 5/16" x 1" Patch Screw (81), a Small Axle Cover (67), and a 5/16" Washer (104). Repeat this step for the other side of the elliptical exerciser. 8 81 67 104 8 12 104 81 94 10 9 Tip: These parts are designed to two 5/8" Wave Washers (102). 7. Then, slide a Pivot Spacer (71) and...
... tightly. Tip: If it is marked with a "Right" sticker. 7 Apply a small amount of the way. Repeat this step for the other side of the elliptical exerciser. 12 Grease 102 71 71 102 8 Grease 10 8. Then, attach the Right Link Arm (10) to work the Right Link Arm (10) into the... Arm (12) with a 5/16" x 1" Patch Screw (81), a Small Axle Cover (67), and a 5/16" Washer (104). Repeat this step for the other side of the elliptical exerciser. 8 81 67 104 8 12 104 81 94 10 9 Tip: These parts are designed to two 5/8" Wave Washers (102). 7. Then, slide a Pivot Spacer (71) and...
English Manual
Page 11
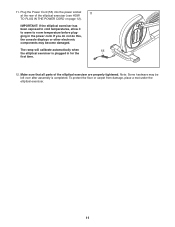
... console displays or other electronic components may be left over after assembly is plugged in the power cord. Make sure that all parts of the elliptical exerciser (see HOW TO PLUG IN THE POWER CORD on page 12). Plug the Power Cord (55) into the power socket 11 at the rear... of the elliptical exerciser are properly tightened. Note: Some hardware may become damaged. IMPORTANT: If the elliptical exerciser has been exposed to cold temperatures, allow it to warm to room temperature before plugging in for the...
... console displays or other electronic components may be left over after assembly is plugged in the power cord. Make sure that all parts of the elliptical exerciser (see HOW TO PLUG IN THE POWER CORD on page 12). Plug the Power Cord (55) into the power socket 11 at the rear... of the elliptical exerciser are properly tightened. Note: Some hardware may become damaged. IMPORTANT: If the elliptical exerciser has been exposed to cold temperatures, allow it to warm to room temperature before plugging in for the...
English Manual
Page 12
...of the front wheels. This product is properly grounded. DANGER: Improper connection of the equipment-grounding conductor can be held in front of the elliptical exerciser, hold the upright, and place one foot against one or both of electric shock. Do not modify the plug provided with a ... front wheels. The temporary adapter should malfunction or break down, grounding provides a path of least resistance for use , turn one of the elliptical exerciser, moving it to reduce the risk of the leveling feet beneath the rear stabilizer until the rocking motion is used, it must be...
...of the front wheels. This product is properly grounded. DANGER: Improper connection of the equipment-grounding conductor can be held in front of the elliptical exerciser, hold the upright, and place one foot against one or both of electric shock. Do not modify the plug provided with a ... front wheels. The temporary adapter should malfunction or break down, grounding provides a path of least resistance for use , turn one of the elliptical exerciser, moving it to reduce the risk of the leveling feet beneath the rear stabilizer until the rocking motion is used, it must be...
English Manual
Page 13
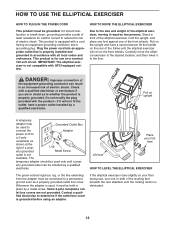
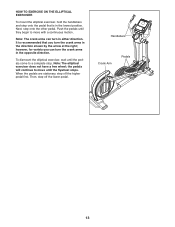
...flywheel stops. Then, step off the higher pedal first. Note: The crank arms can turn the crank arms in the opposite direction. Note: The elliptical exerciser does not have a free wheel; Next, step onto the other pedal. Handlebars Crank Arm Pedals 13 the pedals will continue to move until... the pedal that is recommended that you can turn the crank arms in the direction shown by the arrow at the right; To dismount the elliptical exerciser, wait until the pedals come to move with a continuous motion. however, for variety you turn in either direction. When the pedals are...
...flywheel stops. Then, step off the higher pedal first. Note: The crank arms can turn the crank arms in the opposite direction. Note: The elliptical exerciser does not have a free wheel; Next, step onto the other pedal. Handlebars Crank Arm Pedals 13 the pedals will continue to move until... the pedal that is recommended that you can turn the crank arms in the direction shown by the arrow at the right; To dismount the elliptical exerciser, wait until the pedals come to move with a continuous motion. however, for variety you turn in either direction. When the pedals are...
English Manual
Page 16
... or to squeeze the metal contacts tightly. Press the Fan button repeatedly to select a fan speed or to move for several seconds, a series of the elliptical exerciser may wear prematurely. 16 Note: If the pedals do not move for at least 15 seconds. When you are finished exercising, unplug the power...
... or to squeeze the metal contacts tightly. Press the Fan button repeatedly to select a fan speed or to move for several seconds, a series of the elliptical exerciser may wear prematurely. 16 Note: If the pedals do not move for at least 15 seconds. When you are finished exercising, unplug the power...
English Manual
Page 22
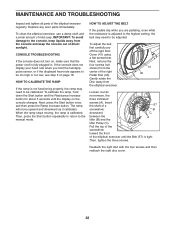
...the Ramp increase button. The ramp will move upward and downward as it calibrates. Next, remove the four screws (not shown) from the elliptical exerciser. 41 40 Loosen, but do not remove, the three indicated screws (A). HOW TO CALIBRATE THE RAMP If the ramp is not functioning...carefully pry off the right Disc Cover (41) using a flat screwdriver. Insert the shaft of mild soap. Then, tighten the three screws. To clean the elliptical exerciser, use a damp cloth and a small amount of a 57 screwdriver B downward C between the A Idler (B) and the Idler Pulley (C). If the ...
...the Ramp increase button. The ramp will move upward and downward as it calibrates. Next, remove the four screws (not shown) from the elliptical exerciser. 41 40 Loosen, but do not remove, the three indicated screws (A). HOW TO CALIBRATE THE RAMP If the ramp is not functioning...carefully pry off the right Disc Cover (41) using a flat screwdriver. Insert the shaft of mild soap. Then, tighten the three screws. To clean the elliptical exerciser, use a damp cloth and a small amount of a 57 screwdriver B downward C between the A Idler (B) and the Idler Pulley (C). If the ...


