
Installation Guide
Page 3
... Conventions 12 Text Conventions 14 1 Overview 15 About the Check Point IP690 Security Platform 15 Managing the Check Point IP690 Security Platform 16 Check Point IP690 Security Platform Overview 17 Four-Port 10/100/1000 Ethernet NIC 17 PMC Expansion Slots 18 Console Port 18 Auxiliary Port 19 System Status LEDs 19 Logging Options... Fan Unit 22 Power Supplies 22 Fan Unit 23 Site Requirements, Warnings, and Cautions 24 Software Requirements 24 Product Disposal 25 2 Installing the Check Point IP690 Appliance 27 Before You Begin 27 Rack-Mounting the Appliance 27 Check Point...
... Conventions 12 Text Conventions 14 1 Overview 15 About the Check Point IP690 Security Platform 15 Managing the Check Point IP690 Security Platform 16 Check Point IP690 Security Platform Overview 17 Four-Port 10/100/1000 Ethernet NIC 17 PMC Expansion Slots 18 Console Port 18 Auxiliary Port 19 System Status LEDs 19 Logging Options... Fan Unit 22 Power Supplies 22 Fan Unit 23 Site Requirements, Warnings, and Cautions 24 Software Requirements 24 Product Disposal 25 2 Installing the Check Point IP690 Appliance 27 Before You Begin 27 Rack-Mounting the Appliance 27 Check Point...

Installation Guide
Page 4
3 Performing the Initial Configuration 33 Using a Console Connection 34 Connecting Power and Turning the Power On 34 Performing the Initial Configuration 36 Connecting Network Interfaces 37 Using Check Point Network Voyager 38 ... Features 48 Ethernet NIC Connectors and Cables 49 Two-Port and Four-Port Copper Gigabit Ethernet NIC 50 Copper Gigabit Ethernet NIC Features in the IP690 50 Copper Gigabit Ethernet NIC Connectors and Cables 51 Two-Port Fiber-Optic Gigabit Ethernet NICs 53 Fiber-Optic Gigabit Ethernet NIC Features 53 Fiber...
3 Performing the Initial Configuration 33 Using a Console Connection 34 Connecting Power and Turning the Power On 34 Performing the Initial Configuration 36 Connecting Network Interfaces 37 Using Check Point Network Voyager 38 ... Features 48 Ethernet NIC Connectors and Cables 49 Two-Port and Four-Port Copper Gigabit Ethernet NIC 50 Copper Gigabit Ethernet NIC Features in the IP690 50 Copper Gigabit Ethernet NIC Connectors and Cables 51 Two-Port Fiber-Optic Gigabit Ethernet NICs 53 Fiber-Optic Gigabit Ethernet NIC Features 53 Fiber...

Installation Guide
Page 9
Tables Table 1 Command-Line Conventions 12 Table 2 Text Conventions 14 Table 3 Pin Assignments for Console Connector and Console Cable 18 Table 4 System Status LEDs 20 Table 5 Power Supply Status LEDs 23 Table 6 NIC PCI Frequency 47 Check Point IP690 Security Platform Installation Guide 9
Tables Table 1 Command-Line Conventions 12 Table 2 Text Conventions 14 Table 3 Pin Assignments for Console Connector and Console Cable 18 Table 4 System Status LEDs 20 Table 5 Power Supply Status LEDs 23 Table 6 NIC PCI Frequency 47 Check Point IP690 Security Platform Installation Guide 9

Installation Guide
Page 15
... in slot 3 „ A four-port Ethernet 10/100/1000 interface in slot 4 „ A console port „ An auxiliary port Check Point IP690 Security Platform Installation Guide 15 In its base configuration, the IP690 consists of: „ Solid state IDE compact flash storage, which stores the Check Point IPSO operating system „ 2-GB system RAM „...
... in slot 3 „ A four-port Ethernet 10/100/1000 interface in slot 4 „ A console port „ An auxiliary port Check Point IP690 Security Platform Installation Guide 15 In its base configuration, the IP690 consists of: „ Solid state IDE compact flash storage, which stores the Check Point IPSO operating system „ 2-GB system RAM „...

Installation Guide
Page 17
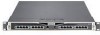
...1 Component Locations Front View System status LEDs PMC NIC slots (slots 1 and 2) PC-card slot (slot 3) SLOT 1 SLOT 2 CONSOLE RESET AUX SLOT 3 SLOT 4 1 2 3 4 IP690 00577 Console port AUX port Reset button Four-port Ethernet 10/100/1000 (slot 4) Four-Port 10/100/1000 Ethernet NIC The four-port 10/...100/1000 Mbps Ethernet ports are intended for the IP690. The top link LED represents the left to right. Note The...
...1 Component Locations Front View System status LEDs PMC NIC slots (slots 1 and 2) PC-card slot (slot 3) SLOT 1 SLOT 2 CONSOLE RESET AUX SLOT 3 SLOT 4 1 2 3 4 IP690 00577 Console port AUX port Reset button Four-port Ethernet 10/100/1000 (slot 4) Four-Port 10/100/1000 Ethernet NIC The four-port 10/...100/1000 Mbps Ethernet ports are intended for the IP690. The top link LED represents the left to right. Note The...

Installation Guide
Page 18
...7 6 DSR TxD 3 6 2 RxD GND 4 5 5 GND GND 5 4 5 GND RxD 6 3 3 TxD DSR 7 2 4 DTR CTS 8 1 7 RTS The console cable provided with the IP690 is comprised of the serial ports are: 9600 baud, 8 bits, no parity, and 1 stop. Table 3 provides pin assignment information for network interface card...and Accelerated Data Path (ADP) services modules options. 1 Overview PMC Expansion Slots The IP690 security platform provides two additional PMC expansion slots for console connections. Note Check Point products only support NICs and ADP modules purchased from Check Point ...
...7 6 DSR TxD 3 6 2 RxD GND 4 5 5 GND GND 5 4 5 GND RxD 6 3 3 TxD DSR 7 2 4 DTR CTS 8 1 7 RTS The console cable provided with the IP690 is comprised of the serial ports are: 9600 baud, 8 bits, no parity, and 1 stop. Table 3 provides pin assignment information for network interface card...and Accelerated Data Path (ADP) services modules options. 1 Overview PMC Expansion Slots The IP690 security platform provides two additional PMC expansion slots for console connections. Note Check Point products only support NICs and ADP modules purchased from Check Point ...

Installation Guide
Page 19
... Platform Installation Guide 19 System Status LEDs You can then connect to RS232 adaptor. Check Point IP690 Security Platform Overview „ An RJ-45 to the console port of the IP690. Use this end of the cable when connecting to DB-9 adapter One RJ-45 termination has a retractable shroud ...that releases or secures the RJ-45 tab. For Check Point approved modem connections, you can visually monitor the status of the console cable, connect...
... Platform Installation Guide 19 System Status LEDs You can then connect to RS232 adaptor. Check Point IP690 Security Platform Overview „ An RJ-45 to the console port of the IP690. Use this end of the cable when connecting to DB-9 adapter One RJ-45 termination has a retractable shroud ...that releases or secures the RJ-45 tab. For Check Point approved modem connections, you can visually monitor the status of the console cable, connect...

Installation Guide
Page 20
1 Overview Figure 3 Check Point IP690 Security Platform System Status LEDs Warning (yellow) System OK (green) Fault (red) SLOT 2 CONSOLE RESET AUX SLOT 3 SLOT 4 1 2 3 4 00578 Table 4 shows the system status LEDs and describes their meaning. Power supply over temperature fault. System activity indicator The location ... experiencing a temperature problem. ! The location and definition of the status LEDs for the installed ADP modules is an alarm condition, as specified. 20 Check Point IP690 Security Platform Installation Guide
1 Overview Figure 3 Check Point IP690 Security Platform System Status LEDs Warning (yellow) System OK (green) Fault (red) SLOT 2 CONSOLE RESET AUX SLOT 3 SLOT 4 1 2 3 4 00578 Table 4 shows the system status LEDs and describes their meaning. Power supply over temperature fault. System activity indicator The location ... experiencing a temperature problem. ! The location and definition of the status LEDs for the installed ADP modules is an alarm condition, as specified. 20 Check Point IP690 Security Platform Installation Guide

Installation Guide
Page 21
...described in "Installing a Hard-Disk Drive" on the motherboard. A hard-disk drive is not included with a standard flash-based IP690, nor is a second hard-disk drive included with 1 GB flash memory. Check Point only supports PC cards purchased from Check Point or Check Point-approved resellers. Using PC Card for...hard-disk drives that plug into the system at a time. Using Hard-Disk Drives for Logging The IP690 security platform is located on the front panel of the PMC PC Card Carrier Slot SLOT 2 CONSOLE RESET AUX SLOT 3 SLOT 4 1 2 3 4 00578 PMC card carrier slot You can use...
...described in "Installing a Hard-Disk Drive" on the motherboard. A hard-disk drive is not included with a standard flash-based IP690, nor is a second hard-disk drive included with 1 GB flash memory. Check Point only supports PC cards purchased from Check Point or Check Point-approved resellers. Using PC Card for...hard-disk drives that plug into the system at a time. Using Hard-Disk Drives for Logging The IP690 security platform is located on the front panel of the PMC PC Card Carrier Slot SLOT 2 CONSOLE RESET AUX SLOT 3 SLOT 4 1 2 3 4 00578 PMC card carrier slot You can use...

Installation Guide
Page 28
... fan unit and the two retaining screws that secure it on the side of the IP690. Loosen the retaining screws by turning them counterclockwise. 28 Check Point IP690 Security Platform Installation Guide Caution During installation, do not block any ventilation openings. To rack... be attached further back on the back of the appliance. 2 Installing the Check Point IP690 Appliance Figure 8 Rack-Mounting Screw Locations SLOT 1 SLOT 2 CONSOLE RESET AUX SLOT 3 SLOT 4 1 2 3 4 IP690 00581 Rack-mounting screw locations Two rack-mounting positions allow you remove it from the packaging...
... fan unit and the two retaining screws that secure it on the side of the IP690. Loosen the retaining screws by turning them counterclockwise. 28 Check Point IP690 Security Platform Installation Guide Caution During installation, do not block any ventilation openings. To rack... be attached further back on the back of the appliance. 2 Installing the Check Point IP690 Appliance Figure 8 Rack-Mounting Screw Locations SLOT 1 SLOT 2 CONSOLE RESET AUX SLOT 3 SLOT 4 1 2 3 4 IP690 00581 Rack-mounting screw locations Two rack-mounting positions allow you remove it from the packaging...

Installation Guide
Page 30
... components. Loosen the two chassis tray assembly retaining screws from the appliance. SLOT 1 SLOT 2 CONSOLE RESET AUX SLOT 3 1 2 3 4 SLOT 4 IP690 00597 SLOT 1 SLOT 2 CONSOLE RESET AUX SLOT 3 1 2 3 4 SLOT 4 IP690 c. Place the chassis tray assembly on the right side of the appliance. Optionally, remove the...to prevent damaging components, press the release tab on a properly grounded surface. 00584 30 Check Point IP690 Security Platform Installation Guide SLOT 1 SLOT 2 CONSOLE RESET AUX SLOT 3 SLOT 4 1 2 3 4 Chassis tray assembly retaining screws...
... components. Loosen the two chassis tray assembly retaining screws from the appliance. SLOT 1 SLOT 2 CONSOLE RESET AUX SLOT 3 1 2 3 4 SLOT 4 IP690 00597 SLOT 1 SLOT 2 CONSOLE RESET AUX SLOT 3 1 2 3 4 SLOT 4 IP690 c. Place the chassis tray assembly on the right side of the appliance. Optionally, remove the...to prevent damaging components, press the release tab on a properly grounded surface. 00584 30 Check Point IP690 Security Platform Installation Guide SLOT 1 SLOT 2 CONSOLE RESET AUX SLOT 3 SLOT 4 1 2 3 4 Chassis tray assembly retaining screws...

Installation Guide
Page 31
... located on the side of the appliance. 9. After you rack-mount the appliance, you can use the rear brackets for additional chassis support. 7. SLOT 1 SLOT 2 CONSOLE RESET AUX SLOT 3 1 2 3 4 SLOT 4 IP690 00583 8. Adjust the mounting brackets on the mounting brackets. Check Point...
... located on the side of the appliance. 9. After you rack-mount the appliance, you can use the rear brackets for additional chassis support. 7. SLOT 1 SLOT 2 CONSOLE RESET AUX SLOT 3 1 2 3 4 SLOT 4 IP690 00583 8. Adjust the mounting brackets on the mounting brackets. Check Point...
Installation Guide
Page 33
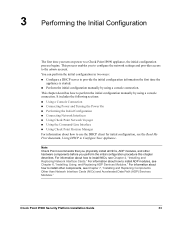
... describes. This chapter describes how to perform the initial configuration manually by using a console connection. For information about how to use the DHCP client for initial configuration, see Chapter 6, "Installing, Using, and Replacing ADP Services Modules." Check Point IP690 Security Platform Installation Guide 33 3 Performing the Initial Configuration The first time you...
... describes. This chapter describes how to perform the initial configuration manually by using a console connection. For information about how to use the DHCP client for initial configuration, see Chapter 6, "Installing, Using, and Replacing ADP Services Modules." Check Point IP690 Security Platform Installation Guide 33 3 Performing the Initial Configuration The first time you...

Installation Guide
Page 34
...with the following settings for the console connection, see "Console Port" on the back of the cable to the VT100 console or to a system running a terminal- SLOT 1 SLOT 2 CONSOLE RESET AUX SLOT 3 SLOT 4 1 2 3 4 IP690 00577 Console port For cable pin assignments for the console: „ 9600 bps „... is an auxiliary port. emulation program. 3 Performing the Initial Configuration Using a Console Connection If you do not use DHCP to perform the initial configuration of your Check Point IP690 security platform, you must use a straight-through cable. After you perform the ...
...with the following settings for the console connection, see "Console Port" on the back of the cable to the VT100 console or to a system running a terminal- SLOT 1 SLOT 2 CONSOLE RESET AUX SLOT 3 SLOT 4 1 2 3 4 IP690 00577 Console port For cable pin assignments for the console: „ 9600 bps „... is an auxiliary port. emulation program. 3 Performing the Initial Configuration Using a Console Connection If you do not use DHCP to perform the initial configuration of your Check Point IP690 security platform, you must use a straight-through cable. After you perform the ...

Installation Guide
Page 36
...fans are correct, see the Check Point Support Center at http://support.checkpoint.com/. 2. At the console a series of your Check Point IP690 security platform, you must use a serial console connection (cable included). After some miscellaneous output, the following prompt appears: Hostname? prompts, verify that...; Make sure the chassis tray assembly is pushed all the way in from starting. 36 Check Point IP690 Security Platform Installation Guide If you no longer need the console connection. If the settings are still not running , or if the power LED is not illuminated: ...
...fans are correct, see the Check Point Support Center at http://support.checkpoint.com/. 2. At the console a series of your Check Point IP690 security platform, you must use a serial console connection (cable included). After some miscellaneous output, the following prompt appears: Hostname? prompts, verify that...; Make sure the chassis tray assembly is pushed all the way in from starting. 36 Check Point IP690 Security Platform Installation Guide If you no longer need the console connection. If the settings are still not running , or if the power LED is not illuminated: ...

Installation Guide
Page 37
... end of IPSO you are using the user name admin and the password password. Check Point IP690 Security Platform Installation Guide 37 b. Enter the following: rm /config/active or mv /config/active /config/active.old d. Establish a console connection to the Hostname? Reboot the appliance. e. For more information about how to respond to...
... end of IPSO you are using the user name admin and the password password. Check Point IP690 Security Platform Installation Guide 37 b. Enter the following: rm /config/active or mv /config/active /config/active.old d. Establish a console connection to the Hostname? Reboot the appliance. e. For more information about how to respond to...

Installation Guide
Page 39
... about how to manage and configure Check Point IP security appliances from the CLI shell and the Check Point IPSO shell. Check Point IP690 Security Platform Installation Guide 39 Nearly everything that you can accomplish with Check Point Network Voyager you can also do with the CLI. That... see the traffic management commands section in the CLI Reference Guide for the version of Check Point IPSO you are using a command-line connection (SSH, console, or Telnet) over a TCP/IP network as an admin, cadmin, or monitor user: „ If you log in as a cadmin (cluster administrator) ...
... about how to manage and configure Check Point IP security appliances from the CLI shell and the Check Point IPSO shell. Check Point IP690 Security Platform Installation Guide 39 Nearly everything that you can accomplish with Check Point Network Voyager you can also do with the CLI. That... see the traffic management commands section in the CLI Reference Guide for the version of Check Point IPSO you are using a command-line connection (SSH, console, or Telnet) over a TCP/IP network as an admin, cadmin, or monitor user: „ If you log in as a cadmin (cluster administrator) ...

Installation Guide
Page 43
Installing NICs SLOT 1 SLOT 2 CONSOLE RESET AUX SLOT 3 SLOT 4 1 2 3 4 Chassis tray assembly retaining screws IP690 00581 4. Place the chassis tray assembly on the right side of the assembly, and completely remove the chassis tray assembly to expose the motherboard components. ...Slowly slide the chassis tray assembly forward, taking care to prevent damaging components, press the release tab on a table top. 00597 Check Point IP690 Security Platform Installation Guide 43 Loosen the two front panel retaining screws. SLOT 1 SLOT...
Installing NICs SLOT 1 SLOT 2 CONSOLE RESET AUX SLOT 3 SLOT 4 1 2 3 4 Chassis tray assembly retaining screws IP690 00581 4. Place the chassis tray assembly on the right side of the assembly, and completely remove the chassis tray assembly to expose the motherboard components. ...Slowly slide the chassis tray assembly forward, taking care to prevent damaging components, press the release tab on a table top. 00597 Check Point IP690 Security Platform Installation Guide 43 Loosen the two front panel retaining screws. SLOT 1 SLOT...

Installation Guide
Page 44
SLOT 1 SLOT 2 CONSOLE RESET AUX 00590 If you are installing a NIC in an unoccupied slot, remove the blank bezel that occupies the space in the appliance front panel ... on the back of the NIC adjacent to the two interface connectors. 7. Insert the NIC bezel into the front panel. SLOT 1 SLOT 2 CONSOLE RESET AUX 00592 44 Check Point IP690 Security Platform Installation Guide a. If you are removing an installed NIC, remove it for future use. Insert the new NIC. From underneath...
SLOT 1 SLOT 2 CONSOLE RESET AUX 00590 If you are installing a NIC in an unoccupied slot, remove the blank bezel that occupies the space in the appliance front panel ... on the back of the NIC adjacent to the two interface connectors. 7. Insert the NIC bezel into the front panel. SLOT 1 SLOT 2 CONSOLE RESET AUX 00592 44 Check Point IP690 Security Platform Installation Guide a. If you are removing an installed NIC, remove it for future use. Insert the new NIC. From underneath...

Installation Guide
Page 45
...NICs b. From beneath the chassis tray assembly, screw in the bezel retaining screws. 10. SLOT 1 SLOT 2 CONSOLE RESET AUX 00591 9. SLOT 1 SLOT 2 CONSOLE RESET AUX SLOT 3 1 2 3 4 SLOT 4 IP690 00583 The IPSO operating system automatically recognizes the NIC and applies the original configuration to the new NIC. From the...Insert and close the chassis tray assembly until it clicks into the standoffs on the back of the NIC. Check Point IP690 Security Platform Installation Guide 45 Gently push down on the two connectors on the back of the NIC until they are fully seated....
...NICs b. From beneath the chassis tray assembly, screw in the bezel retaining screws. 10. SLOT 1 SLOT 2 CONSOLE RESET AUX 00591 9. SLOT 1 SLOT 2 CONSOLE RESET AUX SLOT 3 1 2 3 4 SLOT 4 IP690 00583 The IPSO operating system automatically recognizes the NIC and applies the original configuration to the new NIC. From the...Insert and close the chassis tray assembly until it clicks into the standoffs on the back of the NIC. Check Point IP690 Security Platform Installation Guide 45 Gently push down on the two connectors on the back of the NIC until they are fully seated....