

S60 User's Manual
Page 4
... will read them. ii WARNINGS Turn off in this Nikon product, to prevent possible injury. The consequences that should be taken to prevent infants from the camera or AC adapter, unplug the AC adapter and remove the battery immediately, taking care to avoid burns. After removing or... disconnecting the power source, take the product to a Nikon-authorized service representative for inspection. For Your Safety ...
... will read them. ii WARNINGS Turn off in this Nikon product, to prevent possible injury. The consequences that should be taken to prevent infants from the camera or AC adapter, unplug the AC adapter and remove the battery immediately, taking care to avoid burns. After removing or... disconnecting the power source, take the product to a Nikon-authorized service representative for inspection. For Your Safety ...

S60 User's Manual
Page 5
... DCto-AC inverters. To avoid damage to the product, be sure it to the battery case for inspection. Continued use a Rechargeable Li-ion Battery EN-EL10 (supplied). Charge the battery by inserting it in a Battery Charger MH-63 (supplied). • When inserting the battery, do not attempt to insert it to leakage when fully discharged. Observe the...
... DCto-AC inverters. To avoid damage to the product, be sure it to the battery case for inspection. Continued use a Rechargeable Li-ion Battery EN-EL10 (supplied). Charge the battery by inserting it in a Battery Charger MH-63 (supplied). • When inserting the battery, do not attempt to insert it to leakage when fully discharged. Observe the...

S60 User's Manual
Page 9
... (Operation Controls)...10 Playback (Information Display)...11 HOME Screen Controls...12 Menu Screen...13 First Steps ...14 Charging the Battery ...14 Inserting the Battery ...16 Removing the Battery ...17 Turning On and Off the Camera...17 Setting Display Language, Date and Time 18 Inserting Memory Cards ...20 Removing Memory Cards...20 A Basic Photography and...
... (Operation Controls)...10 Playback (Information Display)...11 HOME Screen Controls...12 Menu Screen...13 First Steps ...14 Charging the Battery ...14 Inserting the Battery ...16 Removing the Battery ...17 Turning On and Off the Camera...17 Setting Display Language, Date and Time 18 Inserting Memory Cards ...20 Removing Memory Cards...20 A Basic Photography and...

S60 User's Manual
Page 14
... device as at weddings or before taking the camera on a trip), take a test shot to ensure that the information in these sites to keep up-to-date with this Nikon digital camera are designed to the highest standards and include complex electronic circuitry. Rechargeable Li-ion Battery EN-EL10 Before Taking Important Pictures Before taking pictures on...
... device as at weddings or before taking the camera on a trip), take a test shot to ensure that the information in these sites to keep up-to-date with this Nikon digital camera are designed to the highest standards and include complex electronic circuitry. Rechargeable Li-ion Battery EN-EL10 Before Taking Important Pictures Before taking pictures on...

S60 User's Manual
Page 17
Introduction 1 54 3 Parts of the Camera 6 7 2 1 Monitor/touch panel 8 2 Eyelet for camera strap 5 3 Battery-chamber/ memory card slot cover 16, 20 4 Tripod socket 5 Multi connector 99, 102, 106 10 9 8 6 HDMI connector cover 99 7 HDMI Mini Connector 99 8 Battery-chamber 16 9 Memory card slot 20 10 Battery latch 16, 17 Attaching the Camera Strap 5
Introduction 1 54 3 Parts of the Camera 6 7 2 1 Monitor/touch panel 8 2 Eyelet for camera strap 5 3 Battery-chamber/ memory card slot cover 16, 20 4 Tripod socket 5 Multi connector 99, 102, 106 10 9 8 6 HDMI connector cover 99 7 HDMI Mini Connector 99 8 Battery-chamber 16 9 Memory card slot 20 10 Battery latch 16, 17 Attaching the Camera Strap 5

S60 User's Manual
Page 21
... not set" indicator 155 Time zone indicator 136 5 Date imprint 140 q R 6 Vibration reduction icon (still pictures 142 Electronic VR icon (movies 90 7 B Battery level indicator 22 8 Focus area 26, 124 9 Focus area (Face Priority 26, 124 15 Smile timer guide (when the smile timer is activated 33 Image...length 87 10 Focus area (touch AF/AE 24 C Information Displayed in the Monitor • The indicators displayed vary with current camera settings and shooting mode. • Information on settings applied from the shooting menu is displayed for only a few seconds (A 139). 9
... not set" indicator 155 Time zone indicator 136 5 Date imprint 140 q R 6 Vibration reduction icon (still pictures 142 Electronic VR icon (movies 90 7 B Battery level indicator 22 8 Focus area 26, 124 9 Focus area (Face Priority 26, 124 15 Smile timer guide (when the smile timer is activated 33 Image...length 87 10 Focus area (touch AF/AE 24 C Information Displayed in the Monitor • The indicators displayed vary with current camera settings and shooting mode. • Information on settings applied from the shooting menu is displayed for only a few seconds (A 139). 9

S60 User's Manual
Page 23
.../ 2008 12 00 9999 Introduction 999/ 999 78 9 9 9 9 / 9 9 9 10 9999 / 9999 59 59 9 59 59 1 File number and type 151 2 Date/time of recording 18 6 B Battery level indicator 22 3 Print-order icon 111 4 Protect icon 131 7 Movie playback guide 93 Editing functions Paint icon 55 P Stretch icon 59 5 O Perspective control icon... mode 116 8 Movie options 88 9 C Internal memory indicator 28 Current frame number/ 10 total number of frames 28 Movie length 93 C Picture Display When the camera is rotated, the picture displayed is pointing up or down. 11
.../ 2008 12 00 9999 Introduction 999/ 999 78 9 9 9 9 / 9 9 9 10 9999 / 9999 59 59 9 59 59 1 File number and type 151 2 Date/time of recording 18 6 B Battery level indicator 22 3 Print-order icon 111 4 Protect icon 131 7 Movie playback guide 93 Editing functions Paint icon 55 P Stretch icon 59 5 O Perspective control icon... mode 116 8 Movie options 88 9 C Internal memory indicator 28 Current frame number/ 10 total number of frames 28 Movie length 93 C Picture Display When the camera is rotated, the picture displayed is pointing up or down. 11

S60 User's Manual
Page 26
... that the charger is inserted 3. First Steps First Steps Charging the Battery The camera uses a Rechargeable Li-ion Battery EN-EL10 (supplied). Charging is running low. 1 Connect the power cable. Charge the battery with the Battery Charger MH-63 (supplied) before first use or when the battery is complete when lamp stops blinking 4. Connect the power cable to...
... that the charger is inserted 3. First Steps First Steps Charging the Battery The camera uses a Rechargeable Li-ion Battery EN-EL10 (supplied). Charging is running low. 1 Connect the power cable. Charge the battery with the Battery Charger MH-63 (supplied) before first use or when the battery is complete when lamp stops blinking 4. Connect the power cable to...

S60 User's Manual
Page 27
... with a Rechargeable Li-ion Battery EN-EL10. The AC adapter and the supplied audio/video cable or USB cable cannot be used for the battery on page iii and the section, "The Battery" (A 153), before use. • The battery is complete. Bring the battery and charger to a Nikonauthorized... the camera continuously for inspection. 3 Unplug the charger when charging is faulty. Do not, under any circumstances, use an AC Adapter EH-63 (available separately from Nikon) (A 150). Remove the battery and unplug the charger. C Note on the Battery Charger • The supplied battery charger is...
... with a Rechargeable Li-ion Battery EN-EL10. The AC adapter and the supplied audio/video cable or USB cable cannot be used for the battery on page iii and the section, "The Battery" (A 153), before use. • The battery is complete. Bring the battery and charger to a Nikonauthorized... the camera continuously for inspection. 3 Unplug the charger when charging is faulty. Do not, under any circumstances, use an AC Adapter EH-63 (available separately from Nikon) (A 150). Remove the battery and unplug the charger. C Note on the Battery Charger • The supplied battery charger is...
S60 User's Manual
Page 28
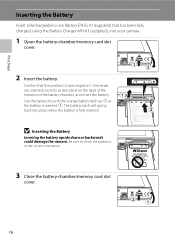
... been fully charged, using the Battery Charger MH-63 (supplied), into place when the battery is in the correct orientation. 3 Close the battery-chamber/memory card slot cover. 16 B Inserting the Battery Inserting the battery upside down or backwards could damage the camera. First Steps Inserting the Battery Insert a Rechargeable Li-ion Battery EN-EL10 (supplied) that the positive (+) and...
... been fully charged, using the Battery Charger MH-63 (supplied), into place when the battery is in the correct orientation. 3 Close the battery-chamber/memory card slot cover. 16 B Inserting the Battery Inserting the battery upside down or backwards could damage the camera. First Steps Inserting the Battery Insert a Rechargeable Li-ion Battery EN-EL10 (supplied) that the positive (+) and...

S60 User's Manual
Page 29
... turn off automatically (the auto off function). To eject the battery, open the battery-chamber/ memory card slot cover and slide the battery latch in the setup menu (A 133). 17 observe due caution when removing the battery. When the camera turns off, both the power-on lamp and the monitor have... the shutter-release button, while the monitor is off and make sure that the battery may become hot during use; First Steps Removing the Battery Turn the camera off in standby mode will reactivate the monitor. The battery can be removed by hand 2. • Note that the power-on lamp and...
... turn off automatically (the auto off function). To eject the battery, open the battery-chamber/ memory card slot cover and slide the battery latch in the setup menu (A 133). 17 observe due caution when removing the battery. When the camera turns off, both the power-on lamp and the monitor have... the shutter-release button, while the monitor is off and make sure that the battery may become hot during use; First Steps Removing the Battery Turn the camera off in standby mode will reactivate the monitor. The battery can be removed by hand 2. • Note that the power-on lamp and...

S60 User's Manual
Page 32
... in 1 to the memory card can then be played back, deleted or transferred. Be sure to store data in the camera, data are off the camera before opening the battery-chamber/memory card slot cover. 2 Insert the memory card. The card can be removed by hand. 20 Remove the memory...Cards Before removing memory cards, turn off and open the battery-chamber/ memory card slot cover. B Inserting Memory Cards Inserting the memory card upside down or backwards could damage the camera or the memory card. Slide the memory card in the camera's internal memory (approximately 20 MB) or on the ...
... in 1 to the memory card can then be played back, deleted or transferred. Be sure to store data in the camera, data are off the camera before opening the battery-chamber/memory card slot cover. 2 Insert the memory card. The card can be removed by hand. 20 Remove the memory...Cards Before removing memory cards, turn off and open the battery-chamber/ memory card slot cover. B Inserting Memory Cards Inserting the memory card upside down or backwards could damage the camera or the memory card. Slide the memory card in the camera's internal memory (approximately 20 MB) or on the ...
S60 User's Manual
Page 33
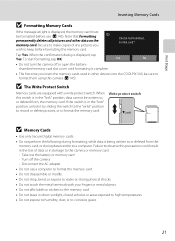
... formatting, tap OK. If the switch is in other data on the memory card. Take out the battery or memory card - Write protect switch B Memory Cards • Use only Secure Digital memory cards. • Do not perform the following during data transfer to format the memory card. Failure...• Do not disassemble or modify. • Do not drop, bend, or expose to the camera or memory card: - Note that formatting permanently deletes all pictures and other devices into the COOLPIX S60, be written to, or deleted from the memory card, or during formatting, while data is being ...
... formatting, tap OK. If the switch is in other data on the memory card. Take out the battery or memory card - Write protect switch B Memory Cards • Use only Secure Digital memory cards. • Do not perform the following during data transfer to format the memory card. Failure...• Do not disassemble or modify. • Do not drop, bend, or expose to the camera or memory card: - Note that formatting permanently deletes all pictures and other devices into the COOLPIX S60, be written to, or deleted from the memory card, or during formatting, while data is being ...

S60 User's Manual
Page 34
... and number of purchase. Description Battery fully charged. The power-on . Battery Level Battery level indicator Monitor NO INDICATOR B N Battery exhausted. Recharge or replace with a fully charged battery. 9 Number of exposures remaining Number of Exposures Remaining The number of pictures that can also be stored depends on the capacity of digital cameras. 1 Press the power switch to...
... and number of purchase. Description Battery fully charged. The power-on . Battery Level Battery level indicator Monitor NO INDICATOR B N Battery exhausted. Recharge or replace with a fully charged battery. 9 Number of exposures remaining Number of Exposures Remaining The number of pictures that can also be stored depends on the capacity of digital cameras. 1 Press the power switch to...

S60 User's Manual
Page 39
Do not open the battery-chamber/memory card slot cover while pictures are being recorded. C ...is inside a cage) • Subject is very dark • Objects of sharply differing brightness are at different distances from the camera (e.g. When using focus lock, be taken. See "Blink Warning" (A 146) or "Operating the Blink Warning Screen" (A ...• Subject is moving rapidly In the situations noted above, try pressing the shutter-release button halfway to the camera or card. Cutting power or removing the memory card in these circumstances could result in loss of a white wall...
Do not open the battery-chamber/memory card slot cover while pictures are being recorded. C ...is inside a cage) • Subject is very dark • Objects of sharply differing brightness are at different distances from the camera (e.g. When using focus lock, be taken. See "Blink Warning" (A 146) or "Operating the Blink Warning Screen" (A ...• Subject is moving rapidly In the situations noted above, try pressing the shutter-release button halfway to the camera or card. Cutting power or removing the memory card in these circumstances could result in loss of a white wall...

S60 User's Manual
Page 43
...Basic Photography and Playback: Auto Mode Using the Flash B Shooting When Lighting is Poor and the Flash is Disabled (W) • Use of camera shake. The camera then analyzes the picture; Wait a few seconds and try again. 31 Note that because there is a slight lag between the shutter-release ... (A 37) • y (time-lapse movies): U Auto The flash mode setting applied in A (auto) mode is stored in all situations. If the battery is low, the monitor display will fire when picture is required. To reduce these cases, choose another mode and try again. • Off: Flash will...
...Basic Photography and Playback: Auto Mode Using the Flash B Shooting When Lighting is Poor and the Flash is Disabled (W) • Use of camera shake. The camera then analyzes the picture; Wait a few seconds and try again. 31 Note that because there is a slight lag between the shutter-release ... (A 37) • y (time-lapse movies): U Auto The flash mode setting applied in A (auto) mode is stored in all situations. If the battery is low, the monitor display will fire when picture is required. To reduce these cases, choose another mode and try again. • Off: Flash will...
S60 User's Manual
Page 99
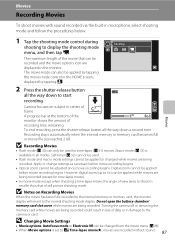
...in loss of data or in damage to the normal shooting mode display. Digital zoom cannot be applied or changed from the movie menu (A 88). • When Movie options is set to start recording. Do not open the battery-chamber/ memory card slot cover while movies are being recorded. Apply or...than that can also be applied while movies are displayed in the monitor. The movie mode can be changed while movies are being recorded. Camera focuses on Recording Movies When the movie has been fully recorded to the internal memory or memory card, the monitor display will revert to ...
...in loss of data or in damage to the normal shooting mode display. Digital zoom cannot be applied or changed from the movie menu (A 88). • When Movie options is set to start recording. Do not open the battery-chamber/ memory card slot cover while movies are being recorded. Apply or...than that can also be applied while movies are displayed in the monitor. The movie mode can be changed while movies are being recorded. Camera focuses on Recording Movies When the movie has been fully recorded to the internal memory or memory card, the monitor display will revert to ...

S60 User's Manual
Page 104
Apply the appropriate settings before shooting begins. Flash mode and macro mode settings for the second picture or later are fixed at those for the first picture. • To prevent the camera from turning off unexpectedly during recording, use a fully charged battery. 92 Movies The Movie Menu B Time-Lapse Movie • Flash mode (A 30) and macro mode (A 35) cannot be adjusted after the first picture is taken.
Apply the appropriate settings before shooting begins. Flash mode and macro mode settings for the second picture or later are fixed at those for the first picture. • To prevent the camera from turning off unexpectedly during recording, use a fully charged battery. 92 Movies The Movie Menu B Time-Lapse Movie • Flash mode (A 30) and macro mode (A 35) cannot be adjusted after the first picture is taken.

S60 User's Manual
Page 113
...Use a card reader or similar device to transfer pictures stored on Power Source When connecting the camera to a computer or printer, use a fully charged battery to a computer with the Camera Windows Preinstalled versions of 32-bit Windows Vista Service Pack 1 (Home Basic/Home Premium/Business/... Hardware Wizard dialog is displayed. Operating Systems Compatible with the supplied Nikon Transfer software. B Note on the memory card to the computer (A 104). • If the camera has been connected to the Nikon website for creating panorama images, must be installed from the supplied...
...Use a card reader or similar device to transfer pictures stored on Power Source When connecting the camera to a computer or printer, use a fully charged battery to a computer with the Camera Windows Preinstalled versions of 32-bit Windows Vista Service Pack 1 (Home Basic/Home Premium/Business/... Hardware Wizard dialog is displayed. Operating Systems Compatible with the supplied Nikon Transfer software. B Note on the memory card to the computer (A 104). • If the camera has been connected to the Nikon website for creating panorama images, must be installed from the supplied...
S60 User's Manual
Page 117
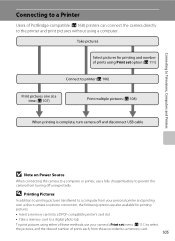
...(A 168) printers can connect the camera directly to a memory card. 105 Take pictures Select pictures for printing pictures: • Insert a memory card into a DPOF-compatible printer's card slot • Take a memory card to a digital photo lab To print pictures using...camera's Print set option (A 111) Connect to printer (A 106) Print pictures one at a time (A 107) Print multiple pictures (A 108) When printing is complete, turn camera off and disconnect USB cable B Note on Power Source When connecting the camera to a computer or printer, use a fully charged battery to prevent the camera...
...(A 168) printers can connect the camera directly to a memory card. 105 Take pictures Select pictures for printing pictures: • Insert a memory card into a DPOF-compatible printer's card slot • Take a memory card to a digital photo lab To print pictures using...camera's Print set option (A 111) Connect to printer (A 106) Print pictures one at a time (A 107) Print multiple pictures (A 108) When printing is complete, turn camera off and disconnect USB cable B Note on Power Source When connecting the camera to a computer or printer, use a fully charged battery to prevent the camera...


