

S60 User's Manual
Page 4
... service representative for inspection, after unplugging the product and/or removing the battery. After removing or disconnecting the power source, take the product to a Nikon-authorized service representative for inspection. Do not use the camera or AC adapter in the presence of flammable gas Do not use the ...neck of flammable gas, as the result of children Particular care should be taken to prevent infants from the camera or AC adapter, unplug the AC adapter and remove the battery immediately, taking care to avoid burns. Keep out of reach of a fall or other small parts into...
... service representative for inspection, after unplugging the product and/or removing the battery. After removing or disconnecting the power source, take the product to a Nikon-authorized service representative for inspection. Do not use the camera or AC adapter in the presence of flammable gas Do not use the ...neck of flammable gas, as the result of children Particular care should be taken to prevent infants from the camera or AC adapter, unplug the AC adapter and remove the battery immediately, taking care to avoid burns. Keep out of reach of a fall or other small parts into...

S60 User's Manual
Page 5
...disassemble the battery or attempt to remove or break the battery insulation or casing. • Do not expose the battery to flame or to another or with wet hands. Failure to remove the battery when no charge remains. • Discontinue use a Rechargeable Li-ion Battery EN-EL10 (supplied).... Failure to heat or flames. iii To avoid damage to the product, be removed with metal objects such as discoloration or deformation. • If liquid from the damaged battery comes in electric shock. • Do ...
...disassemble the battery or attempt to remove or break the battery insulation or casing. • Do not expose the battery to flame or to another or with wet hands. Failure to remove the battery when no charge remains. • Discontinue use a Rechargeable Li-ion Battery EN-EL10 (supplied).... Failure to heat or flames. iii To avoid damage to the product, be removed with metal objects such as discoloration or deformation. • If liquid from the damaged battery comes in electric shock. • Do ...

S60 User's Manual
Page 9
... (Operation Controls)...10 Playback (Information Display)...11 HOME Screen Controls...12 Menu Screen...13 First Steps ...14 Charging the Battery ...14 Inserting the Battery ...16 Removing the Battery ...17 Turning On and Off the Camera...17 Setting Display Language, Date and Time 18 Inserting Memory Cards ...20 Removing Memory Cards...20 A Basic Photography and...
... (Operation Controls)...10 Playback (Information Display)...11 HOME Screen Controls...12 Menu Screen...13 First Steps ...14 Charging the Battery ...14 Inserting the Battery ...16 Removing the Battery ...17 Turning On and Off the Camera...17 Setting Display Language, Date and Time 18 Inserting Memory Cards ...20 Removing Memory Cards...20 A Basic Photography and...

S60 User's Manual
Page 14
... liable for contact information: http://imaging.nikon.com/ Use Only Nikon Brand Electronic Accessories Nikon COOLPIX cameras are engineered and proven to operate within the operational and safety requirements of this product. • While every effort was made to ensure that the camera is functioning normally. Rechargeable Li-ion Battery EN-EL10 Before Taking Important Pictures Before taking pictures...
... liable for contact information: http://imaging.nikon.com/ Use Only Nikon Brand Electronic Accessories Nikon COOLPIX cameras are engineered and proven to operate within the operational and safety requirements of this product. • While every effort was made to ensure that the camera is functioning normally. Rechargeable Li-ion Battery EN-EL10 Before Taking Important Pictures Before taking pictures...

S60 User's Manual
Page 17
Introduction 1 54 3 Parts of the Camera 6 7 2 1 Monitor/touch panel 8 2 Eyelet for camera strap 5 3 Battery-chamber/ memory card slot cover 16, 20 4 Tripod socket 5 Multi connector 99, 102, 106 10 9 8 6 HDMI connector cover 99 7 HDMI Mini Connector 99 8 Battery-chamber 16 9 Memory card slot 20 10 Battery latch 16, 17 Attaching the Camera Strap 5
Introduction 1 54 3 Parts of the Camera 6 7 2 1 Monitor/touch panel 8 2 Eyelet for camera strap 5 3 Battery-chamber/ memory card slot cover 16, 20 4 Tripod socket 5 Multi connector 99, 102, 106 10 9 8 6 HDMI connector cover 99 7 HDMI Mini Connector 99 8 Battery-chamber 16 9 Memory card slot 20 10 Battery latch 16, 17 Attaching the Camera Strap 5

S60 User's Manual
Page 21
... not set" indicator 155 Time zone indicator 136 5 Date imprint 140 q R 6 Vibration reduction icon (still pictures 142 Electronic VR icon (movies 90 7 B Battery level indicator 22 8 Focus area 26, 124 9 Focus area (Face Priority 26, 124 15 Smile timer guide (when the smile timer is activated 33 Image...length 87 10 Focus area (touch AF/AE 24 C Information Displayed in the Monitor • The indicators displayed vary with current camera settings and shooting mode. • Information on settings applied from the shooting menu is displayed for only a few seconds (A 139). 9
... not set" indicator 155 Time zone indicator 136 5 Date imprint 140 q R 6 Vibration reduction icon (still pictures 142 Electronic VR icon (movies 90 7 B Battery level indicator 22 8 Focus area 26, 124 9 Focus area (Face Priority 26, 124 15 Smile timer guide (when the smile timer is activated 33 Image...length 87 10 Focus area (touch AF/AE 24 C Information Displayed in the Monitor • The indicators displayed vary with current camera settings and shooting mode. • Information on settings applied from the shooting menu is displayed for only a few seconds (A 139). 9

S60 User's Manual
Page 23
... 999/ 999 78 9 9 9 9 / 9 9 9 10 9999 / 9999 59 59 9 59 59 1 File number and type 151 2 Date/time of recording 18 6 B Battery level indicator 22 3 Print-order icon 111 4 Protect icon 131 7 Movie playback guide 93 Editing functions Paint icon 55 P Stretch icon 59 5 O Perspective control icon... 116 8 Movie options 88 9 C Internal memory indicator 28 Current frame number/ 10 total number of frames 28 Movie length 93 C Picture Display When the camera is rotated, the picture displayed is pointing up or down. 11 A 66, 69, 73). 15 / 11/ 2008 15 30 0004 4/ 4 15 /...
... 999/ 999 78 9 9 9 9 / 9 9 9 10 9999 / 9999 59 59 9 59 59 1 File number and type 151 2 Date/time of recording 18 6 B Battery level indicator 22 3 Print-order icon 111 4 Protect icon 131 7 Movie playback guide 93 Editing functions Paint icon 55 P Stretch icon 59 5 O Perspective control icon... 116 8 Movie options 88 9 C Internal memory indicator 28 Current frame number/ 10 total number of frames 28 Movie length 93 C Picture Display When the camera is rotated, the picture displayed is pointing up or down. 11 A 66, 69, 73). 15 / 11/ 2008 15 30 0004 4/ 4 15 /...

S60 User's Manual
Page 26
... plug into a power outlet 2. Charge the battery with the Battery Charger MH-63 (supplied) before first use or when the battery is inserted 3. First Steps First Steps Charging the Battery The camera uses a Rechargeable Li-ion Battery EN-EL10 (supplied). Charging is on 3. 2 3 1 2 Charge the battery. The CHARGE lamp will light to the battery charger 2. 1 2 CHARGE lamp starts blinking when...
... plug into a power outlet 2. Charge the battery with the Battery Charger MH-63 (supplied) before first use or when the battery is inserted 3. First Steps First Steps Charging the Battery The camera uses a Rechargeable Li-ion Battery EN-EL10 (supplied). Charging is on 3. 2 3 1 2 Charge the battery. The CHARGE lamp will light to the battery charger 2. 1 2 CHARGE lamp starts blinking when...

S60 User's Manual
Page 27
...35 °C (41 °F to read and follow the warnings for the battery charger on AC power supply To power the camera continuously for an extended period, recharge it flat before using the battery. The AC adapter and the supplied audio/video cable or USB cable cannot be... Rechargeable Li-ion Battery EN-EL10. B Note on page iii and the section, "The Battery" (A 153), before use an AC Adapter EH-63 (available separately from Nikon) (A 150). Battery fully charged. B Note on the Battery Be sure to 95 °F) before using the battery charger. • If the battery will not be ...
...35 °C (41 °F to read and follow the warnings for the battery charger on AC power supply To power the camera continuously for an extended period, recharge it flat before using the battery. The AC adapter and the supplied audio/video cable or USB cable cannot be... Rechargeable Li-ion Battery EN-EL10. B Note on page iii and the section, "The Battery" (A 153), before use an AC Adapter EH-63 (available separately from Nikon) (A 150). Battery fully charged. B Note on the Battery Be sure to 95 °F) before using the battery charger. • If the battery will not be ...
S60 User's Manual
Page 28
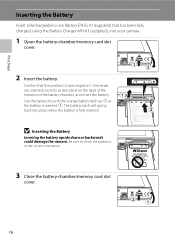
... label at the entrance of the battery chamber, and insert the battery. The battery latch will spring back into your camera. 1 Open the battery-chamber/memory card slot cover. 2 Insert the battery. B Inserting the Battery Inserting the battery upside down or backwards could damage the camera. First Steps Inserting the Battery Insert a Rechargeable Li-ion Battery EN-EL10 (supplied) that the positive (+) and...
... label at the entrance of the battery chamber, and insert the battery. The battery latch will spring back into your camera. 1 Open the battery-chamber/memory card slot cover. 2 Insert the battery. B Inserting the Battery Inserting the battery upside down or backwards could damage the camera. First Steps Inserting the Battery Insert a Rechargeable Li-ion Battery EN-EL10 (supplied) that the positive (+) and...

S60 User's Manual
Page 29
... the power switch again. The time allowed to elapse from the Auto off . observe due caution when removing the battery. When the camera turns off, both the power-on lamp and monitor will enter standby mode. Pressing the power switch, or the shutter-release button, while... the monitor is off automatically and the camera will turn on. Inserting the Battery D Auto Power Off in the setup menu (A 133). 17 To eject the battery, open the battery-chamber/ memory card slot cover and slide the battery latch in standby mode will turn off option (A 144) in...
... the power switch again. The time allowed to elapse from the Auto off . observe due caution when removing the battery. When the camera turns off, both the power-on lamp and monitor will enter standby mode. Pressing the power switch, or the shutter-release button, while... the monitor is off automatically and the camera will turn on. Inserting the Battery D Auto Power Off in the setup menu (A 133). 17 To eject the battery, open the battery-chamber/ memory card slot cover and slide the battery latch in standby mode will turn off option (A 144) in...

S60 User's Manual
Page 32
...Memory Cards Before removing memory cards, turn off the camera before opening the battery-chamber/memory card slot cover. 2 Insert the memory card. Open the battery-chamber/memory card slot cover and press the card in 1 to turn the camera off and confirm that the memory card is inserted ...(A 150). First Steps Inserting Memory Cards Image, sound, and movie files are stored in the camera's internal memory (approximately 20 MB) or on lamp and the monitor are off and open the battery-chamber/ memory card slot cover. B Inserting Memory Cards Inserting the memory card upside down or ...
...Memory Cards Before removing memory cards, turn off the camera before opening the battery-chamber/memory card slot cover. 2 Insert the memory card. Open the battery-chamber/memory card slot cover and press the card in 1 to turn the camera off and confirm that the memory card is inserted ...(A 150). First Steps Inserting Memory Cards Image, sound, and movie files are stored in the camera's internal memory (approximately 20 MB) or on lamp and the monitor are off and open the battery-chamber/ memory card slot cover. B Inserting Memory Cards Inserting the memory card upside down or ...
S60 User's Manual
Page 33
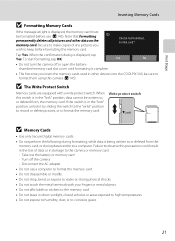
... using this camera (A 145). Tap Yes. Yes No • Do not turn the camera off the camera - If the switch is complete. • The first time you wish to the camera or memory ... • Do not touch the metal terminals with a write protect switch. Take out the battery or memory card - Format card? When the confirmation dialog is not formatted. Card is displayed...all pictures and other devices into the COOLPIX S60, be formatted before formatting the memory card. Write protect switch B Memory Cards • Use only Secure Digital memory cards. • Do not ...
... using this camera (A 145). Tap Yes. Yes No • Do not turn the camera off the camera - If the switch is complete. • The first time you wish to the camera or memory ... • Do not touch the metal terminals with a write protect switch. Take out the battery or memory card - Format card? When the confirmation dialog is not formatted. Card is displayed...all pictures and other devices into the COOLPIX S60, be formatted before formatting the memory card. Write protect switch B Memory Cards • Use only Secure Digital memory cards. • Do not ...

S60 User's Manual
Page 34
...shoot. Recharge or replace with a fully charged battery. 9 Number of exposures remaining Number of Exposures Remaining The number of pictures that can also be stored depends on the capacity of digital cameras. 1 Press the power switch to turn on the camera. Basic Photography and Playback: Auto Mode Step ...1 Turn the Camera On and Select A (Auto) Mode This section describes how to take ...
...shoot. Recharge or replace with a fully charged battery. 9 Number of exposures remaining Number of Exposures Remaining The number of pictures that can also be stored depends on the capacity of digital cameras. 1 Press the power switch to turn on the camera. Basic Photography and Playback: Auto Mode Step ...1 Turn the Camera On and Select A (Auto) Mode This section describes how to take ...

S60 User's Manual
Page 39
...is behind the subject and is taken in front of a white wall, wearing a white shirt) • Several objects are at different distances from the camera (e.g. C Blink Warning If the blink warning screen is displayed shortly after a picture is in the following situations. See "Blink Warning" (A 146) or...27 Basic Photography and Playback: Auto Mode Step 3 Focus and Shoot B During Recording While pictures are being recorded. Do not open the battery-chamber/memory card slot cover while pictures are being recorded, the number of data or in focus despite the fact that for more information....
...is behind the subject and is taken in front of a white wall, wearing a white shirt) • Several objects are at different distances from the camera (e.g. C Blink Warning If the blink warning screen is displayed shortly after a picture is in the following situations. See "Blink Warning" (A 146) or...27 Basic Photography and Playback: Auto Mode Step 3 Focus and Shoot B During Recording While pictures are being recorded. Do not open the battery-chamber/memory card slot cover while pictures are being recorded, the number of data or in focus despite the fact that for more information....

S60 User's Manual
Page 43
...is recommended to further reduce red-eye before the picture is saved. The camera then analyzes the picture; if redeye is detected, the affected area will fire when picture is required. in pictures. If the battery is low, the monitor display will not fire when picture is selected....flash to W (Off). Wait a few seconds and try again. 31 Pictures taken when E is displayed may not produce the desired results in the camera's memory even after the camera is turned off , until the flash is fully charged. 1 / 1 2 5 F 3.8 C The Flash Mode Setting The default flash mode ...
...is recommended to further reduce red-eye before the picture is saved. The camera then analyzes the picture; if redeye is detected, the affected area will fire when picture is required. in pictures. If the battery is low, the monitor display will not fire when picture is selected....flash to W (Off). Wait a few seconds and try again. 31 Pictures taken when E is displayed may not produce the desired results in the camera's memory even after the camera is turned off , until the flash is fully charged. 1 / 1 2 5 F 3.8 C The Flash Mode Setting The default flash mode ...
S60 User's Manual
Page 99
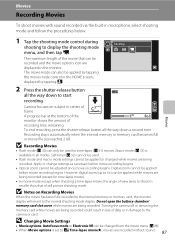
... by tapping the movie mode control in all the way down a second time. However, digital zoom (up to 2×) can also be changed while movies are recorded without sound. 87 Turning the camera off or removing the memory card while movies are being recorded (except for time-lapse (A...end recording, press the shutter-release button all the way down to y Time-lapse movieP, movies are being recorded. Do not open the battery-chamber/ memory card slot cover while movies are displayed in microphone, select shooting mode and follow the procedures below. 1 Tap the shooting mode...
... by tapping the movie mode control in all the way down a second time. However, digital zoom (up to 2×) can also be changed while movies are recorded without sound. 87 Turning the camera off or removing the memory card while movies are being recorded (except for time-lapse (A...end recording, press the shutter-release button all the way down to y Time-lapse movieP, movies are being recorded. Do not open the battery-chamber/ memory card slot cover while movies are displayed in microphone, select shooting mode and follow the procedures below. 1 Tap the shooting mode...

S60 User's Manual
Page 104
Apply the appropriate settings before shooting begins. Flash mode and macro mode settings for the second picture or later are fixed at those for the first picture. • To prevent the camera from turning off unexpectedly during recording, use a fully charged battery. 92 Movies The Movie Menu B Time-Lapse Movie • Flash mode (A 30) and macro mode (A 35) cannot be adjusted after the first picture is taken.
Apply the appropriate settings before shooting begins. Flash mode and macro mode settings for the second picture or later are fixed at those for the first picture. • To prevent the camera from turning off unexpectedly during recording, use a fully charged battery. 92 Movies The Movie Menu B Time-Lapse Movie • Flash mode (A 30) and macro mode (A 35) cannot be adjusted after the first picture is taken.

S60 User's Manual
Page 113
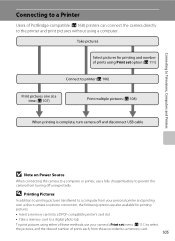
... For more information on Power Source When connecting the camera to a computer or printer, use a fully charged battery to prevent the camera from the supplied Software Suite CD. B Note on installing the software, refer to the Quick Start Guide. Select Cancel to a computer, software, including Nikon Transfer and Panorama Maker for the latest information...
... For more information on Power Source When connecting the camera to a computer or printer, use a fully charged battery to prevent the camera from the supplied Software Suite CD. B Note on installing the software, refer to the Quick Start Guide. Select Cancel to a computer, software, including Nikon Transfer and Panorama Maker for the latest information...
S60 User's Manual
Page 117
...'s card slot • Take a memory card to a digital photo lab To print pictures using a computer. D Printing Pictures In addition to printing pictures transferred to a computer from your personal printer and printing over a direct camera-to-printer connection, the following options are also available for ...cable B Note on Power Source When connecting the camera to a computer or printer, use your camera's Print set menu (A 111) to select the pictures, and the desired number of these methods, use a fully charged battery to prevent the camera from those recorded to a memory card. 105 ...
...'s card slot • Take a memory card to a digital photo lab To print pictures using a computer. D Printing Pictures In addition to printing pictures transferred to a computer from your personal printer and printing over a direct camera-to-printer connection, the following options are also available for ...cable B Note on Power Source When connecting the camera to a computer or printer, use your camera's Print set menu (A 111) to select the pictures, and the desired number of these methods, use a fully charged battery to prevent the camera from those recorded to a memory card. 105 ...


