
Reference Manual
Page 2
... marks cautions; A This icon marks notes; Help Use the camera's on-board help feature for help on menu items and other pages in bold. Menu items, options, and messages displayed in movie form, is available from your purchase of a Nikon single-lens reflex (SLR) digital camera. To get... the most from the following symbols and conventions are used . Camera Settings The explanations in this manual.
... marks cautions; A This icon marks notes; Help Use the camera's on-board help feature for help on menu items and other pages in bold. Menu items, options, and messages displayed in movie form, is available from your purchase of a Nikon single-lens reflex (SLR) digital camera. To get... the most from the following symbols and conventions are used . Camera Settings The explanations in this manual.

Reference Manual
Page 4
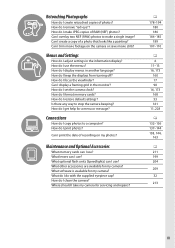
...when needed? i Focus Can I shoot movies? How can I keep the flash from accidental deletion? How do I get more information about a photo? i Using the Flash Can I view photos in quiet surroundings (quiet shutter release) ? Can I set the flash to freeze or blur motion (mode S)? Can I choose... I view photos on the memory card? i Release Modes Can I view more pictures on a TV? How do I take snapshots? Can I use special effects during shooting? Taking Photographs i Shooting Modes and Framing Options Is there a quick and easy way to blur backgrounds or bring them into ...
...when needed? i Focus Can I shoot movies? How can I keep the flash from accidental deletion? How do I get more information about a photo? i Using the Flash Can I view photos in quiet surroundings (quiet shutter release) ? Can I set the flash to freeze or blur motion (mode S)? Can I choose... I view photos on the memory card? i Release Modes Can I view more pictures on a TV? How do I take snapshots? Can I use special effects during shooting? Taking Photographs i Shooting Modes and Framing Options Is there a quick and easy way to blur backgrounds or bring them into ...
Reference Manual
Page 5
...do I adjust settings in the information display? Menus and Settings How do I copy photos to a computer? Maintenance and Optional Accessories What memory cards can I use? What lenses can I print the date of a photo that looks like a painting? Can I overlay two NEF (RAW) photos to stop the camera beeping...How do I display menus in the monitor? How do with the supplied eyepiece cap? What do I do I get help for my camera? Can I use? What other accessories are available for a menu or message? How do I remove "red-eye"? Is there any way to make JPEG copies of photos?...
...do I adjust settings in the information display? Menus and Settings How do I copy photos to a computer? Maintenance and Optional Accessories What memory cards can I use? What lenses can I print the date of a photo that looks like a painting? Can I overlay two NEF (RAW) photos to stop the camera beeping...How do I display menus in the monitor? How do with the supplied eyepiece cap? What do I do I get help for my camera? Can I use? What other accessories are available for a menu or message? How do I remove "red-eye"? Is there any way to make JPEG copies of photos?...

Reference Manual
Page 6
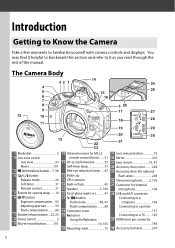
... to Know the Camera 1 The Camera Body ...1 The Mode Dial...3 The Viewfinder...4 The Monitor ...5 The Information Display...6 The Command Dial ...8 Camera Menus: An Overview 11 Using Camera Menus ...12 First Steps ...14 Basic Photography 20 Battery Level and Card Capacity 20 "Point-and-Shoot" Photography (i and j Modes 21 Creative Photography (Scene...
... to Know the Camera 1 The Camera Body ...1 The Mode Dial...3 The Viewfinder...4 The Monitor ...5 The Information Display...6 The Command Dial ...8 Camera Menus: An Overview 11 Using Camera Menus ...12 First Steps ...14 Basic Photography 20 Battery Level and Card Capacity 20 "Point-and-Shoot" Photography (i and j Modes 21 Creative Photography (Scene...

Reference Manual
Page 7
... AF-Area Mode ...36 Focus Point Selection ...38 Focus Lock ...38 Manual Focus ...40 Image Quality and Size ...42 Image Quality ...42 Image Size...44 Using the Built-in Flash...45 Flash Mode ...46 ISO Sensitivity...49 Interval Timer Photography 51 Restoring Default Settings 53 P, S, A, and M Modes 55 Shutter Speed and...
... AF-Area Mode ...36 Focus Point Selection ...38 Focus Lock ...38 Manual Focus ...40 Image Quality and Size ...42 Image Quality ...42 Image Size...44 Using the Built-in Flash...45 Flash Mode ...46 ISO Sensitivity...49 Interval Timer Photography 51 Restoring Default Settings 53 P, S, A, and M Modes 55 Shutter Speed and...

Reference Manual
Page 9
Connections 132 Installing ViewNX 2 ...132 Using ViewNX 2 ...134 Copy Pictures to the Computer 134 View Pictures ...135 Printing Photographs...137 Connecting the Printer ...137 Printing Pictures One at a Time 138 Printing ...
Connections 132 Installing ViewNX 2 ...132 Using ViewNX 2 ...134 Copy Pictures to the Computer 134 View Pictures ...135 Printing Photographs...137 Connecting the Printer ...137 Printing Pictures One at a Time 138 Printing ...

Reference Manual
Page 12
.... After removing the battery, take the product to a Nikon-authorized service center for extended periods while the devices are indicated by a qualified technician. A Do not use in the presence of flammable gas Do not use electronic equipment in the presence of malfunction, the product should...impairment. To prevent possible injury, read the following symbol: A This icon marks warnings. Keep these safety instructions where all warnings before using this Nikon product. ❚❚ WARNINGS A Keep the sun out of the frame Keep the sun well out of children Failure to observe...
.... After removing the battery, take the product to a Nikon-authorized service center for extended periods while the devices are indicated by a qualified technician. A Do not use in the presence of flammable gas Do not use electronic equipment in the presence of malfunction, the product should...impairment. To prevent possible injury, read the following symbol: A This icon marks warnings. Keep these safety instructions where all warnings before using this Nikon product. ❚❚ WARNINGS A Keep the sun out of the frame Keep the sun well out of children Failure to observe...

Reference Manual
Page 13
...compliance with product regulations. A CD-ROMs CD-ROMs containing software or manuals should be hot immediately after use with travel converters or adapters designed to convert from one meter (39 in.) from the monitor touching the...proper precautions when handling batteries Batteries may be no charge remains. • When the battery is not in use could result in fire. • Do not go near the metal parts of the plug should be sure ...one voltage to another or with DC-to cool. • Discontinue use only the cables provided or sold by Nikon for an extended period. xi
...compliance with product regulations. A CD-ROMs CD-ROMs containing software or manuals should be hot immediately after use with travel converters or adapters designed to convert from one meter (39 in.) from the monitor touching the...proper precautions when handling batteries Batteries may be no charge remains. • When the battery is not in use could result in fire. • Do not go near the metal parts of the plug should be sure ...one voltage to another or with DC-to cool. • Discontinue use only the cables provided or sold by Nikon for an extended period. xi

Reference Manual
Page 14
...8226; While every effort has been made to ensure that the information in these manuals at any time and without Nikon's prior written permission. • Nikon reserves the right to change the specifications of the hardware and software described in these manuals is designated for separate...as household waste. • For more information, contact the retailer or the local authorities in charge of waste management. DISPOSE OF USED BATTERIES ACCORDING TO THE INSTRUCTIONS. This symbol on the battery indicates that this product is to be collected separately. Notice for Customers...
...8226; While every effort has been made to ensure that the information in these manuals at any time and without Nikon's prior written permission. • Nikon reserves the right to change the specifications of the hardware and software described in these manuals is designated for separate...as household waste. • For more information, contact the retailer or the local authorities in charge of waste management. DISPOSE OF USED BATTERIES ACCORDING TO THE INSTRUCTIONS. This symbol on the battery indicates that this product is to be collected separately. Notice for Customers...

Reference Manual
Page 15
... to which can radiate The FCC requires the user be correctly oriented in a vertical or floor mount position. guarantee that to provide D5200 reasonable protection against harmful CAUTIONS interference in a particular installation. may expose you to lead, a chemical known to cause birth defects equipment...cause harmful interference to radio or television reception, which the receiver is encouraged to try to Interface Cables Use the interface cables sold or provided by Nikon may cause harmful interference to radio Corporation may exceed the limits of Class B Part 15 of the ...
... to which can radiate The FCC requires the user be correctly oriented in a vertical or floor mount position. guarantee that to provide D5200 reasonable protection against harmful CAUTIONS interference in a particular installation. may expose you to lead, a chemical known to cause birth defects equipment...cause harmful interference to radio or television reception, which the receiver is encouraged to try to Interface Cables Use the interface cables sold or provided by Nikon may cause harmful interference to radio Corporation may exceed the limits of Class B Part 15 of the ...

Reference Manual
Page 16
... completely refill it with copyright notices The copying or reproduction of making illegal copies or to another person, erase all data using commercially available software, potentially resulting in a foreign country is the user's responsibility. AVC Patent Portfolio License THIS PRODUCT IS ... OBTAINED FROM A VIDEO PROVIDER LICENSED TO PROVIDE AVC VIDEO. Ensuring the privacy of necessary copies are circulated in the malicious use by national and international copyright laws. ADDITIONAL INFORMATION MAY BE OBTAINED FROM MPEG LA, L.L.C. The copying or reproduction of stamps...
... completely refill it with copyright notices The copying or reproduction of making illegal copies or to another person, erase all data using commercially available software, potentially resulting in a foreign country is the user's responsibility. AVC Patent Portfolio License THIS PRODUCT IS ... OBTAINED FROM A VIDEO PROVIDER LICENSED TO PROVIDE AVC VIDEO. Ensuring the privacy of necessary copies are circulated in the malicious use by national and international copyright laws. ADDITIONAL INFORMATION MAY BE OBTAINED FROM MPEG LA, L.L.C. The copying or reproduction of stamps...

Reference Manual
Page 17
... could damage the camera and may void your area. For more information about Nikon brand accessories, contact a local authorized Nikon dealer. THE USE OF NON-NIKON ACCESSORIES COULD DAMAGE YOUR CAMERA AND MAY VOID YOUR NIKON WARRANTY. A Life-Long Learning As part of the camera or result in ....nikonusa.com/ • For users in Europe and Africa: http://www.europe-nikon.com/support/ • For users in your Nikon warranty. Nikon will not be available from product malfunction. The use with your Nikon digital camera are engineered and proven to ensure that may be held liable for...
... could damage the camera and may void your area. For more information about Nikon brand accessories, contact a local authorized Nikon dealer. THE USE OF NON-NIKON ACCESSORIES COULD DAMAGE YOUR CAMERA AND MAY VOID YOUR NIKON WARRANTY. A Life-Long Learning As part of the camera or result in ....nikonusa.com/ • For users in Europe and Africa: http://www.europe-nikon.com/support/ • For users in your Nikon warranty. Nikon will not be available from product malfunction. The use with your Nikon digital camera are engineered and proven to ensure that may be held liable for...
Reference Manual
Page 18
... flash 45 15 Speaker 2, 106 16 Focal plane mark (E)...........41 17 M/ Y button Flash mode 46, 47 Flash compensation..........68 18 Connector cover 19 Fn button Using the Fn button 10, 165 20 Mounting mark 15 21 Lens release button 19 22 Mirror 216 23 Lens mount 15, 41 24 Accessory shoe...
... flash 45 15 Speaker 2, 106 16 Focal plane mark (E)...........41 17 M/ Y button Flash mode 46, 47 Flash compensation..........68 18 Connector cover 19 Fn button Using the Fn button 10, 165 20 Mounting mark 15 21 Lens release button 19 22 Mirror 216 23 Lens mount 15, 41 24 Accessory shoe...

Reference Manual
Page 19
...) ......... 31 5 Monitor Viewing settings 6 Live view 93 Full-frame playback ....... 118 6 Tripod socket 7 Diopter adjustment control 17 8 P (information edit) button 6 Restoring default settings 53 9 A/L button Using the A (L) button 39, 166 Protecting photographs from deletion 126 10 Command dial 8 11 K button Playback 118 12 J (OK) button 12 13 Memory card slot cover...
...) ......... 31 5 Monitor Viewing settings 6 Live view 93 Full-frame playback ....... 118 6 Tripod socket 7 Diopter adjustment control 17 8 P (information edit) button 6 Restoring default settings 53 9 A/L button Using the A (L) button 39, 166 Protecting photographs from deletion 126 10 Command dial 8 11 K button Playback 118 12 J (OK) button 12 13 Memory card slot cover...

Reference Manual
Page 20
... full control over camera settings. • P-Programmed auto (0 56) • S-Shutter-priority auto (0 57) • A-Aperture-priority auto (0 58) • M-Manual (0 59) Special Effects Modes Use special effects during shooting. • % Night vision (0 112) • g Color sketch (0 112, 114) • ( Miniature effect (0 112, 115) • 3 Selective color (0 113, 116) • 1 Silhouette...; h Other scenes (0 26) A Scene Auto Selector (Live View) Selecting live view in i or j mode enables automatic scene selection ("scene auto selector"; 0 98) when autofocus is used. 3
... full control over camera settings. • P-Programmed auto (0 56) • S-Shutter-priority auto (0 57) • A-Aperture-priority auto (0 58) • M-Manual (0 59) Special Effects Modes Use special effects during shooting. • % Night vision (0 112) • g Color sketch (0 112, 114) • ( Miniature effect (0 112, 115) • 3 Selective color (0 113, 116) • 1 Silhouette...; h Other scenes (0 26) A Scene Auto Selector (Live View) Selecting live view in i or j mode enables automatic scene selection ("scene auto selector"; 0 98) when autofocus is used. 3

Reference Manual
Page 22
... rotated as shown below. 180° 90° 180° Normal use , fold it back face down against the camera face out. Self-portraits Use for normal photography. To protect the monitor when the camera is recommended for self-portraits in use Fold the monitor against the camera body. The monitor shows a mirror...-angle shots Frame live view shots with the camera close to observe these precautions could damage the connection between the monitor and the camera body. D Using the Monitor Rotate the monitor gently within the limits shown. Do not...
... rotated as shown below. 180° 90° 180° Normal use , fold it back face down against the camera face out. Self-portraits Use for normal photography. To protect the monitor when the camera is recommended for self-portraits in use Fold the monitor against the camera body. The monitor shows a mirror...-angle shots Frame live view shots with the camera close to observe these precautions could damage the connection between the monitor and the camera body. D Using the Monitor Rotate the monitor gently within the limits shown. Do not...

Reference Manual
Page 23
...: Display shown with all indicators lit for illustrative purposes. 6 The Information Display Camera settings can be viewed and adjusted in the information display. Highlight items using the multi selector and press J to settings.
...: Display shown with all indicators lit for illustrative purposes. 6 The Information Display Camera settings can be viewed and adjusted in the information display. Highlight items using the multi selector and press J to settings.

Reference Manual
Page 25
M (Y) button E (N) button Fn button Choose a scene (h mode; 0 26). q mode Command dial Choose a shutter speed (mode S or M; 0 57, 59). h mode Command dial Choose a combination of settings when shooting information is displayed in the monitor. Mode P Command dial Mode S or M Command dial 8 Mode dial Command dial Choose a special effect (q mode; 0 111). The Command Dial The command dial can be used with other controls to adjust a variety of aperture and shutter speed (mode P; 0 56).
M (Y) button E (N) button Fn button Choose a scene (h mode; 0 26). q mode Command dial Choose a shutter speed (mode S or M; 0 57, 59). h mode Command dial Choose a combination of settings when shooting information is displayed in the monitor. Mode P Command dial Mode S or M Command dial 8 Mode dial Command dial Choose a special effect (q mode; 0 111). The Command Dial The command dial can be used with other controls to adjust a variety of aperture and shutter speed (mode P; 0 56).

Reference Manual
Page 27
The role of the Fn button can be selected using Custom Setting f1 (Assign Fn button; 0 165), allowing the following settings to be adjusted by rotating the + command dial while keeping the Fn button pressed: Image quality/size (0 42) Fn button ISO sensitivity (0 49) Command dial White balance (0 76) Active D-Lighting (0 69) HDR (0 71) Auto bracketing (0 83) AF-area mode (0 36, 96) 10
The role of the Fn button can be selected using Custom Setting f1 (Assign Fn button; 0 165), allowing the following settings to be adjusted by rotating the + command dial while keeping the Fn button pressed: Image quality/size (0 42) Fn button ISO sensitivity (0 49) Command dial White balance (0 76) Active D-Lighting (0 69) HDR (0 71) Auto bracketing (0 83) AF-area mode (0 36, 96) 10

Reference Manual
Page 29
Using Camera Menus The multi selector and J button are used to navigate the menus. 1 Display the menus. Move cursor up J button: select highlighted item Cancel and return to previous menu Select highlighted item or display sub-menu Move cursor down Follow the steps below to navigate the camera menus. Press 1 or 3 to highlight the icon for the current menu. Press 4 to select the desired menu. Press the G button to display the menus. 2 Highlight the icon for the current menu. 3 Select a menu. G button 12
Using Camera Menus The multi selector and J button are used to navigate the menus. 1 Display the menus. Move cursor up J button: select highlighted item Cancel and return to previous menu Select highlighted item or display sub-menu Move cursor down Follow the steps below to navigate the camera menus. Press 1 or 3 to highlight the icon for the current menu. Press 4 to select the desired menu. Press the G button to display the menus. 2 Highlight the icon for the current menu. 3 Select a menu. G button 12


