
Reference Manual
Page 2
... this manual assume that default settings are used : D This icon marks cautions; information that should be read before use the product. information that should be read by all instructions thoroughly and keep them where they will be read before using the camera for the first time, read the safety instructions in "For Your Safety" (0 x-xv). Digitutor "Digitutor", a series of a Nikon single-lens reflex (SLR) digital camera. Where...
... this manual assume that default settings are used : D This icon marks cautions; information that should be read before use the product. information that should be read by all instructions thoroughly and keep them where they will be read before using the camera for the first time, read the safety instructions in "For Your Safety" (0 x-xv). Digitutor "Digitutor", a series of a Nikon single-lens reflex (SLR) digital camera. Where...
Reference Manual
Page 5
... I format memory cards? What software is available for my camera? How do I create retouched copies of RAW (NEF) photos? Maintenance and Optional Accessories What memory cards can I make a single image? Retouching Photographs How do I display menus in another language? Can I print the date of a photo that looks like a painting? Can I trim movie footage on my photos? How do I set the camera clock? How do I restore default settings? What lenses can I use...
... I format memory cards? What software is available for my camera? How do I create retouched copies of RAW (NEF) photos? Maintenance and Optional Accessories What memory cards can I make a single image? Retouching Photographs How do I display menus in another language? Can I print the date of a photo that looks like a painting? Can I trim movie footage on my photos? How do I set the camera clock? How do I restore default settings? What lenses can I use...
Reference Manual
Page 10
...-L Button 166 f3: Reverse Dial Rotation 166 f4: Slot Empty Release Lock 166 f5: Reverse Indicators...166 B The Setup Menu: Camera Setup 167 Format Memory Card ...168 Monitor Brightness...168 Info Display Format ...169 Auto Info Display...171 Image Dust Off Ref Photo 171 Video Mode...172 Flicker Reduction...172 Time Zone and Date ...173 Language ...173 Image Comment ...174 Auto Image Rotation ...174 Accessory Terminal ...175 Eye-Fi Upload ...176 Wireless Mobile Adapter 177 Firmware Version ...177 N The Retouch Menu...
...-L Button 166 f3: Reverse Dial Rotation 166 f4: Slot Empty Release Lock 166 f5: Reverse Indicators...166 B The Setup Menu: Camera Setup 167 Format Memory Card ...168 Monitor Brightness...168 Info Display Format ...169 Auto Info Display...171 Image Dust Off Ref Photo 171 Video Mode...172 Flicker Reduction...172 Time Zone and Date ...173 Language ...173 Image Comment ...174 Auto Image Rotation ...174 Accessory Terminal ...175 Eye-Fi Upload ...176 Wireless Mobile Adapter 177 Firmware Version ...177 N The Retouch Menu...

Reference Manual
Page 11
... Accessories ...209 Approved Memory Cards 211 Attaching a Power Connector and AC Adapter 212 Caring for the Camera...213 Storage...213 Cleaning ...213 The Low-Pass Filter...214 Caring for the Camera and Battery: Cautions 218 Caring for the Camera ...218 Caring for the Battery ...219 Available Settings ...221 Exposure Program (Mode P 223 Troubleshooting ...224 Battery/Display ...224 Shooting (All Modes) ...224 Shooting (P, S, A, M)...226 Playback ...226 Miscellaneous...227 Error Messages...228 Specifications ...231 The...
... Accessories ...209 Approved Memory Cards 211 Attaching a Power Connector and AC Adapter 212 Caring for the Camera...213 Storage...213 Cleaning ...213 The Low-Pass Filter...214 Caring for the Camera and Battery: Cautions 218 Caring for the Camera ...218 Caring for the Battery ...219 Available Settings ...221 Exposure Program (Mode P 223 Troubleshooting ...224 Battery/Display ...224 Shooting (All Modes) ...224 Shooting (P, S, A, M)...226 Playback ...226 Miscellaneous...227 Error Messages...228 Specifications ...231 The...
Reference Manual
Page 18
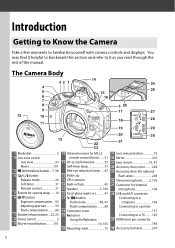
...22 21 23 1 Mode dial 3 2 Live view switch Live view 93 Movie 101 3 R (information) button... 7, 98 4 I/E/# button Release mode 29 Self-timer 31 Remote control 31 5 Eyelets for camera strap ...... 14 6 E/N button Exposure compensation... 66 Adjusting aperture 59 Flash compensation ......... 68 7 Shutter-release button ...22, 23 8 Power switch 2 9 Movie-record button.......... 101 10 Infrared receiver for ML-L3 remote control (front) .......31 11 AF-assist illuminator 35 Self-timer lamp 31 Red-eye reduction lamp ......47 12 Body cap 13 CPU contacts 14 Built-in flash 45 15 Speaker...
...22 21 23 1 Mode dial 3 2 Live view switch Live view 93 Movie 101 3 R (information) button... 7, 98 4 I/E/# button Release mode 29 Self-timer 31 Remote control 31 5 Eyelets for camera strap ...... 14 6 E/N button Exposure compensation... 66 Adjusting aperture 59 Flash compensation ......... 68 7 Shutter-release button ...22, 23 8 Power switch 2 9 Movie-record button.......... 101 10 Infrared receiver for ML-L3 remote control (front) .......31 11 AF-assist illuminator 35 Self-timer lamp 31 Red-eye reduction lamp ......47 12 Body cap 13 CPU contacts 14 Built-in flash 45 15 Speaker...

Reference Manual
Page 104
...or the user's creative intent. A Modifications to Original Picture Controls Picture Controls that have been adjusted, or select Quick adjust to choose a preset combination of settings using Quick adjust, or make manual adjustments to individual settings. 1 Display the Picture Control menu. Modifying Picture Controls Existing preset or custom Picture Controls (0 90) can be modified to choose a value (0 88). Highlight Set Picture Control in the shooting menu and press 2. 2 Select a Picture Control. Choose a balanced combination of settings. G button 3 Adjust settings. Press...
...or the user's creative intent. A Modifications to Original Picture Controls Picture Controls that have been adjusted, or select Quick adjust to choose a preset combination of settings using Quick adjust, or make manual adjustments to individual settings. 1 Display the Picture Control menu. Modifying Picture Controls Existing preset or custom Picture Controls (0 90) can be modified to choose a value (0 88). Highlight Set Picture Control in the shooting menu and press 2. 2 Select a Picture Control. Choose a balanced combination of settings. G button 3 Adjust settings. Press...

Reference Manual
Page 109
...custom Picture Controls from the memory card. Sharing Custom Picture Controls Custom Picture Controls created using the Picture Control Utility available with ViewNX 2 or optional software such as desired. • Delete from card: Delete selected custom Picture Controls from the memory card, highlight Load/Save in compatible cameras and software and then deleted when no longer needed. The confirmation dialog shown at any one time. The preset Picture Controls supplied with the camera can be copied to the memory card to store user-created custom Picture Controls. To copy custom Picture...
...custom Picture Controls from the memory card. Sharing Custom Picture Controls Custom Picture Controls created using the Picture Control Utility available with ViewNX 2 or optional software such as desired. • Delete from card: Delete selected custom Picture Controls from the memory card, highlight Load/Save in compatible cameras and software and then deleted when no longer needed. The confirmation dialog shown at any one time. The preset Picture Controls supplied with the camera can be copied to the memory card to store user-created custom Picture Controls. To copy custom Picture...

Reference Manual
Page 121
... G button to reduce noise caused by lens vibration being recorded during autofocus. A Using an External Microphone The optional ME-1 stereo microphone can be used to display the menus. Note that ISO sensitivity is in these values when live view ends. Shutter speed can be set to supported values, and remain at the value selected; ISO sensitivity can be displayed 30 s before resuming movie recording. 104 Highlight Movie settings in the shooting menu...
... G button to reduce noise caused by lens vibration being recorded during autofocus. A Using an External Microphone The optional ME-1 stereo microphone can be used to display the menus. Note that ISO sensitivity is in these values when live view ends. Shutter speed can be set to supported values, and remain at the value selected; ISO sensitivity can be displayed 30 s before resuming movie recording. 104 Highlight Movie settings in the shooting menu...

Reference Manual
Page 123
... full-frame playback. Return to fullframe playback /K Press 1 or K to exit to start playback. 1 icon Length Current position/total length Volume Movie progress bar The following operations can be performed: To Use Description Pause Pause playback. Skip 10 s Rotate the command dial to shooting mode Press shutter-release button halfway. Exit to skip ahead or back 10 s. photographs can be taken immediately. A The 2 Icon 2 is displayed in...
... full-frame playback. Return to fullframe playback /K Press 1 or K to exit to start playback. 1 icon Length Current position/total length Volume Movie progress bar The following operations can be performed: To Use Description Pause Pause playback. Skip 10 s Rotate the command dial to shooting mode Press shutter-release button halfway. Exit to skip ahead or back 10 s. photographs can be taken immediately. A The 2 Icon 2 is displayed in...

Reference Manual
Page 138
... 3 Metering 62 Shutter speed 57, 59 Aperture 58, 59 4 Shooting mode 21, 24, 55, 111 ISO sensitivity 1 49 5 Exposure compensation 65 6 Focal length 203 7 Lens data 8 Focus mode 33, 94 Lens VR (vibration reduction) 2 238 9 Flash type 164, 204 Commander mode 3 10 Flash mode 46 11 Flash control 164 Flash compensation 67 12 Camera name 13 Frame number/total number of images 14 White balance 76 White balance fine-tuning 78 Preset manual 79 15 Color space 152 16 Picture Control 86 17 Quick adjust...
... 3 Metering 62 Shutter speed 57, 59 Aperture 58, 59 4 Shooting mode 21, 24, 55, 111 ISO sensitivity 1 49 5 Exposure compensation 65 6 Focal length 203 7 Lens data 8 Focus mode 33, 94 Lens VR (vibration reduction) 2 238 9 Flash type 164, 204 Commander mode 3 10 Flash mode 46 11 Flash control 164 Flash compensation 67 12 Camera name 13 Frame number/total number of images 14 White balance 76 White balance fine-tuning 78 Preset manual 79 15 Color space 152 16 Picture Control 86 17 Quick adjust...

Reference Manual
Page 139
... Shutter speed 57, 59 15 Aperture 58, 59 16 ISO sensitivity 1 49 17 Focal length 203 18 GPS data indicator 175 19 Image comment indicator 174 20 Active D-Lighting 69 21 Picture Control 86 22 Color space 152 23 Flash mode 46 24 White balance 76 White balance fine-tuning 78 Preset manual 79 25 Flash compensation 67 Commander mode 2 26 Exposure compensation 65 1 Displayed in red if photo was taken with ISO sensitivity auto control...
... Shutter speed 57, 59 15 Aperture 58, 59 16 ISO sensitivity 1 49 17 Focal length 203 18 GPS data indicator 175 19 Image comment indicator 174 20 Active D-Lighting 69 21 Picture Control 86 22 Color space 152 23 Flash mode 46 24 White balance 76 White balance fine-tuning 78 Preset manual 79 25 Flash compensation 67 Commander mode 2 26 Exposure compensation 65 1 Displayed in red if photo was taken with ISO sensitivity auto control...
Reference Manual
Page 160
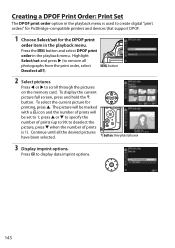
... the X button. to create digital "print orders" for PictBridge-compatible printers and devices that support DPOF. 1 Choose Select/set for printing, press 1. Press the G button and select DPOF print order in the playback menu. Continue until all ?). 2 Select pictures. The picture will be marked with a Z icon and the number of prints will be set and press 2 (to 1; X button: View photo full screen 3 Display imprint options. Highlight Select/set to remove all...
... the X button. to create digital "print orders" for PictBridge-compatible printers and devices that support DPOF. 1 Choose Select/set for printing, press 1. Press the G button and select DPOF print order in the playback menu. Continue until all ?). 2 Select pictures. The picture will be marked with a Z icon and the number of prints will be set and press 2 (to 1; X button: View photo full screen 3 Display imprint options. Highlight Select/set to remove all...
Reference Manual
Page 180
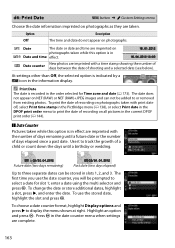
... press J. To choose a date counter format, highlight Display options and press 2 to or removed from existing photos. d6: Print Date G button ➜ A Custom Settings menu Choose the date information imprinted on photographs. enter a date using the multi selector and press J. Option Description Off The time and date do not appear on photographs as they are imprinted with the number of recording on all pictures in the current DPOF...
... press J. To choose a date counter format, highlight Display options and press 2 to or removed from existing photos. d6: Print Date G button ➜ A Custom Settings menu Choose the date information imprinted on photographs. enter a date using the multi selector and press J. Option Description Off The time and date do not appear on photographs as they are imprinted with the number of recording on all pictures in the current DPOF...

Reference Manual
Page 188
... shutter-release button halfway. in the viewfinder. • Clean sensor and then start only if the Image Dust Off reference data will automatically be used with existing photographs. 2 Frame a featureless white object in . 1 Choose a start option. If Off is pressed halfway; In autofocus mode, focus will not be set focus to clean the image sensor before image sensor cleaning is complete. The message shown at right will appear in manual focus mode, set to the information display during shooting...
... shutter-release button halfway. in the viewfinder. • Clean sensor and then start only if the Image Dust Off reference data will automatically be used with existing photographs. 2 Frame a featureless white object in . 1 Choose a start option. If Off is pressed halfway; In autofocus mode, focus will not be set focus to clean the image sensor before image sensor cleaning is complete. The message shown at right will appear in manual focus mode, set to the information display during shooting...
Reference Manual
Page 193
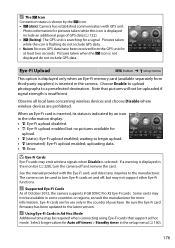
... latest version. uploading data. • g: Error. The camera can be used to turn the camera off , but no pictures available for pictures taken while this icon is insufficient. A Supported Eye-Fi Cards As of October 2012, the camera supports 8 GB SDHC Pro X2 Eye-Fi cards. Some cards may be required when connecting using Eye-Fi cards that pictures will not be available in the information display: • d: Eye-Fi upload disabled. • e: Eye-Fi upload enabled but...
... latest version. uploading data. • g: Error. The camera can be used to turn the camera off , but no pictures available for pictures taken while this icon is insufficient. A Supported Eye-Fi Cards As of October 2012, the camera supports 8 GB SDHC Pro X2 Eye-Fi cards. Some cards may be required when connecting using Eye-Fi cards that pictures will not be available in the information display: • d: Eye-Fi upload disabled. • e: Eye-Fi upload enabled but...

Reference Manual
Page 242
... to record photos: Turn long exposure noise reduction off (0 153). No photo taken when remote control shutter-release button is pressed: • Replace battery in remote control (0 210). • Choose remote control release mode (0 31). • Flash is charging (0 23). • Time selected for Movie settings > Microphone (0 103). Sound is not recorded with ML-L3 remote control. Can not select AF-area mode: Manual focus selected (0 40, 95). Focus does not lock when shutter-release button is pressed halfway: Use A (L) button to lock focus when live view or movie recording: Choose...
... to record photos: Turn long exposure noise reduction off (0 153). No photo taken when remote control shutter-release button is pressed: • Replace battery in remote control (0 210). • Choose remote control release mode (0 31). • Flash is charging (0 23). • Time selected for Movie settings > Microphone (0 103). Sound is not recorded with ML-L3 remote control. Can not select AF-area mode: Manual focus selected (0 40, 95). Focus does not lock when shutter-release button is pressed halfway: Use A (L) button to lock focus when live view or movie recording: Choose...

Reference Manual
Page 243
... (RAW)+JPEG (0 43). Playback NEF (RAW) image is taken (0 148). Colors are displayed in image review (0 149). • Camera was pointed up or down when photo was taken (0 174). For consistent results over a series of available shutter speed varies with this camera (0 178). 226 Note that Current is automatically selected after shutter speed of "Bulb" or "Time" selected in long time-exposures: Turn long-exposure noise reduction on (0 153). Metering can not be changed: Autoexposure lock is selected for Movie settings > Manual movie settings...
... (RAW)+JPEG (0 43). Playback NEF (RAW) image is taken (0 148). Colors are displayed in image review (0 149). • Camera was pointed up or down when photo was taken (0 174). For consistent results over a series of available shutter speed varies with this camera (0 178). 226 Note that Current is automatically selected after shutter speed of "Bulb" or "Time" selected in long time-exposures: Turn long-exposure noise reduction on (0 153). Metering can not be changed: Autoexposure lock is selected for Movie settings > Manual movie settings...

Reference Manual
Page 260
... A-M mode switch 40, 237 Angle of view 203 Aperture 55, 58, 59 Aperture-priority auto 58 Assign AE-L/AF-L button ...........166 Assign Fn button 10, 165 Auto (White balance 76 Auto bracketing 83, 164 Auto distortion control 151 Auto flash 47 Auto image rotation 174 Auto info display 171 Auto ISO sensitivity control......154 Auto off timers 160 Auto-area AF (AF-area mode) .... 36 Autoexposure lock 63 Autofocus 33-39, 94-96 Auto-servo AF 33 Available settings 221 B Battery 14...
... A-M mode switch 40, 237 Angle of view 203 Aperture 55, 58, 59 Aperture-priority auto 58 Assign AE-L/AF-L button ...........166 Assign Fn button 10, 165 Auto (White balance 76 Auto bracketing 83, 164 Auto distortion control 151 Auto flash 47 Auto image rotation 174 Auto info display 171 Auto ISO sensitivity control......154 Auto off timers 160 Auto-area AF (AF-area mode) .... 36 Autoexposure lock 63 Autofocus 33-39, 94-96 Auto-servo AF 33 Available settings 221 B Battery 14...

Reference Manual
Page 261
... reduction switch..... 15, 237 Live view 93, 101 Lock mirror up for cleaning...... 216 Long exposure NR 153 Low-angle shots 5 M Manage Picture Control 90 Manual 40, 59 Manual focus 40, 94, 100 Manual movie settings 104 Matrix metering 62 Maximum aperture 40, 199 Maximum sensitivity 154 Medium (Image size 44 Memory buffer 22, 30 Memory card ....... 15, 168, 211, 241 Memory card capacity 241 Metering 62 Microphone 103 Miniature effect 115, 191 Minimum aperture 19, 55 Minimum shutter speed 154 Mirror 1, 216 Mode dial...
... reduction switch..... 15, 237 Live view 93, 101 Lock mirror up for cleaning...... 216 Long exposure NR 153 Low-angle shots 5 M Manage Picture Control 90 Manual 40, 59 Manual focus 40, 94, 100 Manual movie settings 104 Matrix metering 62 Maximum aperture 40, 199 Maximum sensitivity 154 Medium (Image size 44 Memory buffer 22, 30 Memory card ....... 15, 168, 211, 241 Memory card capacity 241 Metering 62 Microphone 103 Miniature effect 115, 191 Minimum aperture 19, 55 Minimum shutter speed 154 Mirror 1, 216 Mode dial...

Reference Manual
Page 262
... Movie settings 103 Movie-record button 101 Movies 101 Multiple exposure 73 My Menu 195 N NEF 42 NEF (RAW 42, 186 NEF (RAW) processing 186 Neutral (Set Picture Control) ...... 86 Nikon Transfer 2 134 Non-CPU lens 201 Normal-area AF 95 Number of focus points 157 Number of shots 242 O Optional flash 164, 204 Output resolution (HDMI) .........147 Overview data 122 P Page size (PictBridge 138 Perspective control 190 Photo information 119, 149 PictBridge 137, 240 Picture Controls 86, 87 Playback 118 Playback display...
... Movie settings 103 Movie-record button 101 Movies 101 Multiple exposure 73 My Menu 195 N NEF 42 NEF (RAW 42, 186 NEF (RAW) processing 186 Neutral (Set Picture Control) ...... 86 Nikon Transfer 2 134 Non-CPU lens 201 Normal-area AF 95 Number of focus points 157 Number of shots 242 O Optional flash 164, 204 Output resolution (HDMI) .........147 Overview data 122 P Page size (PictBridge 138 Perspective control 190 Photo information 119, 149 PictBridge 137, 240 Picture Controls 86, 87 Playback 118 Playback display...


