Reference Manual
Page 2
...conventions are used : D This icon marks cautions; Camera Settings The explanations in "For Your Safety" (0 x-xv). A This icon marks notes; Digitutor "Digitutor", a series of "watch and learn" manuals in movie form, is available from your purchase of a Nikon single-lens reflex (SLR) digital camera. Thank you need... easier to find the information you for details. Help Use the camera's on menu items and other pages in this manual assume that default settings are used . information that should be read before using the camera for help on -board help feature for the first...
...conventions are used : D This icon marks cautions; Camera Settings The explanations in "For Your Safety" (0 x-xv). A This icon marks notes; Digitutor "Digitutor", a series of "watch and learn" manuals in movie form, is available from your purchase of a Nikon single-lens reflex (SLR) digital camera. Thank you need... easier to find the information you for details. Help Use the camera's on menu items and other pages in this manual assume that default settings are used . information that should be read before using the camera for help on -board help feature for the first...

Reference Manual
Page 7
...35 Self-Timer and Remote Control Modes 37 Focus ...39 Focus Mode...39 AF-Area Mode ...42 Focus Point Selection ...43 Focus Lock ...44 Manual Focus ...45 Image Quality and Size ...47 Image Quality ...47 Image Size...49 Using the Built-in Flash...50 Flash Mode ...51 ISO Sensitivity......54 Interval Timer Photography 56 Restoring Default Settings 58 P, S, A, and M Modes 61 Shutter Speed and Aperture 61 Mode P (Programmed Auto 62 Mode S (Shutter-Priority Auto 63 Mode A (Aperture-Priority ...
...35 Self-Timer and Remote Control Modes 37 Focus ...39 Focus Mode...39 AF-Area Mode ...42 Focus Point Selection ...43 Focus Lock ...44 Manual Focus ...45 Image Quality and Size ...47 Image Quality ...47 Image Size...49 Using the Built-in Flash...50 Flash Mode ...51 ISO Sensitivity......54 Interval Timer Photography 56 Restoring Default Settings 58 P, S, A, and M Modes 61 Shutter Speed and Aperture 61 Mode P (Programmed Auto 62 Mode S (Shutter-Priority Auto 63 Mode A (Aperture-Priority ...
Reference Manual
Page 21
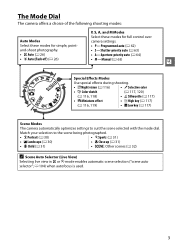
...priority auto (0 63) • i Auto (0 26) • A-Aperture-priority auto (0 64) • j Auto (flash off) (0 26) • M-Manual (0 65) X Special Effects Modes Use special effects during shooting. • % Night vision (0 116) • 3 Selective color • g Color sketch (0...(0 117) • ( Miniature effect • 2 High key (0 117) (0 116, 119) • 3 Low key (0 117) Scene Modes The camera automatically optimizes settings to the scene being photographed. • k Portrait (0 30) • m Sports (0 31) • l Landscape (0 30) • n Close up (0 31) ...
...priority auto (0 63) • i Auto (0 26) • A-Aperture-priority auto (0 64) • j Auto (flash off) (0 26) • M-Manual (0 65) X Special Effects Modes Use special effects during shooting. • % Night vision (0 116) • 3 Selective color • g Color sketch (0...(0 117) • ( Miniature effect • 2 High key (0 117) (0 116, 119) • 3 Low key (0 117) Scene Modes The camera automatically optimizes settings to the scene being photographed. • k Portrait (0 30) • m Sports (0 31) • l Landscape (0 30) • n Close up (0 31) ...

Reference Manual
Page 23
...65 3 Shutter speed 63, 65 4 Shutter-speed display 6 5 Aperture display 6 6 Auto-area AF indicator .........42 3D-tracking indicator............42 Focus point 43 7 Manual flash indicator....... 164 Flash compensation indicator for optional flash units ... 205 8 Print date indicator 163 9 Auto ISO sensitivity indicator 155 10 Multiple exposure indicator 79... 68 33 Active D-Lighting 74 34 Bracketing increment ...........89 5 Highlight items using the multi selector and press J to settings. The Information Display Camera settings can be viewed and adjusted in the information display.
...65 3 Shutter speed 63, 65 4 Shutter-speed display 6 5 Aperture display 6 6 Auto-area AF indicator .........42 3D-tracking indicator............42 Focus point 43 7 Manual flash indicator....... 164 Flash compensation indicator for optional flash units ... 205 8 Print date indicator 163 9 Auto ISO sensitivity indicator 155 10 Multiple exposure indicator 79... 68 33 Active D-Lighting 74 34 Bracketing increment ...........89 5 Highlight items using the multi selector and press J to settings. The Information Display Camera settings can be viewed and adjusted in the information display.

Reference Manual
Page 36
... on . When the camera is panned, vibration reduction applies only to motion that is panned horizontally, for the image in both autofocus and manual focus modes. After removing the lens, replace the lens caps and camera body cap. This is not a malfunction, and can be turned... button (q) while turning the lens clockwise (w). D CPU Lenses with Aperture Rings In the case of 55 mm (Nikon measurements; Turn vibration reduction off by approximately 3 EV at the minimum setting (highest f-number). effects vary with an aperture ring (0 198), lock aperture at a focal length of CPU lenses...
... on . When the camera is panned, vibration reduction applies only to motion that is panned horizontally, for the image in both autofocus and manual focus modes. After removing the lens, replace the lens caps and camera body cap. This is not a malfunction, and can be turned... button (q) while turning the lens clockwise (w). D CPU Lenses with Aperture Rings In the case of 55 mm (Nikon measurements; Turn vibration reduction off by approximately 3 EV at the minimum setting (highest f-number). effects vary with an aperture ring (0 198), lock aperture at a focal length of CPU lenses...

Reference Manual
Page 57
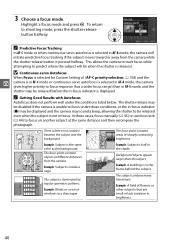
...in the information display. Shutter can only be released if camera is able to focus. For moving . At default settings, shutter can only be adjusted automatically or manually (see "Focus Mode," below). If shooting information is able to focus (0 158). Focus Mode Choose from the ...autofocus if subject is stationary, continuous-servo autofocus if subject is pressed halfway. z AF-S Single-servo AF For stationary subjects. MF Manual focus Focus manually (0 45). 1 Place the cursor in the monitor, press the P button. Shutter can only be released if camera is not ...
...in the information display. Shutter can only be released if camera is able to focus. For moving . At default settings, shutter can only be adjusted automatically or manually (see "Focus Mode," below). If shooting information is able to focus (0 158). Focus Mode Choose from the ...autofocus if subject is stationary, continuous-servo autofocus if subject is pressed halfway. z AF-S Single-servo AF For stationary subjects. MF Manual focus Focus manually (0 45). 1 Place the cursor in the monitor, press the P button. Shutter can only be released if camera is not ...
Reference Manual
Page 58
...different distances from the camera while the shutter-release button is selected in the shade. D Continuous-servo Autofocus When Focus is selected for Custom Setting a1 (AF-C priority selection; 0 158) and the z camera is in AF-C mode or continuous-servo autofocus is selected in -focus indicator... may be released even when the subject is displayed. A Getting Good Results with Autofocus Autofocus does not perform well under these cases, focus manually (0 45) or use focus lock (0 44) to shooting mode, press the shutter-release button halfway. Example: Subject is little or no...
...different distances from the camera while the shutter-release button is selected in the shade. D Continuous-servo Autofocus When Focus is selected for Custom Setting a1 (AF-C priority selection; 0 158) and the z camera is in AF-C mode or continuous-servo autofocus is selected in -focus indicator... may be released even when the subject is displayed. A Getting Good Results with Autofocus Autofocus does not perform well under these cases, focus manually (0 45) or use focus lock (0 44) to shooting mode, press the shutter-release button halfway. Example: Subject is little or no...
Reference Manual
Page 59
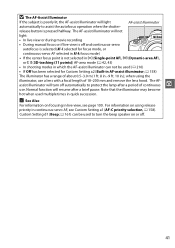
...release priority in quick succession. assist illuminator will not light: • In live view or during movie recording • During manual focus or if live view, see Custom Setting a1 (AF-C priority selection, 0 158). Note that the illuminator may become hot when used to turn off and continuous-...servo autofocus is selected (AF-C selected for Custom Setting a2 (Built-in AF-assist illuminator; 0 158) The illuminator has a range of 18-200 mm and remove the lens hood. A See Also ...
...release priority in quick succession. assist illuminator will not light: • In live view or during movie recording • During manual focus or if live view, see Custom Setting a1 (AF-C priority selection, 0 158). Note that the illuminator may become hot when used to turn off and continuous-...servo autofocus is selected (AF-C selected for Custom Setting a2 (Built-in AF-assist illuminator; 0 158) The illuminator has a range of 18-200 mm and remove the lens hood. A See Also ...
Reference Manual
Page 63
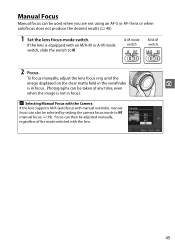
...lens or when autofocus does not produce the desired results (0 40). 1 Set the lens focus-mode switch. Photographs can also be taken at any time, even when the image is in focus. To focus manually, adjust the lens focus ring until the image displayed on the clear ...matte field in the viewfinder z is not in focus. If the lens is equipped with manual override), manual focus can be selected by setting the camera focus mode to M. A-M mode switch M/A-M switch 2 Focus. A Selecting Manual Focus with the Camera If the lens supports M/A (autofocus with an M/A-M or A-M mode ...
...lens or when autofocus does not produce the desired results (0 40). 1 Set the lens focus-mode switch. Photographs can also be taken at any time, even when the image is in focus. To focus manually, adjust the lens focus ring until the image displayed on the clear ...matte field in the viewfinder z is not in focus. If the lens is equipped with manual override), manual focus can be selected by setting the camera focus mode to M. A-M mode switch M/A-M switch 2 Focus. A Selecting Manual Focus with the Camera If the lens supports M/A (autofocus with an M/A-M or A-M mode ...

Reference Manual
Page 79
...aperture. tP, S, A, and M Modes Shutter Speed and Aperture P, S, A, and M modes offer different degrees of shutter speed and aperture. M Manual (0 65) User controls both foreground and background into focus. Type G lenses are not equipped with an aperture ring (0 198), lock the aperture ...ring at the minimum aperture (highest f-number). Set shutter speed to freeze or blur motion. User chooses shutter speed; camera selects shutter speed for best results. Recommended for optimal exposure. t...
...aperture. tP, S, A, and M Modes Shutter Speed and Aperture P, S, A, and M modes offer different degrees of shutter speed and aperture. M Manual (0 65) User controls both foreground and background into focus. Type G lenses are not equipped with an aperture ring (0 198), lock the aperture ...ring at the minimum aperture (highest f-number). Set shutter speed to freeze or blur motion. User chooses shutter speed; camera selects shutter speed for best results. Recommended for optimal exposure. t...
Reference Manual
Page 83
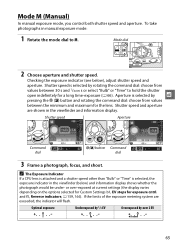
...Choose aperture and shutter speed. and f5, Reverse indicators; 0 159, 166). Shutter speed is selected by over -exposed at current settings (the display varies depending on the options selected for Custom Settings b1, EV steps for a long time-exposure (0 66). Checking the exposure indicator (see below ) and information display shows whether ... from values between 30 s and 1/4,000 s or select "Bulb" or "Time" to M. If the limits of the exposure metering system are shown in manual exposure mode: 1 Rotate the mode dial to hold the shutter open indefinitely for exposure cntrl.
...Choose aperture and shutter speed. and f5, Reverse indicators; 0 159, 166). Shutter speed is selected by over -exposed at current settings (the display varies depending on the options selected for Custom Settings b1, EV steps for a long time-exposure (0 66). Checking the exposure indicator (see below ) and information display shows whether ... from values between 30 s and 1/4,000 s or select "Bulb" or "Time" to M. If the limits of the exposure metering system are shown in manual exposure mode: 1 Rotate the mode dial to hold the shutter open indefinitely for exposure cntrl.
Reference Manual
Page 99
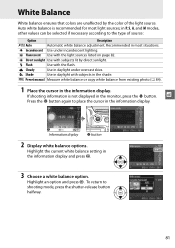
... balance adjustment. M Shade Use in most light sources; Information display P button 2 Display white balance options. If shooting information is recommended for most situations. L Preset manual Measure white balance or copy white balance from existing photo (0 84). 1 Place the cursor in the information display. t Press the P button again to place the... balance is not displayed in the information display and press J. 3 Choose a white balance option. I Fluorescent Use with the flash. Highlight the current white balance setting in the monitor, press the P button.
... balance adjustment. M Shade Use in most light sources; Information display P button 2 Display white balance options. If shooting information is recommended for most situations. L Preset manual Measure white balance or copy white balance from existing photo (0 84). 1 Place the cursor in the information display. t Press the P button again to place the... balance is not displayed in the information display and press J. 3 Choose a white balance option. I Fluorescent Use with the flash. Highlight the current white balance setting in the monitor, press the P button.
Reference Manual
Page 101
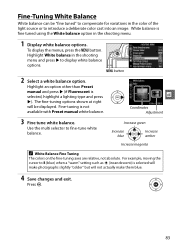
t Coordinates Adjustment 3 Fine tune white balance. For example, moving the cursor to B (blue) when a "warm" setting such as J (incandescent) is fine tuned using the White balance option in the shooting menu and press 2 to fine-tune white balance. Use the multi ... in the shooting menu. 1 Display white balance options. Press J. 83 Fine-Tuning White Balance White balance can be displayed. Highlight an option other than Preset manual and press 2 (if Fluorescent is not available with Preset...
t Coordinates Adjustment 3 Fine tune white balance. For example, moving the cursor to B (blue) when a "warm" setting such as J (incandescent) is fine tuned using the White balance option in the shooting menu and press 2 to fine-tune white balance. Use the multi ... in the shooting menu. 1 Display white balance options. Press J. 83 Fine-Tuning White Balance White balance can be displayed. Highlight an option other than Preset manual and press 2 (if Fluorescent is not available with Preset...
Reference Manual
Page 102
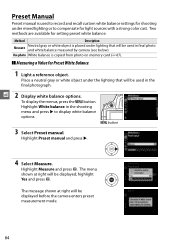
...in final photo and white balance measured by camera (see below). Highlight Preset manual and press 2. 4 Select Measure. G button 3 Select Preset manual. Two methods are available for setting preset white balance: Method Description Measure Neutral gray or white object is placed... reference object. Highlight White balance in the final photograph. 2 t Display white balance options. Preset Manual Preset manual is used to record and recall custom white balance settings for shooting under mixed lighting or to display white balance options. The message shown at right will ...
...in final photo and white balance measured by camera (see below). Highlight Preset manual and press 2. 4 Select Measure. G button 3 Select Preset manual. Two methods are available for setting preset white balance: Method Description Measure Neutral gray or white object is placed... reference object. Highlight White balance in the final photograph. 2 t Display white balance options. Preset Manual Preset manual is used to record and recall custom white balance settings for shooting under mixed lighting or to display white balance options. The message shown at right will ...
Reference Manual
Page 105
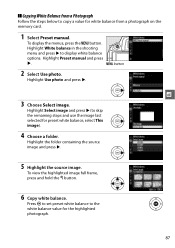
...and hold the X button. 6 Copy white balance. ❚❚ Copying White Balance from a photograph on the memory card. 1 Select Preset manual. Highlight the folder containing the source image and press 2. 5 Highlight the source image. Highlight Use photo and press 2. To display the menus, ...press the G button. Press J to set preset white balance to the white balance value for white balance from a Photograph Follow the steps below to copy a value for the highlighted...
...and hold the X button. 6 Copy white balance. ❚❚ Copying White Balance from a photograph on the memory card. 1 Select Preset manual. Highlight the folder containing the source image and press 2. 5 Highlight the source image. Highlight Use photo and press 2. To display the menus, ...press the G button. Press J to set preset white balance to the white balance value for white balance from a Photograph Follow the steps below to copy a value for the highlighted...

Reference Manual
Page 110
... the G button. G button 3 Adjust settings. Repeat this step until all settings have been modified from default settings are indicated by pressing the O button. ... scene or the user's creative intent. Highlight Set Picture Control in the shooting menu and press 2. 2 t Select a Picture Control. Default settings can be restored by an asterisk ("*"). 92 ...Press 1 or 3 to highlight the desired setting and press 4 or 2 to individual settings. 1 Display the Picture Control menu. Choose a balanced combination of settings. A Modifications to Original Picture Controls Picture ...
... the G button. G button 3 Adjust settings. Repeat this step until all settings have been modified from default settings are indicated by pressing the O button. ... scene or the user's creative intent. Highlight Set Picture Control in the shooting menu and press 2. 2 t Select a Picture Control. Default settings can be restored by an asterisk ("*"). 92 ...Press 1 or 3 to highlight the desired setting and press 4 or 2 to individual settings. 1 Display the Picture Control menu. Choose a balanced combination of settings. A Modifications to Original Picture Controls Picture ...
Reference Manual
Page 111
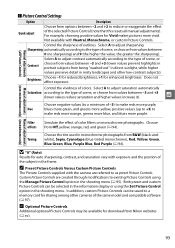
...other low-contrast subjects). In addition, custom Picture Controls can be available for enhanced brightness. ❚❚ Picture Control Settings Manual adjustments (all manual adjustments). Select A to adjust sharpening Sharpening automatically according to the type of scene, or Contrast choose from values between ...Picture Controls are referred to existing Picture Controls using the Set Picture Control option in the frame. Toning Choose the tint used in the shooting menu (0 95). Choose from Nikon websites (0 xv). 93 A Preset Picture Controls Versus Custom...
...other low-contrast subjects). In addition, custom Picture Controls can be available for enhanced brightness. ❚❚ Picture Control Settings Manual adjustments (all manual adjustments). Select A to adjust sharpening Sharpening automatically according to the type of scene, or Contrast choose from values between ...Picture Controls are referred to existing Picture Controls using the Set Picture Control option in the frame. Toning Choose the tint used in the shooting menu (0 95). Choose from Nikon websites (0 xv). 93 A Preset Picture Controls Versus Custom...
Reference Manual
Page 177
... a maximum aperture of Off, exposure only locks when the AE-L/ AF-L button is slightly behind subject. Indicator Description Camera in manual focus mode (0 65; The desired results may not be achieved in situations in live view. note that this function is not ... and bracketing. Indicator Description Focus point is pressed. c: Timers/AE Lock c1: Shutter-Release Button AE-L L G button ➜ A Custom Settings menu At the default setting of f/5.6 or faster and is correctly exposed). Focus point is pressed halfway. 159 b: Exposure b1: EV Steps for Exposure Cntrl. G button...
... a maximum aperture of Off, exposure only locks when the AE-L/ AF-L button is slightly behind subject. Indicator Description Camera in manual focus mode (0 65; The desired results may not be achieved in situations in live view. note that this function is not ... and bracketing. Indicator Description Focus point is pressed. c: Timers/AE Lock c1: Shutter-Release Button AE-L L G button ➜ A Custom Settings menu At the default setting of f/5.6 or faster and is correctly exposed). Focus point is pressed halfway. 159 b: Exposure b1: EV Steps for Exposure Cntrl. G button...

Reference Manual
Page 182
...units. • i-TTL Balanced Fill-Flash for the main subject; Standard i-TTL flash control is adjusted automatically in response to shooting conditions. 2 Manual Choose a flash level between the main subject and the background. • Standard i-TTL Fill-Flash for digital SLR is raised. At full power,... in P, S, A, and M modes. the brightness of full power). e: Bracketing/Flash e1: Flash Cntrl for Built-in Flash G button ➜ A Custom Settings menu Choose the flash mode for the SB-400 to be selected from the 420-pixel RGB sensor is used in combination with the optional...
...units. • i-TTL Balanced Fill-Flash for the main subject; Standard i-TTL flash control is adjusted automatically in response to shooting conditions. 2 Manual Choose a flash level between the main subject and the background. • Standard i-TTL Fill-Flash for digital SLR is raised. At full power,... in P, S, A, and M modes. the brightness of full power). e: Bracketing/Flash e1: Flash Cntrl for Built-in Flash G button ➜ A Custom Settings menu Choose the flash mode for the SB-400 to be selected from the 420-pixel RGB sensor is used in combination with the optional...
Reference Manual
Page 191
... photographs. 2 Frame a featureless white object in the viewfinder. In autofocus mode, focus will automatically be set focus to acquire Image Dust Off reference data. in manual focus mode, set to acquire Image Dust Off reference data and the message shown at right will be displayed. Press the ...shutter-release button the rest of the way down to infinity manually. 3 Acquire dust off reference data will ...
... photographs. 2 Frame a featureless white object in the viewfinder. In autofocus mode, focus will automatically be set focus to acquire Image Dust Off reference data. in manual focus mode, set to acquire Image Dust Off reference data and the message shown at right will be displayed. Press the ...shutter-release button the rest of the way down to infinity manually. 3 Acquire dust off reference data will ...


