
D50 User's Manual
Page 1
En The Nikon Guide to Digital Photography with the DIGITAL CAMERA
En The Nikon Guide to Digital Photography with the DIGITAL CAMERA

D50 User's Manual
Page 2
... (pages 30-50) Play with exposure and explore the creative possibilities of some of camera parts and ready the camera for a complete description of all aspects of camera operation Introduction (pages 1-13) Learn the names of the camera's more about camera playback, transferring photographs to know for simple, "point-and-shoot" photography Read these chapters...
... (pages 30-50) Play with exposure and explore the creative possibilities of some of camera parts and ready the camera for a complete description of all aspects of camera operation Introduction (pages 1-13) Learn the names of the camera's more about camera playback, transferring photographs to know for simple, "point-and-shoot" photography Read these chapters...

D50 User's Manual
Page 3
Introduction Tutorial Photography and Playback Reference More on Photography More on Playback Setup Basic Camera Settings: The Setup Menu Shooting Options: The Shooting Menu Playback Options: The Playback Menu Custom Settings: The Custom Settings Menu Technical Notes i
Introduction Tutorial Photography and Playback Reference More on Photography More on Playback Setup Basic Camera Settings: The Setup Menu Shooting Options: The Shooting Menu Playback Options: The Playback Menu Custom Settings: The Custom Settings Menu Technical Notes i

D50 User's Manual
Page 4
...section are indicated by a qualified technician. Do not place strap around the neck of an infant or child Placing the camera strap around the neck of an infant or child could result in injury. ii Do not disassemble Touching the product's internal parts could...marks warnings, information that could result in explosion or fire. Do not transport After removing the battery, take the product to a Nikon-authorized service center for inspection. Should the product break open as this equipment. The consequences that should be read before replacing the battery....
...section are indicated by a qualified technician. Do not place strap around the neck of an infant or child Placing the camera strap around the neck of an infant or child could result in injury. ii Do not disassemble Touching the product's internal parts could...marks warnings, information that could result in explosion or fire. Do not transport After removing the battery, take the product to a Nikon-authorized service center for inspection. Should the product break open as this equipment. The consequences that should be read before replacing the battery....

D50 User's Manual
Page 5
... When connecting cables to the input and output jacks, use only the cables provided or sold by Nikon for an extended period, the battery may become hot. Before removing the battery, turn the camera off and allow the battery to prevent infants from the monitor touching the skin or entering the eyes...
... When connecting cables to the input and output jacks, use only the cables provided or sold by Nikon for an extended period, the battery may become hot. Before removing the battery, turn the camera off and allow the battery to prevent infants from the monitor touching the skin or entering the eyes...

D50 User's Manual
Page 7
... The copying or reproduction of paper a minimum of securities is- pany. postage stamps or post cards issued by • Comply with your Nikon product are stamped checks, gift certificates, etc.), commuter "Sample." PictBridge is a trademark. v Notice Concerning Prohibition of Copying or ...passports issued by the government, Unless the prior permission of the government has been obtained, the copying or reproduction of a scanner, digital camera or other device may be provided for customers in this product for the purpose of making illegal copies or to money, coins, ...
... The copying or reproduction of paper a minimum of securities is- pany. postage stamps or post cards issued by • Comply with your Nikon product are stamped checks, gift certificates, etc.), commuter "Sample." PictBridge is a trademark. v Notice Concerning Prohibition of Copying or ...passports issued by the government, Unless the prior permission of the government has been obtained, the copying or reproduction of a scanner, digital camera or other device may be provided for customers in this product for the purpose of making illegal copies or to money, coins, ...
D50 User's Manual
Page 8
... Introduction...1 Getting to Know the Camera 2 First Steps ...7 Attaching a Lens 7 Charging and Inserting the Battery 8 Basic Setup 10 Inserting Memory Cards 11 Adjusting Viewfinder Focus 13 Tutorial: Photography and Playback 14 Taking Photographs in Mode 14 Digital Vari-Programs 19 Choosing a Shooting... Mode 21 Using the Self-timer or Remote Control 22 Basic Playback 24 Reference...25 Using Camera Menus 26 Reference: More on Photography 30 Image Quality and ...
... Introduction...1 Getting to Know the Camera 2 First Steps ...7 Attaching a Lens 7 Charging and Inserting the Battery 8 Basic Setup 10 Inserting Memory Cards 11 Adjusting Viewfinder Focus 13 Tutorial: Photography and Playback 14 Taking Photographs in Mode 14 Digital Vari-Programs 19 Choosing a Shooting... Mode 21 Using the Self-timer or Remote Control 22 Basic Playback 24 Reference...25 Using Camera Menus 26 Reference: More on Photography 30 Image Quality and ...

D50 User's Manual
Page 9
...Fldr 84 Rotate Tall ...84 Slide Show ...85 Print Set ...86 Small Picture 86 Custom Settings 87 Technical Notes 101 Camera Settings 101 Optional Accessories 104 Caring for the Camera 115 Troubleshooting 120 Appendix ...126 Specifications 129 Index ...136 A two-button reset (page 50) and Custom ...Setting R (Menu Reset; Viewing Photographs on a Computer 59 Printing Photographs 62 Setup...68 Basic Camera Settings 68 Format ...68 CSM/Setup Menu 69 Date ...69 LCD Brightness 69 Video Mode 69 Language (LANG 70 Image Comment 70 USB ...71 ...
...Fldr 84 Rotate Tall ...84 Slide Show ...85 Print Set ...86 Small Picture 86 Custom Settings 87 Technical Notes 101 Camera Settings 101 Optional Accessories 104 Caring for the Camera 115 Troubleshooting 120 Appendix ...126 Specifications 129 Index ...136 A two-button reset (page 50) and Custom ...Setting R (Menu Reset; Viewing Photographs on a Computer 59 Printing Photographs 62 Setup...68 Basic Camera Settings 68 Format ...68 CSM/Setup Menu 69 Date ...69 LCD Brightness 69 Video Mode 69 Language (LANG 70 Image Comment 70 USB ...71 ...

D50 User's Manual
Page 10
...and Africa: http://www.nikon-asia.com/ Visit these sites to keep up-to-date with the latest product information, tips, answers to frequently-asked questions (FAQs), and general advice on digital imaging and photography. Take Test Shots Before taking the camera with you lose this manual...appear in place, be used with the low-pass filter during production and shipping. viii The D50, however, is in photographs taken under certain conditions. Foreign Matter on the Low-Pass Filter Nikon takes every possible precaution to prevent foreign matter from product malfunction.
...and Africa: http://www.nikon-asia.com/ Visit these sites to keep up-to-date with the latest product information, tips, answers to frequently-asked questions (FAQs), and general advice on digital imaging and photography. Take Test Shots Before taking the camera with you lose this manual...appear in place, be used with the low-pass filter during production and shipping. viii The D50, however, is in photographs taken under certain conditions. Foreign Matter on the Low-Pass Filter Nikon takes every possible precaution to prevent foreign matter from product malfunction.

D50 User's Manual
Page 11
...marks settings that can be fine-tuned from the camera. • Quick Start Guide: The Quick Start Guide takes you through the process of a Nikon D50 single-lens reflex (SLR) digital camera with your camera. Read this product also includes the manuals listed below. ...Introduction Introduction Thank you for your purchase of unpacking and setting up your Nikon digital camera, taking pictures with the lens for ...
...marks settings that can be fine-tuned from the camera. • Quick Start Guide: The Quick Start Guide takes you through the process of a Nikon D50 single-lens reflex (SLR) digital camera with your camera. Read this product also includes the manuals listed below. ...Introduction Introduction Thank you for your purchase of unpacking and setting up your Nikon digital camera, taking pictures with the lens for ...

D50 User's Manual
Page 12
... a few moments to it helpful to bookmark this section and refer to familiarize yourself with camera controls and displays. Camera Body Accessory shoe: 109 Control panel: 4 AF-assist illuminator: 34 [Self-timer lamp: 22] [Red-eye reduction lamp: 36] (self-timer / remote ... Accessory shoe cover: 109 Built-in flash: 109 (flash sync mode) button: 18, 36 [ Flash compensation: 38] Mode dial: 6 Eyelet for camera strap: 7 Infrared receiver: 28 Lens release button: 7 Power switch: 14 Shutter-release Focus-mode selector: button: 17 15, 35 Connector cover USB connector: 60,...
... a few moments to it helpful to bookmark this section and refer to familiarize yourself with camera controls and displays. Camera Body Accessory shoe: 109 Control panel: 4 AF-assist illuminator: 34 [Self-timer lamp: 22] [Red-eye reduction lamp: 36] (self-timer / remote ... Accessory shoe cover: 109 Built-in flash: 109 (flash sync mode) button: 18, 36 [ Flash compensation: 38] Mode dial: 6 Eyelet for camera strap: 7 Infrared receiver: 28 Lens release button: 7 Power switch: 14 Shutter-release Focus-mode selector: button: 17 15, 35 Connector cover USB connector: 60,...

D50 User's Manual
Page 13
... ( 51) Move cursor up Menu navigation ( 28) Display previous page Return to control the display of photo information during playback. Introduction-Getting to Know the Camera Camera Body (continued) Viewfinder eyepiece: 5, 13, 16 Viewfinder eyepiece cup: 13 (shooting mode) button: 21 [Reset button: 50] (playback) button: 24, 51...
... ( 51) Move cursor up Menu navigation ( 28) Display previous page Return to control the display of photo information during playback. Introduction-Getting to Know the Camera Camera Body (continued) Viewfinder eyepiece: 5, 13, 16 Viewfinder eyepiece cup: 13 (shooting mode) button: 21 [Reset button: 50] (playback) button: 24, 51...

D50 User's Manual
Page 14
Introduction-Getting to Know the Camera Control Panel 1 11 2 3 10 4 9 8 5 6 7 1 Shutter speed 40-45 8 Number of exposures remaining ... 14 Exposure compensation value ....... 47 Number of shots remaining Flash compensation value 38 ...
Introduction-Getting to Know the Camera Control Panel 1 11 2 3 10 4 9 8 5 6 7 1 Shutter speed 40-45 8 Number of exposures remaining ... 14 Exposure compensation value ....... 47 Number of shots remaining Flash compensation value 38 ...
D50 User's Manual
Page 15
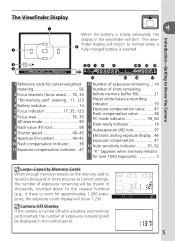
Introduction-Getting to Know the Camera 3 56 7 8 9 10 11 12 13 4 14 15 16 17 1 Reference circle for center-weighted metering 96 2 Focus brackets (focus areas) .... 16, 33 3 "No memory card" ...-45 10 Flash compensation indicator........ 38 11 Exposure compensation indicator.. 47 12 Number of exposures remaining ... 14 Number of exposures remaining will show 1.2 K). Camera Off Display If the camera is turned off with a battery and memory card inserted, the number of exposures remaining will be shown in thousands, rounded down to the...
Introduction-Getting to Know the Camera 3 56 7 8 9 10 11 12 13 4 14 15 16 17 1 Reference circle for center-weighted metering 96 2 Focus brackets (focus areas) .... 16, 33 3 "No memory card" ...-45 10 Flash compensation indicator........ 38 11 Exposure compensation indicator.. 47 12 Number of exposures remaining ... 14 Number of exposures remaining will show 1.2 K). Camera Off Display If the camera is turned off with a battery and memory card inserted, the number of exposures remaining will be shown in thousands, rounded down to the...

D50 User's Manual
Page 16
P: Programmed auto ( 42) S: Shutter-priority auto ( 43) A: Aperture-priority auto ( 44) M: Manual ( 45) Point-and-Shoot Modes (Digital Vari-Programs) Selecting a Digital Vari-Program automatically optimizes settings to Know the Camera The Mode Dial The D50 offers a choice of the following eleven shooting modes: Advanced Modes (Exposure Modes) Select these modes for full control over...
P: Programmed auto ( 42) S: Shutter-priority auto ( 43) A: Aperture-priority auto ( 44) M: Manual ( 45) Point-and-Shoot Modes (Digital Vari-Programs) Selecting a Digital Vari-Program automatically optimizes settings to Know the Camera The Mode Dial The D50 offers a choice of the following eleven shooting modes: Advanced Modes (Exposure Modes) Select these modes for full control over...

D50 User's Manual
Page 17
... the lens, press and hold the lensrelease button while turning the lens clockwise. Attaching the Camera Strap Attach the strap as shown below. 7 Remove the rear lens cap from entering the camera when the lens is equipped with the mounting index on the lens aligned with an aperture...Being careful not to prevent dust from the lens. 2 Keeping the mounting index on the camera body, position the lens in the camera's bayonet mount. Aperture Ring If the lens is removed. 1 Turn the camera off when removing or exchanging lenses. Introduction-First Steps First Steps Attaching a Lens Care ...
... the lens, press and hold the lensrelease button while turning the lens clockwise. Attaching the Camera Strap Attach the strap as shown below. 7 Remove the rear lens cap from entering the camera when the lens is equipped with the mounting index on the lens aligned with an aperture...Being careful not to prevent dust from the lens. 2 Keeping the mounting index on the camera body, position the lens in the camera's bayonet mount. Aperture Ring If the lens is removed. 1 Turn the camera off when removing or exchanging lenses. Introduction-First Steps First Steps Attaching a Lens Care ...

D50 User's Manual
Page 19
Removing the Battery Turn the camera off , open the battery chamber cover. 2.2 Insert a fully charged battery as shown at right. Introduction-First Steps 2 Insert the battery 2.1 After confirming that the camera is not in use. 9 Replace the terminal cover when the battery is off before removing the battery. Close the battery chamber cover.
Removing the Battery Turn the camera off , open the battery chamber cover. 2.2 Insert a fully charged battery as shown at right. Introduction-First Steps 2 Insert the battery 2.1 After confirming that the camera is not in use. 9 Replace the terminal cover when the battery is off before removing the battery. Close the battery chamber cover.

D50 User's Manual
Page 20
Introduction-First Steps Basic Setup The first time the camera is turned on, the language selection dialog shown in Step 1 will be displayed in Step 3. Monitor turns off. Follow the steps below to the setup ...
Introduction-First Steps Basic Setup The first time the camera is turned on, the language selection dialog shown in Step 1 will be displayed in Step 3. Monitor turns off. Follow the steps below to the setup ...

D50 User's Manual
Page 21
...Proceed to prevent accidental loss of exposures remaining, the card is ready for about a second. Introduction-First Steps Inserting Memory Cards The camera stores pictures on . Write protect switch 11 The memory card access lamp will display a message to warn that photos can not be...write protect switch to Step 2. Close the memory card slot cover. 1.3 Turn the camera on Secure Digital (SD) memory cards (available separately). 1 Insert a memory card 1.1 Before inserting or removing memory cards, turn the camera off and open the card slot cover. 1.2 Slide the memory card in as ...
...Proceed to prevent accidental loss of exposures remaining, the card is ready for about a second. Introduction-First Steps Inserting Memory Cards The camera stores pictures on . Write protect switch 11 The memory card access lamp will display a message to warn that photos can not be...write protect switch to Step 2. Close the memory card slot cover. 1.3 Turn the camera on Secure Digital (SD) memory cards (available separately). 1 Insert a memory card 1.1 Before inserting or removing memory cards, turn the camera off and open the card slot cover. 1.2 Slide the memory card in as ...

D50 User's Manual
Page 22
Formatting Memory Cards Use the camera Format option to eject (ቢ). Performance may contain. The card can then be removed by hand (ባ). 12 Be sure all photographs and other data ... cards permanently deletes all data you wish to keep have been copied to another storage device before formatting the card. 2.1 2.2 Highlight Yes. Do not turn camera off or remove battery or memory card until formatting is complete. 2.3 Monitor turns off when formatting is off. 2 Turn the...
Formatting Memory Cards Use the camera Format option to eject (ቢ). Performance may contain. The card can then be removed by hand (ባ). 12 Be sure all photographs and other data ... cards permanently deletes all data you wish to keep have been copied to another storage device before formatting the card. 2.1 2.2 Highlight Yes. Do not turn camera off or remove battery or memory card until formatting is complete. 2.3 Monitor turns off when formatting is off. 2 Turn the...


