
Product Manual
Page 3
Once you have mastered the basics of digital photography, you are ready to a television or computer... ...and on connecting your camera as described in "First Steps." Read this manual and the names of the warnings, cautions, and notices on thumbnail playback, ... aware of camera parts, then set up your camera to take photographs and play them back. How to Know the Camera First Steps Basic Photography Basic Playback Choosing a Shooting Mode Image Quality and Size Sensitivity (ISO Equivalency) White Balance Image Adjustment Focus Exposure Flash Photography Self-Timer Mode More About...
Once you have mastered the basics of digital photography, you are ready to a television or computer... ...and on connecting your camera as described in "First Steps." Read this manual and the names of the warnings, cautions, and notices on thumbnail playback, ... aware of camera parts, then set up your camera to take photographs and play them back. How to Know the Camera First Steps Basic Photography Basic Playback Choosing a Shooting Mode Image Quality and Size Sensitivity (ISO Equivalency) White Balance Image Adjustment Focus Exposure Flash Photography Self-Timer Mode More About...
Product Manual
Page 10
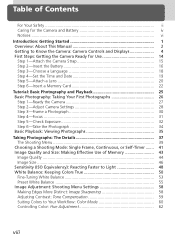
... ...vi Introduction: Getting Started 1 Overview: About This Manual 2 Getting to Know the Camera: Camera Controls and Displays 4 First Steps: Getting the Camera Ready for Use 14 Step 1-Attach the Camera Strap 15 Step 2-Insert the Battery 16 Step 3-Choose a Language 18 Step 4-Set ...Camera 27 Step 2-Adjust Camera Settings 28 Step 3-Frame a Photograph 30 Step 4-Focus 31 Step 5-Check Exposure 32 Step 6-Take the Photograph 34 Basic Playback: Viewing Photographs 35 Taking Photographs: The Details 37 The Shooting Menu 39 Choosing a Shooting Mode: Single Frame, Continuous, or Self-Timer...
... ...vi Introduction: Getting Started 1 Overview: About This Manual 2 Getting to Know the Camera: Camera Controls and Displays 4 First Steps: Getting the Camera Ready for Use 14 Step 1-Attach the Camera Strap 15 Step 2-Insert the Battery 16 Step 3-Choose a Language 18 Step 4-Set ...Camera 27 Step 2-Adjust Camera Settings 28 Step 3-Frame a Photograph 30 Step 4-Focus 31 Step 5-Check Exposure 32 Step 6-Take the Photograph 34 Basic Playback: Viewing Photographs 35 Taking Photographs: The Details 37 The Shooting Menu 39 Choosing a Shooting Mode: Single Frame, Continuous, or Self-Timer...

Product Manual
Page 11
...Camera Sets Exposure 75 Metering ...75 Exposure Mode 76 Autoexposure Lock 84 Exposure Compensation 86 Bracketing ...87 Flash Photography: Using Built-in and Optional Speedlights 94 Flash Sync Modes 96 Using the Built-in Speedlight 98 Flash Exposure Compensation 102 Using an Optional Speedlight 103 Self-Timer...Playback Zoom 118 Protecting Photographs from Deletion 119 Deleting Individual Photographs 120 Menu Guide: Index to Menu Options 121 Using Camera Menus: Basic Menu Operations 122 The Playback Menu: Managing Images 124 Deleting Photographs: Delete 124 Folder Options: Folder ...
...Camera Sets Exposure 75 Metering ...75 Exposure Mode 76 Autoexposure Lock 84 Exposure Compensation 86 Bracketing ...87 Flash Photography: Using Built-in and Optional Speedlights 94 Flash Sync Modes 96 Using the Built-in Speedlight 98 Flash Exposure Compensation 102 Using an Optional Speedlight 103 Self-Timer...Playback Zoom 118 Protecting Photographs from Deletion 119 Deleting Individual Photographs 120 Menu Guide: Index to Menu Options 121 Using Camera Menus: Basic Menu Operations 122 The Playback Menu: Managing Images 124 Deleting Photographs: Delete 124 Folder Options: Folder ...

Product Manual
Page 16
... -field preview button ...... 76 6 AF-assist illuminator 72 Self-timer lamp 108 Red-eye reduction lamp 97 7 Power switch 27 4 8 Release terminal 182 9 Shutter-release button ...... 31-34, 72 10 Exposure compensation ( ) button 86 11 Flash sync mode ( ) button ..... 98 12 LCD illuminator ( ) button (press to familiarize yourself with camera controls and displays.
... -field preview button ...... 76 6 AF-assist illuminator 72 Self-timer lamp 108 Red-eye reduction lamp 97 7 Power switch 27 4 8 Release terminal 182 9 Shutter-release button ...... 31-34, 72 10 Exposure compensation ( ) button 86 11 Flash sync mode ( ) button ..... 98 12 LCD illuminator ( ) button (press to familiarize yourself with camera controls and displays.

Product Manual
Page 38
Tutorial-Basic Photography Basic Photography Taking Your First Photographs There are six basic steps to taking photographs: STEP 1 STEP 2 STEP 3 STEP 4 STEP 5 STEP 6 Ready the Camera 27 To learn more about the battery level display, see: • Introduction: First Steps 16-17 To learn how to restore settings to their default ... about flash photography, see: • Taking Photographs: Flash Photography 94-106 Take the Photograph To learn how to delay shutter release, see: • Taking Photographs: Self-Timer Mode 34 108-109 26
Tutorial-Basic Photography Basic Photography Taking Your First Photographs There are six basic steps to taking photographs: STEP 1 STEP 2 STEP 3 STEP 4 STEP 5 STEP 6 Ready the Camera 27 To learn more about the battery level display, see: • Introduction: First Steps 16-17 To learn how to restore settings to their default ... about flash photography, see: • Taking Photographs: Flash Photography 94-106 Take the Photograph To learn how to delay shutter release, see: • Taking Photographs: Self-Timer Mode 34 108-109 26
Product Manual
Page 49
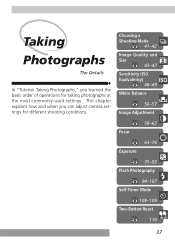
Choosing a Shooting Mode 41-42 Image Quality and Size 43-47 Sensitivity (ISO Equivalency) 48-49 White Balance 50-57 Image Adjustment Focus 58-62 63-74 Exposure 75-93 Flash Photography 94-107 Self-Timer Mode 108-109 Two-Button Reset 110 37 This chapter explains how and when you learned the basic order of operations for different shooting conditions. Taking Photographs The Details In "Tutorial: Taking Photographs," you can adjust camera settings for taking photographs at the most commonly-used settings.
Choosing a Shooting Mode 41-42 Image Quality and Size 43-47 Sensitivity (ISO Equivalency) 48-49 White Balance 50-57 Image Adjustment Focus 58-62 63-74 Exposure 75-93 Flash Photography 94-107 Self-Timer Mode 108-109 Two-Button Reset 110 37 This chapter explains how and when you learned the basic order of operations for different shooting conditions. Taking Photographs The Details In "Tutorial: Taking Photographs," you can adjust camera settings for taking photographs at the most commonly-used settings.

Product Manual
Page 50
... Equivalency White Balance What is my subject, and how will I compose the photograph? ➡ Focus How important is background lighting to delay shutter release? ➡ Self-Timer Mode 41-42 43-47 58-62 48-49 50-57 63-74 75 76-83 86 87-93 94-107 108-109 38
... Equivalency White Balance What is my subject, and how will I compose the photograph? ➡ Focus How important is background lighting to delay shutter release? ➡ Self-Timer Mode 41-42 43-47 58-62 48-49 50-57 63-74 75 76-83 86 87-93 94-107 108-109 38

Product Manual
Page 53
... memory buffer ( 42) fills. Taking Photographs-Choosing a Shooting Mode Choosing a Shooting Mode Single Frame, Continuous, or Self-Timer Your choice of shooting mode determines how the camera takes photographs: one photograph each time the shutter release Single frame button is pressed all the way down . Up to...of images that is pressed. When noise reduction ( 149) is shown in the exposure-count displays in the buffer. Use the self-timer to reduce blurring caused by camera shake or to six frames (four frames in RAW mode) can be stored in the memory buffer at a time, in a...
... memory buffer ( 42) fills. Taking Photographs-Choosing a Shooting Mode Choosing a Shooting Mode Single Frame, Continuous, or Self-Timer Your choice of shooting mode determines how the camera takes photographs: one photograph each time the shutter release Single frame button is pressed all the way down . Up to...of images that is pressed. When noise reduction ( 149) is shown in the exposure-count displays in the buffer. Use the self-timer to reduce blurring caused by camera shake or to six frames (four frames in RAW mode) can be stored in the memory buffer at a time, in a...

Product Manual
Page 99
... shutter is released, each time the shutterrelease button is required to complete the bracketing sequence. Using the Self-Timer If exposure or flash bracketing is used , the camera will be taken each time the shutter is produced each with a different white balance adjustment ( 50...only one photograph is released. NEF (Raw). Taking Photographs-Exposure Controlling How the Camera Sets Exposure Bracketing The D100 offers three types of copies specified in the bracketing program with each shot. 87 If white-balance bracketing is used in self-timer mode, one shot is pressed.
... shutter is released, each time the shutterrelease button is required to complete the bracketing sequence. Using the Self-Timer If exposure or flash bracketing is used , the camera will be taken each time the shutter is produced each with a different white balance adjustment ( 50...only one photograph is released. NEF (Raw). Taking Photographs-Exposure Controlling How the Camera Sets Exposure Bracketing The D100 offers three types of copies specified in the bracketing program with each shot. 87 If white-balance bracketing is used in self-timer mode, one shot is pressed.

Product Manual
Page 120
... to reduce camera shake or for self-portraits. In self-timer mode, a shutter speed of is equivalent to 2 s, 5 s, 10 s (the default setting), or 20 s. 108 In single-servo autofocus ( 63), photographs can only be set to approximately 1/4 s. 8-Self-timer ( 151) Self-timer delay can be used to focus. Taking Photographs-Self-Timer Mode Self-Timer Mode Delaying Shutter Release The self-timer can be...
... to reduce camera shake or for self-portraits. In self-timer mode, a shutter speed of is equivalent to 2 s, 5 s, 10 s (the default setting), or 20 s. 108 In single-servo autofocus ( 63), photographs can only be set to approximately 1/4 s. 8-Self-timer ( 151) Self-timer delay can be used to focus. Taking Photographs-Self-Timer Mode Self-Timer Mode Delaying Shutter Release The self-timer can be...

Product Manual
Page 121
The self-timer lamp (AF-assist illuminator) will prevent light entering via the viewfinder from interfering with your hand before pressing the shutter-release button. Cover the Viewfinder To ensure correct exposure in effect, the camera focuses when the shutter-release button is pressed. Autofocus ...When autofocus is taken. Do not stand in front of the camera when activating the self-timer. This will start the self-timer. To turn the self-timer off before a photograph is taken, turn the mode dial to blink, stopping two seconds before ...
The self-timer lamp (AF-assist illuminator) will prevent light entering via the viewfinder from interfering with your hand before pressing the shutter-release button. Cover the Viewfinder To ensure correct exposure in effect, the camera focuses when the shutter-release button is pressed. Autofocus ...When autofocus is taken. Do not stand in front of the camera when activating the self-timer. This will start the self-timer. To turn the self-timer off before a photograph is taken, turn the mode dial to blink, stopping two seconds before ...

Product Manual
Page 125
... button is on. The focus selector lock switch only takes effect when the monitor is off automatically to the memory card. In single-frame and self-timer modes, photographs are displayed one at any time when the monitor is released after shooting. 6-Monitor Off ( 151) The monitor will be used at a time...
... button is on. The focus selector lock switch only takes effect when the monitor is off automatically to the memory card. In single-frame and self-timer modes, photographs are displayed one at any time when the monitor is released after shooting. 6-Monitor Off ( 151) The monitor will be used at a time...

Product Manual
Page 129
... to shooting mode, press the button or press the shutter-release button halfway. Display menus Press the ( 122). In single-frame and self-timer modes, photographs are taken. The focus selector lock switch only takes effect when the monitor is off automatically to remove protection from the first... button is released after shooting. 6-Monitor Off ( 151) The monitor will be deleted when the memory card is formatted). button to display camera menus Return to shooting mode Shutter release/ To end playback and return to playback mode. 117 To protect an image, or to save power...
... to shooting mode, press the button or press the shutter-release button halfway. Display menus Press the ( 122). In single-frame and self-timer modes, photographs are taken. The focus selector lock switch only takes effect when the monitor is off automatically to remove protection from the first... button is released after shooting. 6-Monitor Off ( 151) The monitor will be deleted when the memory card is formatted). button to display camera menus Return to shooting mode Shutter release/ To end playback and return to playback mode. 117 To protect an image, or to save power...

Product Manual
Page 156
... in effect at the time your camera was purchased. Disable Shutter if no CF Card 147 3 ISO Auto ISO Auto Control 148 4 Long Exp. File Number Sequence 150 6 Monitor Off Monitor Off Delay 151 7 Auto Meter-Off Auto Meter-Off Delay 151 8 Self-timer Self-timer Delay 151 9 EV Step EV...159 25* Batt PK AF Btn Assign Battery Pack AF-ON Button 160 26* Batt PK Volume Adjust Playback Volume 160 * Available only when MB-D100 multi-function battery pack (available separately; 180) is displayed. Option R MENU Reset Reset CSM Menu 145 0 Bank Select Custom Setting Bank 146 ...
... in effect at the time your camera was purchased. Disable Shutter if no CF Card 147 3 ISO Auto ISO Auto Control 148 4 Long Exp. File Number Sequence 150 6 Monitor Off Monitor Off Delay 151 7 Auto Meter-Off Auto Meter-Off Delay 151 8 Self-timer Self-timer Delay 151 9 EV Step EV...159 25* Batt PK AF Btn Assign Battery Pack AF-ON Button 160 26* Batt PK Volume Adjust Playback Volume 160 * Available only when MB-D100 multi-function battery pack (available separately; 180) is displayed. Option R MENU Reset Reset CSM Menu 145 0 Bank Select Custom Setting Bank 146 ...

Product Manual
Page 157
... 26 Batt PK Volume 3 Two-Button Reset Custom settings are unaffected. To re- posite) will be reset; OFF 6 Monitor Off 20 s 7 Auto Meter-Off 6s 8 Self-timer 10 s 9 EV Step 1/3 Step 10 Exposure Comp. [+/-] & CMD Dial 11 BKT Set AE & Flash 12 BKT Order MTR > Under > Over 13 Command Dial Main=S, Sub...
... 26 Batt PK Volume 3 Two-Button Reset Custom settings are unaffected. To re- posite) will be reset; OFF 6 Monitor Off 20 s 7 Auto Meter-Off 6s 8 Self-timer 10 s 9 EV Step 1/3 Step 10 Exposure Comp. [+/-] & CMD Dial 11 BKT Set AE & Flash 12 BKT Order MTR > Under > Over 13 Command Dial Main=S, Sub...

Product Manual
Page 163
...Camera Settings Menu Guide-Custom Settings Custom Setting 6: Monitor Off This option controls whether the monitor stays on , the more often you will need to recharge the battery. The exposure meter can be delayed by approximately two (2 s), five (5 s), ten (10 s), or twenty seconds (20 s). Custom Setting 8: Self-Timer...be set to this setting are performed. Any changes to turn off delay for longer battery life. The default setting is 20 s. CSM MENU F8 Self-timer Delay 2s 5s 10 s OK 20 s CSM MENU F9 EV Steps for ten seconds (10 s), twenty seconds (20 s), one minute (1 ...
...Camera Settings Menu Guide-Custom Settings Custom Setting 6: Monitor Off This option controls whether the monitor stays on , the more often you will need to recharge the battery. The exposure meter can be delayed by approximately two (2 s), five (5 s), ten (10 s), or twenty seconds (20 s). Custom Setting 8: Self-Timer...be set to this setting are performed. Any changes to turn off delay for longer battery life. The default setting is 20 s. CSM MENU F8 Self-timer Delay 2s 5s 10 s OK 20 s CSM MENU F9 EV Steps for ten seconds (10 s), twenty seconds (20 s), one minute (1 ...

Product Manual
Page 208
...approximately 120,000-dot, low temperature polysilicon TFT LCD with brightness adjustment Video output Can be held liable for a camera with one or two rechargeable Nikon EN-EL3 lithium-ion batteries or six LR6 (AA) alkaline or lithium batteries • EH-5 AC adapter (...socket Power source 1/4˝ (ISO) • One rechargeable Nikon EN-EL3 lithium-ion battery • MB-D100 multi-function battery pack (available sep- Nikon will not be selected from any mistakes that this manual may contain. 196 Technical Notes-Specifications Specifications Self-timer Electronically controlled;
...approximately 120,000-dot, low temperature polysilicon TFT LCD with brightness adjustment Video output Can be held liable for a camera with one or two rechargeable Nikon EN-EL3 lithium-ion batteries or six LR6 (AA) alkaline or lithium batteries • EH-5 AC adapter (...socket Power source 1/4˝ (ISO) • One rechargeable Nikon EN-EL3 lithium-ion battery • MB-D100 multi-function battery pack (available sep- Nikon will not be selected from any mistakes that this manual may contain. 196 Technical Notes-Specifications Specifications Self-timer Electronically controlled;

Product Manual
Page 211
..., 94-107. See long time- See white balance, preset Predictive focus tracking, 66 Print Set, 131 Protecting images, 191 R RAW, 44-46. See self-timer Self-timer, 108-109 Sensitivity, 48-49. See autofocus, single-servo; See Date Time exposures. Index J JPEG, 44 L L. See exposure mode, manual; Resolution ... 159 Monitor, v, 135, 185 auto off, 151 cover, 15 Monitor pre-flashes, 95 Multi Sensor Balanced Fill-Flash for Digital SLR, 95 N NEF, 44-46 Nikon Capture 3, 170-171 Nikon View 5, 169 Noise, 83, 149 Noise reduction, 149 NORMAL. See also Image Quality; NEF Red-eye reduction, 96 Resolution,...
..., 94-107. See long time- See white balance, preset Predictive focus tracking, 66 Print Set, 131 Protecting images, 191 R RAW, 44-46. See self-timer Self-timer, 108-109 Sensitivity, 48-49. See autofocus, single-servo; See Date Time exposures. Index J JPEG, 44 L L. See exposure mode, manual; Resolution ... 159 Monitor, v, 135, 185 auto off, 151 cover, 15 Monitor pre-flashes, 95 Multi Sensor Balanced Fill-Flash for Digital SLR, 95 N NEF, 44-46 Nikon Capture 3, 170-171 Nikon View 5, 169 Noise, 83, 149 Noise reduction, 149 NORMAL. See also Image Quality; NEF Red-eye reduction, 96 Resolution,...


