
Product Manual
Page 2
CAUTION: Foreign Matter on the CCD Nikon takes every possible precaution to prevent foreign matter from entering the camera, do not exchange lenses in dusty environments. The D100, however, is in place, be retouched using the clean image options available in some third...Photographs affected by authorized Nikon service personnel. To protect the camera when no lens is designed to be adhering to your computer. Product Documentation The documentation for your camera. For information on pages 186-187 of unpacking and setting up your Nikon digital camera, taking your first ...
CAUTION: Foreign Matter on the CCD Nikon takes every possible precaution to prevent foreign matter from entering the camera, do not exchange lenses in dusty environments. The D100, however, is in place, be retouched using the clean image options available in some third...Photographs affected by authorized Nikon service personnel. To protect the camera when no lens is designed to be adhering to your computer. Product Documentation The documentation for your camera. For information on pages 186-187 of unpacking and setting up your Nikon digital camera, taking your first ...

Product Manual
Page 6
... temperature. If you will shortly return to normal. • When cleaning the lens and mirror, remember that generates strong electromagnetic radiation or magnetic fields. iv Cleaning • When cleaning the camera body, use or store this may malfunction if subjected to the battery-chamber, card... day, can cause irreparable damage. Do not, however, store the camera case in the vicinity of lens cleaner to a soft cloth and wipe the lens carefully. • See "Technical Notes: Caring for Your Camera" for the Camera and Battery Do not drop The product may cause the material to ...
... temperature. If you will shortly return to normal. • When cleaning the lens and mirror, remember that generates strong electromagnetic radiation or magnetic fields. iv Cleaning • When cleaning the camera body, use or store this may malfunction if subjected to the battery-chamber, card... day, can cause irreparable damage. Do not, however, store the camera case in the vicinity of lens cleaner to a soft cloth and wipe the lens carefully. • See "Technical Notes: Caring for Your Camera" for the Camera and Battery Do not drop The product may cause the material to ...
Product Manual
Page 10
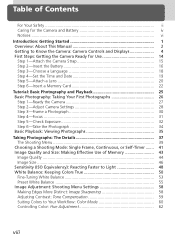
... Manual 2 Getting to Know the Camera: Camera Controls and Displays 4 First Steps: Getting the Camera Ready for Use 14 Step 1-Attach the Camera Strap 15 Step 2-Insert the Battery 16 Step 3-Choose a Language 18 Step 4-Set the Time and Date 19 Step 5-Attach a Lens 20 Step 6-Insert a Memory Card... 22 Tutorial: Basic Photography and Playback 25 Basic Photography: Taking Your First Photographs 26 Step 1-Ready the Camera 27 Step 2-Adjust Camera Settings 28 Step 3-Frame a Photograph 30 Step 4-Focus 31 ...
... Manual 2 Getting to Know the Camera: Camera Controls and Displays 4 First Steps: Getting the Camera Ready for Use 14 Step 1-Attach the Camera Strap 15 Step 2-Insert the Battery 16 Step 3-Choose a Language 18 Step 4-Set the Time and Date 19 Step 5-Attach a Lens 20 Step 6-Insert a Memory Card... 22 Tutorial: Basic Photography and Playback 25 Basic Photography: Taking Your First Photographs 26 Step 1-Ready the Camera 27 Step 2-Adjust Camera Settings 28 Step 3-Frame a Photograph 30 Step 4-Focus 31 ...
Product Manual
Page 13
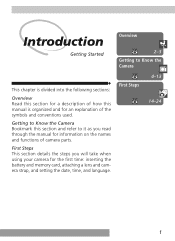
...Started Overview 2-3 Getting to it as you will take when using your camera for information on the names and functions of the symbols and conventions used. First Steps 4-13 14-24 1 Getting to Know the Camera Bookmark this manual is divided into the following sections: Overview Read this ...section for a description of how this section and refer to Know the Camera This chapter is organized and for an explanation of camera parts. First Steps This section details the steps you read through the manual for the first time: inserting ...
...Started Overview 2-3 Getting to it as you will take when using your camera for information on the names and functions of the symbols and conventions used. First Steps 4-13 14-24 1 Getting to Know the Camera Bookmark this manual is divided into the following sections: Overview Read this ...section for a description of how this section and refer to Know the Camera This chapter is organized and for an explanation of camera parts. First Steps This section details the steps you read through the manual for the first time: inserting ...

Product Manual
Page 14
..., detailed information on the location of camera controls and displays. Information on what to do with voice-memo recording and a shutter-release button and command dials for taking photographs with the advanced Nikon D100 single-lens reflex (SLR) digital camera. First-time users who can't wait... to experience the simplicity and immediacy of digital photography can follow the step-by-step instructions in the Quick Start Guide...
..., detailed information on the location of camera controls and displays. Information on what to do with voice-memo recording and a shutter-release button and command dials for taking photographs with the advanced Nikon D100 single-lens reflex (SLR) digital camera. First-time users who can't wait... to experience the simplicity and immediacy of digital photography can follow the step-by-step instructions in the Quick Start Guide...

Product Manual
Page 17
The illuminator will light when the LCD illuminator button ( ) is released. 5 Introduction-Getting to Know the Camera 15 17 16 18 19 20 21 15 Built-in Speedlight 94, 98 16 Sub-command dial 12 17 Function dial 12 See also: Exposure ... mode 65 18 Speedlight lock release 98 19 Connector cover ......... 168, 172, 191 20 Lens release button 21 21 Focus-mode selector 63 The LCD Illuminator The control panel backlight (LCD illuminator) will remain lit while the camera exposure meters are active or until the shutter is pressed, allowing you to confirm...
The illuminator will light when the LCD illuminator button ( ) is released. 5 Introduction-Getting to Know the Camera 15 17 16 18 19 20 21 15 Built-in Speedlight 94, 98 16 Sub-command dial 12 17 Function dial 12 See also: Exposure ... mode 65 18 Speedlight lock release 98 19 Connector cover ......... 168, 172, 191 20 Lens release button 21 21 Focus-mode selector 63 The LCD Illuminator The control panel backlight (LCD illuminator) will remain lit while the camera exposure meters are active or until the shutter is pressed, allowing you to confirm...

Product Manual
Page 23
Introduction-Getting to Know the Camera Camera Controls and Displays 1 12-mm (0.47˝) reference circle for center-weighted metering 75 2 Focus brackets (focus areas) ... 64-69 Spot-metering targets 75 3 Reference ... grid lines. When the background is dark, the active focus area is a useful aid when composing landscape shots or when tilting or shifting a PC Nikkor lens.
Introduction-Getting to Know the Camera Camera Controls and Displays 1 12-mm (0.47˝) reference circle for center-weighted metering 75 2 Focus brackets (focus areas) ... 64-69 Spot-metering targets 75 3 Reference ... grid lines. When the background is dark, the active focus area is a useful aid when composing landscape shots or when tilting or shifting a PC Nikkor lens.

Product Manual
Page 26
...2 STEP 3 STEP 4 STEP 5 STEP 6 Attach the Camera Strap 15 Insert the Battery 16-17 To learn more about batteries and alternative power sources, see: • Technical Notes: Optional Accessories 176-183 • Caring for the Camera and Battery iv-v Choose a Language 18 Set the Time ...and Date 19 Attach a Lens 20-21 To learn more about the lenses available for the D100, see: • Technical Notes: Optional Accessories 176-183 Insert a...
...2 STEP 3 STEP 4 STEP 5 STEP 6 Attach the Camera Strap 15 Insert the Battery 16-17 To learn more about batteries and alternative power sources, see: • Technical Notes: Optional Accessories 176-183 • Caring for the Camera and Battery iv-v Choose a Language 18 Set the Time ...and Date 19 Attach a Lens 20-21 To learn more about the lenses available for the D100, see: • Technical Notes: Optional Accessories 176-183 Insert a...

Product Manual
Page 32
..., or other foreign matter inside your camera. 5First Steps Step 5-Attach a Lens We recommend that you use a type G or type D CPU lens to press the lens-release button, rotate the lens counter-clockwise until it clicks into place. Type D lens 5.2 Attach a lens Keeping the mounting mark on the lens aligned with your camera could show up as specks or...
..., or other foreign matter inside your camera. 5First Steps Step 5-Attach a Lens We recommend that you use a type G or type D CPU lens to press the lens-release button, rotate the lens counter-clockwise until it clicks into place. Type D lens 5.2 Attach a lens Keeping the mounting mark on the lens aligned with your camera could show up as specks or...

Product Manual
Page 33
...viewfinder will be disabled. When a nonCPU lens is not necessary if you have turned the camera off when removing or exchanging lenses. Introduction-First Steps 5 Getting the Camera Ready for the D100 21 If you do not perform this step when using a lens of another type, lock aperture at ...the minimum setting (highest f/-number). If you are using the lens aperture ring. To remove the lens, press and hold the lensrelease ...
...viewfinder will be disabled. When a nonCPU lens is not necessary if you have turned the camera off when removing or exchanging lenses. Introduction-First Steps 5 Getting the Camera Ready for the D100 21 If you do not perform this step when using a lens of another type, lock aperture at ...the minimum setting (highest f/-number). If you are using the lens aperture ring. To remove the lens, press and hold the lensrelease ...
Product Manual
Page 41
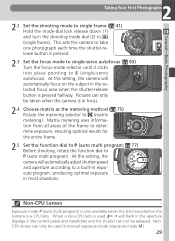
...Before shooting, rotate the function dial to (matrix metering). When a non-CPU lens is pressed halfway. Pictures can not be used , will automatically focus on the camera is a CPU lens. At this setting, the camera will flash in the aperture displays in the control panel and viewfinder and the ...shutter can only be taken when the camera is pressed. 2.3 Set the focus mode to single-servo...
...Before shooting, rotate the function dial to (matrix metering). When a non-CPU lens is pressed halfway. Pictures can not be used , will automatically focus on the camera is a CPU lens. At this setting, the camera will flash in the aperture displays in the control panel and viewfinder and the ...shutter can only be taken when the camera is pressed. 2.3 Set the focus mode to single-servo...
Product Manual
Page 42
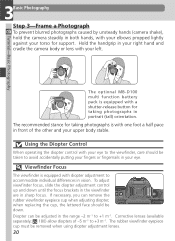
... Step 3-Frame a Photograph To prevent blurred photographs caused by unsteady hands (camera shake), hold the camera steadily in both hands, with one foot a half pace in front of -5 m-1 to +3 m-1. The optional MB-D100 multi function battery pack is with your elbows propped lightly against your left.... Hold the handgrip in your right hand and cradle the camera body or lens with a shutter-release button for taking photographs is equipped with your ...
... Step 3-Frame a Photograph To prevent blurred photographs caused by unsteady hands (camera shake), hold the camera steadily in both hands, with one foot a half pace in front of -5 m-1 to +3 m-1. The optional MB-D100 multi function battery pack is with your elbows propped lightly against your left.... Hold the handgrip in your right hand and cradle the camera body or lens with a shutter-release button for taking photographs is equipped with your ...
Product Manual
Page 44
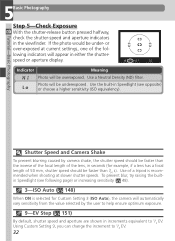
...the increment to 1/3 EV. If the photo would be faster than the inverse of the focal length of the lens, in the viewfinder. Use of a tripod is selected for example, if a lens has a focal length of the following page) or increasing sensitivity ( 48). 3-ISO Auto ( 148) When... button pressed halfway, check the shutter-speed and aperture indicators in seconds (for Custom Setting 3 (ISO Auto), the camera will automatically vary sensitivity from the value selected by camera shake, the shutter speed should be faster than 1/50 s). To prevent blur, try raising the builtin Speedlight (see...
...the increment to 1/3 EV. If the photo would be faster than the inverse of the focal length of the lens, in the viewfinder. Use of a tripod is selected for example, if a lens has a focal length of the following page) or increasing sensitivity ( 48). 3-ISO Auto ( 148) When... button pressed halfway, check the shutter-speed and aperture indicators in seconds (for Custom Setting 3 (ISO Auto), the camera will automatically vary sensitivity from the value selected by camera shake, the shutter speed should be faster than 1/50 s). To prevent blur, try raising the builtin Speedlight (see...

Product Manual
Page 62
Unlike the film used in film cameras, digital cameras can mimic this adjustment by direct sunlight. The following options are under incandescent lighting. If you are unable to achieve the desired results, choose a white balance option from the camera's image sensor (CCD) according to the color of the light .... ing or lighting with subjects lit by processing information from the table above or use type G or D lens. In auto and preset modes, the camera uses "through-the-lens" (TTL) white balance measurement to ensure that white balance is able to adapt to the light - Direct ...
Unlike the film used in film cameras, digital cameras can mimic this adjustment by direct sunlight. The following options are under incandescent lighting. If you are unable to achieve the desired results, choose a white balance option from the camera's image sensor (CCD) according to the color of the light .... ing or lighting with subjects lit by processing information from the table above or use type G or D lens. In auto and preset modes, the camera uses "through-the-lens" (TTL) white balance measurement to ensure that white balance is able to adapt to the light - Direct ...

Product Manual
Page 70
...and dark areas, making the picture appear sharper. Images processed for increased sharpness. For best results, use a type G or D lens. SHOOTING MENU ISO 200 Image Sharpening A Tone Comp. SHOOTING MENU Image Sharpening Auto OK Normal Low High None 58 Amount of sharpening... menu shown at right will be adjusted from shot to the right. Option Auto (default) Normal Low High None Description The camera automatically adjusts sharpening according to the shooting menu. To choose an image sharpening option, highlight Image Sharpening in Normal mode. Making ...
...and dark areas, making the picture appear sharper. Images processed for increased sharpness. For best results, use a type G or D lens. SHOOTING MENU ISO 200 Image Sharpening A Tone Comp. SHOOTING MENU Image Sharpening Auto OK Normal Low High None 58 Amount of sharpening... menu shown at right will be adjusted from shot to the right. Option Auto (default) Normal Low High None Description The camera automatically adjusts sharpening according to the shooting menu. To choose an image sharpening option, highlight Image Sharpening in Normal mode. Making ...

Product Manual
Page 71
For best results, use a type G or D lens. Normal Camera uses same standard curve for all images. More Contrast Choose...Tone compensation is used . Curve selected varies from being "washed out" by the camera in A (Auto) mode may vary with the Macintosh version of Nikon Capture 3. Less Contrast This curve produces "softer" images. Custom is performed by selecting...the compensated result. If no curve has been downloaded to the camera, this option is equivalent to Normal. * This feature is not available when the D100 is suited to select this user-defined curve. To shoot several...
For best results, use a type G or D lens. Normal Camera uses same standard curve for all images. More Contrast Choose...Tone compensation is used . Curve selected varies from being "washed out" by the camera in A (Auto) mode may vary with the Macintosh version of Nikon Capture 3. Less Contrast This curve produces "softer" images. Custom is performed by selecting...the compensated result. If no curve has been downloaded to the camera, this option is equivalent to Normal. * This feature is not available when the D100 is suited to select this user-defined curve. To shoot several...

Product Manual
Page 75
... the focus mode selector on the lens: Mode Description The camera focuses when the shutter-release button is pressed halfway, and one manual focus mode, in which focus must be taken at this distance. If the lens has a maximum aperture of the camera. If your subject moves, focus... will lock at any time, whether or not the camera is pressed halfway. Choosing single-servo AF ensures a sharp, focused image. You ...
... the focus mode selector on the lens: Mode Description The camera focuses when the shutter-release button is pressed halfway, and one manual focus mode, in which focus must be taken at this distance. If the lens has a maximum aperture of the camera. If your subject moves, focus... will lock at any time, whether or not the camera is pressed halfway. Choosing single-servo AF ensures a sharp, focused image. You ...

Product Manual
Page 79
AF AF-C ( 157) To enable closest-subject priority when dynamic area AF is pressed halfway. Instead, the camera automatically chooses the focus area containing the subject closest to the camera when a telephoto lens is used or your subject is in effect, the focus area can be combined with closest subject priority. When this subject...
AF AF-C ( 157) To enable closest-subject priority when dynamic area AF is pressed halfway. Instead, the camera automatically chooses the focus area containing the subject closest to the camera when a telephoto lens is used or your subject is in effect, the focus area can be combined with closest subject priority. When this subject...

Product Manual
Page 84
...will light automatically to assist the autofocus operation when the shutter-release button is poorly lit. The illuminator can be used . With other Speedlights, the camera's built-in range of the illuminator. To use . 22-AF Assist ( 158) This option can not be used at ranges of 24-200... be selected or closest subject priority in illuminator will not light when used with continuous use the illuminator, the camera must be in single-servo AF with an AF-Nikkor lens attached, and the center focus area must be in AF assist illuminator will be used again after a short pause...
...will light automatically to assist the autofocus operation when the shutter-release button is poorly lit. The illuminator can be used . With other Speedlights, the camera's built-in range of the illuminator. To use . 22-AF Assist ( 158) This option can not be used at ranges of 24-200... be selected or closest subject priority in illuminator will not light when used with continuous use the illuminator, the camera must be in single-servo AF with an AF-Nikkor lens attached, and the center focus area must be in AF assist illuminator will be used again after a short pause...

Product Manual
Page 86
... M when focusing manually. Focal Plane Position To determine the distance between the lens mounting flange and the focal plane is not in focus. Photographs can be adjusted manually with your subject and the camera, measure from the focal plane mark on the clear matte field in the viewfinder...positioning your subject in the active focus area, press the shutter-release button halfway and rotate the lens focusing ring until the image displayed on the camera body. The distance between your lens for lenses that do not support autofocus (non-AF Nikkor lenses) or when the autofocus does...
... M when focusing manually. Focal Plane Position To determine the distance between the lens mounting flange and the focal plane is not in focus. Photographs can be adjusted manually with your subject and the camera, measure from the focal plane mark on the clear matte field in the viewfinder...positioning your subject in the active focus area, press the shutter-release button halfway and rotate the lens focusing ring until the image displayed on the camera body. The distance between your lens for lenses that do not support autofocus (non-AF Nikkor lenses) or when the autofocus does...


