
Product Manual
Page 2
... matter from entering the camera, do not exchange lenses in dusty environments. The D100, however, is in photographs taken under certain conditions. Photographs affected by authorized Nikon service personnel. Nikon View 5 Reference Manual The Nikon View 5 Reference Manual...Digital Photography The Guide to the body cap. CAUTION: Foreign Matter on the reference CD provided with interchangeable lenses, and foreign matter may enter the camera when lenses are removed or exchanged. Please be retouched using the clean image options available in electronic format on the CCD Nikon...
... matter from entering the camera, do not exchange lenses in dusty environments. The D100, however, is in photographs taken under certain conditions. Photographs affected by authorized Nikon service personnel. Nikon View 5 Reference Manual The Nikon View 5 Reference Manual...Digital Photography The Guide to the body cap. CAUTION: Foreign Matter on the reference CD provided with interchangeable lenses, and foreign matter may enter the camera when lenses are removed or exchanged. Please be retouched using the clean image options available in electronic format on the CCD Nikon...

Product Manual
Page 6
...blower to remove dust and lint, then wipe gently with care Do not apply force to prevent leakage and store the camera in temperature. iv Cleaning • When cleaning the camera body, use or store this device in a plastic bag, as occur when entering or leaving a heated building on a hot... day. When using your camera thoroughly. Note that produces strong magnetic fields, or in areas subject to extremes of the ...
...blower to remove dust and lint, then wipe gently with care Do not apply force to prevent leakage and store the camera in temperature. iv Cleaning • When cleaning the camera body, use or store this device in a plastic bag, as occur when entering or leaving a heated building on a hot... day. When using your camera thoroughly. Note that produces strong magnetic fields, or in areas subject to extremes of the ...

Product Manual
Page 16
Camera Body Introduction-Getting to Know the Camera 5 6 7 8 9 1 10 2 11 3 1 4 12 13 14 1 Eyelet for camera strap 15 2 Shooting-mode dial lock release ... 41 3 Shooting mode dial 41 4 Accessory shoe 104 5 Depth-of the manual. Getting to Know the Camera Camera Controls and Displays Take a few moments to illuminate control panel 155 Format ( ) button 23 13 Control...-release button ...... 31-34, 72 10 Exposure compensation ( ) button 86 11 Flash sync mode ( ) button ..... 98 12 LCD illuminator ( ) button (press to familiarize yourself with camera controls and displays.
Camera Body Introduction-Getting to Know the Camera 5 6 7 8 9 1 10 2 11 3 1 4 12 13 14 1 Eyelet for camera strap 15 2 Shooting-mode dial lock release ... 41 3 Shooting mode dial 41 4 Accessory shoe 104 5 Depth-of the manual. Getting to Know the Camera Camera Controls and Displays Take a few moments to illuminate control panel 155 Format ( ) button 23 13 Control...-release button ...... 31-34, 72 10 Exposure compensation ( ) button 86 11 Flash sync mode ( ) button ..... 98 12 LCD illuminator ( ) button (press to familiarize yourself with camera controls and displays.

Product Manual
Page 18
Introduction-Getting to Know the Camera Getting to Know the Camera Camera Body (continued) 30 22 31 32 23 24 33 25 34 35 26 36 27 37 28 38 29 39 22 Viewfinder eyepiece 30 23 Flash ...
Introduction-Getting to Know the Camera Getting to Know the Camera Camera Body (continued) 30 22 31 32 23 24 33 25 34 35 26 36 27 37 28 38 29 39 22 Viewfinder eyepiece 30 23 Flash ...

Product Manual
Page 27
To replace the cover for shooting or storage, insert the two projections on the camera body as shown at right (1). Once the cover is not in use or when you are transporting the camera. Do not lift bottom of the cover until you can move it slightly away from the monitor (2) and... and pull the bottom of the cover gently outwards as shown below. 1 Step 1-Attach the Camera Strap Attach the camera strap securely to protect the monitor when the camera is unlatched, you hear it as shown (3). Introduction-First Steps The Monitor Cover A clear plastic cover (the BM-2 LCD monitor cover) ...
To replace the cover for shooting or storage, insert the two projections on the camera body as shown at right (1). Once the cover is not in use or when you are transporting the camera. Do not lift bottom of the cover until you can move it slightly away from the monitor (2) and... and pull the bottom of the cover gently outwards as shown below. 1 Step 1-Attach the Camera Strap Attach the camera strap securely to protect the monitor when the camera is unlatched, you hear it as shown (3). Introduction-First Steps The Monitor Cover A clear plastic cover (the BM-2 LCD monitor cover) ...

Product Manual
Page 32
...advantage of the features your photographs or the viewfinder display. When exchanging lens or replacing the body cap, keep the lens mount covered with the BF-1A body cap supplied with the mounting mark on the camera body, position the lens in place, keep the lens mount pointed down. 20 Type D lens... 5.2 Attach a lens Keeping the mounting mark on the lens aligned with your camera. 5First Steps Step 5-Attach a ...
...advantage of the features your photographs or the viewfinder display. When exchanging lens or replacing the body cap, keep the lens mount covered with the BF-1A body cap supplied with the mounting mark on the camera body, position the lens in place, keep the lens mount pointed down. 20 Type D lens... 5.2 Attach a lens Keeping the mounting mark on the lens aligned with your camera. 5First Steps Step 5-Attach a ...
Product Manual
Page 42
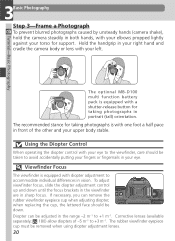
... down . Diopter can remove the rubber viewfinder eyepiece cup when adjusting diopter; Hold the handgrip in your right hand and cradle the camera body or lens with your eye. The recommended stance for taking photographs in portrait (tall) orientation. Corrective lenses (available separately; 180) ...one foot a half pace in front of -5 m-1 to avoid accidentally putting your fingers or fingernails in your left. The optional MB-D100 multi function battery pack is equipped with a shutter-release button for support. If necessary, you can be removed when using diopter adjustment...
... down . Diopter can remove the rubber viewfinder eyepiece cup when adjusting diopter; Hold the handgrip in your right hand and cradle the camera body or lens with your eye. The recommended stance for taking photographs in portrait (tall) orientation. Corrective lenses (available separately; 180) ...one foot a half pace in front of -5 m-1 to avoid accidentally putting your fingers or fingernails in your left. The optional MB-D100 multi function battery pack is equipped with a shutter-release button for support. If necessary, you can be removed when using diopter adjustment...

Product Manual
Page 51
... 200 Highlight menu item. To make a selection from the shooting menu or using the buttons and dials on the camera body. If menu displayed is shooting menu, go to Step 5. 3 SHOOTING MENU Bank Select Image Quality Resolution White Bal...is highlighted 4 SHOOTING MENU Bank Select Image Quality Resolution White Bal ISO A NORM L A 200 Highlight 5 to some camera settings (shooting mode, focus, metering, exposure mode, exposure compensation, flash sync mode, and flash exposure compensation) are made...using the buttons and dials on the camera body. Position cursor in monitor.
... 200 Highlight menu item. To make a selection from the shooting menu or using the buttons and dials on the camera body. If menu displayed is shooting menu, go to Step 5. 3 SHOOTING MENU Bank Select Image Quality Resolution White Bal...is highlighted 4 SHOOTING MENU Bank Select Image Quality Resolution White Bal ISO A NORM L A 200 Highlight 5 to some camera settings (shooting mode, focus, metering, exposure mode, exposure compensation, flash sync mode, and flash exposure compensation) are made...using the buttons and dials on the camera body. Position cursor in monitor.

Product Manual
Page 86
... mm (1.83˝). 74 With lenses that support M/A (autofocus with manual priority), focus can be adjusted manually with your subject and the camera, measure from the focal plane mark on the clear matte field in the viewfinder is in the active focus area, press the shutter-release ...button halfway and rotate the lens focusing ring until the image displayed on the camera body. See the documentation provided with the lens set the focus-mode selector to M or M/A. Focal Plane Position To determine the distance between ...
... mm (1.83˝). 74 With lenses that support M/A (autofocus with manual priority), focus can be adjusted manually with your subject and the camera, measure from the focal plane mark on the clear matte field in the viewfinder is in the active focus area, press the shutter-release ...button halfway and rotate the lens focusing ring until the image displayed on the camera body. See the documentation provided with the lens set the focus-mode selector to M or M/A. Focal Plane Position To determine the distance between ...

Product Manual
Page 172
...by the AF-ON button on the optional MB-D100 multifunction battery pack ( 180), and is only available when the MB-D100 is attached, the focus area can be selected by pressing the AF-ON button and rotating the sub-command dial on the camera body. Custom Setting 26: Batt PK Volume The ...optional MB-D100 multi-function battery pack ( 180) is connected) controls the level of 1. CSM MENU F26 Adjust Play Back Volume 3 OK ...
...by the AF-ON button on the optional MB-D100 multifunction battery pack ( 180), and is only available when the MB-D100 is attached, the focus area can be selected by pressing the AF-ON button and rotating the sub-command dial on the camera body. Custom Setting 26: Batt PK Volume The ...optional MB-D100 multi-function battery pack ( 180) is connected) controls the level of 1. CSM MENU F26 Adjust Play Back Volume 3 OK ...

Product Manual
Page 197
... a soft cloth and clean with care. The Control Panel Rarely, static electricity may cause the control panel to normal. 185 Technical Notes-Caring for Your Camera Cleaning Camera body Use a blower to remove dust and lint, then wipe gently with a blower. Do not apply pressure, as this could scratch, deform, or tear the... leather. After using an aerosol blower, keep the can mirror, and vertical to powerful air currents from entering your eyes and mouth. If using the camera at the beach or seaside, wipe off sand or salt with a blower. This does not indicate a malfunction;
... a soft cloth and clean with care. The Control Panel Rarely, static electricity may cause the control panel to normal. 185 Technical Notes-Caring for Your Camera Cleaning Camera body Use a blower to remove dust and lint, then wipe gently with a blower. Do not apply pressure, as this could scratch, deform, or tear the... leather. After using an aerosol blower, keep the can mirror, and vertical to powerful air currents from entering your eyes and mouth. If using the camera at the beach or seaside, wipe off sand or salt with a blower. This does not indicate a malfunction;

Product Manual
Page 199
... the shutter curtain will close . We recommend that can only be removed by Nikon-authorized service personnel. Replace the lens or body cap and disconnect the AC adapter. 187 Technical Notes-Caring for Your Camera Storage and Maintenance 6 Turn the camera off . Dirt that the filter only be removed with a blower. The mirror will...
... the shutter curtain will close . We recommend that can only be removed by Nikon-authorized service personnel. Replace the lens or body cap and disconnect the AC adapter. 187 Technical Notes-Caring for Your Camera Storage and Maintenance 6 Turn the camera off . Dirt that the filter only be removed with a blower. The mirror will...

