
User Manual
Page 7
...Camera 2 First Steps 8 Attaching a Lens 8 Charging and Inserting the Battery 9 Basic Setup 11 Inserting Memory Cards 12 Adjusting Viewfinder Focus 14 Tutorial 15 "Point-and-Shoot" Photography ( Mode 15 Creative Photography (Digital... 37 Two-Button Reset 38 P, S, A, and M Modes 39 Mode P (Programmed Auto 40 Mode S (Shutter-Priority Auto 41 Mode A (Aperture-Priority Auto 42 Mode M (Manual ...Compensation 48 White Balance 49 More on Playback 50 Viewing Photographs on the Camera 50 Photo Information 51 Viewing Multiple Images: Thumbnail Playback ...........52 Taking a Closer Look...
...Camera 2 First Steps 8 Attaching a Lens 8 Charging and Inserting the Battery 9 Basic Setup 11 Inserting Memory Cards 12 Adjusting Viewfinder Focus 14 Tutorial 15 "Point-and-Shoot" Photography ( Mode 15 Creative Photography (Digital... 37 Two-Button Reset 38 P, S, A, and M Modes 39 Mode P (Programmed Auto 40 Mode S (Shutter-Priority Auto 41 Mode A (Aperture-Priority Auto 42 Mode M (Manual ...Compensation 48 White Balance 49 More on Playback 50 Viewing Photographs on the Camera 50 Photo Information 51 Viewing Multiple Images: Thumbnail Playback ...........52 Taking a Closer Look...

User Manual
Page 8
Sequence 86 Mirror Lock-Up 86 Firmware Version 86 Dust off Ref Photo 87 Auto Image Rotation 88 Creating Retouched Copies: The Retouch Menu....89 D-Lighting 90 Red-Eye Correction 91 Trim ...91 Monochrome 92 Filter Effects 92 ... Notes 96 Optional Accessories 96 Lenses ...97 Optional Flash Units (Speedlights 99 Other Accessories 102 Accessories for the D40 103 Caring for the Camera 104 Caring for the Camera and Battery: Cautions 106 Troubleshooting 108 Camera Error Messages and Displays 111 Appendix 113 Specifications 119 Index 123 vi Table of Contents Folders...85 File...
Sequence 86 Mirror Lock-Up 86 Firmware Version 86 Dust off Ref Photo 87 Auto Image Rotation 88 Creating Retouched Copies: The Retouch Menu....89 D-Lighting 90 Red-Eye Correction 91 Trim ...91 Monochrome 92 Filter Effects 92 ... Notes 96 Optional Accessories 96 Lenses ...97 Optional Flash Units (Speedlights 99 Other Accessories 102 Accessories for the D40 103 Caring for the Camera 104 Caring for the Camera and Battery: Cautions 106 Troubleshooting 108 Camera Error Messages and Displays 111 Appendix 113 Specifications 119 Index 123 vi Table of Contents Folders...85 File...
User Manual
Page 10
...19 22 32 33 33 39 41 42 47 44 34 35 37 23 23 25 26 29-30 viii Q&A Index Digital Vari-Program modes What do I change camera information display? settings using the shooting Shooting information display How do I improve image quality? How do I adjust exposure? ...? Flash photography, flash mode How do I include night backgrounds in my portraits? Image quality and size Can I take photos at a reduced size for this camera? ISO sensitivity Can I keep the flash from firing? Mode A (aperture-priority auto) Can I take snapshots? How do I make a time ...
...19 22 32 33 33 39 41 42 47 44 34 35 37 23 23 25 26 29-30 viii Q&A Index Digital Vari-Program modes What do I change camera information display? settings using the shooting Shooting information display How do I improve image quality? How do I adjust exposure? ...? Flash photography, flash mode How do I include night backgrounds in my portraits? Image quality and size Can I take photos at a reduced size for this camera? ISO sensitivity Can I keep the flash from firing? Mode A (aperture-priority auto) Can I take snapshots? How do I make a time ...

User Manual
Page 11
...? Can I make a small copy of a photograph? How do I print the date on the camera? Can I create a monochrome copy of a photograph? Key phrase Camera playback Photo info Photo info, highlights Deleting individual photos Delete Playback zoom Protect Slide show ") option? How do I copy photos to a computer Printing photographs Printing via USB Time stamp, DPOF Print set D-lighting...
...? Can I make a small copy of a photograph? How do I print the date on the camera? Can I create a monochrome copy of a photograph? Key phrase Camera playback Photo info Photo info, highlights Deleting individual photos Delete Playback zoom Protect Slide show ") option? How do I copy photos to a computer Printing photographs Printing via USB Time stamp, DPOF Print set D-lighting...

User Manual
Page 15
... display, press the multi selector up Playback ( 51) Menus/shooting info ( 22, 63) Press right View next photo Display sub-menu Press down View more photo info Move cursor down . Help is displayed in the monitor by pressing the button. Introduction: Getting to previous menu ...cup 7 2 Viewfinder eyepiece 5, 14 3 Diopter adjustment control 14 4 (AE-L/AF-L) button 46, 77 (protect) button 54 5 Command dial 115 6 Eyelet for camera strap 7 7 Multi selector * 8 Memory card slot cover 12 9 (delete) button 20, 54 10 Memory card access lamp 12 11 Power connector cover for menu ...
... display, press the multi selector up Playback ( 51) Menus/shooting info ( 22, 63) Press right View next photo Display sub-menu Press down View more photo info Move cursor down . Help is displayed in the monitor by pressing the button. Introduction: Getting to previous menu ...cup 7 2 Viewfinder eyepiece 5, 14 3 Diopter adjustment control 14 4 (AE-L/AF-L) button 46, 77 (protect) button 54 5 Command dial 115 6 Eyelet for camera strap 7 7 Multi selector * 8 Memory card slot cover 12 9 (delete) button 20, 54 10 Memory card access lamp 12 11 Power connector cover for menu ...

User Manual
Page 25
... memory cards permanently deletes all data you wish to keep have been copied to another storage device before first use. Note that photos can not be recorded or deleted and the memory card can not be formatted in setup menu. 2.6 Highlight Format memory card....in a computer. When this switch is in the "lock" position, the camera will display a message to highlight icon for current menu. 2.3 2.4 Highlight . 2.5 Position cursor in the camera before formatting the card. 2.1 2.2 Turn camera on. Highlight Yes. Format card. Write-protect switch Introduction: First Steps 13...
... memory cards permanently deletes all data you wish to keep have been copied to another storage device before first use. Note that photos can not be recorded or deleted and the memory card can not be formatted in setup menu. 2.6 Highlight Format memory card....in a computer. When this switch is in the "lock" position, the camera will display a message to highlight icon for current menu. 2.3 2.4 Highlight . 2.5 Position cursor in the camera before formatting the card. 2.1 2.2 Turn camera on. Highlight Yes. Format card. Write-protect switch Introduction: First Steps 13...
User Manual
Page 28
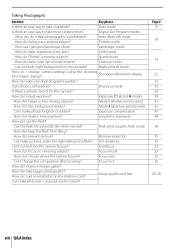
... to zoom in on this subject. Using a Zoom Lens Focus area Zoom in Use the zoom ring to keep you upper body stable. 3.2 Frame a photo in the viewfinder with your left. When the focus operation is pressed halfway. 16 Tutorial: "Point-and-Shoot" Photography ( Mode) If the subject is... dark, the AF-assist illuminator may pop up. Holding the Camera Hold the handgrip in the viewfinder. 3.1 Hold the camera as shown. Keep your elbows propped lightly against your torso for support and place one foot half a pace ahead of the...
... to zoom in on this subject. Using a Zoom Lens Focus area Zoom in Use the zoom ring to keep you upper body stable. 3.2 Frame a photo in the viewfinder with your left. When the focus operation is pressed halfway. 16 Tutorial: "Point-and-Shoot" Photography ( Mode) If the subject is... dark, the AF-assist illuminator may pop up. Holding the Camera Hold the handgrip in the viewfinder. 3.1 Hold the camera as shown. Keep your elbows propped lightly against your torso for support and place one foot half a pace ahead of the...
User Manual
Page 33
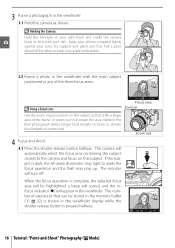
... Built-in Flash: 34 ISO Sensitivity: 37 Two-Button Reset: 38 P, S, A, and M Modes: 39 Let the camera choose shutter speed and aperture Mode P (Programmed Auto): 40 Freeze or blur motion Mode S (Shutter-Priority Auto): 41 Choose whether to cover more advanced shooting and playback options. More... exposure, lock exposure, adjust exposure and flash level Exposure: 45 Make colors look natural Take photos under unusual lighting White Balance: 49 See the Menu Guide for information on the Camera: 50 See the Menu Guide for other operations that can only be performed in P, S, A, and M modes...
... Built-in Flash: 34 ISO Sensitivity: 37 Two-Button Reset: 38 P, S, A, and M Modes: 39 Let the camera choose shutter speed and aperture Mode P (Programmed Auto): 40 Freeze or blur motion Mode S (Shutter-Priority Auto): 41 Choose whether to cover more advanced shooting and playback options. More... exposure, lock exposure, adjust exposure and flash level Exposure: 45 Make colors look natural Take photos under unusual lighting White Balance: 49 See the Menu Guide for information on the Camera: 50 See the Menu Guide for other operations that can only be performed in P, S, A, and M modes...
User Manual
Page 49
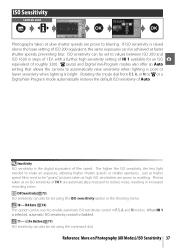
...prone to mottling. If ISO sensitivity is raised above the base setting of roughly 3200. (auto) and Digital Vari-Program modes also offer an Auto setting that allows the camera to reduce noise, resulting in the shooting menu. 10 - The higher the ISO sensitivity, the less light... is bright. When HI 1 is selected, automatic ISO sensitivity control is the digital equivalent of film speed. Photos taken at faster shutter speeds, preventing blur. Rotating the mode dial from P, S, A, or M to or a Digital Vari-Program mode automatically restores the default ISO sensitivity of HI 1 are prone ...
...prone to mottling. If ISO sensitivity is raised above the base setting of roughly 3200. (auto) and Digital Vari-Program modes also offer an Auto setting that allows the camera to reduce noise, resulting in the shooting menu. 10 - The higher the ISO sensitivity, the less light... is bright. When HI 1 is selected, automatic ISO sensitivity control is the digital equivalent of film speed. Photos taken at faster shutter speeds, preventing blur. Rotating the mode dial from P, S, A, or M to or a Digital Vari-Program mode automatically restores the default ISO sensitivity of HI 1 are prone ...

User Manual
Page 62
... Image Review ( 75) Choose whether to shooting mode, press shutter-release button halfway mode or or press the button. Zoom in on the Camera Exit to shooting Shutter button To return to display photographs as shown at right. View menus View menus ( 63). Auto Off Timers ( 78)... (portrait) orientation are taken. 15 - The most recent photograph will be performed in full-frame playback: To View additional photographs View photo information Zoom in the monitor. The following operations can be displayed in on the Camera To play photographs back, press the button. Delete...
... Image Review ( 75) Choose whether to shooting mode, press shutter-release button halfway mode or or press the button. Zoom in on the Camera Exit to shooting Shutter button To return to display photographs as shown at right. View menus View menus ( 63). Auto Off Timers ( 78)... (portrait) orientation are taken. 15 - The most recent photograph will be performed in full-frame playback: To View additional photographs View photo information Zoom in the monitor. The following operations can be displayed in on the Camera To play photographs back, press the button. Delete...

User Manual
Page 63
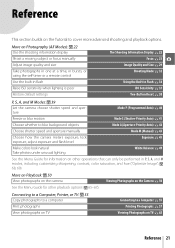
... .......... 11, 83 4 Folder name 85 9 Image size 30 4 6 78 5 9 Shooting Data, Page 1 1 Protect status 54 7 Mode 4 12 2 Retouch indicator 89 8 Exposure compensation.... 47 3 Camera name 9 Focal length 1 3 4 5 4 Metering 45 10 Flash mode 35 7 6 8 5 Shutter speed 39-44 11 Frame number/total 9 10 6 Aperture 39-44 number of images 11...image was created using options in retouch menu. 12 3 4 6 8 10 12 4 Reference: More on Playback/Viewing Photographs on images displayed in full-frame playback. Photo Information Photo information is superimposed on the Camera 51
... .......... 11, 83 4 Folder name 85 9 Image size 30 4 6 78 5 9 Shooting Data, Page 1 1 Protect status 54 7 Mode 4 12 2 Retouch indicator 89 8 Exposure compensation.... 47 3 Camera name 9 Focal length 1 3 4 5 4 Metering 45 10 Flash mode 35 7 6 8 5 Shutter speed 39-44 11 Frame number/total 9 10 6 Aperture 39-44 number of images 11...image was created using options in retouch menu. 12 3 4 6 8 10 12 4 Reference: More on Playback/Viewing Photographs on images displayed in full-frame playback. Photo Information Photo information is superimposed on the Camera 51

User Manual
Page 64
...images 3 4 4 Histogram Viewing Multiple Images: Thumbnail Playback To display images in "contact sheets" of tones in the 12 image. Delete photo Delete highlighted photograph ( 54). The horizontal axis corresponds to shooting mode, press shutter-release button halfway mode or or press the button. ... the button in full-frame playback. The following operations can be 12 3 lost ("washed out") in areas of highlights that camera histograms are intended as a guide only and may be performed while thumbnails are displayed: To Use Description Display more Increase number ...
...images 3 4 4 Histogram Viewing Multiple Images: Thumbnail Playback To display images in "contact sheets" of tones in the 12 image. Delete photo Delete highlighted photograph ( 54). The horizontal axis corresponds to shooting mode, press shutter-release button halfway mode or or press the button. ... the button in full-frame playback. The following operations can be 12 3 lost ("washed out") in areas of highlights that camera histograms are intended as a guide only and may be performed while thumbnails are displayed: To Use Description Display more Increase number ...

User Manual
Page 65
...other areas of approximately 19× (large images), 15× (medium images) or 10× (small images). View other areas of image photo is indicated by yellow border. Cancel zoom Return to view areas of image not visible in , press multi selector up, down, left, or right... monitor is zoomed in monitor. Taking a Closer Look: Playback Zoom Press the button to zoom out. Press to zoom in on the Camera 53 area currently visible in full-frame playback. Delete photo Delete current photograph ( 54). View menus View menus ( 63). played when zoom ratio is dis- Protect...
...other areas of approximately 19× (large images), 15× (medium images) or 10× (small images). View other areas of image photo is indicated by yellow border. Cancel zoom Return to view areas of image not visible in , press multi selector up, down, left, or right... monitor is zoomed in monitor. Taking a Closer Look: Playback Zoom Press the button to zoom out. Press to zoom in on the Camera 53 area currently visible in full-frame playback. Delete photo Delete current photograph ( 54). View menus View menus ( 63). played when zoom ratio is dis- Protect...

User Manual
Page 70
...a Computer, Printer, or TV/Printing Photographs Do not use an EH-5 AC adapter and EP-5 AC adapter connector (available separately; 103). 1 Set the camera USB option to insert the connectors at a Time" ( 59) or "Printing Multiple Pictures" ( 60). Proceed to zoom in doubt, charge the battery ...or use force or attempt to PTP ( 84). 2 Turn the printer on the current photo ( 53). Connecting the Printer Before printing, check that the camera battery is fully charged. Press the multi selector left or right to view additional photographs, or press the button to...
...a Computer, Printer, or TV/Printing Photographs Do not use an EH-5 AC adapter and EP-5 AC adapter connector (available separately; 103). 1 Set the camera USB option to insert the connectors at a Time" ( 59) or "Printing Multiple Pictures" ( 60). Proceed to zoom in doubt, charge the battery ...or use force or attempt to PTP ( 84). 2 Turn the printer on the current photo ( 53). Connecting the Printer Before printing, check that the camera battery is fully charged. Press the multi selector left or right to view additional photographs, or press the button to...

User Manual
Page 71
... by the current printer can be displayed. Reference: Connecting to print menu. Press the multi selector up or down to choose number of recording on photo), or No time stamp, then press OK to select and return to select. Press multi selector up or down to choose Printer default (default for... position of copies up or down to choose print style from Printer default Page size (default page size for current printer), Print with border (print photo with white border), or No border, then press OK to select and return to print at a Time To print the picture currently selected in the...
... by the current printer can be displayed. Reference: Connecting to print menu. Press the multi selector up or down to choose number of recording on photo), or No time stamp, then press OK to select and return to select. Press multi selector up or down to choose Printer default (default for... position of copies up or down to choose print style from Printer default Page size (default page size for current printer), Print with border (print photo with white border), or No border, then press OK to select and return to print at a Time To print the picture currently selected in the...

User Manual
Page 72
... the PictBridge playback display, press OK. 60 Reference: Connecting to 1. Printing Multiple Pictures To print multiple pictures or create an index print listing all JPEG photos, to maximum of 256. Print (DPOF) Print current DPOF print order ( 61). to a Computer, Printer, or TV/Printing Photographs press OK to select. PictBridge menu...
... the PictBridge playback display, press OK. 60 Reference: Connecting to 1. Printing Multiple Pictures To print multiple pictures or create an index print listing all JPEG photos, to maximum of 256. Print (DPOF) Print current DPOF print order ( 61). to a Computer, Printer, or TV/Printing Photographs press OK to select. PictBridge menu...

User Manual
Page 73
...in print order. • Imprint date: Print date of recording on the memory card to create digital "print orders" for printing. 4 Display options. Highlight option and press multi selector right: •... OK. to modify and print the current order ( 60). Note that RAW (NEF) photos can not be selected for PictBridge-compatible printers and devices that support DPOF. tures in "... print order, use the PictBridge Time stamp option. To print the current print order when the camera is connected to a Computer, Printer, or TV/Printing Photographs 61 Selecting Print set (DPOF)...
...in print order. • Imprint date: Print date of recording on the memory card to create digital "print orders" for printing. 4 Display options. Highlight option and press multi selector right: •... OK. to modify and print the current order ( 60). Note that RAW (NEF) photos can not be selected for PictBridge-compatible printers and devices that support DPOF. tures in "... print order, use the PictBridge Time stamp option. To print the current print order when the camera is connected to a Computer, Printer, or TV/Printing Photographs 61 Selecting Print set (DPOF)...

User Manual
Page 75
...highlighted Menu Playback Shooting Custom Settings Setup Retouch Description Adjust playback settings and manage photos ( 65). Move cursor up Increase number Press up Return to navigate the camera menus. Menu Guide Using Camera Menus Most shooting, playback, and setup options can be viewed by pressing button..., shooting, Custom Settings, setup, and retouch menus (see below) If "?" Adjust shooting settings ( 68). Choose from the camera menus. Format memory cards and perform basic camera setup ( 80). Personalize camera settings ( 74). To view the menus, press the button.
...highlighted Menu Playback Shooting Custom Settings Setup Retouch Description Adjust playback settings and manage photos ( 65). Move cursor up Increase number Press up Return to navigate the camera menus. Menu Guide Using Camera Menus Most shooting, playback, and setup options can be viewed by pressing button..., shooting, Custom Settings, setup, and retouch menus (see below) If "?" Adjust shooting settings ( 68). Choose from the camera menus. Format memory cards and perform basic camera setup ( 80). Personalize camera settings ( 74). To view the menus, press the button.

User Manual
Page 77
... Playback folder Choose folder for playback. 66 Rotate tall Rotate "tall" (portrait-orientation) photos during playback. 66 Slide show Play photos back in automatic slide shows. 67 Print set (DPOF) Select photos for printing. 67 Delete The delete menu contains the following options (options displayed may differ if My menu is selected .... To deselect picture, highlight and press multi selector down. Select highlighted picture. Complete operation. Menu Guide/Playback Options: The Playback Menu 65 See "Using Camera Menus" ( 63) for deletion: 1 2 Highlight picture.
... Playback folder Choose folder for playback. 66 Rotate tall Rotate "tall" (portrait-orientation) photos during playback. 66 Slide show Play photos back in automatic slide shows. 67 Print set (DPOF) Select photos for printing. 67 Delete The delete menu contains the following options (options displayed may differ if My menu is selected .... To deselect picture, highlight and press multi selector down. Select highlighted picture. Complete operation. Menu Guide/Playback Options: The Playback Menu 65 See "Using Camera Menus" ( 63) for deletion: 1 2 Highlight picture.

User Manual
Page 78
... that the folder contains no images will be displayed during playback. Select All to rotate "tall" (portrait-orientation) photos for display in the camera monitor. Playback Folder Choose a folder for playback: Option Description Only photos in the folder currently selected for Folders in the setup menu are displayed during playback. If a memory card...
... that the folder contains no images will be displayed during playback. Select All to rotate "tall" (portrait-orientation) photos for display in the camera monitor. Playback Folder Choose a folder for playback: Option Description Only photos in the folder currently selected for Folders in the setup menu are displayed during playback. If a memory card...


