User Manual
Page 4
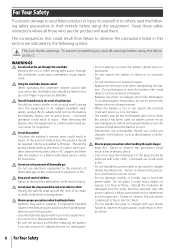
... the following symbol: This icon marks warnings. Continued use , attach the terminal cover and store in this Nikon product. ii For Your Safety Before removing the battery turn the camera off immediately in your eye to a Nikon-authorized service center for inspection. Should the product break open as discoloration or deformation. The consequences that...
... the following symbol: This icon marks warnings. Continued use , attach the terminal cover and store in this Nikon product. ii For Your Safety Before removing the battery turn the camera off immediately in your eye to a Nikon-authorized service center for inspection. Should the product break open as discoloration or deformation. The consequences that...

User Manual
Page 7
...vii Introduction 1 Getting to Know the Camera 2 First Steps 8 Attaching a Lens 8 Charging and Inserting the Battery 9 Basic Setup 11 Inserting Memory Cards 12 Adjusting Viewfinder Focus 14 Tutorial 15 "Point-and-Shoot" Photography ( Mode 15 Creative Photography (Digital Vari-Programs).........18 Basic Playback 20 Reference...33 Using the Built-in Flash 34 ISO Sensitivity 37 Two-Button Reset 38 P, S, A, and M Modes 39 Mode P (Programmed Auto 40 Mode S (Shutter-Priority Auto 41 Mode A (Aperture-Priority Auto 42 Mode M (Manual 43 Exposure 45 Metering 45 Autoexposure Lock 46 ...
...vii Introduction 1 Getting to Know the Camera 2 First Steps 8 Attaching a Lens 8 Charging and Inserting the Battery 9 Basic Setup 11 Inserting Memory Cards 12 Adjusting Viewfinder Focus 14 Tutorial 15 "Point-and-Shoot" Photography ( Mode 15 Creative Photography (Digital Vari-Programs).........18 Basic Playback 20 Reference...33 Using the Built-in Flash 34 ISO Sensitivity 37 Two-Button Reset 38 P, S, A, and M Modes 39 Mode P (Programmed Auto 40 Mode S (Shutter-Priority Auto 41 Mode A (Aperture-Priority Auto 42 Mode M (Manual 43 Exposure 45 Metering 45 Autoexposure Lock 46 ...

User Manual
Page 8
... Image Overlay 94 Technical Notes 96 Optional Accessories 96 Lenses ...97 Optional Flash Units (Speedlights 99 Other Accessories 102 Accessories for the D40 103 Caring for the Camera 104 Caring for the Camera and Battery: Cautions 106 Troubleshooting 108 Camera Error Messages and Displays 111 Appendix 113 Specifications 119 Index 123 vi Table of Contents
... Image Overlay 94 Technical Notes 96 Optional Accessories 96 Lenses ...97 Optional Flash Units (Speedlights 99 Other Accessories 102 Accessories for the D40 103 Caring for the Camera 104 Caring for the Camera and Battery: Cautions 106 Troubleshooting 108 Camera Error Messages and Displays 111 Appendix 113 Specifications 119 Index 123 vi Table of Contents

User Manual
Page 9
... information on the front of exposures remaining 29, 116 Battery level 15 Exposure 39 Self timer, remote control 33 Optional flash units 99 Lenses 97 Accessories for the D40 96 Approved memory cards 102 Accessories for the D40 103 Servicing the camera x Cleaning the camera 104 Camera Setup Question Key phrase How do I focus the viewfinder...
... information on the front of exposures remaining 29, 116 Battery level 15 Exposure 39 Self timer, remote control 33 Optional flash units 99 Lenses 97 Accessories for the D40 96 Approved memory cards 102 Accessories for the D40 103 Servicing the camera x Cleaning the camera 104 Camera Setup Question Key phrase How do I focus the viewfinder...

User Manual
Page 15
...an error or other problem can be viewed in the monitor while the button is used for optional AC adapter connector 103 12 Battery-chamber cover latch 10 13 Battery-chamber cover 10, 103 14 Tripod socket 15 Monitor 6, 50, 82 16 (playback zoom) button 53 (setting) button 22... cup 7 2 Viewfinder eyepiece 5, 14 3 Diopter adjustment control 14 4 (AE-L/AF-L) button 46, 77 (protect) button 54 5 Command dial 115 6 Eyelet for camera strap 7 7 Multi selector * 8 Memory card slot cover 12 9 (delete) button 20, 54 10 Memory card access lamp 12 11 Power connector cover for menu navigation...
...an error or other problem can be viewed in the monitor while the button is used for optional AC adapter connector 103 12 Battery-chamber cover latch 10 13 Battery-chamber cover 10, 103 14 Tripod socket 15 Monitor 6, 50, 82 16 (playback zoom) button 53 (setting) button 22... cup 7 2 Viewfinder eyepiece 5, 14 3 Diopter adjustment control 14 4 (AE-L/AF-L) button 46, 77 (protect) button 54 5 Command dial 115 6 Eyelet for camera strap 7 7 Multi selector * 8 Memory card slot cover 12 9 (delete) button 20, 54 10 Memory card access lamp 12 11 Power connector cover for menu navigation...

User Manual
Page 17
... Focus area display 14, 16, 24, 25, 26 AF-area mode 24 4 Autoexposure (AE) lock 46 5 Flexible program indicator 40 6 Shutter speed 39-44 7 Aperture (f/-number 39-44 8 Flash compensation indicator 48 9 Exposure compensation indicator 47 10 Number of exposures .........71 Exposure compensation value 47 Flash compensation value 48 PC connection indicator 56 11 Flash-ready indicator 17 12 Battery indicator 15 13 Electronic analog exposure display 43 Exposure compensation 47 14 ISO AUTO indicator 76 15 "K" (appears... When enough memory remains on the memory card to Know the Camera 5
... Focus area display 14, 16, 24, 25, 26 AF-area mode 24 4 Autoexposure (AE) lock 46 5 Flexible program indicator 40 6 Shutter speed 39-44 7 Aperture (f/-number 39-44 8 Flash compensation indicator 48 9 Exposure compensation indicator 47 10 Number of exposures .........71 Exposure compensation value 47 Flash compensation value 48 PC connection indicator 56 11 Flash-ready indicator 17 12 Battery indicator 15 13 Electronic analog exposure display 43 Exposure compensation 47 14 ISO AUTO indicator 76 15 "K" (appears... When enough memory remains on the memory card to Know the Camera 5

User Manual
Page 18
...The following shooting information will be displayed in the monitor. Fast shutter speed, large aperture (small f/-number) 6 Introduction: Getting to Know the Camera Slow shutter speed, small aperture (large f/-number) The Shutter-Speed and Aperture Displays These displays provide a visual indication of exposures remaining 15, 116...23 16 Shooting mode 32 17 ISO sensitivity 37 18 White balance mode 49 19 Image size 30 20 Image quality 30 21 Battery indicator 15 22 "Beep" indicator 74 23 Optimize image indicator 68 24 Auto ISO sensitivity indicator 76 25 Manual flash control ...
...The following shooting information will be displayed in the monitor. Fast shutter speed, large aperture (small f/-number) 6 Introduction: Getting to Know the Camera Slow shutter speed, small aperture (large f/-number) The Shutter-Speed and Aperture Displays These displays provide a visual indication of exposures remaining 15, 116...23 16 Shooting mode 32 17 ISO sensitivity 37 18 White balance mode 49 19 Image size 30 20 Image quality 30 21 Battery indicator 15 22 "Beep" indicator 74 23 Optimize image indicator 68 24 Auto ISO sensitivity indicator 76 25 Manual flash control ...
User Manual
Page 19
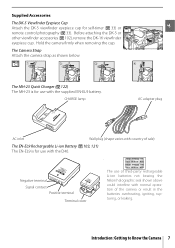
... terminal Signal contact Positive terminal Terminal cover The use with normal operation of third-party rechargeable Li-ion batteries not bearing the Nikon holographic seal shown above could interfere with the D40. . Hold the camera firmly when removing the cup. Supplied Accessories The DK-5 Viewfinder Eyepiece Cap Attach the DK-5 viewfinder eyepiece cap for...
... terminal Signal contact Positive terminal Terminal cover The use with normal operation of third-party rechargeable Li-ion batteries not bearing the Nikon holographic seal shown above could interfere with the D40. . Hold the camera firmly when removing the cup. Supplied Accessories The DK-5 Viewfinder Eyepiece Cap Attach the DK-5 viewfinder eyepiece cap for...

User Manual
Page 21
... lamp will blink as described below 0°C (32°F) or above 20°C (68°F). Battery capacity may drop if the battery is charged or used at temperatures above 40°C (104°F). The Battery and Charger Read and follow the warnings and cautions on pages ii-iii and 106-107 of... 5-35°C (41-95°F). Do not use the battery at shipment. During charging, the temperature ...
... lamp will blink as described below 0°C (32°F) or above 20°C (68°F). Battery capacity may drop if the battery is charged or used at temperatures above 40°C (104°F). The Battery and Charger Read and follow the warnings and cautions on pages ii-iii and 106-107 of... 5-35°C (41-95°F). Do not use the battery at shipment. During charging, the temperature ...
User Manual
Page 22
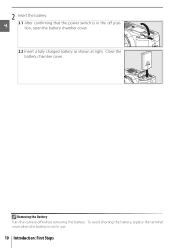
To avoid shorting the battery, replace the terminal cover when the battery is in use. 10 Introduction: First Steps Removing the Battery Turn the camera off position, open the battery chamber cover. 2.2 Insert a fully charged battery as shown at right. Close the battery chamber cover. 2 Insert the battery. 2.1 After confirming that the power switch is not in the off before removing the battery.
To avoid shorting the battery, replace the terminal cover when the battery is in use. 10 Introduction: First Steps Removing the Battery Turn the camera off position, open the battery chamber cover. 2.2 Insert a fully charged battery as shown at right. Close the battery chamber cover. 2 Insert the battery. 2.1 After confirming that the power switch is not in the off before removing the battery.

User Manual
Page 25
Format card. Do not turn camera off or remove card or battery until formatting is complete and setup menu is in the camera before formatting the card. 2.1 2.2 Turn camera on. Write-protect switch Introduction: First Steps 13 Display menus.* * If menu item is highlighted, press multi selector ... Switch SD cards are formatted in setup menu. 2.6 Highlight Format memory card. 2.7 2.8 Display options. Formatting Memory Cards Use the camera Format memory card option to another storage device before first use. Be sure all photographs and other data they may drop if cards ...
Format card. Do not turn camera off or remove card or battery until formatting is complete and setup menu is in the camera before formatting the card. 2.1 2.2 Turn camera on. Write-protect switch Introduction: First Steps 13 Display menus.* * If menu item is highlighted, press multi selector ... Switch SD cards are formatted in setup menu. 2.6 Highlight Format memory card. 2.7 2.8 Display options. Formatting Memory Cards Use the camera Format memory card option to another storage device before first use. Be sure all photographs and other data they may drop if cards ...

User Manual
Page 26
Before shooting, make sure that the display in the viewfinder is in clear focus. 1 Remove the lens cap and turn the camera on the battery. Focus brackets Auto Meter Off At default settings, the viewfinder and shooting information display will turn off automatically can be careful not to put your ...
Before shooting, make sure that the display in the viewfinder is in clear focus. 1 Remove the lens cap and turn the camera on the battery. Focus brackets Auto Meter Off At default settings, the viewfinder and shooting information display will turn off automatically can be careful not to put your ...

User Manual
Page 27
...mode in which the majority of settings are controlled by the camera in the shooting information display and viewfinder. The monitor will turn the camera on and the viewfinder display will flash as described below. Charge battery. (blinks) (blinks) If shooting information is not displayed when... the button is pressed, the battery is not enough memory to (auto mode). No...
...mode in which the majority of settings are controlled by the camera in the shooting information display and viewfinder. The monitor will turn the camera on and the viewfinder display will flash as described below. Charge battery. (blinks) (blinks) If shooting information is not displayed when... the button is pressed, the battery is not enough memory to (auto mode). No...
User Manual
Page 29
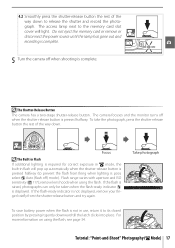
Take photograph To save battery power when the flash is not in flash will light. The camera focuses and the monitor turns off when the shutter-release ... rest of the way down to release the shutter and record the photograph. The Shutter-Release Button The camera has a two-stage shutter-release button. If the flash-ready indicator is not displayed, remove your finger...remove or disconnect the power source until the lamp has gone out and recording is complete. 5 Turn the camera off ) mode). Focus The Built-in Flash If additional lighting is displayed. If the flash is raised...
Take photograph To save battery power when the flash is not in flash will light. The camera focuses and the monitor turns off when the shutter-release ... rest of the way down to release the shutter and record the photograph. The Shutter-Release Button The camera has a two-stage shutter-release button. If the flash-ready indicator is not displayed, remove your finger...remove or disconnect the power source until the lamp has gone out and recording is complete. 5 Turn the camera off ) mode). Focus The Built-in Flash If additional lighting is displayed. If the flash is raised...
User Manual
Page 32
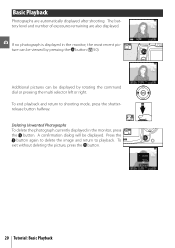
... the button again to delete the image and return to shooting mode, press the shutterrelease button halfway. To end playback and return to playback. The battery level and number of exposures remaining are automatically displayed after shooting. Basic Playback Photographs are also displayed. To exit without deleting the picture, press the...
... the button again to delete the image and return to shooting mode, press the shutterrelease button halfway. To end playback and return to playback. The battery level and number of exposures remaining are automatically displayed after shooting. Basic Playback Photographs are also displayed. To exit without deleting the picture, press the...

User Manual
Page 56
... Shutter speeds of "bulb" and "--" can be present in the shooting menu. 44 Reference: P, S, A, and M Modes/Mode M (Manual) To prevent blurring caused by camera shake, use a fully charged battery or an optional AC adapter. Select mode M, choose a shutter speed of power before shooting, choose On for thirty minutes or until the button...
... Shutter speeds of "bulb" and "--" can be present in the shooting menu. 44 Reference: P, S, A, and M Modes/Mode M (Manual) To prevent blurring caused by camera shake, use a fully charged battery or an optional AC adapter. Select mode M, choose a shutter speed of power before shooting, choose On for thirty minutes or until the button...

User Manual
Page 67
... and printed. The supplied PictureProject software can then be used to copy photographs to the computer, where they can be sure the camera battery is fully charged. To ensure that data transfer is not interrupted, be connected to a computer using the supplied USB cable. Before connecting the... camera, select the USB item in doubt, charge the battery before connecting the camera or use force or attempt to a Computer 55 Connecting the USB Cable 1 Turn the computer on and ...
... and printed. The supplied PictureProject software can then be used to copy photographs to the computer, where they can be sure the camera battery is fully charged. To ensure that data transfer is not interrupted, be connected to a computer using the supplied USB cable. Before connecting the... camera, select the USB item in doubt, charge the battery before connecting the camera or use force or attempt to a Computer 55 Connecting the USB Cable 1 Turn the computer on and ...

User Manual
Page 70
...). Use the multi selector to highlight photographs, or press to display the highlighted photograph full frame. 58 Reference: Connecting to the printer; Connect the camera directly to a Computer, Printer, or TV/Printing Photographs Proceed to insert the connectors at an angle. To view six photographs at a Time" (... Pictures" ( 60). Press the multi selector left or right to view additional photographs, or press the button to zoom in doubt, charge the battery or use force or attempt to "Printing Pictures One at a time, press the button. do not connect the cable via a USB hub or...
...). Use the multi selector to highlight photographs, or press to display the highlighted photograph full frame. 58 Reference: Connecting to the printer; Connect the camera directly to a Computer, Printer, or TV/Printing Photographs Proceed to insert the connectors at an angle. To view six photographs at a Time" (... Pictures" ( 60). Press the multi selector left or right to view additional photographs, or press the button to zoom in doubt, charge the battery or use force or attempt to "Printing Pictures One at a time, press the button. do not connect the cable via a USB hub or...

User Manual
Page 90
... time from 4s, 8s, 20s, 1minute, or 30minutes. 14: Built-in Flash (P, S, A, and M Modes Only) Choose a flash control mode for longer battery life. When Image review is on for 8s. Using an AC Adapter Regardless of 18/59 (ISO 200, m/ft., 20°C/68°F). When Image...). Monitor and exposure meters remain on , pictures are displayed in response to Optional Speedlight. 15: Auto off . Choose monitor off automatically when the camera is adjusted automatically in monitor for 4s after shooting ( 75). A icon flashes in the menu shown at right. When Image review is on for...
... time from 4s, 8s, 20s, 1minute, or 30minutes. 14: Built-in Flash (P, S, A, and M Modes Only) Choose a flash control mode for longer battery life. When Image review is on for 8s. Using an AC Adapter Regardless of 18/59 (ISO 200, m/ft., 20°C/68°F). When Image...). Monitor and exposure meters remain on , pictures are displayed in response to Optional Speedlight. 15: Auto off . Choose monitor off automatically when the camera is adjusted automatically in monitor for 4s after shooting ( 75). A icon flashes in the menu shown at right. When Image review is on for...
User Manual
Page 91
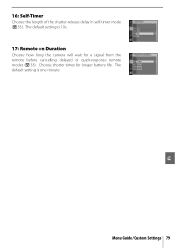
Choose shorter times for a signal from the remote before cancelling delayed or quick-response remote modes ( 33). Menu Guide/Custom Settings 79 The default setting is one minute. The default setting is 10s. 17: Remote on Duration Choose how long the camera will wait for longer battery life. 16: Self-Timer Choose the length of the shutter-release delay in self-timer mode ( 33).
Choose shorter times for a signal from the remote before cancelling delayed or quick-response remote modes ( 33). Menu Guide/Custom Settings 79 The default setting is one minute. The default setting is 10s. 17: Remote on Duration Choose how long the camera will wait for longer battery life. 16: Self-Timer Choose the length of the shutter-release delay in self-timer mode ( 33).


