User Manual
Page 4
...the event of malfunction Should you notice smoke or an unusual smell coming from failure to avoid burns. Before removing the battery turn the camera off before replacing the battery. Should the insulation be hot immediately after use could result in fire. • Do not handle the power cable or...is off and allow the battery to observe this precaution could result in this Nikon product. Do not disassemble Touching the product's internal parts could result in electric shock. Do not place the strap around the neck of an infant or child Placing the camera strap around the neck ...
...the event of malfunction Should you notice smoke or an unusual smell coming from failure to avoid burns. Before removing the battery turn the camera off before replacing the battery. Should the insulation be hot immediately after use could result in fire. • Do not handle the power cable or...is off and allow the battery to observe this precaution could result in this Nikon product. Do not disassemble Touching the product's internal parts could result in electric shock. Do not place the strap around the neck of an infant or child Placing the camera strap around the neck ...

User Manual
Page 7
...vii Introduction 1 Getting to Know the Camera 2 First Steps 8 Attaching a Lens 8 Charging and Inserting the Battery 9 Basic Setup 11 Inserting Memory Cards 12 Adjusting Viewfinder Focus 14 Tutorial 15 "Point-and-Shoot" Photography ( Mode 15 Creative Photography (Digital Vari-Programs).........18 Basic Playback 20 Reference...33 Using the Built-in Flash 34 ISO Sensitivity 37 Two-Button Reset 38 P, S, A, and M Modes 39 Mode P (Programmed Auto 40 Mode S (Shutter-Priority Auto 41 Mode A (Aperture-Priority Auto 42 Mode M (Manual 43 Exposure 45 Metering 45 Autoexposure Lock 46 ...
...vii Introduction 1 Getting to Know the Camera 2 First Steps 8 Attaching a Lens 8 Charging and Inserting the Battery 9 Basic Setup 11 Inserting Memory Cards 12 Adjusting Viewfinder Focus 14 Tutorial 15 "Point-and-Shoot" Photography ( Mode 15 Creative Photography (Digital Vari-Programs).........18 Basic Playback 20 Reference...33 Using the Built-in Flash 34 ISO Sensitivity 37 Two-Button Reset 38 P, S, A, and M Modes 39 Mode P (Programmed Auto 40 Mode S (Shutter-Priority Auto 41 Mode A (Aperture-Priority Auto 42 Mode M (Manual 43 Exposure 45 Metering 45 Autoexposure Lock 46 ...

User Manual
Page 8
... Image Overlay 94 Technical Notes 96 Optional Accessories 96 Lenses ...97 Optional Flash Units (Speedlights 99 Other Accessories 102 Accessories for the D40 103 Caring for the Camera 104 Caring for the Camera and Battery: Cautions 106 Troubleshooting 108 Camera Error Messages and Displays 111 Appendix 113 Specifications 119 Index 123 vi Table of Contents
... Image Overlay 94 Technical Notes 96 Optional Accessories 96 Lenses ...97 Optional Flash Units (Speedlights 99 Other Accessories 102 Accessories for the D40 103 Caring for the Camera 104 Caring for the Camera and Battery: Cautions 106 Troubleshooting 108 Camera Error Messages and Displays 111 Appendix 113 Specifications 119 Index 123 vi Table of Contents

User Manual
Page 9
...? How many more information on the front of exposures remaining 29, 116 Battery level 15 Exposure 39 Self timer, remote control 33 Optional flash units 99 Lenses 97 Accessories for the D40 96 Approved memory cards 102 Accessories for daylight savings time? What software is... brightness? How can I focus the viewfinder? What optional flash units (Speedlights) can I set the clock for the D40 103 Servicing the camera x Cleaning the camera 104 Camera Setup Question Key phrase How do I change the remote delay? Stand-by mode How do I keep the file number...
...? How many more information on the front of exposures remaining 29, 116 Battery level 15 Exposure 39 Self timer, remote control 33 Optional flash units 99 Lenses 97 Accessories for the D40 96 Approved memory cards 102 Accessories for daylight savings time? What software is... brightness? How can I focus the viewfinder? What optional flash units (Speedlights) can I set the clock for the D40 103 Servicing the camera x Cleaning the camera 104 Camera Setup Question Key phrase How do I change the remote delay? Stand-by mode How do I keep the file number...

User Manual
Page 15
...7 2 Viewfinder eyepiece 5, 14 3 Diopter adjustment control 14 4 (AE-L/AF-L) button 46, 77 (protect) button 54 5 Command dial 115 6 Eyelet for camera strap 7 7 Multi selector * 8 Memory card slot cover 12 9 (delete) button 20, 54 10 Memory card access lamp 12 11 Power connector cover for ...Battery-chamber cover 10, 103 14 Tripod socket 15 Monitor 6, 50, 82 16 (playback zoom) button 53 (setting) button 22 z (reset) button 38 17 (thumbnail) button 52 (help) button 18 (menu) button 63 19 (playback) button 20, 50 * Multi selector The multi selector is pressed; to Know the Camera...
...7 2 Viewfinder eyepiece 5, 14 3 Diopter adjustment control 14 4 (AE-L/AF-L) button 46, 77 (protect) button 54 5 Command dial 115 6 Eyelet for camera strap 7 7 Multi selector * 8 Memory card slot cover 12 9 (delete) button 20, 54 10 Memory card access lamp 12 11 Power connector cover for ...Battery-chamber cover 10, 103 14 Tripod socket 15 Monitor 6, 50, 82 16 (playback zoom) button 53 (setting) button 22 z (reset) button 38 17 (thumbnail) button 52 (help) button 18 (menu) button 63 19 (playback) button 20, 50 * Multi selector The multi selector is pressed; to Know the Camera...

User Manual
Page 17
...16, 24, 25, 26 AF-area mode 24 4 Autoexposure (AE) lock 46 5 Flexible program indicator 40 6 Shutter speed 39-44 7 Aperture (f/-number 39-44 8 Flash compensation indicator 48 9 Exposure compensation indicator ...47 Flash compensation value 48 PC connection indicator 56 11 Flash-ready indicator 17 12 Battery indicator 15 13 Electronic analog exposure display 43 Exposure compensation 47 14 ISO AUTO ...exposures, the exposure count display will be shown in thousands, rounded down to Know the Camera 5 This is room for over 1000 exposures) 16 Warning indicator 3, 111 The Viewfinder The...
...16, 24, 25, 26 AF-area mode 24 4 Autoexposure (AE) lock 46 5 Flexible program indicator 40 6 Shutter speed 39-44 7 Aperture (f/-number 39-44 8 Flash compensation indicator 48 9 Exposure compensation indicator ...47 Flash compensation value 48 PC connection indicator 56 11 Flash-ready indicator 17 12 Battery indicator 15 13 Electronic analog exposure display 43 Exposure compensation 47 14 ISO AUTO ...exposures, the exposure count display will be shown in thousands, rounded down to Know the Camera 5 This is room for over 1000 exposures) 16 Warning indicator 3, 111 The Viewfinder The...

User Manual
Page 18
... mode 23 16 Shooting mode 32 17 ISO sensitivity 37 18 White balance mode 49 19 Image size 30 20 Image quality 30 21 Battery indicator 15 22 "Beep" indicator 74 23 Optimize image indicator 68 24 Auto ISO sensitivity indicator 76 25 Manual flash control indicator 78... is shown when Graphic is selected for other display formats. Fast shutter speed, large aperture (small f/-number) 6 Introduction: Getting to Know the Camera Slow shutter speed, small aperture (large f/-number) The following shooting information will be displayed in the monitor. See page 81 for Info display format.
... mode 23 16 Shooting mode 32 17 ISO sensitivity 37 18 White balance mode 49 19 Image size 30 20 Image quality 30 21 Battery indicator 15 22 "Beep" indicator 74 23 Optimize image indicator 68 24 Auto ISO sensitivity indicator 76 25 Manual flash control indicator 78... is shown when Graphic is selected for other display formats. Fast shutter speed, large aperture (small f/-number) 6 Introduction: Getting to Know the Camera Slow shutter speed, small aperture (large f/-number) The following shooting information will be displayed in the monitor. See page 81 for Info display format.
User Manual
Page 19
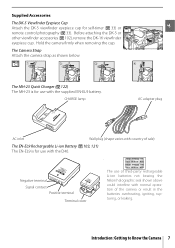
...-ion batteries not bearing the Nikon holographic seal shown above could interfere with normal operation of sale) The EN-EL9 Rechargeable Li-ion Battery ( 103, 121) The EN-EL9 is for self-timer ( 33) or remote control photography ( 33). Introduction: Getting to Know the Camera 7...varies with country of the camera or result in the batteries overheating, igniting, rupturing, or leaking. The Camera Strap Attach the camera strap as shown below. Supplied Accessories The DK-5 Viewfinder Eyepiece Cap Attach the DK-5 viewfinder eyepiece cap for use with the D40. . Before attaching the ...
...-ion batteries not bearing the Nikon holographic seal shown above could interfere with normal operation of sale) The EN-EL9 Rechargeable Li-ion Battery ( 103, 121) The EN-EL9 is for self-timer ( 33) or remote control photography ( 33). Introduction: Getting to Know the Camera 7...varies with country of the camera or result in the batteries overheating, igniting, rupturing, or leaking. The Camera Strap Attach the camera strap as shown below. Supplied Accessories The DK-5 Viewfinder Eyepiece Cap Attach the DK-5 viewfinder eyepiece cap for use with the D40. . Before attaching the ...

User Manual
Page 21
... the vicinity of this manual, together with any warnings and instructions provided by the battery manufacturer. Battery capacity may drop if the battery is charged or used at temperatures above 40°C (104°F). For best results, charge the battery at lower temperatures. The CHARGE lamp will blink as described below 0°C (32°F) or...
... the vicinity of this manual, together with any warnings and instructions provided by the battery manufacturer. Battery capacity may drop if the battery is charged or used at temperatures above 40°C (104°F). For best results, charge the battery at lower temperatures. The CHARGE lamp will blink as described below 0°C (32°F) or...
User Manual
Page 22
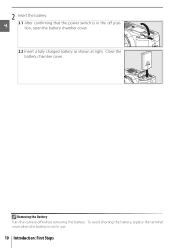
To avoid shorting the battery, replace the terminal cover when the battery is in use. 10 Introduction: First Steps Close the battery chamber cover. Removing the Battery Turn the camera off position, open the battery chamber cover. 2.2 Insert a fully charged battery as shown at right. 2 Insert the battery. 2.1 After confirming that the power switch is not in the off before removing the battery.
To avoid shorting the battery, replace the terminal cover when the battery is in use. 10 Introduction: First Steps Close the battery chamber cover. Removing the Battery Turn the camera off position, open the battery chamber cover. 2.2 Insert a fully charged battery as shown at right. 2 Insert the battery. 2.1 After confirming that the power switch is not in the off before removing the battery.

User Manual
Page 25
... is highlighted, press multi selector left to another storage device before first use. Do not turn camera off or remove card or battery until formatting is complete and setup menu is in the "lock" position, the camera will display a message to warn that formatting memory cards permanently deletes all data you wish to...
... is highlighted, press multi selector left to another storage device before first use. Do not turn camera off or remove card or battery until formatting is complete and setup menu is in the "lock" position, the camera will display a message to warn that formatting memory cards permanently deletes all data you wish to...

User Manual
Page 26
... no operations are performed for about eight seconds (auto meter off ), reducing the drain on The length of time before the exposure meters turn the camera on. 2 Slide the diopter adjustment control up and down until the focus brackets are framed in the viewfinder. Press the shutter-release button halfway to... be careful not to reactivate the display in your eye to the viewfinder, be adjusted using Custom Setting 15 (Auto off Exposure meters on the battery.
... no operations are performed for about eight seconds (auto meter off ), reducing the drain on The length of time before the exposure meters turn the camera on. 2 Slide the diopter adjustment control up and down until the focus brackets are framed in the viewfinder. Press the shutter-release button halfway to... be careful not to reactivate the display in your eye to the viewfinder, be adjusted using Custom Setting 15 (Auto off Exposure meters on the battery.

User Manual
Page 27
... been deleted ( 20, 65). 2 Rotate the mode dial to (auto mode). Battery partially discharged. Check the number of settings are controlled by the camera in response to shooting conditions. 1 Turn the camera on. 1.1 Remove the lens cap and turn on and the viewfinder display will flash... as described below. Check the battery level as shown at right. Tutorial Photography and Playback ...
... been deleted ( 20, 65). 2 Rotate the mode dial to (auto mode). Battery partially discharged. Check the number of settings are controlled by the camera in response to shooting conditions. 1 Turn the camera on. 1.1 Remove the lens cap and turn on and the viewfinder display will flash... as described below. Check the battery level as shown at right. Tutorial Photography and Playback ...
User Manual
Page 29
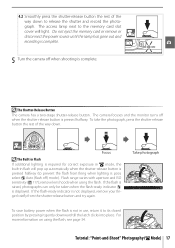
...ready indicator ( ) is not in use, return it to its closed position by pressing it gently downward till the latch clicks into place. The camera focuses and the monitor turns off ) mode). Focus The Built-in flash will light. For more information on using the flash. Tutorial: "Point-...and-Shoot" Photography ( Mode) 17 Take photograph To save battery power when the flash is displayed. remove lens hoods when using the flash, see page 34. The access lamp next to the memory card slot...
...ready indicator ( ) is not in use, return it to its closed position by pressing it gently downward till the latch clicks into place. The camera focuses and the monitor turns off ) mode). Focus The Built-in flash will light. For more information on using the flash. Tutorial: "Point-...and-Shoot" Photography ( Mode) 17 Take photograph To save battery power when the flash is displayed. remove lens hoods when using the flash, see page 34. The access lamp next to the memory card slot...
User Manual
Page 32
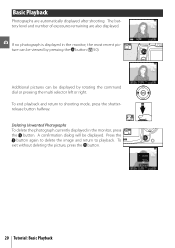
... or pressing the multi selector left or right. A confirmation dialog will be displayed by pressing the button ( 50). Basic Playback Photographs are also displayed. The battery level and number of exposures remaining are automatically displayed after shooting. To end playback and return to playback. Deleting Unwanted Photographs To delete the photograph...
... or pressing the multi selector left or right. A confirmation dialog will be displayed by pressing the button ( 50). Basic Playback Photographs are also displayed. The battery level and number of exposures remaining are automatically displayed after shooting. To end playback and return to playback. Deleting Unwanted Photographs To delete the photograph...

User Manual
Page 56
... remote control ( 33, 103). Select mode M, choose a shutter speed of moving lights, the stars, night scenery, or fireworks. To prevent blurring caused by camera shake, use a fully charged battery or an optional AC adapter. Long Time-Exposures Shutter speeds of "bulb" and "--" can be present in the shooting menu. 44 Reference: P, S, A, and...
... remote control ( 33, 103). Select mode M, choose a shutter speed of moving lights, the stars, night scenery, or fireworks. To prevent blurring caused by camera shake, use a fully charged battery or an optional AC adapter. Long Time-Exposures Shutter speeds of "bulb" and "--" can be present in the shooting menu. 44 Reference: P, S, A, and...

User Manual
Page 67
... adapter and EP-5 AC adapter connector ( 103). Before Connecting the Camera Install PictureProject from the supplied installer CD. Before connecting the camera, select the USB item in doubt, charge the battery before connecting the camera or use force or attempt to insert the connectors at an angle.... If PTP is selected when the camera is connected, the Windows hardware wizard will be sure the camera battery is not interrupted, be displayed. Connect the camera directly to a Computer 55 do not connect the cable via a USB hub or...
... adapter and EP-5 AC adapter connector ( 103). Before Connecting the Camera Install PictureProject from the supplied installer CD. Before connecting the camera, select the USB item in doubt, charge the battery before connecting the camera or use force or attempt to insert the connectors at an angle.... If PTP is selected when the camera is connected, the Windows hardware wizard will be sure the camera battery is not interrupted, be displayed. Connect the camera directly to a Computer 55 do not connect the cable via a USB hub or...

User Manual
Page 70
... option to zoom in on . Connecting the Printer Before printing, check that the camera battery is fully charged. do not connect the cable via a USB hub or keyboard. 5 Turn the camera on the current photo ( 53). A welcome screen will be displayed, followed by the PictBridge playback display. Proceed to ... or right to view additional photographs, or press the button to PTP ( 84). 2 Turn the printer on. 3 Turn the camera off. 4 Connect the supplied USB cable as shown. If in doubt, charge the battery or use force or attempt to "Printing Pictures One at a time, press the button.
... option to zoom in on . Connecting the Printer Before printing, check that the camera battery is fully charged. do not connect the cable via a USB hub or keyboard. 5 Turn the camera on the current photo ( 53). A welcome screen will be displayed, followed by the PictBridge playback display. Proceed to ... or right to view additional photographs, or press the button to PTP ( 84). 2 Turn the printer on. 3 Turn the camera off. 4 Connect the supplied USB cable as shown. If in doubt, charge the battery or use force or attempt to "Printing Pictures One at a time, press the button.

User Manual
Page 90
... is powered by an optional EH-5 AC adapter and EP-5 AC adapter connector ( 103). 78 Menu Guide/Custom Settings Choose monitor off automatically when the camera is adjusted automatically in flash has a Guide Number of the setting chosen, the monitor and exposure meters do not turn off Timers Choose how long..., 20s, 1minute, and 10minutes. Choose auto meter-off delay for the SB-400 and the name changes to choose the flash control mode for longer battery life.
... is powered by an optional EH-5 AC adapter and EP-5 AC adapter connector ( 103). 78 Menu Guide/Custom Settings Choose monitor off automatically when the camera is adjusted automatically in flash has a Guide Number of the setting chosen, the monitor and exposure meters do not turn off Timers Choose how long..., 20s, 1minute, and 10minutes. Choose auto meter-off delay for the SB-400 and the name changes to choose the flash control mode for longer battery life.
User Manual
Page 91
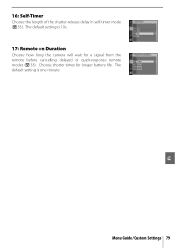
Menu Guide/Custom Settings 79 The default setting is 10s. 17: Remote on Duration Choose how long the camera will wait for longer battery life. The default setting is one minute. Choose shorter times for a signal from the remote before cancelling delayed or quick-response remote modes ( 33). 16: Self-Timer Choose the length of the shutter-release delay in self-timer mode ( 33).
Menu Guide/Custom Settings 79 The default setting is 10s. 17: Remote on Duration Choose how long the camera will wait for longer battery life. The default setting is one minute. Choose shorter times for a signal from the remote before cancelling delayed or quick-response remote modes ( 33). 16: Self-Timer Choose the length of the shutter-release delay in self-timer mode ( 33).


