
User Manual
Page 8
Table of Contents For Your Safety ii Introduction 1 Parts of the Camera 2 The Monitor 4 The MV-11 COOL-STATION 6 The EH-63 AC Adapter 6 First Steps 7 Inserting the Battery 7 Charging the Battery 8 Inserting Memory Cards 10 Turning the Camera On 12 Basic Setup 12 ...
Table of Contents For Your Safety ii Introduction 1 Parts of the Camera 2 The Monitor 4 The MV-11 COOL-STATION 6 The EH-63 AC Adapter 6 First Steps 7 Inserting the Battery 7 Charging the Battery 8 Inserting Memory Cards 10 Turning the Camera On 12 Basic Setup 12 ...

User Manual
Page 16
The EH-63 AC Adapter The supplied EH-63 AC adapter can be connected directly to the camera or via the MV-11 COOL-STATION to a computer ( 47) • Print pictures via direct USB connection ( 52) Camera connector ( 8) USB connector ( 47, 52) DC-IN connector ( 8) Audio... 45) Placing the Camera in the COOL-STATION Place the camera in the COOL-STATION as shown below , making sure that the connector is fully inserted in the supplied MV-11 COOL-STATION to: • Charge the camera battery ( 8) • View pictures on the COOL-STATION. Removing the Camera from the COOLSTATION ...
The EH-63 AC Adapter The supplied EH-63 AC adapter can be connected directly to the camera or via the MV-11 COOL-STATION to a computer ( 47) • Print pictures via direct USB connection ( 52) Camera connector ( 8) USB connector ( 47, 52) DC-IN connector ( 8) Audio... 45) Placing the Camera in the COOL-STATION Place the camera in the COOL-STATION as shown below , making sure that the connector is fully inserted in the supplied MV-11 COOL-STATION to: • Charge the camera battery ( 8) • View pictures on the COOL-STATION. Removing the Camera from the COOLSTATION ...

User Manual
Page 18
... power lamp on the AC adapter will not charge when the camera is on. 3 Place the camera in the COOL-STATION Place the camera in the COOL-STATION with the monitor facing forwards and the connector fully inserted in the matching connector on lamp is running low. 1 Connect the AC adapter to the... MV-11 COOL-STATION After connecting the AC adapter power cord to the AC inlet (ᕡ), insert the DC plug into the COOL-STATION's DC-IN connector (ᕢ) and then plug the power cord into a household AC power outlet (&#...
... power lamp on the AC adapter will not charge when the camera is on. 3 Place the camera in the COOL-STATION Place the camera in the COOL-STATION with the monitor facing forwards and the connector fully inserted in the matching connector on lamp is running low. 1 Connect the AC adapter to the... MV-11 COOL-STATION After connecting the AC adapter power cord to the AC inlet (ᕡ), insert the DC plug into the COOL-STATION's DC-IN connector (ᕢ) and then plug the power cord into a household AC power outlet (&#...

User Manual
Page 19
... the correct orientation. To eject the battery, slide the battery latch in damage to charge the battery. First Steps Removing the Battery from the COOL-STATION When charging is correctly inserted, battery requires replacement. Note that camera is shown as shown at right. 4 Charge the battery The indicator lamp... the warnings and cautions on pages ii-iii and 85 of AC adapter. Whether connected directly to the camera or to the MV-11 COOL-STATION, the EH-63 can also be used to power the camera or to the camera. observe due caution when removing the battery. Failure...
... the correct orientation. To eject the battery, slide the battery latch in damage to charge the battery. First Steps Removing the Battery from the COOL-STATION When charging is correctly inserted, battery requires replacement. Note that camera is shown as shown at right. 4 Charge the battery The indicator lamp... the warnings and cautions on pages ii-iii and 85 of AC adapter. Whether connected directly to the camera or to the MV-11 COOL-STATION, the EH-63 can also be used to power the camera or to the camera. observe due caution when removing the battery. Failure...

User Manual
Page 55
... selected for Video mode and the camera connected to a video device, video output will be used in the video device. 1 Place the camera in the COOL-STATION Turn the camera off and the television will remain off and place it in the monitor. Viewing Pictures on Playback Insert the yellow plug into... mode selected matches the standard used to connect the camera to the video channel If in movie mode. 45 More on TV The MV-11 COOL-STATION and EG-E5000 audio/video (A/V) cable included with the camera can be suspended and the camera monitor will turn the camera on Press the button...
... selected for Video mode and the camera connected to a video device, video output will be used in the video device. 1 Place the camera in the COOL-STATION Turn the camera off and the television will remain off and place it in the monitor. Viewing Pictures on Playback Insert the yellow plug into... mode selected matches the standard used to connect the camera to the video channel If in movie mode. 45 More on TV The MV-11 COOL-STATION and EG-E5000 audio/video (A/V) cable included with the camera can be suspended and the camera monitor will turn the camera on Press the button...
User Manual
Page 56
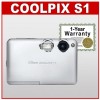
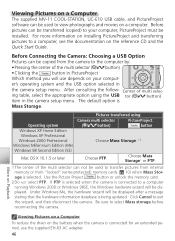
... a message stating that the hardware information database is connected to select Mass storage before reconnecting the camera. Viewing Pictures on a Computer The supplied MV-11 COOL-STATION, UC-E10 USB cable, and PictureProject software can be dis- After consulting the follow- The default option is selected.
... a message stating that the hardware information database is connected to select Mass storage before reconnecting the camera. Viewing Pictures on a Computer The supplied MV-11 COOL-STATION, UC-E10 USB cable, and PictureProject software can be dis- After consulting the follow- The default option is selected.

User Manual
Page 57
Connect the COOLSTATION directly to start up. Connecting the USB Cable 1 Place the camera in the COOL-STATION Turn the camera off and place it in the COOL-STATION. 2 Connect the USB cable If the computer is not already running, turn it on 47 More on Playback UC-E10 USB cable 3 Turn the camera ...
Connect the COOLSTATION directly to start up. Connecting the USB Cable 1 Place the camera in the COOL-STATION Turn the camera off and place it in the COOL-STATION. 2 Connect the USB cable If the computer is not already running, turn it on 47 More on Playback UC-E10 USB cable 3 Turn the camera ...

User Manual
Page 58
... on another device. 48 Pressing the center of the multi selector ( / button) copies to the computer all pictures that index points created with the camera can not be transferred using QuickTime or any other WAV-compatible audio player. Remove the memory card before attempting...remove the camera from internal memory. Select Mass storage for transfer ( 69). Sound Files PictureProject can be copied to transfer data from the COOL-STATION while data are marked for USB, copy the files manually, and then play sound ("*.wav") files. Transferring Pictures If ...
... on another device. 48 Pressing the center of the multi selector ( / button) copies to the computer all pictures that index points created with the camera can not be transferred using QuickTime or any other WAV-compatible audio player. Remove the memory card before attempting...remove the camera from internal memory. Select Mass storage for transfer ( 69). Sound Files PictureProject can be copied to transfer data from the COOL-STATION while data are marked for USB, copy the files manually, and then play sound ("*.wav") files. Transferring Pictures If ...

User Manual
Page 62
Printing Via Direct USB Connection When the camera is off, place it in the COOL-STATION and connect the UC-E10 USB cable as shown below. A PictBridge start-up screen will then enter full-frame playback with the PictBridge logo displayed ... printer ( 47; the default option is Mass storage). 2 Connect the USB cable After confirming that the camera is placed in the MV-11 COOL-STATION and connected to a PictBridge-compatible printer via the UC-E10 USB cable, selected pictures can be displayed. More on Playback UC-E10 USB cable 3 Turn...
Printing Via Direct USB Connection When the camera is off, place it in the COOL-STATION and connect the UC-E10 USB cable as shown below. A PictBridge start-up screen will then enter full-frame playback with the PictBridge logo displayed ... printer ( 47; the default option is Mass storage). 2 Connect the USB cable After confirming that the camera is placed in the MV-11 COOL-STATION and connected to a PictBridge-compatible printer via the UC-E10 USB cable, selected pictures can be displayed. More on Playback UC-E10 USB cable 3 Turn...

User Manual
Page 88
... when the camera is sound connected ( 47, 52). If On is selected, startup sound will play if camera is Start-up inserted in MV-11 COOL-STATION when USB cable is zoomed in. Exit Confirm VOLUME Loud Normal Off Exit Confirm Blur Warning Blur warning If On is selected for BSS. Option...
... when the camera is sound connected ( 47, 52). If On is selected, startup sound will play if camera is Start-up inserted in MV-11 COOL-STATION when USB cable is zoomed in. Exit Confirm VOLUME Loud Normal Off Exit Confirm Blur Warning Blur warning If On is selected for BSS. Option...
User Manual
Page 92
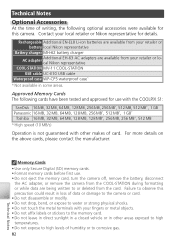
...corrosive gas. 82 Technical Notes Memory Cards • Use only Secure Digital (SD) memory cards. • Format memory cards before first use with the COOLPIX S1: SanDisk 16MB, 32MB, 64MB, 128MB, 256MB, 256MB*, 512MB, 512MB*, 1GB Panasonic 16 MB, 32 MB, 64 MB, 128 MB, 256 MB*, 512... Operation is not guaranteed with your local retailer or Nikon representative for use . • Do not eject the memory card, turn the camera off, remove the battery, disconnect the AC adapter, or remove the camera from the COOL-STATION during formatting or while data are available from the card...
...corrosive gas. 82 Technical Notes Memory Cards • Use only Secure Digital (SD) memory cards. • Format memory cards before first use with the COOLPIX S1: SanDisk 16MB, 32MB, 64MB, 128MB, 256MB, 256MB*, 512MB, 512MB*, 1GB Panasonic 16 MB, 32 MB, 64 MB, 128 MB, 256 MB*, 512... Operation is not guaranteed with your local retailer or Nikon representative for use . • Do not eject the memory card, turn the camera off, remove the battery, disconnect the AC adapter, or remove the camera from the COOL-STATION during formatting or while data are available from the card...
User Manual
Page 99
...8226; AC adapter is not properly connected. 6, 9 Monitor is blank • Standby mode: press shutter-release button halfway. 79 • Camera in COOL-STATION: camera connected to com- 45, 47 puter or audio/video cable connected. • Voice recording is being recorded. 33 • Camera is selected for... • Interval-timer shooting in camera. In the event of common problems below before consulting your retailer or Nikon representative. Technical Notes 89 Note that disconnecting the power source as expected, check the list of continued malfunction, contact your retailer or...
...8226; AC adapter is not properly connected. 6, 9 Monitor is blank • Standby mode: press shutter-release button halfway. 79 • Camera in COOL-STATION: camera connected to com- 45, 47 puter or audio/video cable connected. • Voice recording is being recorded. 33 • Camera is selected for... • Interval-timer shooting in camera. In the event of common problems below before consulting your retailer or Nikon representative. Technical Notes 89 Note that disconnecting the power source as expected, check the list of continued malfunction, contact your retailer or...
User Manual
Page 106
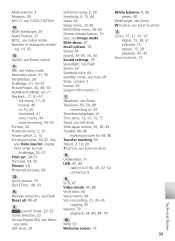
...215; 1.7˝ × 1.9˝ (W × H × D) Weight Approximately 50 g (1.8 oz) Technical Notes Specifications Nikon will not be selected from NTSC and PAL Supported languages Chinese (Simplified and Traditional), Dutch, English, French, German, Italian, Japanese,...Nikon EN-EL8 lithium-ion battery (supplied) • EH-63 AC adapter (supplied) Battery life Approximately 200 shots (EN-EL8; Measured at an ambient temperature of this product and its specifications are for any errors this manual may contain. MV-11 COOL-STATION Supported cameras COOLPIX S1...
...215; 1.7˝ × 1.9˝ (W × H × D) Weight Approximately 50 g (1.8 oz) Technical Notes Specifications Nikon will not be selected from NTSC and PAL Supported languages Chinese (Simplified and Traditional), Dutch, English, French, German, Italian, Japanese,...Nikon EN-EL8 lithium-ion battery (supplied) • EH-63 AC adapter (supplied) Battery life Approximately 200 shots (EN-EL8; Measured at an ambient temperature of this product and its specifications are for any errors this manual may contain. MV-11 COOL-STATION Supported cameras COOLPIX S1...

User Manual
Page 108
... Selector C Clock, see Date Close-up, 30 Close-ups, 21 Color options, 4, 64 98 Computer, 46 copying pictures to, 47-49 Compression, 59 Continuous, 61 COOL-STATION, 6, 8-9, 45, 47, 52 Copy (playback menu), 71 Copy (scene mode), 30 Cropping pictures, 42 Cyanotype, 64 D Date, 4, 12-13, 74-75 Date counter, 77 Date...
... Selector C Clock, see Date Close-up, 30 Close-ups, 21 Color options, 4, 64 98 Computer, 46 copying pictures to, 47-49 Compression, 59 Continuous, 61 COOL-STATION, 6, 8-9, 45, 47, 52 Copy (playback menu), 71 Copy (scene mode), 30 Cropping pictures, 42 Cyanotype, 64 D Date, 4, 12-13, 74-75 Date counter, 77 Date...
User Manual
Page 109
...-81 S (scene) mode, 22-32 Scene selection, 22 Secure Digital (SD), see Video mode Number of exposures remain- Multi selector, 3 Museum, 30 MV-11, see COOL-STATION N Night landscape, 29 Night Portrait, 27 NTSC, see Mem- ory cards Self-timer, 20 Self-timer lamp, 2, 20 Sensitivity, 4, 19, 64 Sepia, 64 Setup menu...
...-81 S (scene) mode, 22-32 Scene selection, 22 Secure Digital (SD), see Video mode Number of exposures remain- Multi selector, 3 Museum, 30 MV-11, see COOL-STATION N Night landscape, 29 Night Portrait, 27 NTSC, see Mem- ory cards Self-timer, 20 Self-timer lamp, 2, 20 Sensitivity, 4, 19, 64 Sepia, 64 Setup menu...


