User Manual
Page 1
En The Nikon Guide to Digital Photography with the DIGITAL CAMERA (En)
En The Nikon Guide to Digital Photography with the DIGITAL CAMERA (En)

User Manual
Page 2
... is provided by Identix®. All other trade names mentioned in this manual or the other documentation provided with your Nikon product are registered trademarks of their respective holders. Adobe and Acrobat are trademarks or registered trademarks of Adobe Systems Inc..... Microsoft and Windows are registered trademarks of Apple Computer, Inc. The SD logo is provided by Apical Limited. Attaching the Camera Strap Attach the camera strap as shown below. ቢ ባ Trademark Information Macintosh, Mac OS, and QuickTime are registered trademarks of the SD Card...
... is provided by Identix®. All other trade names mentioned in this manual or the other documentation provided with your Nikon product are registered trademarks of their respective holders. Adobe and Acrobat are trademarks or registered trademarks of Adobe Systems Inc..... Microsoft and Windows are registered trademarks of Apple Computer, Inc. The SD logo is provided by Apical Limited. Attaching the Camera Strap Attach the camera strap as shown below. ቢ ባ Trademark Information Macintosh, Mac OS, and QuickTime are registered trademarks of the SD Card...

User Manual
Page 3
... that should be formatted or used to store, delete, or view pictures. If a memory card is available elsewhere in this camera can be read before using the camera. Technical Notes i Introduction First Steps Basic Photography More on Photography Scene Mode Voice Recordings Movies More on Playback Menu Guide Memory Cards... memory or on the memory card. The memory card must be removed before use to prevent damage to the camera. This icon indicates that more information is inserted, all new pictures will apply only to the pictures on removable memory cards. Symbols and...
... that should be formatted or used to store, delete, or view pictures. If a memory card is available elsewhere in this camera can be read before using the camera. Technical Notes i Introduction First Steps Basic Photography More on Photography Scene Mode Voice Recordings Movies More on Playback Menu Guide Memory Cards... memory or on the memory card. The memory card must be removed before use to prevent damage to the camera. This icon indicates that more information is inserted, all new pictures will apply only to the pictures on removable memory cards. Symbols and...
User Manual
Page 4
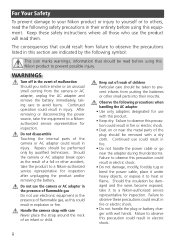
...Repairs should be taken to prevent infants from putting the batteries or other accident, take the product to a Nikon-authorized service representative for inspection. Should the camera or AC adapter break open as this could result in explosion or fire. WARNINGS Turn off in ...Observe the following symbol: This icon marks warnings, information that could result from the camera or AC adapter, unplug the AC adapter and remove the battery immediately, taking care to a Nikon-authorized service representative for inspection after unplugging the product and/or removing the battery....
...Repairs should be taken to prevent infants from putting the batteries or other accident, take the product to a Nikon-authorized service representative for inspection. Should the camera or AC adapter break open as this could result in explosion or fire. WARNINGS Turn off in ...Observe the following symbol: This icon marks warnings, information that could result from the camera or AC adapter, unplug the AC adapter and remove the battery immediately, taking care to a Nikon-authorized service representative for inspection after unplugging the product and/or removing the battery....
User Manual
Page 5
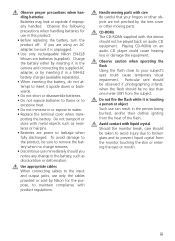
...'s eyes could cause hearing loss or damage the equipment. Charge the battery either by inserting it in the camera and connecting the supplied AC adapter, or by Nikon for use can result in this device should you are not pinched by the lens cover or other objects...62 battery charger (available separately). • When inserting the battery, do not attempt to insert it is unplugged. • Use only rechargeable Nikon EN-EL8 lithium-ion batteries (supplied). Observe proper precautions when handling batteries Batteries may leak or explode if improperly handled. If you notice any ...
...'s eyes could cause hearing loss or damage the equipment. Charge the battery either by inserting it in the camera and connecting the supplied AC adapter, or by Nikon for use can result in this device should you are not pinched by the lens cover or other objects...62 battery charger (available separately). • When inserting the battery, do not attempt to insert it is unplugged. • Use only rechargeable Nikon EN-EL8 lithium-ion batteries (supplied). Observe proper precautions when handling batteries Batteries may leak or explode if improperly handled. If you notice any ...
User Manual
Page 7
... a minimum of material that has been digitally copied or reproduced by a company. Do not use this product for business use by means of a scanner, digital camera or other device may be provided for the purpose of making illegal copies or to be punishable by law. • Items prohibited by public agencies...
... a minimum of material that has been digitally copied or reproduced by a company. Do not use this product for business use by means of a scanner, digital camera or other device may be provided for the purpose of making illegal copies or to be punishable by law. • Items prohibited by public agencies...

User Manual
Page 8
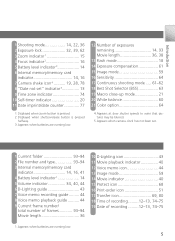
... Monitor 4 The MV-11 COOL-STATION 6 The EH-63 AC Adapter 6 First Steps 7 Inserting the Battery 7 Charging the Battery 8 Inserting Memory Cards 10 Turning the Camera On 12 Basic Setup 12 Basic Photography 14 Step 1-Select Mode 14 Step 2-Frame the Picture 15 Step 3-Focus and Shoot 16 Step 4-View the... Other Scenes 28 Voice Recordings 33 Movies 36 Movie Mode 36 Recording Movies 38 Viewing Movies 40 More on Playback 41 Viewing Pictures on the Camera 41 Viewing Pictures on TV 45 Viewing Pictures on a Computer 46 Printing Pictures 50 vi
... Monitor 4 The MV-11 COOL-STATION 6 The EH-63 AC Adapter 6 First Steps 7 Inserting the Battery 7 Charging the Battery 8 Inserting Memory Cards 10 Turning the Camera On 12 Basic Setup 12 Basic Photography 14 Step 1-Select Mode 14 Step 2-Frame the Picture 15 Step 3-Focus and Shoot 16 Step 4-View the... Other Scenes 28 Voice Recordings 33 Movies 36 Movie Mode 36 Recording Movies 38 Viewing Movies 40 More on Playback 41 Viewing Pictures on the Camera 41 Viewing Pictures on TV 45 Viewing Pictures on a Computer 46 Printing Pictures 50 vi

User Manual
Page 9
... 79 Language...80 Interface ...80 AF Assist ...80 Reset all ...80 Menus ...81 Firmware Version 81 Technical Notes 82 Optional Accessories 82 Caring for the Camera 83 Error Messages 86 Troubleshooting 89 Appendix: Focus Lock, File Storage, and Date Imprint 92 Specifications 95 Index...98 vii
... 79 Language...80 Interface ...80 AF Assist ...80 Reset all ...80 Menus ...81 Firmware Version 81 Technical Notes 82 Optional Accessories 82 Caring for the Camera 83 Error Messages 86 Troubleshooting 89 Appendix: Focus Lock, File Storage, and Date Imprint 92 Specifications 95 Index...98 vii
User Manual
Page 10
... Accessories Nikon COOLPIX cameras are engineered and proven to the highest standards and include complex electronic circuitry. Only Nikon brand electronic accessories (including battery chargers, batteries, and AC adapters) certified by Nikon specifically for use of third-party rechargeable Li-ion batteries not approved by Nikon could interfere with this Nikon digital camera are...
... Accessories Nikon COOLPIX cameras are engineered and proven to the highest standards and include complex electronic circuitry. Only Nikon brand electronic accessories (including battery chargers, batteries, and AC adapters) certified by Nikon specifically for use of third-party rechargeable Li-ion batteries not approved by Nikon could interfere with this Nikon digital camera are...
User Manual
Page 11
....com/ • For users in Europe: http://www.europe-nikon.com/support • For users in your area. Life-Long Learning As part of a Nikon COOLPIX S1 digital camera. Nikon will read it. See the URL below for your purchase of Nikon's "Life-Long Learning" commitment to ongoing product support and education...com/ Visit these sites to keep it where all those who use , and keep up-to-date with your Nikon digital camera. Introduction Introduction Thank you enjoy taking the camera on a trip), take a test shot to frequently-asked questions (FAQs), and general advice on -line at ...
....com/ • For users in Europe: http://www.europe-nikon.com/support • For users in your area. Life-Long Learning As part of a Nikon COOLPIX S1 digital camera. Nikon will read it. See the URL below for your purchase of Nikon's "Life-Long Learning" commitment to ongoing product support and education...com/ Visit these sites to keep it where all those who use , and keep up-to-date with your Nikon digital camera. Introduction Introduction Thank you enjoy taking the camera on a trip), take a test shot to frequently-asked questions (FAQs), and general advice on -line at ...
User Manual
Page 12
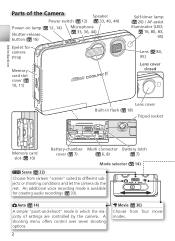
Auto ( 14) A simple "point-and-shoot" mode in which the majority of the Camera Speaker Power switch ( 12) ( 33, 40, 44) Power-on lamp ( 12, 14) Shutter-release Microphone ( 33, 36...2 Movie ( 36) Choose from sixteen "scenes" suited to different subjects or shooting conditions and let the camera do the rest. An additional voice recording mode is available for camera strap Memory card slot cover ( 10, 11) Self-timer lamp ( 20) / AF-assist illuminator ... ( 7) Mode selector ( 14) Scene ( 22) Choose from four movie modes. Introduction Parts of settings are controlled by the camera.
Auto ( 14) A simple "point-and-shoot" mode in which the majority of the Camera Speaker Power switch ( 12) ( 33, 40, 44) Power-on lamp ( 12, 14) Shutter-release Microphone ( 33, 36...2 Movie ( 36) Choose from sixteen "scenes" suited to different subjects or shooting conditions and let the camera do the rest. An additional voice recording mode is available for camera strap Memory card slot cover ( 10, 11) Self-timer lamp ( 20) / AF-assist illuminator ... ( 7) Mode selector ( 14) Scene ( 22) Choose from four movie modes. Introduction Parts of settings are controlled by the camera.

User Manual
Page 14
Introduction The Monitor The following indicators may appear in the monitor during shooting and playback (actual display varies with current camera settings): Shooting 20 21 23 4 1 5 6 19 7 8 10 9 10 +1.0 11 AUTO 999 18 17 16 14 12 AUTO 15 13 Playback 19 01.01.2005 18 00:00 100NIKON 1 9999.JPG 2 3 17 16 15 14 4 5 6 9999/9999 9 13 12 10 7 :START 11 8 4
Introduction The Monitor The following indicators may appear in the monitor during shooting and playback (actual display varies with current camera settings): Shooting 20 21 23 4 1 5 6 19 7 8 10 9 10 +1.0 11 AUTO 999 18 17 16 14 12 AUTO 15 13 Playback 19 01.01.2005 18 00:00 100NIKON 1 9999.JPG 2 3 17 16 15 14 4 5 6 9999/9999 9 13 12 10 7 :START 11 8 4
User Manual
Page 15
... 22, 36 2 Exposure lock 32, 39, 62 3 Zoom indicator1 15 4 Focus indicator2 16 5 Battery level indicator3 14 6 Internal memory/memory card indicator 14, 16 7 Camera shake icon4 .......... 19, 28, 78 8 "Date not set" indicator5 13 9 Time zone indicator 74 10 Self-timer indicator 20 11 Date imprint/date counter 77...-up mode 21 20 White balance 60 21 Color option 64 4 Appears at slow shutter speeds to warn that pictures may be blurred. 5 Appears when camera clock has not been set. 1 Current folder 93-94 2 File number and type 93-94 3 Internal memory/memory card indicator 14, 16, 41 4...
... 22, 36 2 Exposure lock 32, 39, 62 3 Zoom indicator1 15 4 Focus indicator2 16 5 Battery level indicator3 14 6 Internal memory/memory card indicator 14, 16 7 Camera shake icon4 .......... 19, 28, 78 8 "Date not set" indicator5 13 9 Time zone indicator 74 10 Self-timer indicator 20 11 Date imprint/date counter 77...-up mode 21 20 White balance 60 21 Color option 64 4 Appears at slow shutter speeds to warn that pictures may be blurred. 5 Appears when camera clock has not been set. 1 Current folder 93-94 2 File number and type 93-94 3 Internal memory/memory card indicator 14, 16, 41 4...

User Manual
Page 16
...AC inlet AC plug Power cord (connects to charge the battery or power the camera ( 8). The EH-63 AC Adapter The supplied EH-63 AC adapter can be connected directly to the camera or via direct USB connection ( 52) Camera connector ( 8) USB connector ( 47, 52) DC-IN connector ( 8) ...Audio/video connector (A/V out; 45) Placing the Camera in the COOL-STATION Place the camera in the COOL-STATION as shown below . Introduction...
...AC inlet AC plug Power cord (connects to charge the battery or power the camera ( 8). The EH-63 AC Adapter The supplied EH-63 AC adapter can be connected directly to the camera or via direct USB connection ( 52) Camera connector ( 8) USB connector ( 47, 52) DC-IN connector ( 8) ...Audio/video connector (A/V out; 45) Placing the Camera in the COOL-STATION Place the camera in the COOL-STATION as shown below . Introduction...

User Manual
Page 17
First Steps First Steps Inserting the Battery The camera uses a rechargeable Nikon EN-EL8 lithium-ion battery (supplied). 1 Open the battery-chamber cover Slide the cover in the direction shown (ᕡ) until it opens (ᕢ). ᕡ ᕢ 2 ...Insert the battery Insert the battery as the battery is inserted. Inserting the Battery Inserting the battery upside down or backwards could damage the camera. Check...
First Steps First Steps Inserting the Battery The camera uses a rechargeable Nikon EN-EL8 lithium-ion battery (supplied). 1 Open the battery-chamber cover Slide the cover in the direction shown (ᕡ) until it opens (ᕢ). ᕡ ᕢ 2 ...Insert the battery Insert the battery as the battery is inserted. Inserting the Battery Inserting the battery upside down or backwards could damage the camera. Check...

User Manual
Page 18
The power lamp on the AC adapter will not charge when the camera is on. 3 Place the camera in the COOL-STATION Place the camera in the COOL-STATION with the monitor facing forwards and the connector fully inserted in the matching connector on lamp is running low. 1 Connect the ...;). First Steps Charging the Battery Charge the battery before first use or when the battery is off. The battery will light (ᕤ). 4 1 3 2 2 Turn the camera off Charging the Battery Check that the...
The power lamp on the AC adapter will not charge when the camera is on. 3 Place the camera in the COOL-STATION Place the camera in the COOL-STATION with the monitor facing forwards and the connector fully inserted in the matching connector on lamp is running low. 1 Connect the ...;). First Steps Charging the Battery Charge the battery before first use or when the battery is off. The battery will light (ᕤ). 4 1 3 2 2 Turn the camera off Charging the Battery Check that the...

User Manual
Page 19
...or in the direction shown. Flickers Check that the battery may become hot during use another make or model of this precaution could damage the camera or COOL-STATION. 9 First Steps Removing the Battery from the COOL-STATION and unplug the AC adapter. observe due caution when removing the ...battery. The battery can be connected directly to charge the battery. 4 Charge the battery The indicator lamp next to the camera. Failure to the MV-11 COOL-STATION, the EH-63 can then be sure the DC plug is correctly inserted in the correct orientation....
...or in the direction shown. Flickers Check that the battery may become hot during use another make or model of this precaution could damage the camera or COOL-STATION. 9 First Steps Removing the Battery from the COOL-STATION and unplug the AC adapter. observe due caution when removing the ...battery. The battery can be connected directly to charge the battery. 4 Charge the battery The indicator lamp next to the camera. Failure to the MV-11 COOL-STATION, the EH-63 can then be sure the DC plug is correctly inserted in the correct orientation....
User Manual
Page 20
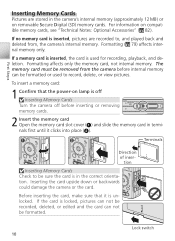
...no memory card is unlocked. Formatting affects only the memory card, not internal memory. Inserting the card upside down or backwards could damage the camera or the card. Before inserting the card, make sure that the power-on compatible memory cards, see "Technical Notes: Optional Accessories" ( ...82). First Steps Inserting Memory Cards Pictures are recorded to, and played back and deleted from the camera before inserting or removing memory cards. 2 Insert the memory card Open the memory card slot cover (ᕡ) and slide the memory card in ...
...no memory card is unlocked. Formatting affects only the memory card, not internal memory. Inserting the card upside down or backwards could damage the camera or the card. Before inserting the card, make sure that the power-on compatible memory cards, see "Technical Notes: Optional Accessories" ( ...82). First Steps Inserting Memory Cards Pictures are recorded to, and played back and deleted from the camera before inserting or removing memory cards. 2 Insert the memory card Open the memory card slot cover (ᕡ) and slide the memory card in ...
User Manual
Page 21
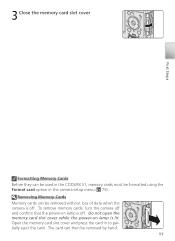
...to partially eject the card. Removing Memory Cards Memory cards can be removed without loss of data when the camera is off and confirm that the power-on lamp is off. The card can then be ...the camera setup menu ( 79). Do not open the memory card slot cover while the power-on lamp is lit. First Steps 3 Close the memory card slot cover Formatting Memory Cards Before they can be used in the COOLPIX S1, ...memory cards must be removed by hand. 11 To remove memory cards, turn the camera off .
...to partially eject the card. Removing Memory Cards Memory cards can be removed without loss of data when the camera is off and confirm that the power-on lamp is off. The card can then be ...the camera setup menu ( 79). Do not open the memory card slot cover while the power-on lamp is lit. First Steps 3 Close the memory card slot cover Formatting Memory Cards Before they can be used in the COOLPIX S1, ...memory cards must be removed by hand. 11 To remove memory cards, turn the camera off .

User Manual
Page 22
...gone out. Auto Power off (Stand-by Mode) If no operations are performed for about five seconds, the monitor will turn the camera off when the power-on setting daylight saving time. Full brightness can be displayed. London, Casablanca DaylightSaving No Yes Confirm Confirm Highlight Yes. Do... not remove the battery or memory card or disconnect the AC adapter until the power-on the battery ( 79). 12 The power-on lamp shows camera status as follows: 1 * Press 2 DATE Set time and date? TIME ZONE menu displayed. † † See "The Setup Menu: Date" ( 74) ...
...gone out. Auto Power off (Stand-by Mode) If no operations are performed for about five seconds, the monitor will turn the camera off when the power-on setting daylight saving time. Full brightness can be displayed. London, Casablanca DaylightSaving No Yes Confirm Confirm Highlight Yes. Do... not remove the battery or memory card or disconnect the AC adapter until the power-on the battery ( 79). 12 The power-on lamp shows camera status as follows: 1 * Press 2 DATE Set time and date? TIME ZONE menu displayed. † † See "The Setup Menu: Date" ( 74) ...


