
L20/19 User's Manual
Page 4
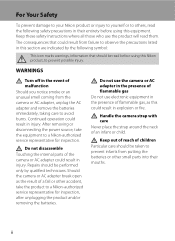
WARNINGS Turn off in the event of malfunction Should you notice smoke or an unusual smell coming from putting the batteries or other accident, take the equipment to a Nikon-authorized service representative for inspection. Keep out of reach of flammable gas, as the result of flammable gas ...Do not use the product will read before using this equipment. After removing or disconnecting the power source, take the product to a Nikon-authorized service representative for inspection, after unplugging the product and/or removing the batteries. Do not use the camera or AC adapter in...
WARNINGS Turn off in the event of malfunction Should you notice smoke or an unusual smell coming from putting the batteries or other accident, take the equipment to a Nikon-authorized service representative for inspection. Keep out of reach of flammable gas, as the result of flammable gas ...Do not use the product will read before using this equipment. After removing or disconnecting the power source, take the product to a Nikon-authorized service representative for inspection, after unplugging the product and/or removing the batteries. Do not use the camera or AC adapter in...
L20/19 User's Manual
Page 5
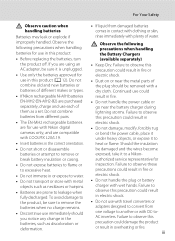
... the insulation be sure it to observe this product: • Before replacing the batteries, turn the product off. Do not combine old and new batteries or batteries of different makes or types. • If Nikon rechargeable Ni-MH batteries EN-MH2 (EN-MH2-B2) are using an AC adapter, be... fire. Failure to observe these precautions could damage the product or result in or expose to water. • Do not transport or store with COOLPIX L20/L19. • Insert batteries in the correct orientation. • Do not short or disassemble batteries or attempt to remove or break battery insulation ...
... the insulation be sure it to observe this product: • Before replacing the batteries, turn the product off. Do not combine old and new batteries or batteries of different makes or types. • If Nikon rechargeable Ni-MH batteries EN-MH2 (EN-MH2-B2) are using an AC adapter, be... fire. Failure to observe these precautions could damage the product or result in or expose to water. • Do not transport or store with COOLPIX L20/L19. • Insert batteries in the correct orientation. • Do not short or disassemble batteries or attempt to remove or break battery insulation ...
L20/19 User's Manual
Page 7
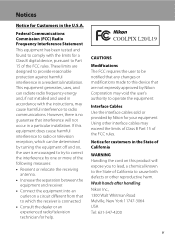
... energy and, if not installed and used in accordance with the limits for a Class B digital device, pursuant to Part 15 of the FCC rules. Nikon Inc., 1300 Walt Whitman Road Melville, New York 11747-3064 USA Tel: 631-547-4200 v This equipment generates, uses, and can be notified that ...to this product will not occur in the State of California to radio communications. CAUTIONS Modifications The FCC requires the user to be determined by turning the equipment off and on, the user is encouraged to try to correct the interference by one or more of the following measures: •...
... energy and, if not installed and used in accordance with the limits for a Class B digital device, pursuant to Part 15 of the FCC rules. Nikon Inc., 1300 Walt Whitman Road Melville, New York 11747-3064 USA Tel: 631-547-4200 v This equipment generates, uses, and can be notified that ...to this product will not occur in the State of California to radio communications. CAUTIONS Modifications The FCC requires the user to be determined by turning the equipment off and on, the user is encouraged to try to correct the interference by one or more of the following measures: •...
L20/19 User's Manual
Page 9
...Displays...11 About the Shutter-release Button...11 Attaching the Camera Strap ...11 First Steps ...12 Inserting the Batteries ...12 Applicable Batteries ...12 Turning On and Off the Camera...12 Setting Display Language, Date and Time 14 Inserting Memory Cards ...16 Removing Memory Cards...17 G Basic ...Photography and Playback: Easy Auto Mode 18 Step 1 Turn the Camera On and Select G (Easy Auto) Mode 18 Indicators Displayed in G (Easy auto) Mode 19 Step 2 Frame a Picture ...20 Using...
...Displays...11 About the Shutter-release Button...11 Attaching the Camera Strap ...11 First Steps ...12 Inserting the Batteries ...12 Applicable Batteries ...12 Turning On and Off the Camera...12 Setting Display Language, Date and Time 14 Inserting Memory Cards ...16 Removing Memory Cards...17 G Basic ...Photography and Playback: Easy Auto Mode 18 Step 1 Turn the Camera On and Select G (Easy Auto) Mode 18 Indicators Displayed in G (Easy auto) Mode 19 Step 2 Frame a Picture ...20 Using...

L20/19 User's Manual
Page 18
...*1 .........18, 27, 33, 44, 53 a Number of the Camera Introduction The Monitor The following indicators may appear in the monitor during shooting and playback will turn off after a few seconds (A 89). The indicators and photo info displayed during shooting and playback (actual display varies with current camera settings). Refer to the... 73 22 Continuous shooting mode 75 23 Self-timer indicator 30 *1 Differs according to the sections on each mode for details. 6 *2 K and K are displayed on L20, and z and y are displayed on L19.
...*1 .........18, 27, 33, 44, 53 a Number of the Camera Introduction The Monitor The following indicators may appear in the monitor during shooting and playback will turn off after a few seconds (A 89). The indicators and photo info displayed during shooting and playback (actual display varies with current camera settings). Refer to the... 73 22 Continuous shooting mode 75 23 Self-timer indicator 30 *1 Differs according to the sections on each mode for details. 6 *2 K and K are displayed on L20, and z and y are displayed on L19.
L20/19 User's Manual
Page 20
... camera is displayed, you can return to shooting mode by pressing the shooting mode button again. While the shooting-mode selection menu is turned off, hold down c to turn the camera on the last scene mode selected. Introduction Basic Operations The Shooting Mode Button • Press the shooting mode button in playback...
... camera is displayed, you can return to shooting mode by pressing the shooting mode button again. While the shooting-mode selection menu is turned off, hold down c to turn the camera on the last scene mode selected. Introduction Basic Operations The Shooting Mode Button • Press the shooting mode button in playback...
L20/19 User's Manual
Page 24
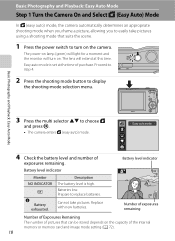
... Two LR6/L40 alkaline batteries (batteries supplied) • Two FR6/L91 lithium batteries • Two EN-MH2 Ni-MH (nickel metal hydride) rechargeable batteries Turning On and Off the Camera To turn on. If the camera is turned off . The power-on lamp (green) will light for a moment and the monitor will... turn off , hold the camera upside down c to turn the camera on the camera, press the power switch. When the camera turns off, both the power-on lamp and monitor will turn on in playback mode. 12 Press the power switch again ...
... Two LR6/L40 alkaline batteries (batteries supplied) • Two FR6/L91 lithium batteries • Two EN-MH2 Ni-MH (nickel metal hydride) rechargeable batteries Turning On and Off the Camera To turn on. If the camera is turned off . The power-on lamp (green) will light for a moment and the monitor will... turn off , hold the camera upside down c to turn the camera on the camera, press the power switch. When the camera turns off, both the power-on lamp and monitor will turn on in playback mode. 12 Press the power switch again ...
L20/19 User's Manual
Page 25
...observe this precaution could result in overheating or in the setup menu (A 82). 13 After a further three minutes, the Auto off function will turn the camera off and open the battery-chamber/ memory card slot cover. The default setting is determined by the Auto off setting (A 94) ...passes before the camera enters standby mode is the type of different makes or types. • Batteries with the following defects cannot be used , turn the camera on the manufacturer. Inserting the Batteries B Removing the Batteries Confirm the power-on page iii and the section, "The Battery" (A ...
...observe this precaution could result in overheating or in the setup menu (A 82). 13 After a further three minutes, the Auto off function will turn the camera off and open the battery-chamber/ memory card slot cover. The default setting is determined by the Auto off setting (A 94) ...passes before the camera enters standby mode is the type of different makes or types. • Batteries with the following defects cannot be used , turn the camera on the manufacturer. Inserting the Batteries B Removing the Batteries Confirm the power-on page iii and the section, "The Battery" (A ...
L20/19 User's Manual
Page 26
...selected, the W mark appears on the top of the monitor. When the daylight saving time setting is selected, the date and time will turn on the camera. For information on . Setting Display Language, Date and Time A language-selection dialog is displayed the first time the camera is... turned on. 1 Press the power switch to turn on. No Yes Cancel London Casablanca Back D Daylight Saving Time To use the camera in an area where daylight saving time is...
...selected, the W mark appears on the top of the monitor. When the daylight saving time setting is selected, the date and time will turn on the camera. For information on . Setting Display Language, Date and Time A language-selection dialog is displayed the first time the camera is... turned on. 1 Press the power switch to turn on. No Yes Cancel London Casablanca Back D Daylight Saving Time To use the camera in an area where daylight saving time is...

L20/19 User's Manual
Page 28
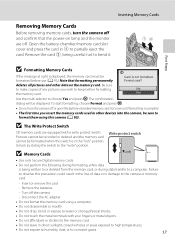
... play back, delete or transfer pictures from falling out. 2 Insert the memory card. If a memory card is correctly oriented. 16 Remove the memory card to turn off and open the battery-chamber/ memory card slot cover. Be sure to store pictures in correctly until it clicks into place.
... play back, delete or transfer pictures from falling out. 2 Insert the memory card. If a memory card is correctly oriented. 16 Remove the memory card to turn off and open the battery-chamber/ memory card slot cover. Be sure to store pictures in correctly until it clicks into place.
L20/19 User's Manual
Page 29
...• Use only Secure Digital memory cards. • Do not perform the following during data transfer to the camera or memory card: - Turn off or open the battery-chamber/memory card slot cover until formatting is in direct sunlight, closed vehicles or areas exposed to high temperatures. &#... is displayed, the memory card must be formatted when this camera (A 95). To start formatting, choose Format and press k. • Do not turn the camera off and confirm that formatting permanently Card is not formatted. Remove the card 2, being careful not to bend it. 12 First Steps B...
...• Use only Secure Digital memory cards. • Do not perform the following during data transfer to the camera or memory card: - Turn off or open the battery-chamber/memory card slot cover until formatting is in direct sunlight, closed vehicles or areas exposed to high temperatures. &#... is displayed, the memory card must be formatted when this camera (A 95). To start formatting, choose Format and press k. • Do not turn the camera off and confirm that formatting permanently Card is not formatted. Remove the card 2, being careful not to bend it. 12 First Steps B...
L20/19 User's Manual
Page 30
...Battery level indicator Battery level indicator Monitor NO INDICATOR B N Battery exhausted. The lens will turn on the camera. Cannot take pictures using a shooting mode that suits the scene. 1 Press the power switch to turn on the capacity of pictures that can be stored depends on . Batteries low. Basic Photography... and Playback: Easy Auto Mode Step 1 Turn the Camera On and Select G (Easy Auto) Mode In G (easy auto) mode, the camera automatically determines an appropriate shooting mode when you ...
...Battery level indicator Battery level indicator Monitor NO INDICATOR B N Battery exhausted. The lens will turn on the camera. Cannot take pictures using a shooting mode that suits the scene. 1 Press the power switch to turn on the capacity of pictures that can be stored depends on . Batteries low. Basic Photography... and Playback: Easy Auto Mode Step 1 Turn the Camera On and Select G (Easy Auto) Mode In G (easy auto) mode, the camera automatically determines an appropriate shooting mode when you ...

L20/19 User's Manual
Page 31
...• The self-timer (A 30) and exposure compensation (A 32) are as follows: L20: K Normal (3648×2736) L19: y Normal (3264×2448) The indicators and photo info displayed during shooting and playback will turn off after a few seconds (A 89). Image mode Display image size and quality set to ... function is not activated in the movie mode.) • When the camera detects shaking and increases shutter speed, the motion detection indicator turns green. 19 Motion detection indicator Reduce the blurring caused by pressing d. • See "Easy auto mode" (A 26) for the current ...
...• The self-timer (A 30) and exposure compensation (A 32) are as follows: L20: K Normal (3648×2736) L19: y Normal (3264×2448) The indicators and photo info displayed during shooting and playback will turn off after a few seconds (A 89). Image mode Display image size and quality set to ... function is not activated in the movie mode.) • When the camera detects shaking and increases shutter speed, the motion detection indicator turns green. 19 Motion detection indicator Reduce the blurring caused by pressing d. • See "Easy auto mode" (A 26) for the current ...

L20/19 User's Manual
Page 32
... a human face (front view), that the built-in effect, the shooting mode is above the lens. 2 Frame the picture. When taking pictures in "tall" orientation, turn the camera so that face will be in both hands, keeping your fingers and other faces will be framed by a yellow double border. In this...
... a human face (front view), that the built-in effect, the shooting mode is above the lens. 2 Frame the picture. When taking pictures in "tall" orientation, turn the camera so that face will be in both hands, keeping your fingers and other faces will be framed by a yellow double border. In this...

L20/19 User's Manual
Page 33
... is increased beyond V. When zoom is applied at the current image mode setting. at the telephoto end, i.e. Digital zoom is initiated and the zoom indicator turns yellow to a max. The position of V moves to magnify images, resulting in slight deterioration of picture quality. Step 2 Frame a Picture Zoom out Zoom in on...
... is increased beyond V. When zoom is applied at the current image mode setting. at the telephoto end, i.e. Digital zoom is initiated and the zoom indicator turns yellow to a max. The position of V moves to magnify images, resulting in slight deterioration of picture quality. Step 2 Frame a Picture Zoom out Zoom in on...
L20/19 User's Manual
Page 37
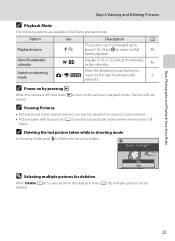
Press k to return to the last shooting mode 8 selected. C Power on by pressing c When the camera is off, hold down c to turn on the camera in shooting mode In shooting mode, press l to about 10×. The lens will be deleted. 25 C Deleting the last picture taken ...
Press k to return to the last shooting mode 8 selected. C Power on by pressing c When the camera is off, hold down c to turn on the camera in shooting mode In shooting mode, press l to about 10×. The lens will be deleted. 25 C Deleting the last picture taken ...
L20/19 User's Manual
Page 41
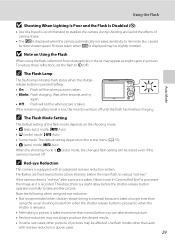
...flash lamp indicates flash status when the shutterrelease button is pressed halfway. • On: Flash will fire when picture is low, the monitor will turn off . If the remaining battery level is taken. • Blinks: Flash charging. C Red-eye Reduction This camera is recorded. Note the ...following when using the flash, reflections from when the shutter-release button is taken, Nikon's own In-Camera Red Eye Fix processes the image as bright spots in above cases. 29 B Note on the scene menu (A 33). • ...
...flash lamp indicates flash status when the shutterrelease button is pressed halfway. • On: Flash will fire when picture is low, the monitor will turn off . If the remaining battery level is taken. • Blinks: Flash charging. C Red-eye Reduction This camera is recorded. Note the ...following when using the flash, reflections from when the shutter-release button is taken, Nikon's own In-Camera Red Eye Fix processes the image as bright spots in above cases. 29 B Note on the scene menu (A 33). • ...

L20/19 User's Manual
Page 43
.... If a setting is displayed. 2 Use the multi selector to choose ON and press k. Note that the flash may be cancelled. The macro mode icon (F) is turned off. 31 Macro mode 3 Press the zoom buttons to move to the wide zoom position. • Macro mode can focus on objects as close as...
.... If a setting is displayed. 2 Use the multi selector to choose ON and press k. Note that the flash may be cancelled. The macro mode icon (F) is turned off. 31 Macro mode 3 Press the zoom buttons to move to the wide zoom position. • Macro mode can focus on objects as close as...

L20/19 User's Manual
Page 44
... Exposure Compensation The camera tends to lower exposure when the frame is dominated by brightly lit objects and to increase exposure when the frame is turned off. Exposure Compensation Exposure compensation is used to alter exposure from the value suggested by the camera to make pictures brighter or darker. 1 Press o (exposure...
... Exposure Compensation The camera tends to lower exposure when the frame is dominated by brightly lit objects and to increase exposure when the frame is turned off. Exposure Compensation Exposure compensation is used to alter exposure from the value suggested by the camera to make pictures brighter or darker. 1 Press o (exposure...
L20/19 User's Manual
Page 46
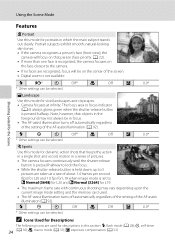
... the camera will be selected. m W n Off p Off o 0.0* * Other settings can be on the face closest to i Normal (3648) for L20 and R Normal (3264) for L19. • The maximum frame rate with continuous shooting may not always be in this section: m, flash mode (A 28);... Off o 0.0* * Other settings can be selected. C Icons Used for Descriptions The following icons are used . • The AF-assist illumination turns off automatically regardless of the setting of the AF-assist illumination (A 92). d Sports Use this mode for dynamic action shots that objects in the ...
... the camera will be selected. m W n Off p Off o 0.0* * Other settings can be on the face closest to i Normal (3648) for L20 and R Normal (3264) for L19. • The maximum frame rate with continuous shooting may not always be in this section: m, flash mode (A 28);... Off o 0.0* * Other settings can be selected. C Icons Used for Descriptions The following icons are used . • The AF-assist illumination turns off automatically regardless of the setting of the AF-assist illumination (A 92). d Sports Use this mode for dynamic action shots that objects in the ...


