L12 User's Manual
Page 13
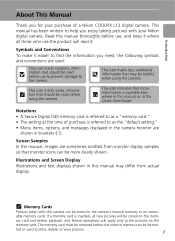
... the time of a Nikon COOLPIX L12 digital camera. j mation that monitor icons can be read it where all new pictures will be read before the internal memory can be helpful when using the camera. able memory cards. Introduction About This Manual Thank you for your Nikon digital camera. Illustrations and Screen Display Illustrations and text displays shown in brackets ([ ]). If a memory card is referred to help you enjoy taking pictures with this manual or in the camera's internal memory or on remov- Screen...
... the time of a Nikon COOLPIX L12 digital camera. j mation that monitor icons can be read it where all new pictures will be read before the internal memory can be helpful when using the camera. able memory cards. Introduction About This Manual Thank you for your Nikon digital camera. Illustrations and Screen Display Illustrations and text displays shown in brackets ([ ]). If a memory card is referred to help you enjoy taking pictures with this manual or in the camera's internal memory or on remov- Screen...
L12 User's Manual
Page 14
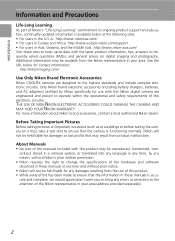
... battery chargers, batteries, and AC adapters) certified by any means, without prior notice. • Nikon will not be available from product malfunction. Nikon will not be held liable for any time and without Nikon's prior written permission. • Nikon reserves the right to change the specifications of the hardware and software described in these manuals at any damages resulting from the use with this Nikon digital camera...
... battery chargers, batteries, and AC adapters) certified by any means, without prior notice. • Nikon will not be available from product malfunction. Nikon will not be held liable for any time and without Nikon's prior written permission. • Nikon reserves the right to change the specifications of the hardware and software described in these manuals at any damages resulting from the use with this Nikon digital camera...
L12 User's Manual
Page 26
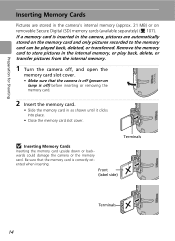
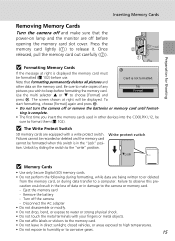
... or removing the memory card. 2 Insert the memory card. • Slide the memory card in the internal memory, or play back, delete, or transfer pictures from the internal memory. 1 Turn the camera off, and open the memory card slot cover. • Make sure that the camera is off (power-on removable Secure Digital (SD) memory cards (available separately) (c 107). Terminals j Inserting Memory Cards Inserting the memory card upside down or backwards could damage the camera or the memory card. If a memory card is inserted in the camera's internal memory...
... or removing the memory card. 2 Insert the memory card. • Slide the memory card in the internal memory, or play back, delete, or transfer pictures from the internal memory. 1 Turn the camera off, and open the memory card slot cover. • Make sure that the camera is off (power-on removable Secure Digital (SD) memory cards (available separately) (c 107). Terminals j Inserting Memory Cards Inserting the memory card upside down or backwards could damage the camera or the memory card. If a memory card is inserted in the camera's internal memory...
L12 User's Manual
Page 27
... COOLPIX L12, be formatted when this pre- Write protect switch j Memory Cards • Use only Secure Digital (SD) memory cards. • Do not perform the following during data transfer to a computer. The screen shown at right is complete. • The first time you wish to keep before use. Remove the battery - Press the memory card lightly ( ) to choose [Format] and press d. ting is displayed the memory card must be displayed. Unlock by sliding the switch to the "write" position. Turn...
... COOLPIX L12, be formatted when this pre- Write protect switch j Memory Cards • Use only Secure Digital (SD) memory cards. • Do not perform the following during data transfer to a computer. The screen shown at right is complete. • The first time you wish to keep before use. Remove the battery - Press the memory card lightly ( ) to choose [Format] and press d. ting is displayed the memory card must be displayed. Unlock by sliding the switch to the "write" position. Turn...
L12 User's Manual
Page 32
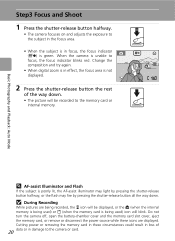
... Shoot 1 Press the shutter-release button halfway. • The camera focuses on and adjusts the exposure to the subject in the focus area. • When the subject is in focus, the focus indicator (p) is unable to focus, the focus indicator blinks red. Cutting power or removing the memory card in these icons are being used) or O (when the memory card is poorly lit, the AF-assist illuminator may light by pressing the shutter-release button halfway, or the flash...
... Shoot 1 Press the shutter-release button halfway. • The camera focuses on and adjusts the exposure to the subject in the focus area. • When the subject is in focus, the focus indicator (p) is unable to focus, the focus indicator blinks red. Cutting power or removing the memory card in these icons are being used) or O (when the memory card is poorly lit, the AF-assist illuminator may light by pressing the shutter-release button halfway, or the flash...
L12 User's Manual
Page 35
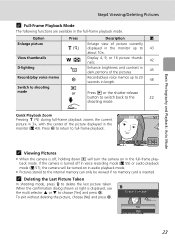
... :ZOOM k Viewing Pictures • When the camera is displayed, use the multi selector G or H to the 22 shooting mode. Basic Photography and Playback: Auto Mode Step4 Viewing/Deleting Pictures k Full-Frame Playback Mode The following functions are available in the monitor (c 43). To exit without deleting the picture, choose [No] and press d. When the confirmation dialog shown at right is off in voice recording mode (c 55) or audio playback mode (c 57), the camera will turn...
... :ZOOM k Viewing Pictures • When the camera is displayed, use the multi selector G or H to the 22 shooting mode. Basic Photography and Playback: Auto Mode Step4 Viewing/Deleting Pictures k Full-Frame Playback Mode The following functions are available in the monitor (c 43). To exit without deleting the picture, choose [No] and press d. When the confirmation dialog shown at right is off in voice recording mode (c 55) or audio playback mode (c 57), the camera will turn...
L12 User's Manual
Page 37
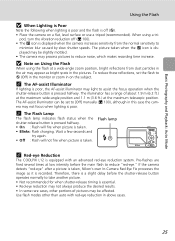
... delay before the main flash to reduce noise, which makes recording time increase. The AF-assist illuminator can be slightly mottled. • The camera may appear as it is equipped with red-eye reduction in the pictures. To reduce these reflections, set to minimize blur caused by slow shutter speeds. j Note on the subject. Basic Photography and Playback: Auto Mode Using the Flash j When Lighting is Poor Note...
... delay before the main flash to reduce noise, which makes recording time increase. The AF-assist illuminator can be slightly mottled. • The camera may appear as it is equipped with red-eye reduction in the pictures. To reduce these reflections, set to minimize blur caused by slow shutter speeds. j Note on the subject. Basic Photography and Playback: Auto Mode Using the Flash j When Lighting is Poor Note...
L12 User's Manual
Page 39
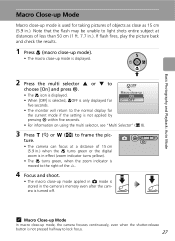
... mode, the camera focuses continuously, even when the shutter-release button is turned off. Basic Photography and Playback: Auto Mode Macro Close-up Mode Macro close-up mode is used for the current mode if the setting is not applied by pressing d within five seconds. • For information on using the multi selector, see "Multi Selector" (c 8). 3 Press v (k) or t (j) to frame the pic- Note that the flash may be unable to light shots...
... mode, the camera focuses continuously, even when the shutter-release button is turned off. Basic Photography and Playback: Auto Mode Macro Close-up Mode Macro close-up mode is used for the current mode if the setting is not applied by pressing d within five seconds. • For information on using the multi selector, see "Multi Selector" (c 8). 3 Press v (k) or t (j) to frame the pic- Note that the flash may be unable to light shots...

L12 User's Manual
Page 56
... for pictures taken with nonCOOLPIX L12 digital cameras. • If a copy created using crop, D-Lighting, and small picture have the same transfer marking 44 (c 89) as separate files (c 108). The original pictures are not deleted if copies created with editing functions are deleted. • Edited copies are stored with the same recording date and time as the original. • Copies created using the COOLPIX L12 is viewed on a different digital camera, the picture may not be displayed or...
... for pictures taken with nonCOOLPIX L12 digital cameras. • If a copy created using crop, D-Lighting, and small picture have the same transfer marking 44 (c 89) as separate files (c 108). The original pictures are not deleted if copies created with editing functions are deleted. • Edited copies are stored with the same recording date and time as the original. • Copies created using the COOLPIX L12 is viewed on a different digital camera, the picture may not be displayed or...
L12 User's Manual
Page 61
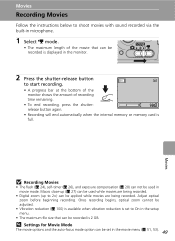
... be applied while movies are being recorded. l Settings for Movie Mode The movie options and the auto-focus mode option can not be used while movies are being recorded. • Digital zoom (up (c 27) can be recorded is 2 GB. Movies j Recording Movies • The flash (c 24), self-timer (c 26), and exposure compensation (c 28) can be set to On in the setup menu. • The maximum file size that can be recorded is displayed in movie mode. Macro close-up to start recording. • A progress...
... be applied while movies are being recorded. l Settings for Movie Mode The movie options and the auto-focus mode option can not be used while movies are being recorded. • Digital zoom (up (c 27) can be recorded is 2 GB. Movies j Recording Movies • The flash (c 24), self-timer (c 26), and exposure compensation (c 28) can be set to On in the setup menu. • The maximum file size that can be recorded is displayed in movie mode. Macro close-up to start recording. • A progress...
L12 User's Manual
Page 91
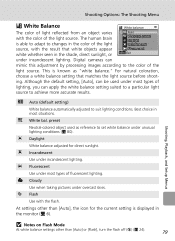
G Auto (default setting) White balance automatically adjusted to achieve more accurate results. preset Neutral-colored object used under incandescent lighting. i Fluorescent Use under incandescent lighting. l Flash Use with the result that matches the light source before shoot- preset Daylight Incandescent source, with the flash. Digital cameras can mimic this adjustment by processing images according to the color of the light Auto White bal. This is displayed in most types of the light source. For natural coloration, choose a white balance setting that...
G Auto (default setting) White balance automatically adjusted to achieve more accurate results. preset Neutral-colored object used under incandescent lighting. i Fluorescent Use under incandescent lighting. l Flash Use with the result that matches the light source before shoot- preset Daylight Incandescent source, with the flash. Digital cameras can mimic this adjustment by processing images according to the color of the light Auto White bal. This is displayed in most types of the light source. For natural coloration, choose a white balance setting that...

L12 User's Manual
Page 100
... D icon (c 7) in the internal memory or on the memory card will delete protected files (c 102). See "Navigating the Menus" (c 86) for more information on using this function. Transfer important images to delete all pictures. • To exit without deleting pictures, choose [NO] and press d. Note, however, that formatting will be deleted. Back ON/OFF Protected pictures are protected and cannot be deleted. or 9-picture thumbnail playback mode. 88 C Erase all images Delete all pictures stored in full-frame play- Playback Options: The Playback Menu A Delete...
... D icon (c 7) in the internal memory or on the memory card will delete protected files (c 102). See "Navigating the Menus" (c 86) for more information on using this function. Transfer important images to delete all pictures. • To exit without deleting pictures, choose [NO] and press d. Note, however, that formatting will be deleted. Back ON/OFF Protected pictures are protected and cannot be deleted. or 9-picture thumbnail playback mode. 88 C Erase all images Delete all pictures stored in full-frame play- Playback Options: The Playback Menu A Delete...

L12 User's Manual
Page 102
... the memory card when playback mode is JPEG, AVI, or WAV. • The camera may be displayed. First, select from the largest number existing between the internal memory and a memory card. ONM Copy pictures from the largest folder number available. To copy all the pictures in the destination memory is not copied and an error message will be created, the folder is 18 (DSCN0018.JPG), the copied pictures are assigned numbers starting from memory card to internal memory. Choose [Selected images...
... the memory card when playback mode is JPEG, AVI, or WAV. • The camera may be displayed. First, select from the largest number existing between the internal memory and a memory card. ONM Copy pictures from the largest folder number available. To copy all the pictures in the destination memory is not copied and an error message will be created, the folder is 18 (DSCN0018.JPG), the copied pictures are assigned numbers starting from memory card to internal memory. Choose [Selected images...
L12 User's Manual
Page 114
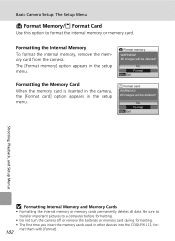
...be deleted! No Format Exit Shooting, Playback, and Setup Menus j Formatting Internal Memory and Memory Cards • Formatting the internal memory or memory cards permanently deletes all data. The [Format memory] option appears in the setup menu. All images will be deleted! Basic Camera Setup: The Setup Menu M Format Memory/O Format Card Use this option to a computer before formatting. • Do not turn the camera off or remove the batteries or memory card during formatting. • The first time you insert the memory cards used in other devices into the COOLPIX L12...
...be deleted! No Format Exit Shooting, Playback, and Setup Menus j Formatting Internal Memory and Memory Cards • Formatting the internal memory or memory cards permanently deletes all data. The [Format memory] option appears in the setup menu. All images will be deleted! Basic Camera Setup: The Setup Menu M Format Memory/O Format Card Use this option to a computer before formatting. • Do not turn the camera off or remove the batteries or memory card during formatting. • The first time you insert the memory cards used in other devices into the COOLPIX L12...
L12 User's Manual
Page 117
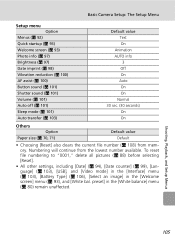
... Option Default value Paper size (c 70, 71) Default • Choosing [Reset] also clears the current file number (c 108) from the lowest number available. To reset file numbering to "0001," delete all pictures (c 88) before selecting [Reset]. • All other settings, including [Date] (c 94), [Date counter] (c 99), [Language] (c 103), [USB], and [Video mode] in the [Interface] menu (c 103), [Battery Type] (c 106), [Select an image] in the [White balance] menu (c 80) remain unaffected. Numbering will continue from mem- Shooting, Playback, and Setup Menus...
... Option Default value Paper size (c 70, 71) Default • Choosing [Reset] also clears the current file number (c 108) from the lowest number available. To reset file numbering to "0001," delete all pictures (c 88) before selecting [Reset]. • All other settings, including [Date] (c 94), [Date counter] (c 99), [Language] (c 103), [USB], and [Video mode] in the [Interface] menu (c 103), [Battery Type] (c 106), [Select an image] in the [White balance] menu (c 80) remain unaffected. Numbering will continue from mem- Shooting, Playback, and Setup Menus...

L12 User's Manual
Page 126
... did not start. modes. USB cable disconnected during transfer or printing. Turn camera off and reconnecting cable. 65, 68 [USB] option incorrect. If PictureProject displays error, click [OK] to one of the three proper position. I Communications error Lens error. Technical Notes 114 other device. current time zone Lens error J I Transfer error Transfer error. • Check battery level. 16 • Check that it is precisely set selector is 63 connected. Error Messages Display K File contains no image data. Disable protection. 88 This image cannot be...
... did not start. modes. USB cable disconnected during transfer or printing. Turn camera off and reconnecting cable. 65, 68 [USB] option incorrect. If PictureProject displays error, click [OK] to one of the three proper position. I Communications error Lens error. Technical Notes 114 other device. current time zone Lens error J I Transfer error Transfer error. • Check battery level. 16 • Check that it is precisely set selector is 63 connected. Error Messages Display K File contains no image data. Disable protection. 88 This image cannot be...
L12 User's Manual
Page 129
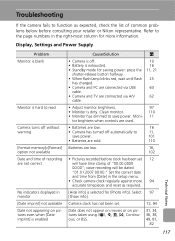
... Camera turns off without warning [Format memory]>[Format] option not available Date and time of recording are not correct No indicators displayed in monitor [Date imprint] not available Date not appearing on pictures taken using F, P, N, F, Continu- Moni- 11 tor brightens when controls are used. • Batteries are low. 16 • Camera has turned off . • Battery is exhausted. • Standby mode for saving power: press the shutter-release button halfway. • When flash lamp blinks red, wait until flash has charged...
... Camera turns off without warning [Format memory]>[Format] option not available Date and time of recording are not correct No indicators displayed in monitor [Date imprint] not available Date not appearing on pictures taken using F, P, N, F, Continu- Moni- 11 tor brightens when controls are used. • Batteries are low. 16 • Camera has turned off . • Battery is exhausted. • Standby mode for saving power: press the shutter-release button halfway. • When flash lamp blinks red, wait until flash has charged...
L12 User's Manual
Page 133
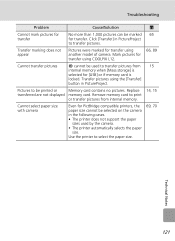
... transfer using COOLPIX L12. Cannot transfer pictures d cannot be used by the camera. • The printer automatically selects the paper size. Pictures to select the paper size. 69, 70 Technical Notes 121 Troubleshooting Problem Cause/Solution c Cannot mark pictures for transfer No more than 1,000 pictures can be marked 65 for transfer using 66, 89 another model of camera. Transfer pictures using the [Transfer] button in the following cases. • The printer does not support the paper sizes used to transfer pictures from internal memory. Replace...
... transfer using COOLPIX L12. Cannot transfer pictures d cannot be used by the camera. • The printer automatically selects the paper size. Pictures to select the paper size. 69, 70 Technical Notes 121 Troubleshooting Problem Cause/Solution c Cannot mark pictures for transfer No more than 1,000 pictures can be marked 65 for transfer using 66, 89 another model of camera. Transfer pictures using the [Transfer] button in the following cases. • The printer does not support the paper sizes used to transfer pictures from internal memory. Replace...

L12 User's Manual
Page 134
... screen(640)] • 3,072 × 1,728 [16:9] 122 max. CCD Total pixels 7.41 million Lens Focal length 3× Zoom-Nikkor lens 5.7-17.1 mm (equivalent with 35mm [135] format picture angle: 35-105 mm) f/-number Construction f/2.8-4.7 5 elements in . Specifications Nikon COOLPIX L12 Digital Camera Type Compact digital camera Effective pixels CCD 7.1 million 1/2.5-in 5 groups Digital zoom Up to ∞ (when the zoom indicator is positioned over S) Focus-area selection Center AF-assist illumination...
... screen(640)] • 3,072 × 1,728 [16:9] 122 max. CCD Total pixels 7.41 million Lens Focal length 3× Zoom-Nikkor lens 5.7-17.1 mm (equivalent with 35mm [135] format picture angle: 35-105 mm) f/-number Construction f/2.8-4.7 5 elements in . Specifications Nikon COOLPIX L12 Digital Camera Type Compact digital camera Effective pixels CCD 7.1 million 1/2.5-in 5 groups Digital zoom Up to ∞ (when the zoom indicator is positioned over S) Focus-area selection Center AF-assist illumination...

L12 User's Manual
Page 140
... 103 Panorama assist 35, 36 G 37 Paper size 70, 71 Party/indoor 32 PictBridge 67, 125 Playback full-frame playback 22, 23 thumbnail payback 42 viewing pictures 23 Playback menu 85 Power saving 11 Power switch 4, 10 Power-on lamp 10 Print set 73 printing date 74 shooting information 74 Printing pictures 67, 69, 70 direct printing 67 Protect 88 Q Quick startup 93 R Red-eye reduction 25 Reset all 104 RSCN 108 S Self-timer 26 Self-timer lamp 4 Setup menu 91 Shooting menu 76 Shutter-release button 4, 20...
... 103 Panorama assist 35, 36 G 37 Paper size 70, 71 Party/indoor 32 PictBridge 67, 125 Playback full-frame playback 22, 23 thumbnail payback 42 viewing pictures 23 Playback menu 85 Power saving 11 Power switch 4, 10 Power-on lamp 10 Print set 73 printing date 74 shooting information 74 Printing pictures 67, 69, 70 direct printing 67 Protect 88 Q Quick startup 93 R Red-eye reduction 25 Reset all 104 RSCN 108 S Self-timer 26 Self-timer lamp 4 Setup menu 91 Shooting menu 76 Shutter-release button 4, 20...


