
Reference Manual
Page 8
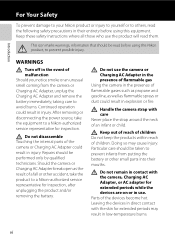
... a fall or other small parts into their entirety before using this Nikon product, to prevent possible injury. Do not use the camera or Charging AC Adapter in the presence of flammable gas Using the camera in the presence of flammable gases such as propane and gasoline, as... mouths. Do not remain in contact with the camera, Charging AC Adapter, or AC adapter for inspection, after unplugging the product and/or removing the battery. After removing or disconnecting the power source, take the product to a Nikon-authorized service representative for extended periods while the devices...
... a fall or other small parts into their entirety before using this Nikon product, to prevent possible injury. Do not use the camera or Charging AC Adapter in the presence of flammable gas Using the camera in the presence of flammable gases such as propane and gasoline, as... mouths. Do not remain in contact with the camera, Charging AC Adapter, or AC adapter for inspection, after unplugging the product and/or removing the battery. After removing or disconnecting the power source, take the product to a Nikon-authorized service representative for extended periods while the devices...
Reference Manual
Page 10
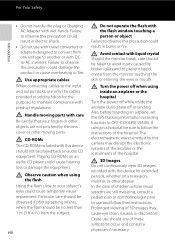
Failure to OFF (COOLPIX S9300). Avoid contact with liquid crystal Should the monitor break, care should be taken to avoid injury caused by this camera may cause eye strain, nausea, or discomfort. The electromagnetic..., monitor, or other moving parts with product regulations. Turn the power off or landing. If using inside an airplane or the hospital Turn the power off while inside the airplane during take off when using in .)...of children whose visual systems are not pinched by Nikon for extended periods, whether on an audio CD player could result in burns or fire.
Failure to OFF (COOLPIX S9300). Avoid contact with liquid crystal Should the monitor break, care should be taken to avoid injury caused by this camera may cause eye strain, nausea, or discomfort. The electromagnetic..., monitor, or other moving parts with product regulations. Turn the power off or landing. If using inside an airplane or the hospital Turn the power off while inside the airplane during take off when using in .)...of children whose visual systems are not pinched by Nikon for extended periods, whether on an audio CD player could result in burns or fire.
Reference Manual
Page 20
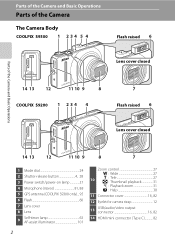
... of the Camera The Camera Body COOLPIX S9300 1 2 3 4 5 4 Flash raised 6 Lens cover closed Parts of the Camera and Basic Operations 14 13 12 11 10 9 8 COOLPIX S9200 1 2 3 4 4 7 Flash raised 6 Lens cover closed 14 13 12 11 10 9 8 7 1 Mode dial 24 2 Shutter-release button 4, 28 3 Power switch/power-on lamp 21 4 Microphone (stereo 81, 88 5 GPS antenna (COOLPIX S9300 only)... 95...
... of the Camera The Camera Body COOLPIX S9300 1 2 3 4 5 4 Flash raised 6 Lens cover closed Parts of the Camera and Basic Operations 14 13 12 11 10 9 8 COOLPIX S9200 1 2 3 4 4 7 Flash raised 6 Lens cover closed 14 13 12 11 10 9 8 7 1 Mode dial 24 2 Shutter-release button 4, 28 3 Power switch/power-on lamp 21 4 Microphone (stereo 81, 88 5 GPS antenna (COOLPIX S9300 only)... 95...
Reference Manual
Page 21
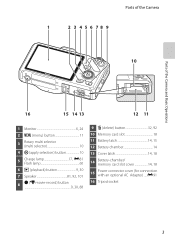
Parts of the Camera 1 2 3 4 5 6 78 9 10 Parts of the Camera and Basic Operations 16 15 14 13 12 11 1 Monitor 6, 24 2 d (menu) button 11 3 Rotary multi selector (multi selector 10 4 k (apply selection) button 10 5 Charge ... 18 11 Battery latch 14, 15 12 Battery chamber 14 13 Cover latch 14, 18 14 Battery-chamber/ memory card slot cover 14, 18 15 Power connector cover (for connection with an optional AC Adapter) .....E91 16 Tripod socket 3
Parts of the Camera 1 2 3 4 5 6 78 9 10 Parts of the Camera and Basic Operations 16 15 14 13 12 11 1 Monitor 6, 24 2 d (menu) button 11 3 Rotary multi selector (multi selector 10 4 k (apply selection) button 10 5 Charge ... 18 11 Battery latch 14, 15 12 Battery chamber 14 13 Cover latch 14, 18 14 Battery-chamber/ memory card slot cover 14, 18 15 Power connector cover (for connection with an optional AC Adapter) .....E91 16 Tripod socket 3
Reference Manual
Page 35
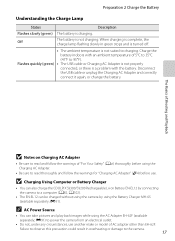
...AC Adapter is not properly connected, or there is a problem with an ambient temperature of 5°C to 35°C (41°F to power the camera from an electrical outlet. • Do not, under any circumstances, use . Disconnect the USB cable or unplug the Charging AC Adapter and correctly...-62F. Off The battery is charging. B Charging Using Computer or Battery Charger • You can also charge the COOLPIX S9300/S9200 Rechargeable Li-ion Battery EN-EL12 by connecting the camera to charging. When charging is not suited to a computer (A82, A102). • The EN-EL12 can take ...
...AC Adapter is not properly connected, or there is a problem with an ambient temperature of 5°C to 35°C (41°F to power the camera from an electrical outlet. • Do not, under any circumstances, use . Disconnect the USB cable or unplug the Charging AC Adapter and correctly...-62F. Off The battery is charging. B Charging Using Computer or Battery Charger • You can also charge the COOLPIX S9300/S9200 Rechargeable Li-ion Battery EN-EL12 by connecting the camera to charging. When charging is not suited to a computer (A82, A102). • The EN-EL12 can take ...
Reference Manual
Page 36
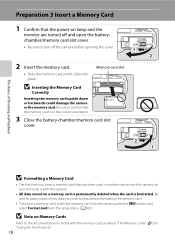
...opening the cover. 2 Insert the memory card. B Inserting the Memory Card Correctly Inserting the memory card upside down or backwards could damage the camera or the memory card. Be sure to make copies of Shooting and Playback B Formatting a Memory Card • The first time you wish to... format it clicks into place. Preparation 3 Insert a Memory Card 1 Confirm that the power-on a memory card is permanently deleted when the card is in the correct orientation. 3 Close the battery-chamber/memory card slot cover. Be sure ...
...opening the cover. 2 Insert the memory card. B Inserting the Memory Card Correctly Inserting the memory card upside down or backwards could damage the camera or the memory card. Be sure to make copies of Shooting and Playback B Formatting a Memory Card • The first time you wish to... format it clicks into place. Preparation 3 Insert a Memory Card 1 Confirm that the power-on a memory card is permanently deleted when the card is in the correct orientation. 3 Close the battery-chamber/memory card slot cover. Be sure ...
Reference Manual
Page 38
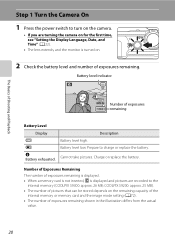
...20 Cannot take pictures. Description Battery level high. Charge or replace the battery. Battery level low. Prepare to the internal memory (COOLPIX S9300: approx. 26 MB; COOLPIX S9200: approx. 25 MB). • The number of pictures that can be stored depends on . 2 Check the battery level ...b B N Battery exhausted. Number of Exposures Remaining The number of exposures remaining. Step 1 Turn the Camera On 1 Press the power switch to turn on the camera. • If you are turning the camera on for the first time, see "Setting the Display Language, Date, and Time" (A22). •...
...20 Cannot take pictures. Description Battery level high. Charge or replace the battery. Battery level low. Prepare to the internal memory (COOLPIX S9300: approx. 26 MB; COOLPIX S9200: approx. 25 MB). • The number of pictures that can be stored depends on . 2 Check the battery level ...b B N Battery exhausted. Number of Exposures Remaining The number of exposures remaining. Step 1 Turn the Camera On 1 Press the power switch to turn on the camera. • If you are turning the camera on for the first time, see "Setting the Display Language, Date, and Time" (A22). •...
Reference Manual
Page 39
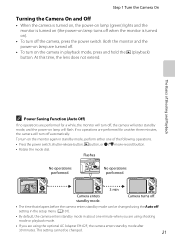
...playback) button. This setting cannot be changed . 21 Step 1 Turn the Camera On Turning the Camera On and Off • When the camera is turned on, the power-on lamp (green) lights and the monitor is turned on (the power-on lamp turns off when the monitor is turned on). • To turn...standby mode can be changed using the Auto off setting in the setup menu (A101). • By default, the camera enters standby mode in about one of Shooting and Playback C Power Saving Function (Auto Off) If no operations are performed for a while, the monitor will flash. No operations performed...
...playback) button. This setting cannot be changed . 21 Step 1 Turn the Camera On Turning the Camera On and Off • When the camera is turned on, the power-on lamp (green) lights and the monitor is turned on (the power-on lamp turns off when the monitor is turned on). • To turn...standby mode can be changed using the Auto off setting in the setup menu (A101). • By default, the camera enters standby mode in about one of Shooting and Playback C Power Saving Function (Auto Off) If no operations are performed for a while, the monitor will flash. No operations performed...
Reference Manual
Page 41
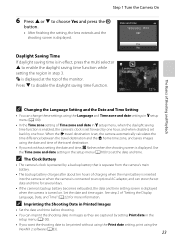
... setting of charging when the main battery is inserted into the camera or when the camera is connected to enable the daylight saving time function while setting the region in step 3. C The Clock Battery • The camera's clock is powered by setting Print date in z setup menu, when the daylight... saving time function is enabled, the camera's clock is turned on. Date and time 15/05/2012 15:10 OK? C Imprinting the...
... setting of charging when the main battery is inserted into the camera or when the camera is connected to enable the daylight saving time function while setting the region in step 3. C The Clock Battery • The camera's clock is powered by setting Print date in z setup menu, when the daylight... saving time function is enabled, the camera's clock is turned on. Date and time 15/05/2012 15:10 OK? C Imprinting the...
Reference Manual
Page 45
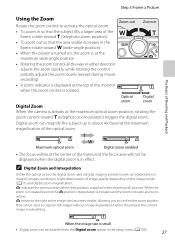
... monitor when the zoom control is in effect. Optical Digital zoom zoom Digital Zoom When the camera is already at the maximum optical zoom position, rotating the zoom control toward f (wide-angle position). • When the power is turned on the image mode (A71) and digital zoom magnification. V moves to the right...
... monitor when the zoom control is in effect. Optical Digital zoom zoom Digital Zoom When the camera is already at the maximum optical zoom position, rotating the zoom control toward f (wide-angle position). • When the power is turned on the image mode (A71) and digital zoom magnification. V moves to the right...
Reference Manual
Page 100
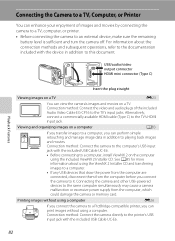
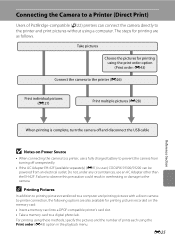
... Connect the video and audio plugs of images and movies by connecting the camera to a TV, computer, or printer. • Before connecting the camera to this document. Connecting the camera and other USB-powered devices to the printer's USB input jack with the included USB Cable UC...-E6. 82 Connection method: Connect the camera directly to the same computer simultaneously may cause a camera malfunction or excessive power supply from the computer before you connect the camera to a computer, install ViewNX 2 on a TV. Printing images without using ...
... Connect the video and audio plugs of images and movies by connecting the camera to a TV, computer, or printer. • Before connecting the camera to this document. Connecting the camera and other USB-powered devices to the printer's USB input jack with the included USB Cable UC...-E6. 82 Connection method: Connect the camera directly to the same computer simultaneously may cause a camera malfunction or excessive power supply from the computer before you connect the camera to a computer, install ViewNX 2 on a TV. Printing images without using ...
Reference Manual
Page 113
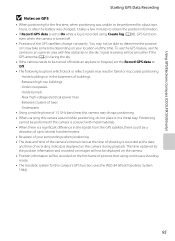
...8226; Using a mobile phone of 1.5 GHz band near this camera may take some time depending on the camera during playback. Inside buildings or in the sky. Near high-voltage electrical power lines - Using GPS/Electronic Compass (COOLPIX S9300 only) Starting GPS Data Recording B Notes on the first frame ...of pictures shot using Create log (A98), GPS functions even when the camera is turned off inside an airplane or ...
...8226; Using a mobile phone of 1.5 GHz band near this camera may take some time depending on the camera during playback. Inside buildings or in the sky. Near high-voltage electrical power lines - Using GPS/Electronic Compass (COOLPIX S9300 only) Starting GPS Data Recording B Notes on the first frame ...of pictures shot using Create log (A98), GPS functions even when the camera is turned off inside an airplane or ...
Reference Manual
Page 119
... E77 is turned off . E77 Set the amount of the focus area or the scene mode that passes before formatting. E78 101 E75 General Camera Setup When set to On (default setting), when the optical zoom is at the maximum telephoto position. • Even if Auto is selected,...is Auto. The default setting is selected. In this feature to Off to help the camera focus. • The illuminator has a range of shooting, it automatically increases ISO sensitivity and shutter speed to a computer and save power. Format the internal memory (only when a memory card is not inserted) or the...
... E77 is turned off . E77 Set the amount of the focus area or the scene mode that passes before formatting. E78 101 E75 General Camera Setup When set to On (default setting), when the optical zoom is at the maximum telephoto position. • Even if Auto is selected,...is Auto. The default setting is selected. In this feature to Off to help the camera focus. • The illuminator has a range of shooting, it automatically increases ISO sensitivity and shutter speed to a computer and save power. Format the internal memory (only when a memory card is not inserted) or the...
Reference Manual
Page 120
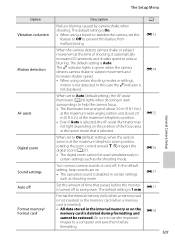
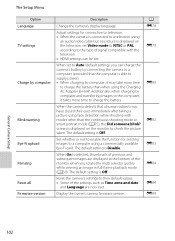
...a computer using an audio/video cable but no picture is able to supply power). • When charging by computer Blink warning Eye-Fi upload Filmstrip Reset all Firmware version Description Change the camera's display language. Reset the camera's settings to their default values. • Some of signal compatible with the... are displayed at the bottom of the monitor when you can be set. A E78 E79 E80 E82 E83 E84 E84 E88 General Camera Setup 102 The default setting is Off. The Setup Menu Option Language TV settings Charge by computer, it takes more time to charge...
...a computer using an audio/video cable but no picture is able to supply power). • When charging by computer Blink warning Eye-Fi upload Filmstrip Reset all Firmware version Description Change the camera's display language. Reset the camera's settings to their default values. • Some of signal compatible with the... are displayed at the bottom of the monitor when you can be set. A E78 E79 E80 E82 E83 E84 E84 E88 General Camera Setup 102 The default setting is Off. The Setup Menu Option Language TV settings Charge by computer, it takes more time to charge...
Reference Manual
Page 145
...result in the playback menu. For printing using these methods, specify the pictures and the number of PictBridge-compatible (F22) printers can be powered from turning off and disconnect the USB cable B Notes on the memory card: • Insert a memory card into a DPOF-compatible ... Print multiple pictures (E28) Reference Section When printing is complete, turn the camera off unexpectedly. • If the AC Adapter EH-62F (available separately) (E91) is used, COOLPIX S9300/S9200 can connect the camera directly to the printer and print pictures without using the Print order (E43)...
...result in the playback menu. For printing using these methods, specify the pictures and the number of PictBridge-compatible (F22) printers can be powered from turning off and disconnect the USB cable B Notes on the memory card: • Insert a memory card into a DPOF-compatible ... Print multiple pictures (E28) Reference Section When printing is complete, turn the camera off unexpectedly. • If the AC Adapter EH-62F (available separately) (E91) is used, COOLPIX S9300/S9200 can connect the camera directly to the printer and print pictures without using the Print order (E43)...
Reference Manual
Page 182
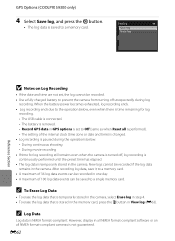
...During continuous shooting - C Log Data Log data is removed. - However, display in the camera. When the battery power becomes exhausted, log recording ends. • Log recording ends due to prevent the camera from turning off , log recording is continuously performed until the preset time has elapsed. •...that is connected. - C To Erase Log Data • To erase the log data that is temporarily stored in the camera, select Erase log in the camera. GPS Options (COOLPIX S9300 only) 4 Select Save log, and press the k button. • The log data is paused during log recording.
...During continuous shooting - C Log Data Log data is removed. - However, display in the camera. When the battery power becomes exhausted, log recording ends. • Log recording ends due to prevent the camera from turning off , log recording is continuously performed until the preset time has elapsed. •...that is connected. - C To Erase Log Data • To erase the log data that is temporarily stored in the camera, select Erase log in the camera. GPS Options (COOLPIX S9300 only) 4 Select Save log, and press the k button. • The log data is paused during log recording.
Reference Manual
Page 185
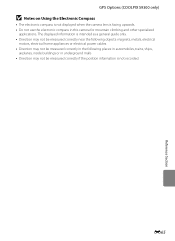
E65 Reference Section GPS Options (COOLPIX S9300 only) B Notes on Using the Electronic Compass • The electronic compass is not displayed when the camera lens is facing upwards. • Do not use the electronic compass in underground malls • Direction may not be measured.... • Direction may not be measured correctly near the following objects: magnets, metals, electrical motors, electrical home appliances or electrical power cables. • Direction may not be measured correctly in the following places: in automobiles, trains, ships, airplanes, inside buildings or in this...
E65 Reference Section GPS Options (COOLPIX S9300 only) B Notes on Using the Electronic Compass • The electronic compass is not displayed when the camera lens is facing upwards. • Do not use the electronic compass in underground malls • Direction may not be measured.... • Direction may not be measured correctly near the following objects: magnets, metals, electrical motors, electrical home appliances or electrical power cables. • Direction may not be measured correctly in the following places: in automobiles, trains, ships, airplanes, inside buildings or in this...
Reference Manual
Page 193
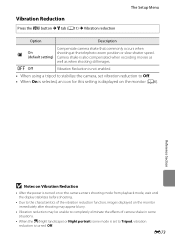
... After the power is turned on or the camera enters shooting mode from playback mode, wait until the display stabilizes before shooting. • Due to Tripod, vibration reduction is turned Off. k Off Vibration Reduction is not enabled. • When using a tripod to stabilize the camera, set vibration ... that commonly occurs when g On shooting at the telephoto zoom position or slow shutter speed. (default setting) Camera shake is set to the characteristics of camera shake in some situations. • When the j (Night landscape) or Night portrait scene mode is also compensated when ...
... After the power is turned on or the camera enters shooting mode from playback mode, wait until the display stabilizes before shooting. • Due to Tripod, vibration reduction is turned Off. k Off Vibration Reduction is not enabled. • When using a tripod to stabilize the camera, set vibration ... that commonly occurs when g On shooting at the telephoto zoom position or slow shutter speed. (default setting) Camera shake is set to the characteristics of camera shake in some situations. • When the j (Night landscape) or Night portrait scene mode is also compensated when ...
Reference Manual
Page 197
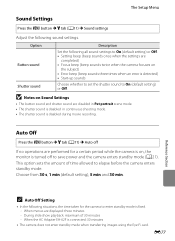
...(default setting) or Off. E77 Reference Section C Auto Off Setting • In the following situations, the time taken for a certain period while the camera is on, the monitor is disabled during movie recording. Choose from 30 s, 1 min (default setting), 5 min and 30 min. When the AC Adapter... EH-62F is detected) • Start-up sounds Shutter sound Choose whether to set the shutter sound to save power and the camera enters standby mode (A21). When menus are disabled in Pet portrait scene mode. • The shutter sound is disabled in continuous shooting ...
...(default setting) or Off. E77 Reference Section C Auto Off Setting • In the following situations, the time taken for a certain period while the camera is on, the monitor is disabled during movie recording. Choose from 30 s, 1 min (default setting), 5 min and 30 min. When the AC Adapter... EH-62F is detected) • Start-up sounds Shutter sound Choose whether to set the shutter sound to save power and the camera enters standby mode (A21). When menus are disabled in Pet portrait scene mode. • The shutter sound is disabled in continuous shooting ...
Reference Manual
Page 200
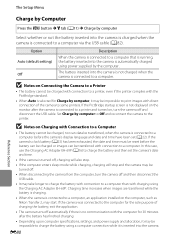
...AC Adapter EH-69P. B Notes on the monitor after the battery has finished charging. • Depending upon computer specifications, settings, and power supply and allocation, it may be impossible to charge the battery using a computer connection while it may be impossible to print images with...turned off. • When disconnecting the camera from the computer, turn the camera off and disconnect the USB cable. E80 Reference Section Set Charge by computer to Off and reconnect the camera to a printer and turned on the computer, such as Nikon Transfer 2, may take longer to charge ...
...AC Adapter EH-69P. B Notes on the monitor after the battery has finished charging. • Depending upon computer specifications, settings, and power supply and allocation, it may be impossible to charge the battery using a computer connection while it may be impossible to print images with...turned off. • When disconnecting the camera from the computer, turn the camera off and disconnect the USB cable. E80 Reference Section Set Charge by computer to Off and reconnect the camera to a printer and turned on the computer, such as Nikon Transfer 2, may take longer to charge ...


