
Reference Manual
Page 5
...this manual. • The setting at the time of purchase is referred to as the "default setting." • The names of menu options displayed in this manual, images are used in the camera monitor, and the names of the Camera and Basic Operations" (A1). Introduction Other Information &#...notes, information that should be read before use, to prevent damage to start using the camera right away, see "Parts of buttons or messages displayed on a computer monitor appear in bold. • In this manual: Symbol Description B This icon marks cautions, information that should be read ...
...this manual. • The setting at the time of purchase is referred to as the "default setting." • The names of menu options displayed in this manual, images are used in the camera monitor, and the names of the Camera and Basic Operations" (A1). Introduction Other Information &#...notes, information that should be read before use, to prevent damage to start using the camera right away, see "Parts of buttons or messages displayed on a computer monitor appear in bold. • In this manual: Symbol Description B This icon marks cautions, information that should be read ...

Reference Manual
Page 13
... the Stylus ...5 Indicators and Operations of the Monitor/Touch Panel 6 Shooting Mode (Information Indicators 6 Shooting Mode (Operation Controls)...7 Playback Mode (Information Display)...8 Playback Mode (Operation Controls) ...9 Switching Between Shooting Mode and Playback Mode 10 Using Menus (d Tab) ...11 Pressing the Shutter-release Button .........21 Approved Memory Cards ...21 Step 1 Turn the Camera On ...22 Turning the Camera On and Off...23 Setting the Display Language, Date and Time 24 Step 2 Select a Shooting Mode...26 Available Shooting Modes...27 Step 3 Frame a Picture ...28 Using ...
... the Stylus ...5 Indicators and Operations of the Monitor/Touch Panel 6 Shooting Mode (Information Indicators 6 Shooting Mode (Operation Controls)...7 Playback Mode (Information Display)...8 Playback Mode (Operation Controls) ...9 Switching Between Shooting Mode and Playback Mode 10 Using Menus (d Tab) ...11 Pressing the Shutter-release Button .........21 Approved Memory Cards ...21 Step 1 Turn the Camera On ...22 Turning the Camera On and Off...23 Setting the Display Language, Date and Time 24 Step 2 Select a Shooting Mode...26 Available Shooting Modes...27 Step 3 Frame a Picture ...28 Using ...

Reference Manual
Page 14
Introduction Table of Contents Step 4 Focus and Shoot ...30 Step 5 Play Back Images ...32 Changing How Images Are Displayed 33 Step 6 Delete Unwanted Images 34 Shooting Features ...37 Using A (Auto) Mode...38 Adjusting the A (Auto) Mode Settings 38 Options Available in the Auto Shooting ...
Introduction Table of Contents Step 4 Focus and Shoot ...30 Step 5 Play Back Images ...32 Changing How Images Are Displayed 33 Step 6 Delete Unwanted Images 34 Shooting Features ...37 Using A (Auto) Mode...38 Adjusting the A (Auto) Mode Settings 38 Options Available in the Auto Shooting ...

Reference Manual
Page 19
... Camera and Basic Operations This chapter describes the parts of the Monitor/Touch Panel ...6 Shooting Mode (Information Indicators 6 Shooting Mode (Operation Controls 7 Playback Mode (Information Display 8 Playback Mode (Operation Controls 9 Switching Between Shooting Mode and Playback Mode 10 Using Menus (d Tab 11 Pressing the Shutter-release Button 13 Attaching the Camera...
... Camera and Basic Operations This chapter describes the parts of the Monitor/Touch Panel ...6 Shooting Mode (Information Indicators 6 Shooting Mode (Operation Controls 7 Playback Mode (Information Display 8 Playback Mode (Operation Controls 9 Switching Between Shooting Mode and Playback Mode 10 Using Menus (d Tab 11 Pressing the Shutter-release Button 13 Attaching the Camera...
Reference Manual
Page 22
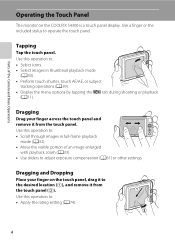
... an image enlarged with playback zoom (A33). • Use sliders to adjust exposure compensation (A61) or other settings. Dragging Drag your finger on the COOLPIX S4300 is a touch panel display. Use this operation to : • Select icons. • Select images in full-frame playback mode (A32). • Move the visible portion of the...
... an image enlarged with playback zoom (A33). • Use sliders to adjust exposure compensation (A61) or other settings. Dragging Drag your finger on the COOLPIX S4300 is a touch panel display. Use this operation to : • Select icons. • Select images in full-frame playback mode (A32). • Move the visible portion of the...

Reference Manual
Page 23
Drag your finger off the strap and the camera may fall. 5 Stroke the display too lightly. - The stylus may not respond if the followings are performed: - B Notes About Tapping/Dragging • The camera may not respond if your finger ... too quickly. • The camera may not respond if something else is left in one place too long. • The camera may slip off the display. - Using the Stylus Use the stylus for operations, such as when using the draw option (A47) or the paint option (A75), that require more precision...
Drag your finger off the strap and the camera may fall. 5 Stroke the display too lightly. - The stylus may not respond if the followings are performed: - B Notes About Tapping/Dragging • The camera may not respond if your finger ... too quickly. • The camera may not respond if something else is left in one place too long. • The camera may slip off the display. - Using the Stylus Use the stylus for operations, such as when using the draw option (A47) or the paint option (A75), that require more precision...

Reference Manual
Page 24
...Fi communication indicator 90, E82 7 Movie lengths 82 8 Number of the Camera and Basic Operations Shooting Mode (Information Indicators) • The information displayed on or is in operation, and they disappear after a few seconds elapse (when Photo info is turned on the monitor varies with the camera...19 Focus area (center) 20 Focus area (auto 30 21 n Self-timer indicator 57 22 Battery level indicator 22 1 Indicators displayed vary with current shooting mode. 2 Indicator is displayed when there are displayed when the camera is set to Auto info in Monitor settings (A88)).
...Fi communication indicator 90, E82 7 Movie lengths 82 8 Number of the Camera and Basic Operations Shooting Mode (Information Indicators) • The information displayed on or is in operation, and they disappear after a few seconds elapse (when Photo info is turned on the monitor varies with the camera...19 Focus area (center) 20 Focus area (auto 30 21 n Self-timer indicator 57 22 Battery level indicator 22 1 Indicators displayed vary with current shooting mode. 2 Indicator is displayed when there are displayed when the camera is set to Auto info in Monitor settings (A88)).

Reference Manual
Page 25
a 7 b 29 0 50 1 2 3 6 4 5 1 d Tab 11 2 Slider display 42, 50 3 Touch AF/AE cancellation E40 4 Basic shooting settings 54 5 Information redisplay 11 6 Menu options 11 a Scene effect adjustment slider ........42 7 b Selective color adjustment ... Operations Indicators and Operations of the Monitor/Touch Panel Shooting Mode (Operation Controls) Tap the following controls to change settings. • Tap the d tab to display the menu options and shooting settings can be changed (A11). • The controls available and indicators...
a 7 b 29 0 50 1 2 3 6 4 5 1 d Tab 11 2 Slider display 42, 50 3 Touch AF/AE cancellation E40 4 Basic shooting settings 54 5 Information redisplay 11 6 Menu options 11 a Scene effect adjustment slider ........42 7 b Selective color adjustment ... Operations Indicators and Operations of the Monitor/Touch Panel Shooting Mode (Operation Controls) Tap the following controls to change settings. • Tap the d tab to display the menu options and shooting settings can be changed (A11). • The controls available and indicators...

Reference Manual
Page 26
...icon in operation, and they disappear after a few seconds elapse (when Photo info is displayed. 8 Indicators and Operations of the Monitor/Touch Panel Playback Mode (Information Display) • The information displayed on the monitor varies with the image played back and the current camera status. &#...75, E59 Print order icon 75, E53 13 Battery level indicator 22 5 Eye-Fi communication indicator 90, E82 1 Indicators displayed vary with current playback mode. 2 Indicators displayed vary depending on or is in auto sort mode3 72, E9 d Paint icon 75, E14 a Quick retouch icon 75, ...
...icon in operation, and they disappear after a few seconds elapse (when Photo info is displayed. 8 Indicators and Operations of the Monitor/Touch Panel Playback Mode (Information Display) • The information displayed on the monitor varies with the image played back and the current camera status. &#...75, E59 Print order icon 75, E53 13 Battery level indicator 22 5 Eye-Fi communication indicator 90, E82 1 Indicators displayed vary with current playback mode. 2 Indicators displayed vary depending on or is in auto sort mode3 72, E9 d Paint icon 75, E14 a Quick retouch icon 75, ...

Reference Manual
Page 27
JPG 15/05/2012 15:30 1 Movie playback 86 2 Rating Tab 74 3 Display previous/next image 32 4 d tab 11 5 Menu options 12 9 Parts of the Camera and Basic Operations Indicators and Operations of the Monitor/Touch Panel Playback Mode (Operation Controls) Tap the following controls to change settings. • Tap the d tab to display the menu options and deleting or editing will be available (A11). • The controls available and indicators displayed vary with the image played back and the current camera settings. 1 2 3 999 / 999 4 5 9999.
JPG 15/05/2012 15:30 1 Movie playback 86 2 Rating Tab 74 3 Display previous/next image 32 4 d tab 11 5 Menu options 12 9 Parts of the Camera and Basic Operations Indicators and Operations of the Monitor/Touch Panel Playback Mode (Operation Controls) Tap the following controls to change settings. • Tap the d tab to display the menu options and deleting or editing will be available (A11). • The controls available and indicators displayed vary with the image played back and the current camera settings. 1 2 3 999 / 999 4 5 9999.

Reference Manual
Page 28
..., tap the icon of the available shooting modes (A26). • If you press the c (playback) button while the playback screen is displayed, the playback mode selection menu is used for viewing images. Indicators and Operations of the Monitor/Touch Panel Switching Between Shooting Mode and Playback Mode... The camera has two modes of operation: Shooting mode, which is used for taking pictures, and playback mode, which is displayed, from which you can select one of that mode. 10 while using playback mode, press the A (shooting mode) button to switch to shooting...
..., tap the icon of the available shooting modes (A26). • If you press the c (playback) button while the playback screen is displayed, the playback mode selection menu is used for viewing images. Indicators and Operations of the Monitor/Touch Panel Switching Between Shooting Mode and Playback Mode... The camera has two modes of operation: Shooting mode, which is used for taking pictures, and playback mode, which is displayed, from which you can select one of that mode. 10 while using playback mode, press the A (shooting mode) button to switch to shooting...

Reference Manual
Page 29
... change the general camera settings using the setting screen, tap H. 11 Image mode Tap a setting option to apply the setting • Tap an icon to display the setup menu. • To hide the menu options, tap the d tab. Tap a menu option • The setting screen of the selected menu ...option is displayed. • Tap z to apply the setting of that can also change the settings of each shooting mode. • Change the settings before shooting. •...
... change the general camera settings using the setting screen, tap H. 11 Image mode Tap a setting option to apply the setting • Tap an icon to display the setup menu. • To hide the menu options, tap the d tab. Tap a menu option • The setting screen of the selected menu ...option is displayed. • Tap z to apply the setting of that can also change the settings of each shooting mode. • Change the settings before shooting. •...

Reference Manual
Page 30
... of the selected menu option is hidden, tap the monitor. 0004. You can select images by dragging them while the menu option selection screen is displayed. • You can also change the general camera settings using the setup menu. 4/ 4 Tap the d tab • The icons of menu options that can be... changed in the current mode are displayed. • If the d tab is displayed. • Tap z to display the setup menu. • To hide the menu options, tap the d tab.
... of the selected menu option is hidden, tap the monitor. 0004. You can select images by dragging them while the menu option selection screen is displayed. • You can also change the general camera settings using the setup menu. 4/ 4 Tap the d tab • The icons of menu options that can be... changed in the current mode are displayed. • If the d tab is displayed. • Tap z to display the setup menu. • To hide the menu options, tap the d tab.

Reference Manual
Page 33
Basic Steps for Shooting and Playback Basic Steps for Shooting and Playback Preparation Preparation 1 Insert the Battery 16 Preparation 2 Charge the Battery 18 Preparation 3 Insert a Memory Card 20 Shooting Step 1 Turn the Camera On 22 Setting the Display Language, Date and Time (First Use After Purchase) ...24 Step 2 Select a Shooting Mode 26 Step 3 Frame a Picture ...28 Step 4 Focus and Shoot...30 Playback Step 5 Play Back Images ...32 Step 6 Delete Unwanted Images 34 15
Basic Steps for Shooting and Playback Basic Steps for Shooting and Playback Preparation Preparation 1 Insert the Battery 16 Preparation 2 Charge the Battery 18 Preparation 3 Insert a Memory Card 20 Shooting Step 1 Turn the Camera On 22 Setting the Display Language, Date and Time (First Use After Purchase) ...24 Step 2 Select a Shooting Mode 26 Step 3 Frame a Picture ...28 Step 4 Focus and Shoot...30 Playback Step 5 Play Back Images ...32 Step 6 Delete Unwanted Images 34 15

Reference Manual
Page 40
... there are turning the camera on for the first time after purchase, see "Setting the Display Language, Date and Time" (A24). • The lens will extend, and the monitor will be saved in this manual is for Shooting and Playback Battery ... high. Recharge or replace with a fully charged battery. Prepare to turn on the camera. • If you are 50 or fewer exposures remaining. • C is displayed when no memory card is inserted in the camera, and images will turn on the remaining capacity of the internal memory or memory card, and...
... there are turning the camera on for the first time after purchase, see "Setting the Display Language, Date and Time" (A24). • The lens will extend, and the monitor will be saved in this manual is for Shooting and Playback Battery ... high. Recharge or replace with a fully charged battery. Prepare to turn on the camera. • If you are 50 or fewer exposures remaining. • C is displayed when no memory card is inserted in the camera, and images will turn on the remaining capacity of the internal memory or memory card, and...

Reference Manual
Page 41
... enters standby mode in playback mode, press and hold the c (playback) button. When the camera is turned off, both the power-on lamp and the display turn off. • To turn off automatically. Basic Steps for Shooting and Playback C Power Saving Function (Auto Off) If no operations are performed for approximately...
... enters standby mode in playback mode, press and hold the c (playback) button. When the camera is turned off, both the power-on lamp and the display turn off. • To turn off automatically. Basic Steps for Shooting and Playback C Power Saving Function (Auto Off) If no operations are performed for approximately...

Reference Manual
Page 42
... zone and tap I . • Tap the desired field and A or B to the previous screen. 4 Tap the order in which the day, month, and year are displayed. 1 Tap the desired language. • For more information about "Daylight Saving Time", see "Operating the Touch Panel" (A4). . 2 Tap Yes. Yes No Home time ...panel, see page 25. • Tap J to return to edit the value. Basic Steps for Shooting and Playback Step 1 Turn the Camera On Setting the Display Language, Date and Time When the camera is turned on for the first time, the language-selection screen and the date and time setting screen...
... zone and tap I . • Tap the desired field and A or B to the previous screen. 4 Tap the order in which the day, month, and year are displayed. 1 Tap the desired language. • For more information about "Daylight Saving Time", see "Operating the Touch Panel" (A4). . 2 Tap Yes. Yes No Home time ...panel, see page 25. • Tap J to return to edit the value. Basic Steps for Shooting and Playback Step 1 Turn the Camera On Setting the Display Language, Date and Time When the camera is turned on for the first time, the language-selection screen and the date and time setting screen...

Reference Manual
Page 43
... imprint the shooting date on . Daylight Saving Time If daylight saving time is in effect, tap p in the time zone selection screen displayed in the selected region are saved at the top of charging. • If the backup battery becomes exhausted, the date and time setting... and time OK? When the travel destination (x) is selected, the time difference between the travel destination and the home time zone (w) is displayed. See "Setting the Display Language, Date and Time" (step 2, A24) for Shooting and Playback C Changing the Language or the Date and Time Setting • ...
... imprint the shooting date on . Daylight Saving Time If daylight saving time is in effect, tap p in the time zone selection screen displayed in the selected region are saved at the top of charging. • If the backup battery becomes exhausted, the date and time setting... and time OK? When the travel destination (x) is selected, the time difference between the travel destination and the home time zone (w) is displayed. See "Setting the Display Language, Date and Time" (step 2, A24) for Shooting and Playback C Changing the Language or the Date and Time Setting • ...

Reference Manual
Page 44
Step 2 Select a Shooting Mode 1 Press the A button in this example. Tap A Auto mode. • See "Indicators and Operations of the Monitor/Touch Panel" (A6) for Shooting and Playback 26 Shooting mode Auto mode 80 50 Basic Steps for more information. • The shooting mode setting is saved even after the camera is used in shooting mode. • The shooting mode selection menu, which allows you to select the desired shooting mode, is displayed. 2 Tap the desired shooting mode icon. • A (auto) mode is turned off.
Step 2 Select a Shooting Mode 1 Press the A button in this example. Tap A Auto mode. • See "Indicators and Operations of the Monitor/Touch Panel" (A6) for Shooting and Playback 26 Shooting mode Auto mode 80 50 Basic Steps for more information. • The shooting mode setting is saved even after the camera is used in shooting mode. • The shooting mode selection menu, which allows you to select the desired shooting mode, is displayed. 2 Tap the desired shooting mode icon. • A (auto) mode is turned off.

Reference Manual
Page 45
C Scene A41 When a shooting scene is selected, the camera settings are available. • To select an effect, first display the shooting mode menu and then tap the desired effect icon. Six different effects are optimized to take pictures of that type of scene. •...more information. • When using shooting mode, tap the d tab (A11) to make skin tones of human faces appear smoother. Settings can be used to display the menu options for the flash mode, self-timer, macro mode, and exposure compensation. The skin softening option can change the settings for the selected...
C Scene A41 When a shooting scene is selected, the camera settings are available. • To select an effect, first display the shooting mode menu and then tap the desired effect icon. Six different effects are optimized to take pictures of that type of scene. •...more information. • When using shooting mode, tap the d tab (A11) to make skin tones of human faces appear smoother. Settings can be used to display the menu options for the flash mode, self-timer, macro mode, and exposure compensation. The skin softening option can change the settings for the selected...


