User Manual
Page 9
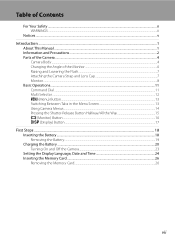
... s (Display) Button ...17 First Steps ...18 Inserting the Battery...18 Removing the Battery...19 Charging the Battery ...20 Turning On and Off the Camera...23 Setting the Display Language, Date and Time 24 Inserting the Memory Card ...26 Removing the Memory Card...26 vii
... s (Display) Button ...17 First Steps ...18 Inserting the Battery...18 Removing the Battery...19 Charging the Battery ...20 Turning On and Off the Camera...23 Setting the Display Language, Date and Time 24 Inserting the Memory Card ...26 Removing the Memory Card...26 vii
User Manual
Page 10
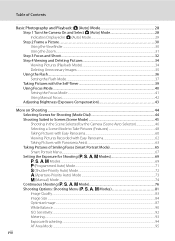
... Pictures (Playback Mode) ...34 Deleting Unnecessary Images...35 Using the Flash...36 Setting the Flash Mode...37 Taking Pictures with the Self-Timer 39 Using Focus Mode ...40 Setting the Focus Mode ...41 Using Manual Focus...42 Adjusting Brightness (Exposure Compensation 43... Pictures Recorded with Easy Panorama 62 Taking Pictures with Panorama Assist...63 Taking Pictures of Smiling Faces (Smart Portrait Mode 65 Smart Portrait Menu...67 Setting the Exposure for Shooting (j, k, l, m Modes 69 j, k, l, m Modes...69 j (Programmed Auto) Mode...71 k (Shutter-Priority Auto) Mode ...72 l (Aperture...
... Pictures (Playback Mode) ...34 Deleting Unnecessary Images...35 Using the Flash...36 Setting the Flash Mode...37 Taking Pictures with the Self-Timer 39 Using Focus Mode ...40 Setting the Focus Mode ...41 Using Manual Focus...42 Adjusting Brightness (Exposure Compensation 43... Pictures Recorded with Easy Panorama 62 Taking Pictures with Panorama Assist...63 Taking Pictures of Smiling Faces (Smart Portrait Mode 65 Smart Portrait Menu...67 Setting the Exposure for Shooting (j, k, l, m Modes 69 j, k, l, m Modes...69 j (Programmed Auto) Mode...71 k (Shutter-Priority Auto) Mode ...72 l (Aperture...
User Manual
Page 11
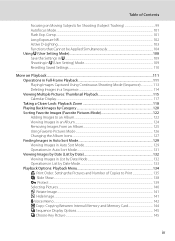
...Images in List by Date Mode 132 Operations in List by Date Mode ...133 Playback Options: Playback Menu 134 a Print Order: Setting the Pictures and Number of Contents Focusing on Moving Subjects for Shooting (Subject Tracking 99 Autofocus Mode...101 Flash Exp. Comp...101...Exposure NR...102 Active D-Lighting...103 Functions that Cannot be Applied Simultaneously 104 Using M (User Setting Mode)...108 Save the Settings in M...109 Shooting in M (User Setting) Mode ...109 Resetting Saved Settings ...110 More on Playback ...111 Operations in Full-Frame Playback 111 Playing Images Captured Using ...
...Images in List by Date Mode 132 Operations in List by Date Mode ...133 Playback Options: Playback Menu 134 a Print Order: Setting the Pictures and Number of Contents Focusing on Moving Subjects for Shooting (Subject Tracking 99 Autofocus Mode...101 Flash Exp. Comp...101...Exposure NR...102 Active D-Lighting...103 Functions that Cannot be Applied Simultaneously 104 Using M (User Setting Mode)...108 Save the Settings in M...109 Shooting in M (User Setting) Mode ...109 Resetting Saved Settings ...110 More on Playback ...111 Operations in Full-Frame Playback 111 Playing Images Captured Using ...
User Manual
Page 13
Table of Contents Basic Camera Setup ...185 Setup Menu...185 Welcome Screen ...187 Time Zone and Date...188 Monitor Settings...191 Print Date ...192 Vibration Reduction ...193 Motion Detection...195 AF Assist...196 Red-eye Reduction ...196 Digital Zoom...197 Assign Side Zoom Control ...198 Sound Settings...199 Auto Off ...199 Format Memory/Format Card...200 Language...201 TV Settings ...201 Charge by Computer...202 Reset File Numbering...202 Blink Warning ...203 Reset All ...205 Firmware Version...208 Caring for the Camera...209 Caring for the Camera ...209 Cleaning ...211 Storage ...212 xi
Table of Contents Basic Camera Setup ...185 Setup Menu...185 Welcome Screen ...187 Time Zone and Date...188 Monitor Settings...191 Print Date ...192 Vibration Reduction ...193 Motion Detection...195 AF Assist...196 Red-eye Reduction ...196 Digital Zoom...197 Assign Side Zoom Control ...198 Sound Settings...199 Auto Off ...199 Format Memory/Format Card...200 Language...201 TV Settings ...201 Charge by Computer...202 Reset File Numbering...202 Blink Warning ...203 Reset All ...205 Firmware Version...208 Caring for the Camera...209 Caring for the Camera ...209 Cleaning ...211 Storage ...212 xi
User Manual
Page 15
... with this manual may be stored in this camera can be more A information is referred to as "memory card." • The setting at the time of Nikon COOLPIX P500 digital camera. This icon marks notes, C information that should be stored on the memory card and delete, playback, and format ...operations will apply only to as the "default setting." • The names of menu items displayed in the camera monitor, and the names ...
... with this manual may be stored in this camera can be more A information is referred to as "memory card." • The setting at the time of Nikon COOLPIX P500 digital camera. This icon marks notes, C information that should be stored on the memory card and delete, playback, and format ...operations will apply only to as the "default setting." • The names of menu items displayed in the camera monitor, and the names ...
User Manual
Page 17
... device may be taken to avoid injury or damage to another person, erase all data using commercially available software, potentially resulting in the Welcome screen setting (A187). Do not use this product for the Select an image option in the malicious use by the government is the user's responsibility. Introduction Information...
... device may be taken to avoid injury or damage to another person, erase all data using commercially available software, potentially resulting in the Welcome screen setting (A187). Do not use this product for the Select an image option in the malicious use by the government is the user's responsibility. Introduction Information...

User Manual
Page 21
... Raising and Lowering the Flash Press the m (flash pop-up) button to raise the flash. • See "Using the Flash" (A36) for more information on setting the flash. • When not using the flash, lower it by gently pushing it down until it clicks.
... Raising and Lowering the Flash Press the m (flash pop-up) button to raise the flash. • See "Using the Flash" (A36) for more information on setting the flash. • When not using the flash, lower it by gently pushing it down until it clicks.

User Manual
Page 22
See page 17 for how to switch the monitor display. Shooting 48 47 46 45 44 43 42 41 40 45 2 6 13 8 7 9 12 13 10 11 14 15 38, 39 37 35 1/250 F5.6 999 32 27 26 17 18 19 16 20 21 34 33 25 36 999 9999 1m00s 31 30 29 28 a b 22 23 24 49 50 1/250 F5.6 1342 8 Introduction Parts of the Camera Monitor The following indicators may appear in the monitor during shooting and playback (actual display varies with current camera settings).
See page 17 for how to switch the monitor display. Shooting 48 47 46 45 44 43 42 41 40 45 2 6 13 8 7 9 12 13 10 11 14 15 38, 39 37 35 1/250 F5.6 999 32 27 26 17 18 19 16 20 21 34 33 25 36 999 9999 1m00s 31 30 29 28 a b 22 23 24 49 50 1/250 F5.6 1342 8 Introduction Parts of the Camera Monitor The following indicators may appear in the monitor during shooting and playback (actual display varies with current camera settings).
User Manual
Page 23
... VR icon (movies 167 14 Active D-Lighting 103 15 View/hide histograms 191 16 Print date 192 17 Travel destination indicator 188 18 "Date not set" indicator 217 19 Wind noise reduction 167 20 Movie options 164 21 HS movie type 165 22 Image quality 83 23 Image size 84 24...
... VR icon (movies 167 14 Active D-Lighting 103 15 View/hide histograms 191 16 Print date 192 17 Travel destination indicator 188 18 "Date not set" indicator 217 19 Wind noise reduction 167 20 Movie options 164 21 HS movie type 165 22 Image quality 83 23 Image size 84 24...

User Manual
Page 24
... icon for the selected album or the selected category in auto sort mode in playback mode is displayed. 10 2 The icon displayed varies with the setting that was set at the time of shooting.
... icon for the selected album or the selected category in auto sort mode in playback mode is displayed. 10 2 The icon displayed varies with the setting that was set at the time of shooting.

User Manual
Page 25
...to select items from a menu screen or to set to m Description A Adjust the flexible program 71 Adjust shutter speed 72 Adjust aperture value 73 Adjust shutter speed or aperture value (Press the multi selector K to l Mode dial set any of the following functions. For Shooting Mode... Mode dial set to j Mode dial set to k Mode dial set to switch between 74 settings.) For Playback Mode Description Full-frame playback or thumbnail playback Choose a picture ...
...to select items from a menu screen or to set to m Description A Adjust the flexible program 71 Adjust shutter speed 72 Adjust aperture value 73 Adjust shutter speed or aperture value (Press the multi selector K to l Mode dial set any of the following functions. For Shooting Mode... Mode dial set to j Mode dial set to k Mode dial set to switch between 74 settings.) For Playback Mode Description Full-frame playback or thumbnail playback Choose a picture ...
User Manual
Page 26
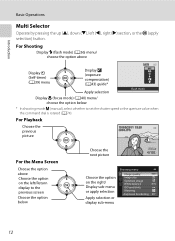
... Selector Operate by pressing the up (H), down (I), left /Return display to the previous screen Choose the option below * In shooting mode m (manual), select whether to set the shutter speed or the aperture value when the command dial is rotated (A74). For Shooting Display m (flash mode) (A36) menu/ choose the option above...
... Selector Operate by pressing the up (H), down (I), left /Return display to the previous screen Choose the option below * In shooting mode m (manual), select whether to set the shutter speed or the aperture value when the command dial is rotated (A74). For Shooting Display m (flash mode) (A36) menu/ choose the option above...

User Manual
Page 27
... size Optimize image White balance ISO sensitivity Metering Exposure bracketing Press the multi selector J to the menu of the chosen tab. Set up Welcome screen Time zone and date Monitor settings Print date Vibration reduction Motion detection AF assist The corresponding menu is pressed, choose the left end tab to switch to...
... size Optimize image White balance ISO sensitivity Metering Exposure bracketing Press the multi selector J to the menu of the chosen tab. Set up Welcome screen Time zone and date Monitor settings Print date Vibration reduction Motion detection AF assist The corresponding menu is pressed, choose the left end tab to switch to...
User Manual
Page 28
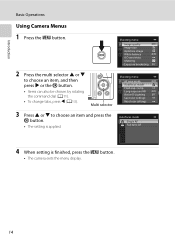
Introduction Basic Operations Using Camera Menus 1 Press the d button. Long exposure NR Active D-Lighting Save user settings Reset user settings Autofocus mode Single AF Full-time AF 4 When setting is applied. Shooting menu Image quality Image size Optimize image White balance ISO sensitivity Metering Exposure bracketing 2 Press the multi selector H or... menu AF area mode Autofocus mode Flash exp. comp. Multi selector 3 Press H or I to choose an item and press the k button. • The setting is finished, press the d button. • The camera exits the menu display. 14
Introduction Basic Operations Using Camera Menus 1 Press the d button. Long exposure NR Active D-Lighting Save user settings Reset user settings Autofocus mode Single AF Full-time AF 4 When setting is applied. Shooting menu Image quality Image size Optimize image White balance ISO sensitivity Metering Exposure bracketing 2 Press the multi selector H or... menu AF area mode Autofocus mode Flash exp. comp. Multi selector 3 Press H or I to choose an item and press the k button. • The setting is finished, press the d button. • The camera exits the menu display. 14

User Manual
Page 29
When the shutter-release button is held in this may result in camera shake and blurred images. Press halfway to shoot. 15 To set . Focus and exposure remain locked while the shutter-release button is pressed halfway. • While the shutter-release button is pressed halfway..., focus and exposure (shutter speed and aperture value) are set focus and exposure, press the shutter-release button halfway, stopping when you feel resistance. Do not use force when pressing the shutter-release button...
When the shutter-release button is held in this may result in camera shake and blurred images. Press halfway to shoot. 15 To set . Focus and exposure remain locked while the shutter-release button is pressed halfway. • While the shutter-release button is pressed halfway..., focus and exposure (shutter speed and aperture value) are set focus and exposure, press the shutter-release button halfway, stopping when you feel resistance. Do not use force when pressing the shutter-release button...

User Manual
Page 31
Use highlights as a guide when setting exposure. 2 The histogram is chosen. 17 Information hidden Display the picture only. 15/05/2011 15:30 0004.JPG 100NIKON 0004.JPG P 1/250 F5.6 4 132 ...
Use highlights as a guide when setting exposure. 2 The histogram is chosen. 17 Information hidden Display the picture only. 15/05/2011 15:30 0004.JPG 100NIKON 0004.JPG P 1/250 F5.6 4 132 ...
User Manual
Page 37
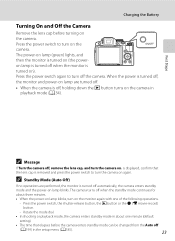
... Turn the camera off (A199) in the setup menu (A185). 23 Press the power switch to turn on the monitor again with one minute (default setting). • The time that the lens cap is turned off the camera. Press the power switch again to turn off automatically, the camera enters standby...
... Turn the camera off (A199) in the setup menu (A185). 23 Press the power switch to turn on the monitor again with one minute (default setting). • The time that the lens cap is turned off the camera. Press the power switch again to turn off automatically, the camera enters standby...
User Manual
Page 38
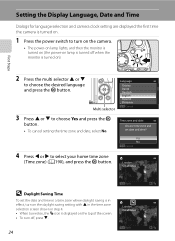
...the desired language and press the k button. First Steps 2 Press the multi selector H or I to choose Yes and press the k button. • To cancel setting the time zone and date, select No. Yes No Cancel 4 Press J or K to select your home time zone (Time zone) (A190), and press the k... button. London Casablanca D Daylight Saving Time To set date and time? Setting the Display Language, Date and Time Dialogs for language selection and camera clock setting are displayed the first time the camera is turned on. 1 Press the power switch to turn off...
...the desired language and press the k button. First Steps 2 Press the multi selector H or I to choose Yes and press the k button. • To cancel setting the time zone and date, select No. Yes No Cancel 4 Press J or K to select your home time zone (Time zone) (A190), and press the k... button. London Casablanca D Daylight Saving Time To set date and time? Setting the Display Language, Date and Time Dialogs for language selection and camera clock setting are displayed the first time the camera is turned on. 1 Press the power switch to turn off...
User Manual
Page 39
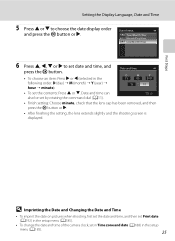
... contents: Press H or I to choose the date display order and press the k button or K. Date and time D M Y 15 05 2011 15 10 • To set date and time, and press the k button. • To choose an item: Press K or J (selected in the setup menu (A185). • To change the date... and time of the camera clock, set by rotating the command dial (A11). • Finish setting: Choose minute, check that the lens cap has been removed, and then press the k button or K. • After finishing the...
... contents: Press H or I to choose the date display order and press the k button or K. Date and time D M Y 15 05 2011 15 10 • To set date and time, and press the k button. • To choose an item: Press K or J (selected in the setup menu (A185). • To change the date... and time of the camera clock, set by rotating the command dial (A11). • Finish setting: Choose minute, check that the lens cap has been removed, and then press the k button or K. • After finishing the...

User Manual
Page 43
...sure to raise the flash (A37). Vibration reduction icon Reduces the effects of movie is 32 displayed for movie recording (A157, 164, 165). The default settings are recorded to the memory card. When a memory card is inserted, C is inserted, the type of camera shake. Rotate the mode dial. D... On and Select A (Auto) Mode Indicators Displayed in A (Auto) Mode Shooting mode A is backlit, be applied. • Press the d button to specify settings for the shooting menu options Image quality (A83) and Image size (A84). C Note on the Flash When the flash is lowered, the flash...
...sure to raise the flash (A37). Vibration reduction icon Reduces the effects of movie is 32 displayed for movie recording (A157, 164, 165). The default settings are recorded to the memory card. When a memory card is inserted, C is inserted, the type of camera shake. Rotate the mode dial. D... On and Select A (Auto) Mode Indicators Displayed in A (Auto) Mode Shooting mode A is backlit, be applied. • Press the d button to specify settings for the shooting menu options Image quality (A83) and Image size (A84). C Note on the Flash When the flash is lowered, the flash...


