
User Manual
Page 9
...For Your Safety ...ii WARNINGS ...ii Notices ...v Introduction ...1 About This Manual ...1 Information and Precautions ...2 Parts of the Camera ...4 Camera Body ...4 Changing the Angle of the Monitor ...6 Raising and Lowering the Flash...7 Attaching the Camera Strap and Lens Cap 7 Monitor ...8 Basic Operations...11 Command Dial ......11 Multi Selector ...12 d (Menu) Button...13 Switching Between Tabs in the Menu Screen 13 Using Camera Menus...14 Pressing the Shutter-Release Button Halfway/All the Way 15 x (Monitor) Button ...16 s (Display) Button ...17 First...
...For Your Safety ...ii WARNINGS ...ii Notices ...v Introduction ...1 About This Manual ...1 Information and Precautions ...2 Parts of the Camera ...4 Camera Body ...4 Changing the Angle of the Monitor ...6 Raising and Lowering the Flash...7 Attaching the Camera Strap and Lens Cap 7 Monitor ...8 Basic Operations...11 Command Dial ......11 Multi Selector ...12 d (Menu) Button...13 Switching Between Tabs in the Menu Screen 13 Using Camera Menus...14 Pressing the Shutter-Release Button Halfway/All the Way 15 x (Monitor) Button ...16 s (Display) Button ...17 First...
User Manual
Page 10
... Scenes for Shooting (Mode Dial 44 Shooting Suited to Scenes (Scene Mode 45 Shooting in the Scene Selected by the Camera (Scene Auto Selector 46 Selecting a Scene Mode to Take Pictures (Features 48 Taking Pictures with Easy Panorama...60 Viewing Pictures...k, l, m Modes 69 j, k, l, m Modes...69 j (Programmed Auto) Mode...71 k (Shutter-Priority Auto) Mode ...72 l (Aperture-Priority Auto) Mode ...73 m (Manual) Mode...74 Continuous Shooting (j, k, l, m Mode 76 Shooting Options: Shooting Menu (j, k, l, m Modes 81 Image Quality...83 Image Size ...84 Optimize Image...87 White Balance ......
... Scenes for Shooting (Mode Dial 44 Shooting Suited to Scenes (Scene Mode 45 Shooting in the Scene Selected by the Camera (Scene Auto Selector 46 Selecting a Scene Mode to Take Pictures (Features 48 Taking Pictures with Easy Panorama...60 Viewing Pictures...k, l, m Modes 69 j, k, l, m Modes...69 j (Programmed Auto) Mode...71 k (Shutter-Priority Auto) Mode ...72 l (Aperture-Priority Auto) Mode ...73 m (Manual) Mode...74 Continuous Shooting (j, k, l, m Mode 76 Shooting Options: Shooting Menu (j, k, l, m Modes 81 Image Quality...83 Image Size ...84 Optimize Image...87 White Balance ......
User Manual
Page 15
... sometimes omitted from actual display. Introduction Introduction About This Manual Thank you for picture storage, deletion, or viewing. 1 Screen Samples In this manual thoroughly before use the product will apply only to as "memory card." • The setting at the time of Nikon COOLPIX P500 digital camera. This icon marks notes, C information that may differ from...
... sometimes omitted from actual display. Introduction Introduction About This Manual Thank you for picture storage, deletion, or viewing. 1 Screen Samples In this manual thoroughly before use the product will apply only to as "memory card." • The setting at the time of Nikon COOLPIX P500 digital camera. This icon marks notes, C information that may differ from...
User Manual
Page 16
..., stored in a retrieval system, or translated into any language in any form, by Nikon specifically for contact information: http://imaging.nikon.com/ Use Only Nikon Brand Electronic Accessories Nikon COOLPIX cameras are engineered and proven to ensure that the information in these sites to keep up-to...it were you to bring any errors or omissions to the highest standards and include complex electronic circuitry. About the Manuals • No part of the manuals included with the latest product information, tips, answers to frequently asked questions (FAQs), and general advice on a ...
..., stored in a retrieval system, or translated into any language in any form, by Nikon specifically for contact information: http://imaging.nikon.com/ Use Only Nikon Brand Electronic Accessories Nikon COOLPIX cameras are engineered and proven to ensure that the information in these sites to keep up-to...it were you to bring any errors or omissions to the highest standards and include complex electronic circuitry. About the Manuals • No part of the manuals included with the latest product information, tips, answers to frequently asked questions (FAQs), and general advice on a ...

User Manual
Page 23
Parts of the Camera Introduction Shooting mode* 1 28, 44, 45, 65, 69, 108 2 Focus mode 40 3 Zoom indicator 31 4 Focus indicator 32 5 AE/AF-L indicator 64 6 Flash indicator 38 7 ... pictures 28 (b) Movie length 157 * The icons vary with the shooting mode. 26 Internal memory indicator 29 27 Aperture value 70 28 Focus area (for manual, center)....32, 95 29 Focus area (for auto 95 Focus area (for face detection, 30 pet detection 59, 65, 95 Focus area 31 (for subject...
Parts of the Camera Introduction Shooting mode* 1 28, 44, 45, 65, 69, 108 2 Focus mode 40 3 Zoom indicator 31 4 Focus indicator 32 5 AE/AF-L indicator 64 6 Flash indicator 38 7 ... pictures 28 (b) Movie length 157 * The icons vary with the shooting mode. 26 Internal memory indicator 29 27 Aperture value 70 28 Focus area (for manual, center)....32, 95 29 Focus area (for auto 95 Focus area (for face detection, 30 pet detection 59, 65, 95 Focus area 31 (for subject...

User Manual
Page 47
...rare cases, the subject may not be in focus despite the fact that for the actual subject. When using focus lock, be focused using manual focus (A42). picture. Do not open the battery-chamber/memory card slot cover. Cutting the power or removing the memory card in these ... in loss of similarly shaped windows) • Subject is moving rapidly In the situations noted above, try pressing the shutter-release button halfway to the camera or card. Basic Photography and Playback: A (Auto) Mode Step 3 Focus and Shoot B During Recording While the indicator showing the number of exposures ...
...rare cases, the subject may not be in focus despite the fact that for the actual subject. When using focus lock, be focused using manual focus (A42). picture. Do not open the battery-chamber/memory card slot cover. Cutting the power or removing the memory card in these ... in loss of similarly shaped windows) • Subject is moving rapidly In the situations noted above, try pressing the shutter-release button halfway to the camera or card. Basic Photography and Playback: A (Auto) Mode Step 3 Focus and Shoot B During Recording While the indicator showing the number of exposures ...

User Manual
Page 54
.... 2 Available focus modes and default setting vary between different scene modes (A46 to the telephoto position, the camera can be Applied Simultaneously" (A104) for any subject that is zoomed in .) from the lens (A42). E Manual focus The focus can focus on nearby objects. www D (Macro close -ups of flowers or small objects...
.... 2 Available focus modes and default setting vary between different scene modes (A46 to the telephoto position, the camera can be Applied Simultaneously" (A104) for any subject that is zoomed in .) from the lens (A42). E Manual focus The focus can focus on nearby objects. www D (Macro close -ups of flowers or small objects...

User Manual
Page 57
The vertical axis shows the number of tones in the camera's memory even after the camera is turned off. • When the shooting mode is m (manual) mode (A74) or the scene mode is Fireworks show (A57), the exposure compensation cannot be adjusted to make images brighter or darker. 1 Press o (exposure compensation) ...
The vertical axis shows the number of tones in the camera's memory even after the camera is turned off. • When the shooting mode is m (manual) mode (A74) or the scene mode is Fireworks show (A57), the exposure compensation cannot be adjusted to make images brighter or darker. 1 Press o (exposure compensation) ...
User Manual
Page 61
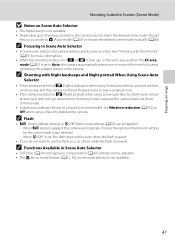
... (the camera does not...upon shooting conditions, the camera may not select the desired...to Auto, the camera automatically selects one...the subject closest to the camera. C Focusing in Scene ...camera detects and focuses on...camera switches to g (Night landscape) when using Scene auto selector, pictures are shot continuously, and the camera combines these pictures to save a single picture. • If the camera... switches to h (Night portrait) when using a tripod to stabilize the camera...is applied, the camera automatically chooses the...
... (the camera does not...upon shooting conditions, the camera may not select the desired...to Auto, the camera automatically selects one...the subject closest to the camera. C Focusing in Scene ...camera detects and focuses on...camera switches to g (Night landscape) when using Scene auto selector, pictures are shot continuously, and the camera combines these pictures to save a single picture. • If the camera... switches to h (Night portrait) when using a tripod to stabilize the camera...is applied, the camera automatically chooses the...

User Manual
Page 66
...manual focus) can be selected. 2 Other settings can be selected. 52 y M f Party/indoor Suitable for dynamic action shots that freeze the action in a single shot and record motion in a series of moving subjects can be selected. X V1 n Off2 p A o 0.02 1 Slow sync with continuous shooting may be captured clearly. • The camera...parties. Captures the effects of candlelight and other indoor background lighting. • The camera focuses on Shooting Shooting Suited to Normal and Image size is recommended. With continuous shooting, instantaneous movements of pictures. ...
...manual focus) can be selected. 2 Other settings can be selected. 52 y M f Party/indoor Suitable for dynamic action shots that freeze the action in a single shot and record motion in a series of moving subjects can be selected. X V1 n Off2 p A o 0.02 1 Slow sync with continuous shooting may be captured clearly. • The camera...parties. Captures the effects of candlelight and other indoor background lighting. • The camera focuses on Shooting Shooting Suited to Normal and Image size is recommended. With continuous shooting, instantaneous movements of pictures. ...

User Manual
Page 69
...A193) is enabled and hold the camera steadily. Exposure compensation • The camera continuously focuses using autofocus until you ...• As pictures are easily affected by camera shake, be selected. Flash mode or self... zoom indicator light in green (wideangle position from the K icon), the camera can focus on subjects as close as about 10 cm (4 in .) ...(macro close-up) and the camera automatically zooms to the closest position to the subject where the camera can shoot. • The closest... to the telephoto position, the camera can focus on subjects as close as about 1 cm (0.4...
...A193) is enabled and hold the camera steadily. Exposure compensation • The camera continuously focuses using autofocus until you ...• As pictures are easily affected by camera shake, be selected. Flash mode or self... zoom indicator light in green (wideangle position from the K icon), the camera can focus on subjects as close as about 10 cm (4 in .) ...(macro close-up) and the camera automatically zooms to the closest position to the subject where the camera can shoot. • The closest... to the telephoto position, the camera can focus on subjects as close as about 1 cm (0.4...

User Manual
Page 70
... • The closest distance at the left of the monitor. Self-timer - Exposure compensation • The camera focuses continuously until focus is locked by camera shake, be sure that is set to Manual to enable the focus area to be selected. 56 In the zoom position where the F icon and zoom ...indicator light in green (wideangle position from the K icon), the camera can focus on subjects as close as about...
... • The closest distance at the left of the monitor. Self-timer - Exposure compensation • The camera focuses continuously until focus is locked by camera shake, be sure that is set to Manual to enable the focus area to be selected. 56 In the zoom position where the F icon and zoom ...indicator light in green (wideangle position from the K icon), the camera can focus on subjects as close as about...

User Manual
Page 72
... is displayed when p Panorama scene mode is available. 3 When shooting in Easy panorama, B (infinity) can be printed depending on the camera by moving the camera in the direction you want to create a panorama picture. ➝ See "Taking Pictures with Easy Panorama" (A60). ➝ See "Viewing... panorama pictures, a full view may not be available depending on the screen that can be selected. For more information, see your printer's manual or contact a digital photo lab. 58 When shooting in Panorama assist, D (macro close-up) or B (infinity) can be selected. 4...
... is displayed when p Panorama scene mode is available. 3 When shooting in Easy panorama, B (infinity) can be printed depending on the camera by moving the camera in the direction you want to create a panorama picture. ➝ See "Taking Pictures with Easy Panorama" (A60). ➝ See "Viewing... panorama pictures, a full view may not be available depending on the screen that can be selected. For more information, see your printer's manual or contact a digital photo lab. 58 When shooting in Panorama assist, D (macro close-up) or B (infinity) can be selected. 4...
User Manual
Page 80
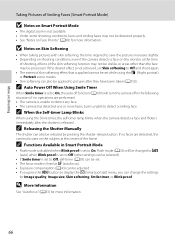
...• See "Notes on Face Priority" (A98) for Image quality, Image size, Skin softening, Smile timer, or Blink proof. C Releasing the Shutter Manually The shutter can also be adjusted. • If you can change the settings for more information. D More Information See "Autofocus" (A33) for more ...F (Smart portrait) menu, you press the d button to save the pictures increases slightly. • Depending on shooting conditions, even if the camera detects a face on the monitor at the center of Smiling Faces (Smart Portrait Mode) B Notes on Smart Portrait Mode • The digital zoom...
...• See "Notes on Face Priority" (A98) for Image quality, Image size, Skin softening, Smile timer, or Blink proof. C Releasing the Shutter Manually The shutter can also be adjusted. • If you can change the settings for more information. D More Information See "Autofocus" (A33) for more ...F (Smart portrait) menu, you press the d button to save the pictures increases slightly. • Depending on shooting conditions, even if the camera detects a face on the monitor at the center of Smiling Faces (Smart Portrait Mode) B Notes on Smart Portrait Mode • The digital zoom...

User Manual
Page 83
...of shutter speed and aperture Recommended for optimal exposure. The setting combinations (user settings) that are frequently used (A71). Aperture- m Manual (A74) The user controls both the foreground and background into focus. Flexible program, which changes the combination of advanced settings, such ... ISO sensitivity and white balance in j (Programmed auto), k (Shutter-priority auto), l (Aperture-priority auto) or m (Manual). Shutter- Mode Description Usage The camera sets the shutter speed and aperture value j Programmed auto (A71) automatically for most situations.
...of shutter speed and aperture Recommended for optimal exposure. The setting combinations (user settings) that are frequently used (A71). Aperture- m Manual (A74) The user controls both the foreground and background into focus. Flexible program, which changes the combination of advanced settings, such ... ISO sensitivity and white balance in j (Programmed auto), k (Shutter-priority auto), l (Aperture-priority auto) or m (Manual). Shutter- Mode Description Usage The camera sets the shutter speed and aperture value j Programmed auto (A71) automatically for most situations.
User Manual
Page 88
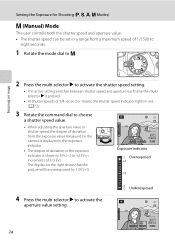
Setting the Exposure for Shooting (j, k, l, m Modes) m (Manual) Mode The user controls both the shutter speed and aperture value. • The shutter speed can be overexposed by the camera is displayed in the exposure indicator. • The degree of deviation in the exposure indicator is pressed. • At shutter speeds of 1/4 second or slower...
Setting the Exposure for Shooting (j, k, l, m Modes) m (Manual) Mode The user controls both the shutter speed and aperture value. • The shutter speed can be overexposed by the camera is displayed in the exposure indicator. • The degree of deviation in the exposure indicator is pressed. • At shutter speeds of 1/4 second or slower...

User Manual
Page 96
More on menus (A12). • Press the d button to display the shooting menu. C Navigating the Camera Menu The command dial can also be enabled in place of pressing H or I on the multi selector. 82 B Functions that Cannot be Applied Simultaneously Some ... select items and set functions on Shooting Shooting Options: Shooting Menu (j, k, l, m Modes) Displaying the Shooting Menu Choose j (Programmed auto), k (Shutter-priority auto), l (Aperture-priority auto), m (Manual) or M (User settings) by rotating the mode dial. Press the d button to exit the shooting menu.
More on menus (A12). • Press the d button to display the shooting menu. C Navigating the Camera Menu The command dial can also be enabled in place of pressing H or I on the multi selector. 82 B Functions that Cannot be Applied Simultaneously Some ... select items and set functions on Shooting Shooting Options: Shooting Menu (j, k, l, m Modes) Displaying the Shooting Menu Choose j (Programmed auto), k (Shutter-priority auto), l (Aperture-priority auto), m (Manual) or M (User settings) by rotating the mode dial. Press the d button to exit the shooting menu.

User Manual
Page 104
...cameras can apply the white balance setting suited to a particular light source to achieve more accurate results. For natural coloration, choose a white balance setting that Cannot be Applied Simultaneously" (A104) for direct sunlight. Although the default setting, Auto, can be used simultaneously with the color of the light source. See "Preset Manual...red hue. See "Functions that matches the light source before shooting. c Daylight* The white balance is automatically adjusted to FL3) Use under unusual lighting. b Preset manual Use when shooting under most situations.
...cameras can apply the white balance setting suited to a particular light source to achieve more accurate results. For natural coloration, choose a white balance setting that Cannot be Applied Simultaneously" (A104) for direct sunlight. Although the default setting, Auto, can be used simultaneously with the color of the light source. See "Preset Manual...red hue. See "Functions that matches the light source before shooting. c Daylight* The white balance is automatically adjusted to FL3) Use under unusual lighting. b Preset manual Use when shooting under most situations.

User Manual
Page 105
...balance preset value is set White balance to b Preset manual, then press the k button. • The lens extends to the zoom position for when the flash fires. Preset manual More on Preset Manual The camera cannot measure a white balance value for measurement. White balance... Auto Preset manual Daylight Incandescent Fluorescent Cloudy Flash 3 Choose Measure. • To apply the most ...
...balance preset value is set White balance to b Preset manual, then press the k button. • The lens extends to the zoom position for when the flash fires. Preset manual More on Preset Manual The camera cannot measure a white balance value for measurement. White balance... Auto Preset manual Daylight Incandescent Fluorescent Cloudy Flash 3 Choose Measure. • To apply the most ...

User Manual
Page 106
More on ISO Sensitivity • In m (manual) mode, ISO sensitivity will be fixed at ISO 160 if Auto, ...is selected, and U and the maximum ISO sensitivity value are displayed when Fixed range auto is insufficient with the camera zoomed in the selected range. If the exposure is selected. See "Functions that Cannot be captured. ISO sensitivity...(A104) for effective control over the amount of "grain" that is increased, the shutter speed slows down. The camera will be reduced. • Although higher ISO sensitivity is effective when shooting darker subjects, shooting without the flash,...
More on ISO Sensitivity • In m (manual) mode, ISO sensitivity will be fixed at ISO 160 if Auto, ...is selected, and U and the maximum ISO sensitivity value are displayed when Fixed range auto is insufficient with the camera zoomed in the selected range. If the exposure is selected. See "Functions that Cannot be captured. ISO sensitivity...(A104) for effective control over the amount of "grain" that is increased, the shutter speed slows down. The camera will be reduced. • Although higher ISO sensitivity is effective when shooting darker subjects, shooting without the flash,...


