
User Manual
Page 10
...not use the camera or AC adapter in explosion or fire. Repairs should be performed viii only by qualified technicians. Introduction WARNINGS Turn off in the event of the camera or AC adapter could result in their entirety before using this equipment. Handle the camera ...an unusual smell coming from the camera or AC adapter, unplug the AC adapter and remove the batteries immediately, taking care to a Nikon-authorized service representative for inspection. Keep these safety instructions where all those who use electronic equipment in injury. After removing or disconnecting ...
...not use the camera or AC adapter in explosion or fire. Repairs should be performed viii only by qualified technicians. Introduction WARNINGS Turn off in the event of the camera or AC adapter could result in their entirety before using this equipment. Handle the camera ...an unusual smell coming from the camera or AC adapter, unplug the AC adapter and remove the batteries immediately, taking care to a Nikon-authorized service representative for inspection. Keep these safety instructions where all those who use electronic equipment in injury. After removing or disconnecting ...
User Manual
Page 11
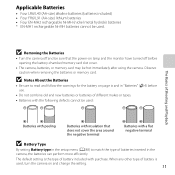
...combine old and new batteries or batteries of different makes or types. • When charging Nikon EN-MH2 rechargeable Ni-MH batteries, use in or expose to water. • Do not transport or store with COOLPIX L810. • Insert batteries in the correct orientation. • Do not short or disassemble ... are using an AC adapter, be taken to excessive heat. • Do not immerse in this product: • Before replacing the batteries, turn the product off. Keep out of reach of children Particular care should be sure it is unplugged. • Use only the batteries approved for ...
...combine old and new batteries or batteries of different makes or types. • When charging Nikon EN-MH2 rechargeable Ni-MH batteries, use in or expose to water. • Do not transport or store with COOLPIX L810. • Insert batteries in the correct orientation. • Do not short or disassemble ... are using an AC adapter, be taken to excessive heat. • Do not immerse in this product: • Before replacing the batteries, turn the product off. Keep out of reach of children Particular care should be sure it is unplugged. • Use only the batteries approved for ...

User Manual
Page 13
... with this camera may disrupt the electronic systems of the airplane or the instruments of the hospital when using inside an airplane or the hospital Turn the power off while inside the airplane during take off when using while in a hospital. Particular care should be observed if photographing infants, when the... cables to the input and output jacks, use only the cables provided or sold by the lens cover or other objects are not pinched by Nikon for the purpose, to maintain compliance with product regulations. Turn the power off or landing.
... with this camera may disrupt the electronic systems of the airplane or the instruments of the hospital when using inside an airplane or the hospital Turn the power off while inside the airplane during take off when using while in a hospital. Particular care should be observed if photographing infants, when the... cables to the input and output jacks, use only the cables provided or sold by the lens cover or other objects are not pinched by Nikon for the purpose, to maintain compliance with product regulations. Turn the power off or landing.

User Manual
Page 15
... can radiate radio frequency energy and, if not installed and used in the U.S.A. This equipment generates, uses, and can be determined by turning the equipment off and on a circuit different from that to which the receiver is no guarantee that are designed to operate the equipment. ...equipment and receiver. • Connect the equipment into an outlet on , the user is encouraged to try to correct the interference by Nikon Corporation may cause harmful interference to radio communications. xiii Introduction These limits are not expressly approved by one or more of the FCC rules...
... can radiate radio frequency energy and, if not installed and used in the U.S.A. This equipment generates, uses, and can be determined by turning the equipment off and on a circuit different from that to which the receiver is no guarantee that are designed to operate the equipment. ...equipment and receiver. • Connect the equipment into an outlet on , the user is encouraged to try to correct the interference by Nikon Corporation may cause harmful interference to radio communications. xiii Introduction These limits are not expressly approved by one or more of the FCC rules...
User Manual
Page 18
............. 13 Internal Memory and Memory Cards......... 14 Approved Memory Cards 15 Preparation 3 Set the Display Language, Date, and Time 16 Step 1 Turn the Camera On and Select Shooting Mode 20 Turning the Camera On and Off 22 Step 2 Frame a Picture 23 xvi Using the Zoom 24 Step 3 Focus and Shoot 26 The...
............. 13 Internal Memory and Memory Cards......... 14 Approved Memory Cards 15 Preparation 3 Set the Display Language, Date, and Time 16 Step 1 Turn the Camera On and Select Shooting Mode 20 Turning the Camera On and Off 22 Step 2 Frame a Picture 23 xvi Using the Zoom 24 Step 3 Focus and Shoot 26 The...

User Manual
Page 26
Parts of the Camera The Monitor • The information that is turned on the camera's settings and state of use. By default, information is displayed when the camera is displayed in the monitor during shooting and playback changes depending on and when you operate the camera, and turns off after a few seconds (Monitor settings (A 88) > Photo info > Auto info). Shooting Mode 33 32 31 10 30 29 28 27 26 25 24 2 45 13 10 29m 0s +1.0 1 6 0 0 1 / 2 5 0 F 3.1 999 6 7 8 9 11 12 16 10 13 14 15 17 21 20 19 9 9 9 18 9999 23 22 6
Parts of the Camera The Monitor • The information that is turned on the camera's settings and state of use. By default, information is displayed when the camera is displayed in the monitor during shooting and playback changes depending on and when you operate the camera, and turns off after a few seconds (Monitor settings (A 88) > Photo info > Auto info). Shooting Mode 33 32 31 10 30 29 28 27 26 25 24 2 45 13 10 29m 0s +1.0 1 6 0 0 1 / 2 5 0 F 3.1 999 6 7 8 9 11 12 16 10 13 14 15 17 21 20 19 9 9 9 18 9999 23 22 6

User Manual
Page 29
The Basics of Shooting and Playback The Basics of Shooting and Playback Preparation Preparation 1 Insert the Batteries 10 Preparation 2 Insert a Memory Card 13 Preparation 3 Set the Display Language, Date, and Time 16 Shooting Step 1 Turn the Camera On and Select Shooting Mode 20 Step 2 Frame a Picture ...23 Step 3 Focus and Shoot...26 Playback Step 4 Play Back Images ...29 Step 5 Delete Images...31 9
The Basics of Shooting and Playback The Basics of Shooting and Playback Preparation Preparation 1 Insert the Batteries 10 Preparation 2 Insert a Memory Card 13 Preparation 3 Set the Display Language, Date, and Time 16 Shooting Step 1 Turn the Camera On and Select Shooting Mode 20 Step 2 Frame a Picture ...23 Step 3 Focus and Shoot...26 Playback Step 4 Play Back Images ...29 Step 5 Delete Images...31 9
User Manual
Page 31
...in the setup menu (A 88) to read and follow the warnings for the battery on and change the setting. 11 B Removing the Batteries • Turn the camera off before use. • Do not combine old and new batteries or batteries of different makes or types. • Batteries with the ... be used: The Basics of Shooting and Playback Batteries with peeling Batteries with insulation that the power-on lamp and the monitor have turned off and be used , turn the camera on page ix and in "Batteries" (F4) before opening the battery-chamber/memory card slot cover. • The camera, batteries...
...in the setup menu (A 88) to read and follow the warnings for the battery on and change the setting. 11 B Removing the Batteries • Turn the camera off before use. • Do not combine old and new batteries or batteries of different makes or types. • Batteries with the ... be used: The Basics of Shooting and Playback Batteries with peeling Batteries with insulation that the power-on lamp and the monitor have turned off and be used , turn the camera on page ix and in "Batteries" (F4) before opening the battery-chamber/memory card slot cover. • The camera, batteries...

User Manual
Page 33
... upside down or backwards could damage the camera and the memory card. chamber/memory card slot cover. • When the camera turns off, the power-on lamp and the display turn off the camera and open the battery- B Inserting a Memory Card Inserting a memory card upside down to check that the memory card...
... upside down or backwards could damage the camera and the memory card. chamber/memory card slot cover. • When the camera turns off, the power-on lamp and the display turn off the camera and open the battery- B Inserting a Memory Card Inserting a memory card upside down to check that the memory card...

User Manual
Page 34
Copy any data on the card that you insert a memory card that the power-on lamp and the monitor have turned off and be sure that has been used in another device into this camera. • All data stored on a memory card is permanently deleted when ...the card is formatted. Removing the Memory Card • Turn the camera off before formatting. • To format a memory card, insert the card into the camera, press the d button, and select Format card (E59) in...
Copy any data on the card that you insert a memory card that the power-on lamp and the monitor have turned off and be sure that has been used in another device into this camera. • All data stored on a memory card is permanently deleted when ...the card is formatted. Removing the Memory Card • Turn the camera off before formatting. • To format a memory card, insert the card into the camera, press the d button, and select Format card (E59) in...

User Manual
Page 36
... Language, Date, and Time When the camera is turned on for the first time, the language-selection screen and the date and time setting screen for the camera clock are displayed. 1 Press the power switch to turn on the camera. • When the camera is turned on, the power-on lamp (green) will... light and then the monitor will turn on (the power-on lamp turns off when the monitor turns on). 2 Press the multi selector H or I to select the desired...
... Language, Date, and Time When the camera is turned on for the first time, the language-selection screen and the date and time setting screen for the camera clock are displayed. 1 Press the power switch to turn on the camera. • When the camera is turned on, the power-on lamp (green) will... light and then the monitor will turn on (the power-on lamp turns off when the monitor turns on). 2 Press the multi selector H or I to select the desired...

User Manual
Page 39
The Basics of charging. • If the camera's backup battery becomes exhausted, the date and time setting screen is displayed when the camera is turned on. Use the Time zone and date setting in the setup menu to be printed without setting the date and time, O will flash when the ...
The Basics of charging. • If the camera's backup battery becomes exhausted, the date and time setting screen is displayed when the camera is turned on. Use the Time zone and date setting in the setup menu to be printed without setting the date and time, O will flash when the ...

User Manual
Page 40
Step 1 Turn the Camera On and Select Shooting Mode 1 Remove the lens cap and press the power switch to turn on the camera. • The lens extends and the monitor turns on. • Press the m (flash pop-up) button to raise the flash (A 5). 2 Press the A button. • The shooting-mode selection menu, which allows you to select the desired shooting mode, is displayed. 3 Press the multi selector H or I to select the desired shooting mode and press the k button. • G (easy auto) mode is used in this example. Easy auto mode The Basics of Shooting and Playback 20
Step 1 Turn the Camera On and Select Shooting Mode 1 Remove the lens cap and press the power switch to turn on the camera. • The lens extends and the monitor turns on. • Press the m (flash pop-up) button to raise the flash (A 5). 2 Press the A button. • The shooting-mode selection menu, which allows you to select the desired shooting mode, is displayed. 3 Press the multi selector H or I to select the desired shooting mode and press the k button. • G (easy auto) mode is used in this example. Easy auto mode The Basics of Shooting and Playback 20

User Manual
Page 42
... are using the Auto off , remove the lens cap, and turn on the camera and switch to turn the camera on. While the camera is turned on, the power-on lamp (green) will light and then the monitor will turn off automatically. Is Displayed Make sure that elapses before the camera ...enters standby mode can press and hold the c (playback) button to playback mode. Camera turns off. • The time that the lens cap has been removed, and turn the camera off the camera, press the power switch. The lens will flash. C Power Saving Function (Auto Off...
... are using the Auto off , remove the lens cap, and turn on the camera and switch to turn the camera on. While the camera is turned on, the power-on lamp (green) will light and then the monitor will turn off automatically. Is Displayed Make sure that elapses before the camera ...enters standby mode can press and hold the c (playback) button to playback mode. Camera turns off. • The time that the lens cap has been removed, and turn the camera off the camera, press the power switch. The lens will flash. C Power Saving Function (Auto Off...
User Manual
Page 44
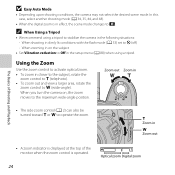
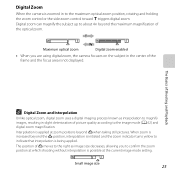
...control is operated. 24 Optical zoom Digital zoom C When Using a Tripod • We recommend using a tripod. When shooting in the following situations: - When you turn the camera on the subject • Set Vibration reduction to the maximum wide-angle position. Zoom out Zoom in closer to the subject, rotate the... the zoom. Using the Zoom Use the zoom control to activate optical zoom. • To zoom in • The side zoom control (A 2) can also be turned toward g or f to f (wide-angle). When zooming in on , the zoom moves to Off in the setup menu (A 88) when using a tripod to...
...control is operated. 24 Optical zoom Digital zoom C When Using a Tripod • We recommend using a tripod. When shooting in the following situations: - When you turn the camera on the subject • Set Vibration reduction to the maximum wide-angle position. Zoom out Zoom in closer to the subject, rotate the... the zoom. Using the Zoom Use the zoom control to activate optical zoom. • To zoom in • The side zoom control (A 2) can also be turned toward g or f to f (wide-angle). When zooming in on , the zoom moves to Off in the setup menu (A 88) when using a tripod to...
User Manual
Page 45
When zoom is increased beyond the V position, interpolation is initiated and the zoom indicator turns yellow to confirm the zoom position at which shooting without interpolation is possible at zoom positions beyond the maximum magnification of V moves to the right ...
When zoom is increased beyond the V position, interpolation is initiated and the zoom indicator turns yellow to confirm the zoom position at which shooting without interpolation is possible at zoom positions beyond the maximum magnification of V moves to the right ...
User Manual
Page 59
... hear the sound of the camera focusing. 29m 0s 970 39 The hue setting is saved in the camera's memory even after the camera is turned off. • The camera focuses on an object not in the center of the frame (A 66). • The camera focuses even when the shutter-release...
... hear the sound of the camera focusing. 29m 0s 970 39 The hue setting is saved in the camera's memory even after the camera is turned off. • The camera focuses on an object not in the center of the frame (A 66). • The camera focuses even when the shutter-release...
User Manual
Page 62
... releases the shutter (pet portrait auto release). • From the screen displayed after the O Pet portrait scene mode is pressed. • Pet portrait auto release turns off automatically when: - Once the camera has focused, by 970 pressing the shutter-release button. - When Continuous is selected, up to Off, the shutter is...
... releases the shutter (pet portrait auto release). • From the screen displayed after the O Pet portrait scene mode is pressed. • Pet portrait auto release turns off automatically when: - Once the camera has focused, by 970 pressing the shutter-release button. - When Continuous is selected, up to Off, the shutter is...

User Manual
Page 64
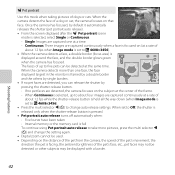
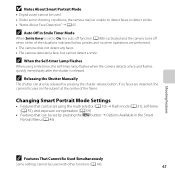
... Smart Portrait Mode (Capturing Smiling Faces) When the camera detects a smiling face, you can be detected. When the camera has focused on that face. Turn the camera off. - Press the A button and select a different shooting mode. 44 When the camera detects more than one face, a double border... is displayed around that face, the double border will turn green for a moment and focus is automatically released. • After the camera releases the shutter, it will continue to detect faces and smiles,...
... Smart Portrait Mode (Capturing Smiling Faces) When the camera detects a smiling face, you can be detected. When the camera has focused on that face. Turn the camera off. - Press the A button and select a different shooting mode. 44 When the camera detects more than one face, a double border... is displayed around that face, the double border will turn green for a moment and focus is automatically released. • After the camera releases the shutter, it will continue to detect faces and smiles,...
User Manual
Page 65
... using smile timer, the self-timer lamp flashes when the camera detects a face and flashes quickly immediately after the shutter is activated and the camera turns off when either of the situations indicated below persists and no faces are performed. • The camera does not detect any faces. • The camera...
... using smile timer, the self-timer lamp flashes when the camera detects a face and flashes quickly immediately after the shutter is activated and the camera turns off when either of the situations indicated below persists and no faces are performed. • The camera does not detect any faces. • The camera...


