
Reference Manual
Page 7
E: "Reference Section", F: "Technical Notes and Index." • SD, SDHC, and SDXC memory cards are referred to as "memory cards" in this manual. • The setting at the time of purchase is referred to find the information you need, the following symbols and conventions are ...
E: "Reference Section", F: "Technical Notes and Index." • SD, SDHC, and SDXC memory cards are referred to as "memory cards" in this manual. • The setting at the time of purchase is referred to find the information you need, the following symbols and conventions are ...

Reference Manual
Page 11
...the user's responsibility. ix Ensuring the privacy of Data Storage Devices Please note that deleting images or formatting data storage devices such as memory cards or built-in the Welcome screen setting (A 82). Care should be recovered from discarded storage devices using commercial deletion software, or ...format the device and then completely refill it with images containing no private information (for the Select an image option in camera memory does not completely erase the original image data. Deleted files can sometimes be taken to avoid injury or damage to also replace ...
...the user's responsibility. ix Ensuring the privacy of Data Storage Devices Please note that deleting images or formatting data storage devices such as memory cards or built-in the Welcome screen setting (A 82). Care should be recovered from discarded storage devices using commercial deletion software, or ...format the device and then completely refill it with images containing no private information (for the Select an image option in camera memory does not completely erase the original image data. Deleted files can sometimes be taken to avoid injury or damage to also replace ...
Reference Manual
Page 18
... (d Button 4 The Monitor 6 Shooting Mode 6 Playback Mode 8 The Basics of Shooting and Playback.... 9 Preparation 1 Insert the Batteries 10 Applicable Batteries 10 Preparation 2 Insert a Memory Card.......... 12 Internal Memory and Memory Cards......... 13 Preparation 3 Set the Display Language, Date, and Time 14 Step 1 Turn the Camera On 18 Turning the Camera On and Off 19 Step...
... (d Button 4 The Monitor 6 Shooting Mode 6 Playback Mode 8 The Basics of Shooting and Playback.... 9 Preparation 1 Insert the Batteries 10 Applicable Batteries 10 Preparation 2 Insert a Memory Card.......... 12 Internal Memory and Memory Cards......... 13 Preparation 3 Set the Display Language, Date, and Time 14 Step 1 Turn the Camera On 18 Turning the Camera On and Off 19 Step...
Reference Manual
Page 20
... E31 a Print Order (Creating a DPOF Print Order E31 b Slide Show E34 d Protect E35 f Rotate Image E37 h Copy (Copy Between Internal Memory and Memory Card E38 The Movie Menu E40 Movie Options E40 Autofocus Mode E42 The Setup Menu E43 Welcome Screen E43 Time Zone and Date E44 Monitor Settings ...E47 Print Date (Imprinting Date and Time E49 Motion Detection E50 Sound Settings E51 Auto Off E52 Format Memory/Format Card E53 Language E54 Video Mode E55 Blink Warning E55 Eye-Fi Upload E57 Reset All E58 Battery Type E61 Firmware Version E61 File...
... E31 a Print Order (Creating a DPOF Print Order E31 b Slide Show E34 d Protect E35 f Rotate Image E37 h Copy (Copy Between Internal Memory and Memory Card E38 The Movie Menu E40 Movie Options E40 Autofocus Mode E42 The Setup Menu E43 Welcome Screen E43 Time Zone and Date E44 Monitor Settings ...E47 Print Date (Imprinting Date and Time E49 Motion Detection E50 Sound Settings E51 Auto Off E52 Format Memory/Format Card E53 Language E54 Video Mode E55 Blink Warning E55 Eye-Fi Upload E57 Reset All E58 Battery Type E61 Firmware Version E61 File...

Reference Manual
Page 23
1 16 2 3 4 5 6 15 7 8 13 12 9 14 11 10 Parts of the Camera 1 Flash lamp 46 2 b (e movie-record) button 74 3 A (shooting mode) button...32, 33, 39, 42 4 c (playback) button 26 5 Multi selector 6 k (apply selection) button 7 d button 4, 54, 64, 77, 82 8 l (delete) button 28 9 Battery-chamber/ memory card slot cover 10, 12 10 Battery chamber 10 11 Memory card slot 12 12 USB/audio/video output connector.......65 13 Connector cover 65 14 Tripod socket F16 15 Speaker 79 16 Monitor 6 3
1 16 2 3 4 5 6 15 7 8 13 12 9 14 11 10 Parts of the Camera 1 Flash lamp 46 2 b (e movie-record) button 74 3 A (shooting mode) button...32, 33, 39, 42 4 c (playback) button 26 5 Multi selector 6 k (apply selection) button 7 d button 4, 54, 64, 77, 82 8 l (delete) button 28 9 Battery-chamber/ memory card slot cover 10, 12 10 Battery chamber 10 11 Memory card slot 12 12 USB/audio/video output connector.......65 13 Connector cover 65 14 Tripod socket F16 15 Speaker 79 16 Monitor 6 3

Reference Manual
Page 29
The Basics of Shooting and Playback The Basics of Shooting and Playback Preparation Preparation 1 Insert the Batteries 10 Preparation 2 Insert a Memory Card 12 Preparation 3 Set the Display Language, Date, and Time 14 Shooting Step 1 Turn the Camera On 18 Step 2 Select a Shooting Mode 20 Step 3 Frame a Picture ...22 Step 4 Focus and Shoot...24 Playback Step 5 Play Back Images ...26 Step 6 Delete Images...28 9
The Basics of Shooting and Playback The Basics of Shooting and Playback Preparation Preparation 1 Insert the Batteries 10 Preparation 2 Insert a Memory Card 12 Preparation 3 Set the Display Language, Date, and Time 14 Shooting Step 1 Turn the Camera On 18 Step 2 Select a Shooting Mode 20 Step 3 Frame a Picture ...22 Step 4 Focus and Shoot...24 Playback Step 5 Play Back Images ...26 Step 6 Delete Images...28 9

Reference Manual
Page 30
Preparation 1 Insert the Batteries 1 Open the battery-chamber/memory card slot cover. • Before opening the battery-chamber/memory card slot cover, hold the camera upside down to prevent the batteries from falling out. 2 Insert the batteries. • Confirm that the positive (+)...on the label at the entrance of the battery chamber, and insert the batteries. 2 1 The Basics of Shooting and Playback 3 Close the battery-chamber/memory card slot cover. Applicable Batteries • Two LR6/L40 (AA-size) alkaline batteries (included batteries) • Two FR6/L91 (AA-size) lithium batteries &#...
Preparation 1 Insert the Batteries 1 Open the battery-chamber/memory card slot cover. • Before opening the battery-chamber/memory card slot cover, hold the camera upside down to prevent the batteries from falling out. 2 Insert the batteries. • Confirm that the positive (+)...on the label at the entrance of the battery chamber, and insert the batteries. 2 1 The Basics of Shooting and Playback 3 Close the battery-chamber/memory card slot cover. Applicable Batteries • Two LR6/L40 (AA-size) alkaline batteries (included batteries) • Two FR6/L91 (AA-size) lithium batteries &#...

Reference Manual
Page 31
...) to match the type of batteries inserted in "Batteries" (F4) before opening the battery-chamber/memory card slot cover. • The camera, batteries, or memory card may vary greatly depending on the manufacturer. Observe caution when removing the batteries or memory card. B Notes About the Batteries • Be sure to read and follow the warnings for...
...) to match the type of batteries inserted in "Batteries" (F4) before opening the battery-chamber/memory card slot cover. • The camera, batteries, or memory card may vary greatly depending on the manufacturer. Observe caution when removing the batteries or memory card. B Notes About the Batteries • Be sure to read and follow the warnings for...

Reference Manual
Page 32
... prevent the batteries from falling out. 2 Insert a memory card. • Slide the memory card in the correct orientation. 3 Close the battery-chamber/memory card slot cover. 2 1 1 2 The Basics of Shooting and Playback 12 B Inserting a Memory Card Inserting a memory card upside down to check that the memory card is in until it clicks into place. chamber/memory card slot cover. • When the camera turns...
... prevent the batteries from falling out. 2 Insert a memory card. • Slide the memory card in the correct orientation. 3 Close the battery-chamber/memory card slot cover. 2 1 1 2 The Basics of Shooting and Playback 12 B Inserting a Memory Card Inserting a memory card upside down to check that the memory card is in until it clicks into place. chamber/memory card slot cover. • When the camera turns...
Reference Manual
Page 33
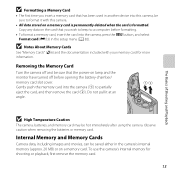
...pull it with your memory card for shooting or playback, first remove the memory card. 13 Observe caution when removing the batteries or memory card. Gently push the memory card into the camera (1) to partially eject the card, and then remove the card (2). Internal Memory and Memory Cards Camera data, including ...Playback B High Temperature Caution The camera, batteries, and memory card may be sure that you insert a memory card that has been used in the camera's internal memory (approx. 20 MB) or on a memory card. B Formatting a Memory Card • The first time you wish to keep to ...
...pull it with your memory card for shooting or playback, first remove the memory card. 13 Observe caution when removing the batteries or memory card. Gently push the memory card into the camera (1) to partially eject the card, and then remove the card (2). Internal Memory and Memory Cards Camera data, including ...Playback B High Temperature Caution The camera, batteries, and memory card may be sure that you insert a memory card that has been used in the camera's internal memory (approx. 20 MB) or on a memory card. B Formatting a Memory Card • The first time you wish to keep to ...
Reference Manual
Page 38
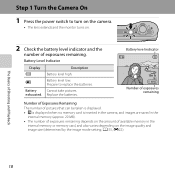
exhausted. The Basics of available memory in the internal memory (approx. 20 MB). • The number of exposures remaining depends on . 2 Check the battery level indicator and the number of exposures remaining. A 55, E22). Battery ... Number of Exposures Remaining The number of pictures that can be taken is displayed. • C is displayed when no memory card is inserted in the camera, and images are saved in the internal memory or memory card, and also varies depending on the image quality and image size (determined by the image mode setting; B Battery...
exhausted. The Basics of available memory in the internal memory (approx. 20 MB). • The number of exposures remaining depends on . 2 Check the battery level indicator and the number of exposures remaining. A 55, E22). Battery ... Number of Exposures Remaining The number of pictures that can be taken is displayed. • C is displayed when no memory card is inserted in the camera, and images are saved in the internal memory or memory card, and also varies depending on the image quality and image size (determined by the image mode setting; B Battery...

Reference Manual
Page 45
... Miss a Shot If you are being saved. Press the button gently. Image and movie data could be lost and the camera or memory card could be damaged. Focus and exposure remain locked while the shutterrelease button is pressed all the way without first pressing it halfway. 25 ...The Flash If the subject is dimly lit, the flash (A 44) may result in camera shake and blurred images. Do not open the batterychamber/memory card slot cover. While pressing the shutter-release button halfway, press the shutter-release button the rest of exposures remaining or the remaining recording time flashes...
... Miss a Shot If you are being saved. Press the button gently. Image and movie data could be lost and the camera or memory card could be damaged. Focus and exposure remain locked while the shutterrelease button is pressed all the way without first pressing it halfway. 25 ...The Flash If the subject is dimly lit, the flash (A 44) may result in camera shake and blurred images. Do not open the batterychamber/memory card slot cover. While pressing the shutter-release button halfway, press the shutter-release button the rest of exposures remaining or the remaining recording time flashes...

Reference Manual
Page 46
... near the current image number/total number of Shooting and Playback 26 Displays the previous image Displays the next image • Remove the memory card from the camera to scroll quickly through images. c (playback) button 2 Use the multi selector to select an image to display. ...: H or J • Display the next image: I or K • Press and hold H, I, J, or K to play back images saved in the camera's internal memory. C is displayed full-frame. Step 5 Play Back Images 1 Press the c (playback) button. • The camera switches to shooting mode, press the A button or the...
... near the current image number/total number of Shooting and Playback 26 Displays the previous image Displays the next image • Remove the memory card from the camera to scroll quickly through images. c (playback) button 2 Use the multi selector to select an image to display. ...: H or J • Display the next image: I or K • Press and hold H, I, J, or K to play back images saved in the camera's internal memory. C is displayed full-frame. Step 5 Play Back Images 1 Press the c (playback) button. • The camera switches to shooting mode, press the A button or the...

Reference Manual
Page 54
..., it focuses on the area in each series. • The frame rate with continuous shooting may vary depending upon the current image mode setting, the memory card used . Panorama assist Characteristics of the frame. • Digital zoom cannot be used , or shooting condition. 34 d Sports • The camera focuses on that face...
..., it focuses on the area in each series. • The frame rate with continuous shooting may vary depending upon the current image mode setting, the memory card used . Panorama assist Characteristics of the frame. • Digital zoom cannot be used , or shooting condition. 34 d Sports • The camera focuses on that face...

Reference Manual
Page 58
... to release the shutter. • Pet portrait auto release turns off automatically when: - By default, the camera automatically releases the shutter once it . Internal memory or the memory card is detected. Shooting Features B Pet Portrait Auto Release • To change Pet portrait auto release settings, press the multi selector J (n). - Continuous: When the camera...
... to release the shutter. • Pet portrait auto release turns off automatically when: - By default, the camera automatically releases the shutter once it . Internal memory or the memory card is detected. Shooting Features B Pet Portrait Auto Release • To change Pet portrait auto release settings, press the multi selector J (n). - Continuous: When the camera...

Reference Manual
Page 84
E8 When using a printer to print images saved on the memory card, you can configure the menu operations listed below by Pressing the d Button (Playback Menu) When viewing images in full-frame playback mode or thumbnail playback... mode, you to protect selected images from accidental deletion. E35 Allows you to copy images between the internal memory and a memory card. Playback Features 64 This feature is useful for creating copies for display on a memory card in images and creates a copy with enhanced brightness and contrast, brightening dark portions of l 4608×2592 ...
E8 When using a printer to print images saved on the memory card, you can configure the menu operations listed below by Pressing the d Button (Playback Menu) When viewing images in full-frame playback mode or thumbnail playback... mode, you to protect selected images from accidental deletion. E35 Allows you to copy images between the internal memory and a memory card. Playback Features 64 This feature is useful for creating copies for display on a memory card in images and creates a copy with enhanced brightness and contrast, brightening dark portions of l 4608×2592 ...
Reference Manual
Page 90
... 70 The connection may take a while for Nikon Transfer 2 to the computer and insert the memory card. select Import File using the included USB cable. To transfer images that the memory card is equipped with an SD card slot, the card can be inserted directly in the camera's internal memory, remove the memory card from third-party suppliers) to start...
... 70 The connection may take a while for Nikon Transfer 2 to the computer and insert the memory card. select Import File using the included USB cable. To transfer images that the memory card is equipped with an SD card slot, the card can be inserted directly in the camera's internal memory, remove the memory card from third-party suppliers) to start...

Reference Manual
Page 91
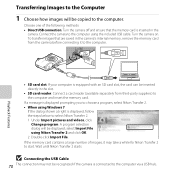
... camera or removable disk is displayed as the "Source" on the "Options" title bar of Nikon Transfer 2 (1). • Click Start Transfer (2). 1 2 • At default settings, all the images on the memory card will be copied to the computer. 3 Terminate the connection. • If the camera is ...connected to the memory card and then remove the card from the card reader or card slot. 71 Playback Features If you are using a card reader or card slot, choose the appropriate option in the computer operating system to eject the removable...
... camera or removable disk is displayed as the "Source" on the "Options" title bar of Nikon Transfer 2 (1). • Click Start Transfer (2). 1 2 • At default settings, all the images on the memory card will be copied to the computer. 3 Terminate the connection. • If the camera is ...connected to the memory card and then remove the card from the card reader or card slot. 71 Playback Features If you are using a card reader or card slot, choose the appropriate option in the computer operating system to eject the removable...

Reference Manual
Page 94
... camera focuses on the subject in the movie can record movies by simply pressing the b (e movie-record) button. • When no memory card is inserted (i.e., when using the camera's internal memory), Movie options (A 77, E40) is displayed while saving to the internal memory. 3 Press the b (e movie-record) button again to m VGA (640×480).
... camera focuses on the subject in the movie can record movies by simply pressing the b (e movie-record) button. • When no memory card is inserted (i.e., when using the camera's internal memory), Movie options (A 77, E40) is displayed while saving to the internal memory. 3 Press the b (e movie-record) button again to m VGA (640×480).
Reference Manual
Page 95
... hot when recording movies, the camera automatically stops recording after 30 seconds. Image and movie data could be lost and the camera or memory card could be changed once recording starts. • Use the zoom control to the subject or the amount of zoom applied, subjects with... degrades when digital zoom is recommended. • Depending on the distance to operate digital zoom while recording movies. Do not open the batterychamber/memory card slot cover. Leave the camera off . Recording and Playing Back Movies B Notes About Saving Data After taking pictures or recording movies, the ...
... hot when recording movies, the camera automatically stops recording after 30 seconds. Image and movie data could be lost and the camera or memory card could be changed once recording starts. • Use the zoom control to the subject or the amount of zoom applied, subjects with... degrades when digital zoom is recommended. • Depending on the distance to operate digital zoom while recording movies. Do not open the batterychamber/memory card slot cover. Leave the camera off . Recording and Playing Back Movies B Notes About Saving Data After taking pictures or recording movies, the ...


