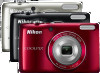

Reference Manual
Page 10
...burns. Handle the camera strap with care Never place the strap around the neck of a fall or other accident, take the equipment to a Nikon-authorized service representative for inspection, after unplugging the product and/or removing the batteries. Keep these safety instructions where all those who use electronic ...result in injury. Repairs should be performed viii only by qualified technicians. After removing or disconnecting the power source, take the product to a Nikon-authorized service representative for inspection. Introduction WARNINGS Turn off in injury.
...burns. Handle the camera strap with care Never place the strap around the neck of a fall or other accident, take the equipment to a Nikon-authorized service representative for inspection, after unplugging the product and/or removing the batteries. Keep these safety instructions where all those who use electronic ...result in injury. Repairs should be performed viii only by qualified technicians. After removing or disconnecting the power source, take the product to a Nikon-authorized service representative for inspection. Introduction WARNINGS Turn off in injury.

Reference Manual
Page 11
... AC adapter, be taken to prevent infants from different pairs. • The EN-MH2 rechargeable batteries are for use with Nikon digital cameras only, and are compatible with COOLPIX L26/L25. • Insert batteries in the correct orientation. • Do not short or disassemble batteries or attempt to remove... not transport or store with the camera, battery charger, or AC adapter for use in this product: • Before replacing the batteries, turn the product off. Do not combine old and new batteries or batteries of them as necklaces or hairpins. Do not remain in use each of...
... AC adapter, be taken to prevent infants from different pairs. • The EN-MH2 rechargeable batteries are for use with Nikon digital cameras only, and are compatible with COOLPIX L26/L25. • Insert batteries in the correct orientation. • Do not short or disassemble batteries or attempt to remove... not transport or store with the camera, battery charger, or AC adapter for use in this product: • Before replacing the batteries, turn the product off. Do not combine old and new batteries or batteries of them as necklaces or hairpins. Do not remain in use each of...

Reference Manual
Page 13
...result in .) from the monitor touching the skin or entering the eyes or mouth. Observe caution when using inside an airplane or the hospital Turn the power off while inside the airplane during take off or landing. Use appropriate cables When connecting cables to the input and output jacks, use... only the cables provided or sold by Nikon for the purpose, to maintain compliance with this device should not be played back on an audio CD player could cause temporary visual impairment. ...
...result in .) from the monitor touching the skin or entering the eyes or mouth. Observe caution when using inside an airplane or the hospital Turn the power off while inside the airplane during take off or landing. Use appropriate cables When connecting cables to the input and output jacks, use... only the cables provided or sold by Nikon for the purpose, to maintain compliance with this device should not be played back on an audio CD player could cause temporary visual impairment. ...

Reference Manual
Page 14
...the limits for Customers in the U.S.A. If this device that to operate the equipment. These limits are not expressly approved by Nikon Corporation may cause harmful interference to provide reasonable protection against harmful interference in a particular installation. CAUTIONS Modifications The FCC requires ...the user to be determined by turning the equipment off and on, the user is encouraged to try to correct the interference by one or more of the ...
...the limits for Customers in the U.S.A. If this device that to operate the equipment. These limits are not expressly approved by Nikon Corporation may cause harmful interference to provide reasonable protection against harmful interference in a particular installation. CAUTIONS Modifications The FCC requires ...the user to be determined by turning the equipment off and on, the user is encouraged to try to correct the interference by one or more of the ...

Reference Manual
Page 17
............. 13 Internal Memory and Memory Cards......... 14 Approved Memory Cards 15 Preparation 3 Set the Display Language, Date, and Time 16 Step 1 Turn the Camera On and Select Shooting Mode 20 Turning the Camera On and Off 21 Step 2 Frame a Picture 23 Using the Zoom 24 Step 3 Focus and Shoot 26 The Shutter...
............. 13 Internal Memory and Memory Cards......... 14 Approved Memory Cards 15 Preparation 3 Set the Display Language, Date, and Time 16 Step 1 Turn the Camera On and Select Shooting Mode 20 Turning the Camera On and Off 21 Step 2 Frame a Picture 23 Using the Zoom 24 Step 3 Focus and Shoot 26 The Shutter...

Reference Manual
Page 26
Parts of the Camera The Monitor • The information that is turned on the camera's settings and state of use. Shooting Mode 32 31 30 10 29 28 27 26 25 24 23 2 45 13 6 7 8 10 9 10 11 12 13 2 9 m 0 s 15 +1.0 1 / 2 5 0 F 3.2 999 14 16 20 19 18 9 9 9 17 9999 22 21 6 By default, information is displayed when the camera is displayed in the monitor during shooting and playback changes depending on and when you operate the camera, and turns off after a few seconds (Monitor settings (A 86) > Photo info > Auto info).
Parts of the Camera The Monitor • The information that is turned on the camera's settings and state of use. Shooting Mode 32 31 30 10 29 28 27 26 25 24 23 2 45 13 6 7 8 10 9 10 11 12 13 2 9 m 0 s 15 +1.0 1 / 2 5 0 F 3.2 999 14 16 20 19 18 9 9 9 17 9999 22 21 6 By default, information is displayed when the camera is displayed in the monitor during shooting and playback changes depending on and when you operate the camera, and turns off after a few seconds (Monitor settings (A 86) > Photo info > Auto info).

Reference Manual
Page 29
The Basics of Shooting and Playback The Basics of Shooting and Playback Preparation Preparation 1 Insert the Batteries 10 Preparation 2 Insert a Memory Card 13 Preparation 3 Set the Display Language, Date, and Time 16 Shooting Step 1 Turn the Camera On and Select Shooting Mode 20 Step 2 Frame a Picture ...23 Step 3 Focus and Shoot...26 Playback Step 4 Play Back Images ...29 Step 5 Delete Images...31 9
The Basics of Shooting and Playback The Basics of Shooting and Playback Preparation Preparation 1 Insert the Batteries 10 Preparation 2 Insert a Memory Card 13 Preparation 3 Set the Display Language, Date, and Time 16 Shooting Step 1 Turn the Camera On and Select Shooting Mode 20 Step 2 Frame a Picture ...23 Step 3 Focus and Shoot...26 Playback Step 4 Play Back Images ...29 Step 5 Delete Images...31 9

Reference Manual
Page 31
...8226; Do not combine old and new batteries or batteries of different makes or types. • Batteries with the following defects cannot be used , turn the camera on the manufacturer. B Notes About the Batteries • Be sure to match the type of batteries inserted in the camera, the ... a reliable brand. 11 The default setting is used : Batteries with peeling Batteries with insulation that the power-on lamp and the monitor have turned off before opening the battery-chamber/memory card slot cover. • The camera, batteries, or memory card may vary greatly depending on and change...
...8226; Do not combine old and new batteries or batteries of different makes or types. • Batteries with the following defects cannot be used , turn the camera on the manufacturer. B Notes About the Batteries • Be sure to match the type of batteries inserted in the camera, the ... a reliable brand. 11 The default setting is used : Batteries with peeling Batteries with insulation that the power-on lamp and the monitor have turned off before opening the battery-chamber/memory card slot cover. • The camera, batteries, or memory card may vary greatly depending on and change...

Reference Manual
Page 33
... falling out. 2 Insert a memory card. • Slide the memory card in the correct orientation. COOLPIX L25 2 1 3 Close the battery-chamber/ memory card slot cover. COOLPIX L26 3 • When the camera turns off, the power- 2 on lamp and the monitor turn off the camera and open the battery-chamber/memory card slot cover. B Inserting a Memory Card...
... falling out. 2 Insert a memory card. • Slide the memory card in the correct orientation. COOLPIX L25 2 1 3 Close the battery-chamber/ memory card slot cover. COOLPIX L26 3 • When the camera turns off, the power- 2 on lamp and the monitor turn off the camera and open the battery-chamber/memory card slot cover. B Inserting a Memory Card...

Reference Manual
Page 34
... a Memory Card • The first time you wish to keep to a computer before opening the batterychamber/memory card slot cover. Removing the Memory Card • Turn the camera off before formatting. • To format a memory card, insert the card into the camera, press the d button, and select Format card (E54) ...immediately after using the camera. Copy any data on the card that you insert a memory card that the power-on lamp and the monitor have turned off and be sure to partially eject the card, and then remove the card (2). Do not pull it with your memory card for shooting ...
... a Memory Card • The first time you wish to keep to a computer before opening the batterychamber/memory card slot cover. Removing the Memory Card • Turn the camera off before formatting. • To format a memory card, insert the card into the camera, press the d button, and select Format card (E54) ...immediately after using the camera. Copy any data on the card that you insert a memory card that the power-on lamp and the monitor have turned off and be sure to partially eject the card, and then remove the card (2). Do not pull it with your memory card for shooting ...

Reference Manual
Page 36
...I to select Yes and press the k button. The Basics of Shooting and Playback Preparation 3 Set the Display Language, Date, and Time When the camera is turned on for the first time, the language-selection screen and the date and time setting screen for the camera clock are displayed. 1 Press the power... switch to turn on the camera. • When the camera is turned on, the power-on lamp (green) will light and then the monitor will turn on (the power-on lamp turns off when the monitor turns on). 2 Press the multi selector H or I to select the...
...I to select Yes and press the k button. The Basics of Shooting and Playback Preparation 3 Set the Display Language, Date, and Time When the camera is turned on for the first time, the language-selection screen and the date and time setting screen for the camera clock are displayed. 1 Press the power... switch to turn on the camera. • When the camera is turned on, the power-on lamp (green) will light and then the monitor will turn on (the power-on lamp turns off when the monitor turns on). 2 Press the multi selector H or I to select the...
Reference Manual
Page 39
... permanently imprint the shooting date in the setup menu to be printed without setting the date and time, O will flash when the shooting screen is turned on. Use the Time zone and date setting in images as they are saved at the time of shooting. • If you want the shooting...
... permanently imprint the shooting date in the setup menu to be printed without setting the date and time, O will flash when the shooting screen is turned on. Use the Time zone and date setting in images as they are saved at the time of shooting. • If you want the shooting...

Reference Manual
Page 40
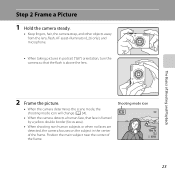
Easy auto mode The Basics of Shooting and Playback 20 Step 1 Turn the Camera On and Select Shooting Mode 1 Press the power switch to turn on the camera. • The lens extends and the monitor turns on. 2 Press the A button. • The shooting-mode selection menu, which allows you to select the desired shooting mode, is displayed. 3 Press the multi selector H or I to select a shooting mode and press the k button. • G (easy auto) mode is used in this example.
Easy auto mode The Basics of Shooting and Playback 20 Step 1 Turn the Camera On and Select Shooting Mode 1 Press the power switch to turn on the camera. • The lens extends and the monitor turns on. 2 Press the A button. • The shooting-mode selection menu, which allows you to select the desired shooting mode, is displayed. 3 Press the multi selector H or I to select a shooting mode and press the k button. • G (easy auto) mode is used in this example.

Reference Manual
Page 41
...Basics of exposures remaining. B Battery exhausted. Replace the batteries. Battery Level Indicator Display b Description Battery level high. Prepare to turn off when the monitor turns on). • To turn on the image quality and image size (determined by the image mode setting; The lens will be saved in the internal ...memory (approx. 20 MB). • The number of available memory in the camera, and images will not extend. Turning the Camera On and Off • When the camera is inserted in the internal memory or memory card, and also varies depending on...
...Basics of exposures remaining. B Battery exhausted. Replace the batteries. Battery Level Indicator Display b Description Battery level high. Prepare to turn off when the monitor turns on). • To turn on the image quality and image size (determined by the image mode setting; The lens will be saved in the internal ...memory (approx. 20 MB). • The number of available memory in the camera, and images will not extend. Turning the Camera On and Off • When the camera is inserted in the internal memory or memory card, and also varies depending on...

Reference Manual
Page 42
...for a while, the monitor will flash. C Power Saving Function (Auto Off) If no operations are performed for approximately another three minutes, the camera will turn off, the camera will enter standby mode, and the power-on if you are using the Auto off setting in the setup menu (A 86). •...; By default, the camera enters standby mode in standby mode, the monitor turns back on lamp will turn off automatically. While the camera is in about 30 seconds when you perform any of Shooting and Playback 22 Camera...
...for a while, the monitor will flash. C Power Saving Function (Auto Off) If no operations are performed for approximately another three minutes, the camera will turn off, the camera will enter standby mode, and the power-on if you are using the Auto off setting in the setup menu (A 86). •...; By default, the camera enters standby mode in standby mode, the monitor turns back on lamp will turn off automatically. While the camera is in about 30 seconds when you perform any of Shooting and Playback 22 Camera...
Reference Manual
Page 43
... steady. • Keep fingers, hair, the camera strap, and other objects away from the lens, flash, AF assist-illuminator (L26 only), and microphone. • When taking pictures in portrait ("tall") orientation, turn the camera so that face is above the lens. Position the main subject near the center of the frame. Shooting...
... steady. • Keep fingers, hair, the camera strap, and other objects away from the lens, flash, AF assist-illuminator (L26 only), and microphone. • When taking pictures in portrait ("tall") orientation, turn the camera so that face is above the lens. Position the main subject near the center of the frame. Shooting...

Reference Manual
Page 44
...; When digital zoom is in Optical Digital zoom zoom Digital Zoom When the camera is rotated. Maximum optical zoom Digital zoom enabled • When you turn the camera on the subject Using the Zoom Use the zoom control to activate optical zoom. • To zoom in the center of the optical...
...; When digital zoom is in Optical Digital zoom zoom Digital Zoom When the camera is rotated. Maximum optical zoom Digital zoom enabled • When you turn the camera on the subject Using the Zoom Use the zoom control to activate optical zoom. • To zoom in the center of the optical...

Reference Manual
Page 45
... to confirm the zoom position at which shooting without interpolation is possible at zoom positions beyond the V position, interpolation is initiated and the zoom indicator turns yellow to indicate that interpolation is applied at the current image mode setting. The position of V moves to the right as interpolation to magnify images...
... to confirm the zoom position at which shooting without interpolation is possible at zoom positions beyond the V position, interpolation is initiated and the zoom indicator turns yellow to indicate that interpolation is applied at the current image mode setting. The position of V moves to the right as interpolation to magnify images...

Reference Manual
Page 59
... • You can adjust hue by pressing the multi selector H and I. The hue setting is saved in the camera's memory even after the camera is turned off. • The camera focuses on the area in the center of the camera focusing. u Food Use this mode to photograph flowers, insects, and other...
... • You can adjust hue by pressing the multi selector H and I. The hue setting is saved in the camera's memory even after the camera is turned off. • The camera focuses on the area in the center of the camera focusing. u Food Use this mode to photograph flowers, insects, and other...

Reference Manual
Page 62
...8226; From the screen displayed after the O Pet portrait scene mode is full To continue using Pet portrait auto release to P 4608×3456 (for L26) or i 3648×2736 (for L25). • When the camera detects a face, a double border (focus area) is focused on the subject...bursts have been taken - Single: Images are captured one face, the face displayed largest in the monitor is pressed. • Pet portrait auto release turns off automatically when: - Internal memory or the memory card is selected, select Single or Continuous. - If no pet faces are detected, the camera...
...8226; From the screen displayed after the O Pet portrait scene mode is full To continue using Pet portrait auto release to P 4608×3456 (for L26) or i 3648×2736 (for L25). • When the camera detects a face, a double border (focus area) is focused on the subject...bursts have been taken - Single: Images are captured one face, the face displayed largest in the monitor is pressed. • Pet portrait auto release turns off automatically when: - Internal memory or the memory card is selected, select Single or Continuous. - If no pet faces are detected, the camera...


